The efficiency and convenience of fishing depends on the correct winding of the fishing line on the reel. It is a mistake to think that the fishing line can be tied in any convenient way. There are several options for how to properly tie a fishing line to a reel. The main thing is that the node is as reliable as possible.
It is also important to eliminate all factors that may cause inconvenience during the fishing process, since this directly affects the result.
Node requirements
When choosing which knot to tie the fishing line to the reel, you should consider several factors:
- maximum strength;
- eliminating the risk of line damage due to kinks;
- no obstacles for the free release of line when casting equipment;
- tensile strength when casting the entire length of the line.
Types of knots for tying bait to braided fishing line
"Grinner"
This is one of the most durable methods of tying. It should be noted that it can be considered universal and can be used in different fishing rigs.
It is very easy to knit and is considered one of the safest. With it you can easily and quickly tie leashes, swivels or fish hooks.
It fits like this:
- The braid is passed through a hook or swivel twice.
- From the threaded end, a loop is formed near the main braid, which goes to the hook or swivel.
- The free end is wound around the main braid and inside the loop that has formed.
- It is necessary to make five turns to ensure that the knot is strong.
- Now all that remains is to pull it down to the swivel or hook.
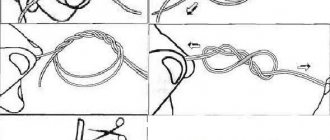
Self-tightening loop
The simplest and most effective way to tie a fishing line to a fishing rod reel is to make a self-tightening loop. Since the knot is self-tightening, it guarantees perfect strength.
Knitting principle:
- To make the knot more convenient to knit, it is better to remove the spool from the reel. The fishing line must first be threaded through the rings of the rod. Such preparation must be carried out when tying the fishing line with any knot.
- Make a loop at the tip of the fishing line. It can be classic or figure eight shaped (surgical loop).
- Thread the main line into the resulting loop. The size of the second loop that is formed depends on the length of the threaded fishing line.
- Throw the resulting large loop onto the spool.
- Tighten the loop. During the installation process, it is extremely important to correctly determine the side on which the loop is thrown. You need to tighten the loop from the side where it will tighten itself during the operation of the coil.
Knots for tying braid to braid
When preparing gear or directly while fishing, it becomes necessary not only to tie a braided cord with a monofilament line (leash), but also to tie the braided line together.
Blood knot or Snake knot
Retains up to 75 percent of the strength of braided cord. The knot turns out to be compact, which makes it easy to pass through spinning rod rings and other elements.
Manufacturing:
- Take the two ends of the braided cord. We place them overlapping towards each other.
- We make 14-16 turns with one end of the cord around the other.
- Keeping the cords from unwinding, in the middle of the twisted section we separate the braid from each other so that a window appears. We thread one end of the braid through this window.
- We thread the second end of the braided cord through this window, but towards the first.
- Wet the knot and tighten it.
- Trim the ends of the braided cord.
The following video clearly shows the process of tying a bloody knot.
Algright node
The unit is universal, compact, and reliable. Read more about this node.
Manufacturing:
- We bend one end of the cord parallel to the edge at a distance of 10-15 cm. The result is a long loop without crossing.
- We pass the end of the second braid under the loop of the first cord (at the bend). It turns out that the second braided cord is located between the two ends of the first.
- We wrap the end of the second cord around the parallel parts of the first cord. We pinch this coil with our fingers.
- Next, from the clamped turn we make 10 turns in the opposite direction with the second braid. We wrap both the parallel parts of the first braid and the main part of the second cord running parallel to them.
- We pass the end of the braided cord into the loop of the first cord (the bend point).
- Wet the knot and tighten it.
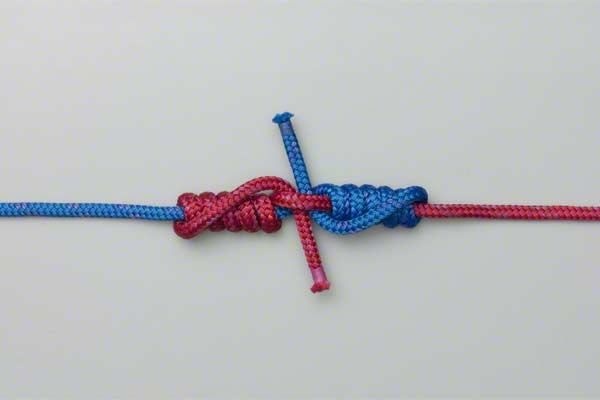
Centaurus node
Provides high knot strength when connecting two braided lines. This unit is also compact and easily passes through the rod rings.
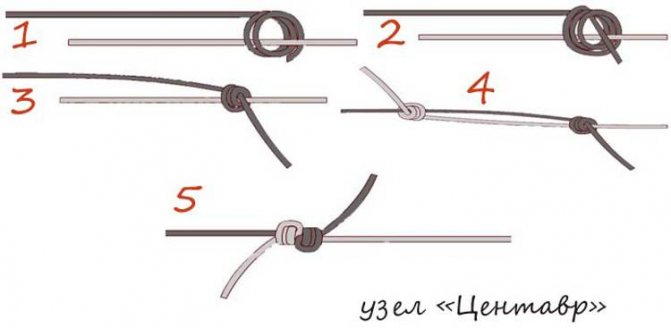
Manufacturing:
- At the end of one braided cord, at a distance of 10-15 cm from the edge, with the second cord we make three to five turns in the direction around the first. The loops should be loose around the first cord.
- We make the last turn in the opposite direction and thread the end of the second cord inside these four turns. Tighten the knot, but not too much. We also make three to five turns with the end of the first cord around the second cord.
- We make the last turn in the opposite direction and thread it inside the formed loops. Tighten the knot, but not too much.
- Tighten both knots.
Read on for a short and practical guide to tying braided line and monofilament.
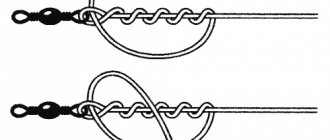
Arbor knot
The simplest method for tying fishing line to a winter reel or any spinning reel is to make an Arbor knot.
In fact, it is also self-tightening, which ensures high reliability, but it is knitted somewhat easier compared to the previous version.
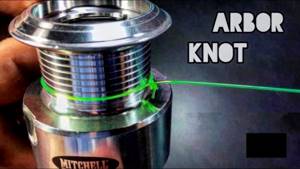
This is done as follows:
Wrap the line around the spool. Leave the tip long enough to make tying a knot easy.
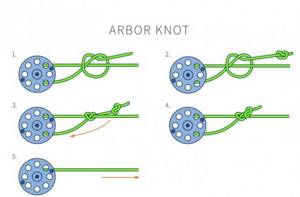
Make a knot at the tip. Before doing this, you need to wrap the line towards the spool. It is necessary to achieve an effect in which the tip of the fishing line with a knot will slide along the main cord directed towards the spool.
Tie a second knot at the end of the fishing line. But, it should not be wrapped around the main line. This unit serves for fixation (stopper). It prevents the risk of the first loop unwinding.
Wet the line and tighten the knots. Cut off the excess part. You should always remove excess line, as it will interfere with the free flow when casting.
Application of nodes
Various loops and knots can be used for fishing.
There are complex and simple fastenings. There are situations in life when you have to use nodes of varying levels of complexity. When fishing from a boat, you may encounter unforeseen circumstances. As an example, consider these:
- Monofilament or braid tied very loosely to the spool can cause the spool to accidentally fall into the water. She may drown when trying to reach it using the end of the braid. If the cast is not made over a very long distance, then there is a chance that you will find it from the shore. But it will be almost impossible to do this from a boat.
- Another example could be this. A loosely tied fishing line will be torn off by a boat passing by. What will happen in this case? If the knot were strong, the fishing rod or spinning rod would simply fall out of your hands and drown. But weak fasteners, in this case, will save your fishing rod and reel. And the fishing line will never be returned. Therefore, in this example you will incur minimal losses.
This knot is the most original of all types. This type of knot is tightened under the influence of loads, therefore, the greater the load on it, the stronger it becomes.
There are many tightening sea knots. But among fishermen, the one that can be used for bottom fishing using a capacious reel is more popular. A large diameter reel with a fishing line wound around it will help you make a big cast.
- To begin, wrap a rope around the spool. To make this material comfortable to hold, you need to leave the tip a little longer.
- Next, the tip of the fishing line needs to be turned into a loop. To do this, wrap the pre-leading line and turn the tip in the opposite direction.
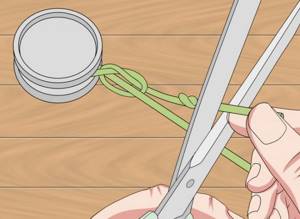
- Guide the free end into the loop that is at the base of the twist. Next, moisten the fishing line with any liquid and tighten the knot. Place the self-tightening loop on the spool and tighten. You need to pull on the main line.
- The rope will tighten on its own. The ends that stick out must be removed using scissors or a knife.
- Such a loop turns out to be sliding. Therefore, if the need arises, you can easily untie it and free the spool from it.
We suggest you read: How to properly tie a fishing line to a fishing rod with and without a connector
This knot is the simplest of all. But despite its simplicity, it is popular, effective and easy to use. It does not require the use of additional devices or specific skills. The heavier the load at the end of the main rope (material), the tighter the loop will tighten. The most important condition is to ensure constant tension and load. This is necessary to ensure that the running end does not slip out.
In order to secure the rope to the spool, many different loops are used. For fishing, the most effective and easiest to use loops are most suitable. If a fisherman hones his skills and ties knots almost automatically, then no type of knot will be problematic for him.
Clinch
A very good way to tie a fishing line to a fishing reel. It is especially effective on girders, although it is quite suitable for any other types of gear.
- Wrap the tip of the line around the spool.
- Step back a little from the spool and wrap the tip around the main line.
- Make 4-6 turns with the tip. You need to wrap the main line towards the spool. This creates a loop around the main line.
- Thread the tip of the fishing line into the formed loop. The base also passes through the same loop.
- Wet the fishing line with water and tighten the formed loop.
Alternative fastening methods
This knot is also self-tightening in nature. Sequencing:
- We wrap the line around the reel. The end of the fishing line should be sufficient for comfortable knitting. It should not be too short and at the same time too long.
- Next, you need to tie a knot at the end of the fishing line, after wrapping the fishing line going to the reel. By tying a knot, it should be so that the end of the fishing line with the tied corner slides along the main part of the fishing line going to the reel.
- At the end of the line after the knot we make another knot. But this time there is no need to wrap around the main part of the fishing line. This knot will be a locking one. He will not allow the knot that was tied first to be untied.
- After wetting and tightening the knots, we cut off the remaining end of the fishing line so that it does not interfere with winding.
- We wrap the end of the fishing line around the spool.
- At a short distance from the spool, we bend the end of the fishing line around the main part of the fishing line going to the reel.
- We make 4-6 turns with the end of the line around the section of the line going from the spool to the place where the main part of the line goes around. The main part of the line is in the loop.
- We thread the end of the fishing line into the resulting loop. The main part of the fishing line goes through the loop there.
- We wet the line and tighten the knot.
Each fisherman has his own preference in tightening knots. As a rule, having mastered one knot, almost no experienced fisherman will change the tactics of tightening the loop. Nowadays, reels are sold that are equipped with a stopper or a clip to which you need to secure the braid. Thanks to such developments, you don’t have to tie the line onto the reel.
Some recreational fishermen prefer not to tie loops at all and not to use modern monofilament fasteners. They like to simply wind the amount of line that will hold it on the spool. If you use 100 meters of line and reel in 200, your monofilament will be motionless.
We invite you to familiarize yourself with: German Shorthaired Pointer Description Character Contents
The main disadvantage of this tactic is the fact that during the fishing period you will sometimes have to remove some of the fishing line that has become frayed. In the end, you will still have to tie a knot, for the reason that the remaining amount of fishing line will not be enough to hold it on its own.
Photo tips on how to tie fishing line to a reel
Note!
How to tie a fishing line to a reel - methods, tips on how to tie correctly and an overview of the most reliable knots (85 photos and videos)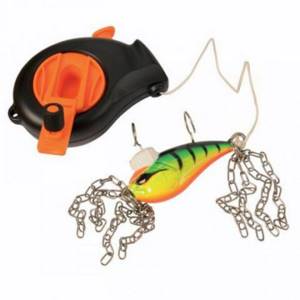
Cuts for wobblers and spinners - how to make a simple homemade cut. 110 photos and videos of practical tips
How to tie a hook to a fishing line - advice from professionals and the best patterns for beginners (115 photos and videos)
Read here Fishing with a spring - rigs, baits, baits, gear and methods of fishing with a spring (80 photos)
Help the project, share on social networks 
0
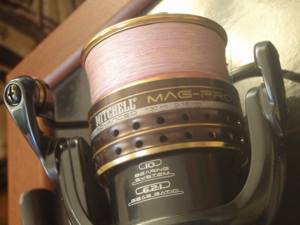
How much fishing line to reel
Many people ask another question: how much fishing line should be wound on the reel spool? I answer - one or two millimeters to the side. This maximum filling will provide a good casting range. If you wind it flush with the side of the reel spool, the rings and beard will drop. This winding can be achieved in several ways.
- If the coil is not capacious, then you can wind the entire coil that you purchased in the store; it will fit completely.
- You can wind a lot of fishing line from a reel onto a capacious reel. But only if you use inexpensive monofilament, otherwise such winding will cost you a fortune.
- If the reel is capacious and you are using expensive fluorocarbon or braid, then wrap a piece of electrical tape or adhesive tape under it. Fluorocarbon or wicker on top. Save money.
- If the reel is capacious, then instead of an adhesive plaster, tie an inexpensive fishing line to an expensive braid and first wind the cheap monofilament, then the braid. A piece of monofilament for winding is called backing. It's easy to calculate. Everything needs to be counted for the same reason, so that there is only 1-2 mm left to the end of the side.
LiveInternetLiveInternet

Securing the thread is a very important point in beading . In no case should you be lazy here, because a poorly tightened knot can cause your hours of painstaking work to go down the drain.
If you have to weave in a circle, put the required number of beads on the thread and tie the ends to make a ring. Pass the short end of the thread through four or five beads and cut.
With other weaving methods, you can temporarily secure the thread at the beginning by placing one bead on it, and then again passing through this bead in the same direction (Fig. 1). Later, when some part of the weaving is ready, this bead is removed. The end of the thread is tied around the nearest loop with two knots and pulled through several adjacent beads, and the remaining “tail” is cut off.
If you are weaving on a fishing line, you can carefully melt its end with a match so that a thickening forms on it, similar to the head of a carnation. It will hold the beads securely. The same can be done at the end of weaving: cut the fishing line, leaving one and a half centimeters, and melt it. This method is used only on the wrong side or in other inconspicuous places of weaving, since the “hat” does not always come out small, but I really love it for its speed and reliability. Make sure that the flame does not burn the fishing line in the weave. It's best to practice on some unnecessary leftovers. At the same time, try not to let the fishing line itself catch fire - you may not have time to blow it out before the fire reaches the weave.
It is best to secure the thread at the end of the weave by tying it with two knots around any adjacent thread. After this, go through several beads and try to tighten the resulting knot into the first one. To be safe, you can repeat the procedure and only then cut the thread.
You can also simply add a thread, hiding the ends in the weave. To do this, fold the end of the first thread in half to create a small loop. Hold the thread in this position with your left hand. Take the new thread in your right hand. Insert its end into the loop, moving from bottom to top. Pull the new thread towards you - it will pass under the side of the loop closest to you. Throw the thread through the loop from above, and then pull it inside the loop from the bottom up - you will get a second symmetrical loop. (Fig. 2). Pull both threads tightly and continue weaving. Pass the remaining ends through two or three beads and cut off.
Source
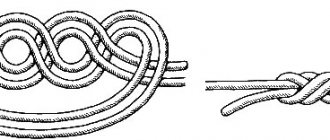
Self-linking nodes
Remember that this knot is considered one of the best options for attaching fishing line to a spool. There are enough tying methods for it (spool), and there are those that are easier to tie correctly or harder. And it's not just the node. Initially, the fishing line is always wound on the spool under tension.
This option will help you get rid of multiple errors when using a fishing rod. Initially, citizens from America tried it and called it “backing”. And in Russia it began to be called podmotka. It is quite simple and you only need to supplement the missing quantities of fishing lines with another, cheapest one. Due to the fact that this winding ends up from below every time, it is rarely used in practice.
The self-tightening knot is used quite often by many professional fishermen.
We knit it simply. You just need to do everything on the list. After which it will tighten itself under tension, which will ensure a very tight fastening of the fishing line to the reel.
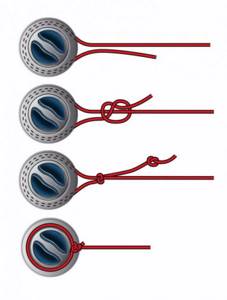
Fastening this type of loop is done in this way:
- create the entire turn of the fishing line along the spool;
- at the end of the fishing line we tie a loop, that is, tie a knot;
- wind the free part at the end around the main line up to 5 times;
- stick the free part into the upper part of the loop;
- wet the knot on the reel with water - then tie it;
- those pieces of fishing line that remain must be cut off with scissors.
This connection is suitable for various types of fishing line and is the tightest, and also cannot be untied indifferently.
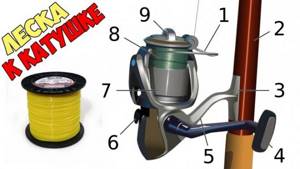
How to choose the right one
Connectors made of duralumin alloys are considered more reliable elements and are used when catching large and powerful fish, carp, barbel, ide and chub. Plastic varieties of products are only suitable for fishing conditions for small fish, roach, bleak, ruff, gudgeon and small crucian carp. The advantages of connectors are the speed of changing the main lines and the reliability of its fastening. In addition, this device is inexpensive, durable and easy to use, and, apart from glue, does not require additional materials for installation on the fishing rod.
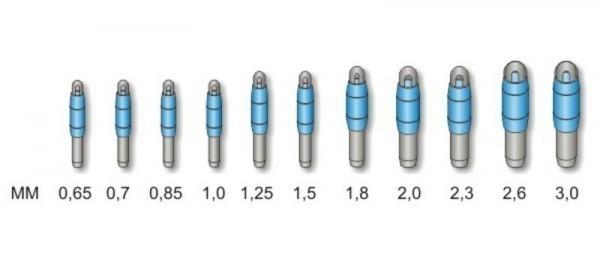
Important! The method of mounting the device on a fishing rod depends on the design of the tip of the tackle.
If the tip has an internal cavity, then the product is purchased with a sleeve for internal installation. If the tip of the rod is solid, purchase a connector with a hollow shank. To accurately select a connector, you will also need to know exactly the outer or inner diameter of the last bend of the form. The easiest way is to measure the rod with a compass and use this tool to select the required accessory option in the store. But it’s safer to take the rod itself to a retail outlet and select a device by directly connecting the parts in a trial . Having chosen the option required for the configuration, the device is glued to the tip of the fishing rod blank with glue and after the joint has dried, the tackle is completely ready for installation of the cord.
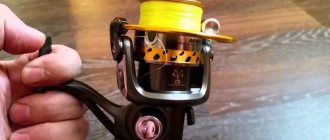
How to spool fishing line correctly
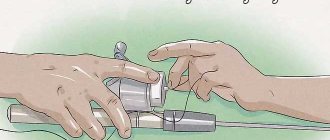
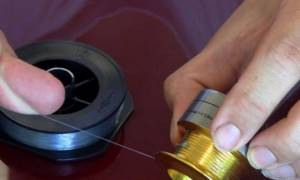
- You need to install a reel on the first leg of the spinning rod and remove the spool. The main line must be threaded through the spinning ring and tied to the spool. Don’t forget to open the line handle before installing the spool on the reel. The line must pass through the line roller. If you have a spare spool, then it is better to carry out this action with it when determining the volume of backing and the initial winding profile.
- The fishing line spool has a central hole, so it can easily be attached to a pencil or pen. To avoid twisting, the line should come off the bobbin as it unwinds, and not come off in coils when the bobbin is stationary. We ask a partner (children are the best helpers) to hold the spool of fishing line on a pencil. If there is no partner, you will have to adapt by holding a pencil with a spool between your knees. You can use special devices for unwinding fishing line from reels. They can also regulate the force of winding the fishing line onto the spool.
- Using one hand through a rag or wearing gloves, so as not to cut yourself or burn yourself on the fishing line, we clamp the fishing line above the first ring. With this hand you can regulate the force of winding the fishing line onto the spool (as tightly as possible, but without fanaticism). With the other hand, we begin to turn the reel handle at low speed.
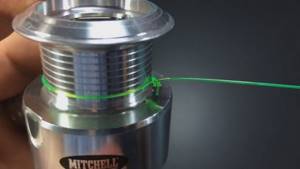
- The volume of the fishing line being wound should be such that the fishing line does not reach the edge of the spool collar by 1-3 mm. If the volume of the fishing line is not enough, then we tie the backing to the fishing line and continue to wind it to the required volume. Winding the fishing line to the edges of the bead is fraught with loops coming off and “beard”.
- After winding the line and backing to the required level, it is necessary to rewind the line from the spare spool to the main one. If the line winding profile is unsatisfactory, you can adjust it by removing or adding the necessary adjusting washers. If there is no spare spool, then for the final winding of the fishing line you will have to rewind the fishing line either to another reel, or first to one reel, then from it to the second reel. This is necessary to turn the line over. For these purposes, you can use a drill by attaching bobbins to the spindle.
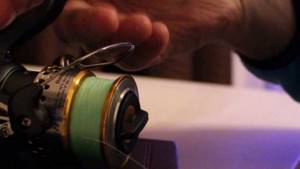
- After the final winding of the fishing line onto the spool, we attach the edge of the fishing line to the clip, which is located on the side of the spool.
Next is a video from a spinning fisherman, which describes and shows the process of winding fishing line onto a spinning reel.
Compliance with simple principles: the use of backing, the correct force, profile and volume of winding will allow you to obtain optimal use of the gear and ensure working with it at a high level of efficiency.
A group of fishermen revealed the name of the secret bait during interrogation.