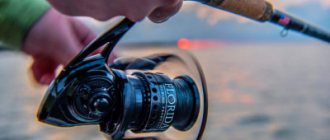
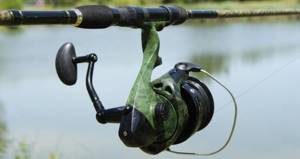
Fishing and accuracy are practically synonymous words. If an angler is careless in relation to gear, rigging and planning of fishing strategy, then he will clearly not be distinguished by his catch. This conclusion directly relates to the equipment of the spinning rod and, in particular, the winding of fishing line on the spinning reel.
Initially, it seems that there is nothing special about this operation. You select a cord in the form of a fishing line or braid, attach the fishing line to the spool and wind it until there is enough space on the spool, because the supply is clearly not a hindrance. But in fact, the fishing practice of a spinning rod shows how important winding the line is for comfortable fishing, the casting distance of the bait and the ability to carry out high-quality and effective retrieves.
Why is correct winding important?
Tying a fishing line to a reel will not work anyhow; here you need knowledge of the features of winding and their methods, depending on the type of reel and the material being wound. Mistakes when carrying out this manipulation already in fishing conditions, and experienced fishermen realize how valuable every minute of hesitation becomes when a predator is actively biting, is fraught with the shedding of rings and the creation of confusion or, in simple terms, a beard. Unwinding the beard can subsequently take up a significant portion of the potential fishing time and bring all fishing to naught.
But the tangle of tangled cord is only one component of the problematic issue. This is followed by defects in the cord from kinks after the formation of knots, loss in casting range, bends in the tip of the rod and shooting of expensive baits, which always negatively affects the initial positive attitude before fishing. Winding a fishing line onto a reel, as can be seen from the above, is a significant factor and there is reason to consider carrying out this operation more thoroughly, so that already on the reservoir the fisherman can avoid serious troubles. How to wind the cord onto a reel and how to properly tie the fishing line to the reel will become the main questions in further consideration of the material.
What types of knots and loops are the most popular?
Fishing experts identify three main units, which are sufficient to securely attach the fishing line to the reel.
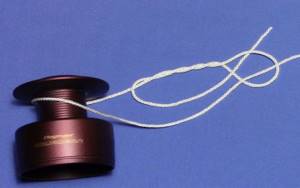
Arbor Knot
The Arbor Knot is ideal for attaching line to the reel spool. In order for the scaffold to hold tightly, the knitting sequence must be strictly followed:
- Turn the line around the reel.
- Create a knotted loop around the main end.
- Make a regular knot at the free end of the fishing line.
- Tighten the knot.
This type of connection is strong and reliable. It has many positive characteristics and advantages over other types. Unfortunately, the Arbor Knot is not suitable for all types of fishing line. When tying braid to a reel, you should abandon it and choose a different type of knot connection.
We suggest you read: How to master a feeder, recommendations for beginner fishermen
Self-tightening knots are quite popular among fishing enthusiasts. They are easy to knit and also simply tighten when tensioned, which ensures the most durable connection between the line and the reel.
To make a fastening based on a self-tightening loop you need:
- Make a full turn of the line around the spool.
- Make a loop at the free end of the fishing line.
- Wrap the free end around the main line and the base of the loop several times.
- Insert the free end into the top of the loop.
- Moisten the knot with water and tighten.
- The resulting excess pieces of fishing line should be cut off with scissors.
This connection is suitable for any type of fishing line and is considered the most durable, since it cannot come undone on its own. The only negative is that the self-tightening loop is very difficult to untie, so usually the knot is cut off with scissors.
Silk knot
A snare knot or “self-tightening figure eight” is also suitable for attaching line to the reel spool. The technique for tying this knot is very simple:
- Wrap the line around the spool.
- Loop the free end around the main end.
- Wrap a loop around both ends.
- Pull the free end through the first loop.
- Slowly tighten the knot.
The simplest and most effective way to tie a fishing line to a fishing rod reel is to make a self-tightening loop. Since the knot is self-tightening, it guarantees perfect strength.
Knitting principle:
- To make the knot more convenient to knit, it is better to remove the spool from the reel. The fishing line must first be threaded through the rings of the rod. Such preparation must be carried out when tying the fishing line with any knot.
- Make a loop at the tip of the fishing line. It can be classic or figure eight shaped (surgical loop).
- Thread the main line into the resulting loop. The size of the second loop that is formed depends on the length of the threaded fishing line.
- Throw the resulting large loop onto the spool.
- Tighten the loop. During the installation process, it is extremely important to correctly determine the side on which the loop is thrown. You need to tighten the loop from the side where it will tighten itself during the operation of the coil.
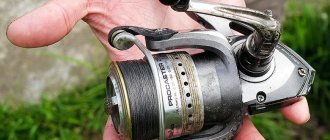
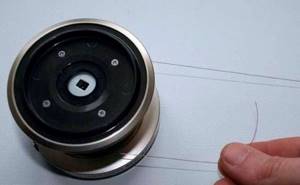
How to tie fishing line to the spool of a reel
At this point it is worth dwelling in more detail. Incorrect methods of attaching fishing line or braid subsequently violate the entire principle of laying the cord and its rational distribution on the base of the spool. Depending on the design features of the reel and its type, the methods by which you should tie the fishing line to the spool also differ.
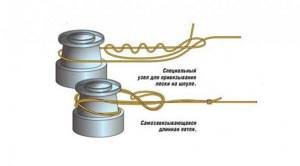
There are two methods for tying fishing line to the spool of a reel in its inertia-free design. One of them is the method of knitting using a special knot, like a clinch. Such a knot has advantages in its ability to resist stretching. The second method of effectively performing the operation is to use a self-tightening knot. This knot stretches a little, but during the operation of the reel, the tension of the cord prevents this shortcoming from fully manifesting itself.
Let's look at how to tie a fishing line to an inertial reel. In this case, the location of the winding changes. If in the inertia-free version the cord winds along the spool across its axis, then in the inertia version - along. It is more effective to secure the fishing line on the reel with this winding method if you tie a knot with a double loop or a regular figure eight.
You need to secure the fishing line to the spool of the multiplier reel by tying its beginning to one of the holes structurally made on its base. Here the angler has the right to use any reliable type of knot that prevents its relaxation and subsequent loss of fastening ability. The principle of cord slipping does not apply to the multiplier reel, since it is attached to a blind one. In inertial and non-inertial versions of the mechanism, slipping of the cord along the spool should be prevented by the optimal tightening force of the knot.
The second option is how to tie a fishing line or braid to a spinning spool
- We bend the line around the spool. The length of the free end is at your discretion, the main thing is that it is comfortable.
- We wrap a short piece of the main cord (fishing line).
- We braid 4 times with a short piece.
- We put the end of the fishing line into a loop. I pay attention to the position of the fishing lines.
- We wet and carefully tighten the knot.
- Tighten on the spool. We cut off the excess tail with sharp scissors or special wire cutters.
The knot is strong and “inconspicuous” even with further laying of turns on budget models, where winding is carried out with a standard “planet” (more advanced ones have a cross-shaped winding).
It is worth noting the convenience of completely removing the thread. It is enough to press the knot with your finger and, pulling it to the side, give slack to the main section of the fishing line. The loop becomes loose and can be easily removed from the spool.
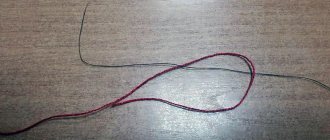
This is my main method of attaching line to the spool. Behind the apparent complexity, after a couple of workouts everything comes together “automatically”.
- We make a loop at the end of the cord.
- We pass a double main thread through it and get a working noose.
- We put the noose on the spool and tighten it.
This option is the most common among fishermen, but there is one peculiarity.
When you rotate the reel knob, the bow goes clockwise. It is necessary to initially put on a loop so that it tightens as it rotates. Otherwise, it will slide along the surface of the spool.
Having decided on the correct position, lower the bow and begin winding.
To complete the picture, the described method can be viewed on the kindly provided video of one of the avid fishermen, where all the steps are clearly shown.
Please note that it is advisable to move the knot to the lower side of the spool. This will allow the coils to lie flat.
In conclusion, I repeat (this is for beginners) that there is no better way to tie a fishing line to a spinning reel. Use the knot that is comfortable for you.
Using adhesive tape (duct tape, tape) is not the best option, although it is common. When it’s hot, it tends to “float” - the adhesive layer begins to blur and seep through the coils, gluing the fishing line.
You can attach the end of a fishing line or braided cord using a clip to the spool, but you should make sure that in the future this section does not become an obstacle when casting.
No tail, no scales. Regards, Oleg
How much fishing line to wind on a spinning reel
The principle of calculating the capacity of the main cord is similar in the multiplier and inertial versions. The cord is wound onto the multiplier reel without preliminary calculations or other auxiliary operations. The amount of material to be wound is determined visually; until the free volume of the spool is completely filled, about two millimeters of the useful volume are not wound.
Important! How many meters of fishing line and what diameter will go into the volume of a multiplier reel can be found out from the product labeling. Typically, this information is printed directly on the mechanism body or is given in its operating instructions. Inertia-free and inertial types of modern models are marked according to the same principle.
When purchasing fishing line or braided cord for subsequent winding on a spinning reel, the angler must take into account these data on the volume of the spool, comparing the diameter of the cord and its quantity on the purchased reel. As a rule, the amount of cord with a purchased reel should not be much higher than the amount in theoretical calculations.
Important! It is impossible to correct the lack of winding to the required volume without a knot, but the extra meters can always be trimmed. A knot in the main cord is strictly unacceptable.
The work of cutting the cord on an inertial reel consists of winding a volume of three quarters of its height. It is this kind of filling that is convenient to work with both when casting and when retrieving, without fear of unauthorized tangles of the cord over the upper edges of the spool. Difficulties in determining the size of the cord for a spinning reel are solved with the help of a spare spool and backing. We will talk about these features in more detail in the next section of the article. The volume of the spool is wound based on the principle of underwinding to its upper edges of about three millimeters.
This feature prevents the rings of the main thread from coming off without permission. This size must be maintained. After all, when casting, the line comes off the spool automatically due to the force of the flying bait, and in this case the angler will definitely not be able to prevent the extra rings from self-resetting, which will lead to a guaranteed beard. Here I would like to draw attention to the cross problem of winding with clipping of the cord when casting.
Important! When the threads are clipped, the winding level may rise, and when cutting with large diameters, you need to pay attention to this factor, increasing the unwinding distance.
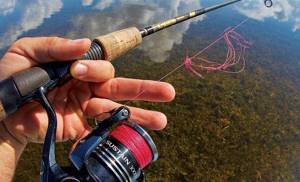
How to wind fishing line on a spinning reel?
As you already understand, the variety of coils is very extensive. Let's look at each type separately.
Inertia-free
This type is a complex technical device that is designed to store a supply of fishing line.
Just like a reel is involved when casting equipment and when landing fish. Fishermen call it a meat grinder.
It provides, first of all, smooth running, winding speed, and power.
Agree that this is important. This type is ideal for beginners
Multiplier
This type is intended for use with all types of gear. In practice, it has been proven that all the money spent on this type of reel fully justified itself and the hopes of the fishermen.
These species are used more often for catching large fish.
The operation of the mechanism allows you to delay the casting of the bait. If you are a beginner and decide to purchase this type, then you need to purchase a baitcasting reel with a digital brake.
Closed
This type is made using a technique that allows fishing to take place in the most comfortable conditions and makes it easier for the fisherman to cast the fishing rod itself.
In addition, this type of reel does not tangle the line while fishing.
What is backing
Using a base or backing allows you to wind fishing line onto an inertia-free reel without flaws and waste of expensive cords. Often the volume of the spool is much more capacious than the diameter of the cord required for fishing conditions can fill. As a rule, the working dimensions of the thread do not exceed one hundred meters, and manufacturers strive to produce for sale precisely these volumes of bobbins.
In addition, braided cords of small diameters and fishing lines specialized for spinning equipment are expensive enough to fill the free volume without any practical use. In these cases, the excess spool height is filled with another, cheaper material. In various sources devoted to this problem, anglers are recommended to use electrical tape as backing, considering it a quick and effective way, but based on practice, I will say that this solution can subsequently cause a number of problems and lead to difficulties in using the reel.
The insulating tape is exposed to water, and water constantly gets onto the base of the spool from the winding cord, either getting wet or completely drying out. As a result, the electrical tape loses its elastic properties, begins to warp and break the winding pattern of the rings. As a result, the rings overlap each other, which ultimately leads to a loss of range of the tackle and increased wear of the cord, especially braided ones.
The most correct solution is to use monofilament fishing lines as backing with a slightly larger diameter than the main thread and, of course, with lower requirements for its quality. When winding fishing line onto a reel, you simply need to tie the fishing line together with a regular knot and cut the ends of the connection as short as possible, soaking the knot with glue to prevent it from untying. A knot hidden in the depths of the coiling will not interfere with the convergence of the rings when casting.
How to wind fishing line on a spinning reel
You can correctly wind the fishing line onto a spinning reel using several methods. The principle of the winding approach should include its density. It is worth winding fishing line onto a spinning reel based on the shape of the spool. The spools can be factory-made, which will allow you to make winding forms without resorting to special techniques. The winding can be in the form of a cylindrical shape, in the form of a cone, in the form of an inverted or reverse cone.
Arbitrary winding is in no way allowed, and the randomness of such manipulation in a low-quality mechanism will cause inevitable failure of the braid or fishing line as a result of its tangling. Pre-moistening the fishing line will allow you to correctly wind the fishing line onto the reel , so the fishing line will receive the necessary qualities that improve its elasticity and ability to twist. It is better to wind the fishing line onto a spinning reel by spreading out the tackle over its entire working length.
The meat grinder is tightly inserted into the saddles of the reel seat and clamped until there is no play. Having passed the tip of the fishing line through the rings of the rod, starting from the very top, the fishing line is tied to the spool and, closing the line guide, they begin to wind. To add tension to the line, you can use a heavy book by passing the cord between the pages. But the best option would be to be able to stretch the fishing line to its full length and wind it under natural tension.
In practice, you need to carry out this method on the street, unwinding the required cut to its entire length and tying one end to the bobbin and the other to a stationary object. Then tension is applied and, as the line is wound up, the rope is approached to the fixed end of the cord. The presence of a comrade in such a case, as a static object, is only beneficial. Having started winding, check the correct placement of the first turns. Their direction will determine the course of the rest of the operation. The braided line should be wound onto the reel using exactly the same principle as the fishing line, only without resorting to wetting.
Correctly winding a cord onto an inertia-free reel is much more difficult than performing the same operation on an inertial reel. Winding on an inertial mechanism consists of uniformly distributing turns across the width of the coil and placing layer on layer without crossing the rings. The methods described above for creating tension will help you wind the line correctly, as well as the braided line. Here, unlike inertialess meat grinders, there are no options for a variety of winding shapes.
The design of this type of mechanism itself will tell you how to properly wind braided wire onto a multiplier reel. Having tied the cord to the spool and moving according to the further algorithm of the spinning reel, having previously created tension in the cord, turning the handle will begin to lay the braid evenly and consistently along the horizontal axis of the spool. In this case, laying the braid on the reel occurs under the full influence of the design features of the mechanism and requires the least control on the part of the angler.
iarybak.ru
Reel models and line winding options
The wide variety of types and models of gear made it necessary to study the question not only of how to wind a fishing line on an inertial reel, but also how to wind a cord on a spinning or multiplier reel. In addition, proper winding of the fishing line onto the spool allows you to bring the casting distance as close as possible to the value declared by the manufacturer of the product . Another important point is that the fisherman must know how many meters of fishing line to wind on the spinning reel. Failure to comply with this parameter will lead to the fact that the braid, fishing line, and cord will wear out very quickly.
Multiplier
Since winding fishing line on a multiplier reel will work well, provided that it is of the thickness recommended by the manufacturer, be sure to pay attention to this indicator. Before winding the line onto the spool, make sure that it is neither thinner nor thicker than the specified values. Winding fishing line onto a multiplier reel begins with fixing it on the spool . Pass the cord or line through the hole in the line guide and tie it to the spool axle.
Expert opinion
Knipovich Nikolai Mikhailovich
Zoologist, hydrobiologist. I am interested in fishing at a professional level.
Important! Before winding the line onto the spinning reel, make sure that the knot and the hole of the line guide are located exactly opposite! If you need to adjust the position, do it with the clutch loose, and then tighten it!
If the spool is perforated, then before winding the fishing line on the spinning rod, thread it through the hole and tie it with a regular knot. If there are no holes, then use one of two types of knots to secure them:
- special unit;
- self-tightening knot.
Inertialess
Just as in the case of the “mult,” the cord is wound onto a spinning reel if its diameter corresponds to that declared by the manufacturer. If the diameter is smaller than required, then it will not be possible to wind the braid onto the spool efficiently. The result will be frequent occurrence of “beards” . In addition, the correct winding of fishing line on a spinning reel implies that the tackle will accommodate a certain footage of it - no more and no less. If the diameter does not match, a deviation from the parameters will occur.
Expert opinion
Knipovich Nikolai Mikhailovich
Zoologist, hydrobiologist. I am interested in fishing at a professional level.
Attention! Winding braid onto an inertia-free reel, as well as winding a cord onto a multiplier reel, must be carried out under the tension of the fishing line . This ensures tight installation and minimizes the chance of the scaffold falling off!
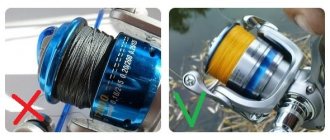
Correct winding of the fishing line onto the spool is carried out according to the “cross” or “turn to turn” . Then the scaffolding is laid very high quality. If the braid is wound onto the reel correctly, then there should be 1-1.5 mm of free space . Now that you know how to properly wind the fishing line on a spinning reel, let's talk about inertial gear.
Inertial
If you know how to correctly wind braid onto an inertia-free or multiplier reel, then you already have an idea of how to wind braid onto an inertial reel. The process is absolutely identical. Attach the cord to the bobbin and begin winding. Since it is necessary to correctly wind the fishing line onto the reel while maintaining tension, be sure to pay attention to this. Another point worthy of attention is that the correct winding of the braid onto the spool is carried out slowly, with smooth and uniform turns of the handle .
Often, a fisherman is interested not only in how to properly wind the line on a reel, but also in the question of how to do it more conveniently . Usually someone is called in to help hold the reel while the line is wound onto the reel. But what to do if there is no one nearby who could help? How to wind fishing line correctly on a spinning reel in this case? Now we will tell you a simple way to correctly wind braid onto a spool yourself.
You will need three books . Place two books in front of you parallel to each other so that there is a distance between them equal to the width of the book. Since you need to correctly wind the braid onto a reel with light tension, the third book will help us with this. Place the third book in front of the other two, and run a cord between the pages. Its edge of the line should come out of the book onto the tackle. Now you know how to wind the cord on a bobbin at home yourself.
Models of spinning reels and types of line winding
Spinning reel
The laying pattern on the inertialess system can be: chaotic, straight cylinder, inverted and straight cone. It is inherent in the design of the coil. The first is inherent in Chinese products, the rest are devices from well-known companies that produce fishing products.
The latter are professional formats - they are preferred when purchasing a device. You shouldn’t save money; if you buy something cheaper from the Middle Kingdom, you’ll end up with annoying overlapping and tangling in your beard.
Winding options:
- a reel with fishing line is attached to some object in the form of a rod; it should scroll on it freely, without delay; the rod can be a knitting needle, a pencil, a screwdriver, a fountain pen, a metal tube, or a polished stick; someone must hold the rod;
- the free end is pulled through all the guide rings of the rod;
- tie a knot at the end;
- by lifting the arc of the line laying device, they fasten the line in a circle on top of the spool; they do this with a special knot, which is designed specifically for attaching it to the reel or with a self-tying long loop; in both options it is wrapped around clockwise;
- when attaching the braid, place a piece of thin rubber under it, which will prevent it from slipping in the future;
- lower the line laying arc;
- begin to turn the reel handle; do it evenly, carefully; the fishing line should be taut all the time; the latter is ensured by supporting it with hands in tight mittens;
- winding to the level of the bobbin sides is not done - this may cause it to self-reset and become terribly tangled; usually it is finished when 1...2 mm remains to the level of the side;
if the main line is not enough to fulfill the last condition, then an auxiliary line is wound under it (backing is arranged), the thickness of which cannot exceed 0.3 mm; its amount in backing is determined experimentally.
Connection with spool
You can attach the cord to this element in different ways. For example, a noose loop, an adhesive plaster, electrical tape. The best option is to use special knots: one of them, for example, is a self-tying long loop. There is no point in simplifying this operation. This can further lead to slippage of the winding and the formation of beards from it.
What is backing
The term applies only to inertia-free vehicles. It is a winder that changes the depth of the spool. This allows you to correctly (up to a level of 1...2 mm to the edge of the sides) and economically wind the main cord, the price of which is usually significant.
Backing is not involved in fishing - it has an auxiliary role. It is often made from cheaper material with a diameter of no more than 0.30 mm.
The only way to determine how much backing is needed is by experimenting. To do this, the main drum is wound on one drum, and the backing is wound on the second. Having visually determined that there is enough winding, the end of the main cord is attached to it and winding is carried out on the element on which the backing was initially wound.
Taper profile
Spool taper is the ratio of the line diameters at the back and front cheeks. Any such part has a bottom of a certain taper. Even the one that is called cylindrical - its taper is insignificant. There are elements with a large taper - this is usually the case with large reels. If the devices have a reverse taper, they have more cord wound in the front part than in the back part.
Reverse-taper devices are best protected against beard formation. The situation is a little worse for cylindrical devices, and most often “beards” are formed in devices with a straight taper.
Multiplier reel
For a multiplier, the winding should take place so that the drum remains 1…2 mm empty. It is also necessary to accurately calculate the required amount of cord - backing is not used in such devices.
The order is:
- the thread is passed through the pass rings of the form and threaded through the line guide;
- tie the cord to any of the holes that are in the movable drum; it is possible to secure the braid on the drum with a loop, for example, as in a spinning machine;
- attach the multiplier to the form;
- pass the cord through the right ring;
- tighten the friction brake;
- quickly reel in (provide tension), then attach the leash.
Inertia coil
It is easiest to wind fishing line on such a device. It is attached to it with a double loop or a figure-of-eight knot. Next, wind the required amount of cord (it must be taut). At the same time, make sure that the latter lies evenly.
The order is:
The reel with cord is placed freely on any rod. For the latter, use a screwdriver, a regular pencil, or a piece of wire. An assistant should hold the rod. He, using his hand in a mitten, ensures the necessary tension of the braid when winding.
The operation begins by opening the line laying arc. Then pass the thread through all the spinning rod’s pass rings and secure it to the spool, for example, with a noose loop, electrical tape, or adhesive tape. Then the reel handle is turned to ensure winding.
The final stage involves tying the leash. It is better to do this through a winding ring and a carabiner. The latter will ensure a quick change of baits.
How much to reel
Usually there are markings on the reels indicating how much winding of a certain diameter can fit into it. Spinners place more than they need for the longest casts. This is done to protect against possible breaks during hooks when fishing for trophies.
By the end of the season, it is advisable to rewind the braid, reversing the beginning and end. This operation will save expensive consumables and increase their service life by at least twice.
Types of line winding depending on the reel
Three types of reels can be used in spinning fishing:
- inertialess;
- inertial;
- cartoon.
Each spinner has his own preferences regarding how to choose a spinning reel. Most often, spinning anglers use spinning rods. But in the case when maximum power and sensitivity are required from the coil, the choice is made on multiplier or inertial models. Due to the different design systems of the reels, there are certain features when winding fishing line on each of them.
Spinning reel
Let's look at how to properly wind the fishing line on a spinning reel:
The spool of fishing line is placed on a rod on which it can rotate freely. The line can be passed through all the rings of the rod, or only through one - the one closest to the reel. Thus, there is no need to assemble the tackle completely in order to reel in the fishing line. The line handle is raised and the line is secured to the spool. This fastening can be in the form of a self-tightening knot (a regular noose loop or a more complex Arbor knot). The fishing line can also be secured with electrical tape or an elastic band
It is especially important to carefully secure the braided line, which often spins at the beginning of reeling. After lowering the line guide, the line is wound onto the spool using a smooth rotation of the reel handle. It is important to ensure that the line has sufficient tension to avoid loops.
First of all, the quality of the winding greatly affects the casting distance: the ideal winding would be one that provides close to the maximum casting distance
When reeling in the line, it is important to observe the direction in which the line comes off the reel. This should be counterclockwise direction
It happens that it is difficult for a beginner to follow the direction of the fishing line. In such a situation, it is worth winding a few turns as a test and checking whether the line is twisted. If twisted turns form, you need to rotate the bobbin to a new position and re-lay the line.
Inertia coil
Inertia reels do not have a line guide, so uniform distribution of the cord (line) on the reel drum is the fisherman’s task. By passing the line between the fingers and moving them to the sides, the spinner ensures the correct laying of the line
Also, in this type of reel there is less chance of the line twisting, so it is not so important to fix the line in one direction or another
Multiplier reel
The answer to the question: “How to properly wind the fishing line on a multiplier reel?” largely depends on the presence of a line guide in the reel. If it is present, then the winding method is similar to a spinning coil. And in its absence, uniform laying of the fishing line is carried out directly by the fisherman, similar to how this is done in inertial reels.
It is advisable to secure the fishing line or cord at the bottom of the spool, this will reduce the number of contacts between the knot and the unwinding turns
Winding technique
Before winding, we place the reel on a fishing rod or in a special machine for winding fishing line. Then we pull the tip of the fishing line or braided cord through the rings, starting from the last one and all the way to the spool.
Before you start winding, you need to tie the fishing line to the reel.
First way
- We wrap the fishing line or braid around the spool.
- We cross the end over the main vein, creating a loop.
- On the loop we make a twist of four to five turns.
- All that remains is to tuck the tip of the cord into the loop at the beginning of the twist and, after wetting the knot, tighten it.
Second way
- At the end of the fishing line or braid you need to tie a small loop.
- We introduce the main vein into it, forming a large loop.
- We throw a large loop over the spool and tighten it, the main thing is not to confuse the winding direction.
Third way
- A double loop is wrapped around the bobbin.
- We wrap the tip of the fishing line around the part of the double loop that it forms.
- We insert the tip into the newly formed loop.
- Tighten the knot. It turned out to be similar to a clinch knot with a large additional loop.
After tying, the fishing line is wound onto the reel. To do this, you need to create some tension on the cord. Use helpers or some kind of device to wind the fishing line.
An assistant holds a pencil or other rod that is used as an axis. The purchased fishing line reel is put on the axle. During this work, one person turns the “meat grinder” handle, and his assistant brakes the reel with his finger, creating the necessary tension.
The simplest device for winding fishing line is a plastic bucket. The reel is placed on its bottom, and the bucket itself is clamped between the soles of the feet. Thus, a reel with monofilament or braid is constantly under visual control. The tension adjustment is controlled by the winder himself, passing the vein between the fingers of the hand with which he holds the spinning rod when laying it.
Machine
To facilitate this process, you can purchase a machine for winding fishing line in a store or make your own. There are a huge number of modifications today, but the basic operating principle of the installation for laying the cord is standard.
- The device is secured to a table or other surface using a clamp, suction cup or stand.
- The bracket has an axis with one or two springs and clamps.
- The bobbin is installed on the axle and clamped onto it.
- By decreasing or increasing the pressure on the springs, we change the tension created during winding.
Backing
On the reel spools there is information about how many cores of a certain diameter will fit on it. If the bobbin you purchased is clearly not enough to completely fill the bobbin, there are two options for getting out of this situation:
- Wrap insulating tape or adhesive tape around the spool, thickening the core.
- They use additional winding made of thread or old vein, the so-called backing.
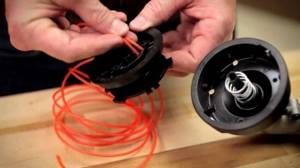
In order to properly wind the fishing line onto a reel using backing, it is best to proceed as follows.
- Take a spare spool. Many modern “meat grinders” are equipped with two of them: one with a metal side, the other with a plastic one.
- We wind the purchased braid or monofilament around it.
- We tie the backing to it with a double slip knot to the desired filling level.
- Remove the spare spool and install the main one.
- Now you need to rewind the cord from the spare spool onto it. Now there will be backing inside, and a new braid on top and in the required quantity.
When using insulating tape or rolled adhesive plaster as a backing, the thickness of the layer is selected in a practical way.
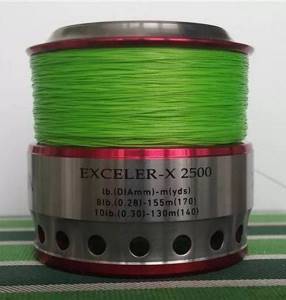
How much fishing line should I reel in?
Before you start winding, you need to decide how much fishing line we really need? You can throw a heavy jig at 100m, a medium jig cast at 60-80m. And a light bait - a wobbler or a regular spinner - can be thrown only 25-30m. Naturally, you need to have a reserve of fishing line for fishing, tangling and breaks. It is also advisable to fill the entire spool with one unwind of fishing line without connecting nodes, although this is not always possible.
As a rule, the optimal length of line on a spool is 100-150m. It is in such unwindings that most modern fishing lines are sold.
Usually, the dimensions of the reels themselves are designed for a certain load - and therefore for a certain “working” range of fishing lines. Therefore, for most manufacturers, the numbers on the reels are “consonant” with similar fishing line diameters. Thus, the most popular model 2500 is optimal for use with monofilament with a diameter of 0.25 mm, which should fit exactly 100-150 m per spool. The line capacity of reels is usually indicated on the spools, i.e. how much fishing line of different diameters fits there.
Therefore, you should not take a line thicker than the largest diameter indicated on the spool - it’s better that the line breaks than the reel breaks. Although with careful fishing this will not happen thanks to the friction brake. But for thick fishing line it is better to immediately take a more powerful reel.
So, if 100-150m of the required fishing line fits on the spool, then there is no problem - a 150m reel is enough for the entire winding. This will be the best option - but not the only one, which we will talk about further.
The question arises - how to properly secure the fishing line to the reel spool?
Winding Features
Few fishermen know that in inertialess reels it is possible to lay the line in a cylinder, straight or reverse cone. By default the bobbin is set to cylindrical winding. However, it is possible to vary the styling at will.
In how to correctly wind the fishing line with a straight or reverse cone, spacer washers will help us; complete with some inertia-free spinning washers, their number reaches four. Such washers are placed on the spool axis. By increasing the spool fit by adding spacers, you will lay the cord in a straight cone, while decreasing it in a reverse cone. This is true for devices with a top clutch.
When using shim washers for a rear-friction reel, you need to remove the spool and place washers on the axle inside the reel. Only, unlike front-friction models, a higher fit will give a reverse cone, and a low cylindrical fit.
Features of winding on multipliers
When rigging a baitcasting reel, inexperienced anglers often make a mistake when tying braid or monofilament. There is no need to skip its far holes in the spool, this can lead to braking. You only need to tie it at the nearest holes. It is recommended to thread the cord into the multiplier as follows:
- Tie the vein with any knot, for example with the same “clinch”.
- Install the “meat grinder” on the spinning rod and pass the braided line through the right ring.
- Tighten the friction and axial brakes.
- Control the tension of the vein by passing it between your fingers.
With this installation method, accidental braking of the coil will be eliminated.
lovlyavsem.ru
Coil
There are several types of reels. Therefore, you can consider how to wind on this or that type.
- On multiplier reels, it is impossible to simply change the spool onto which the fishing line or braid has been threaded in advance.
- On inertial spools, everyone is different, so this operation will also not work.
- On inertialess ones, putting on another spool with braid is quite possible.
Inertial
An inertial, ordinary “meat grinder” fits about 100 meters, so if you buy a fishing line in a 100-meter unwind, it is calculated that it will go in completely.
For a spinning rod or feeder, where there are guide rings, the fishing line is wound onto a “meat grinder” directly on the assembled rod. If you put a reel with a wound line, you will catch the “beards” when casting. Therefore, you need to unfold the spinning rod and thread the fishing line through all the guide rings. Start with the smallest ring. Bend the line guide arm. Then secure the fishing line to the spool, tie it in a knot or with a stopper. First, make several turns evenly by hand, then start turning the “meat grinder” handle. The line will reel in.
Frequently, flaws in the “meat grinder” are to blame for the fact that the line on the reel was wound incorrectly. If you bought a not very successful “meat grinder”, then humps may form, a dip will appear at the front side or there will be a reverse cone. When wound correctly, the fishing line should lie flat, like on a spool of thread.
Multiplier
Everyone knows that a multiplier reel is a type of inertial reel. It is very important to use a fishing line of the thickness that is intended specifically for this model.
Look at the video of how fluorocarbon is spooled onto a baitcasting reel:
Some fishermen make the mistake of tying braid or monofilament to a baitcasting reel. They pass it through the far holes in the spool, which leads to braking. You only need to tie the holes that are close. Thread the fishing line into the multiplier reel as follows:
- Tie the fishing line with any knot.
- Insert the reel onto the spinning rod and pass the braid through the right ring.
- Tighten the clutch and axial brake.
- Use your fingers and a cloth to control the tension of the fishing line.
Inertialess
The thickness of the fishing line should be the same as indicated on the reel. If the braid or monofilament is thicker, it will be very difficult to thread. With a smaller diameter, solid beards will appear when casting. You will end up losing some of the braid or monofilament. Each spinning reel is made not only for a specific fishing line diameter, but can also accommodate a certain amount of braid or monofilament. These parameters are indicated in the coil passport. They are different for different manufacturers. So read the instructions carefully, translate them, even if they are in Japanese.
Well-known manufacturers constantly struggle with twisting. To do this, they will improve the reel, namely the line roller. The better the quality of the company that makes the coils, the better the installation.
Winding the fishing line onto a spinning reel is done in a “cross” or “turn to turn”. This installation is very high quality. But don’t forget that you don’t have to fill the bobbin to capacity. Leave 1-1.5 mm.
Leave 1-2 mm to the edge of the spool
When purchasing a spinning reel, you need to configure the laying profile. Profile adjustment is very important. There are three winding methods and they can be customized:
- Cylindrical.
- Reverse cone.
- Straight cone.
The spinning reel is equipped with 4-6 spacer washers, with which you can adjust the laying. These washers have different thicknesses.
In the picture, the first option is a cylinder, the second option is a reverse cone. the third is a straight cone:
Winding
Reels with front and rear drag have different adjustments and are set up differently.
With front clutch
Washers - spacers are located on the axis where the spool mount is located. By adding or removing spacers, you can adjust the height of the spool. Straight cone – higher spool position. Reverse cone – lower. The default setting is cylindrical.
With rear clutch
The spacers-washers are located inside the spool. You will have to unwind the coil and you will see these washers. But with a rear clutch, a higher landing will produce a reverse cone, and a lower one will produce a straight cone. It's the other way around. The adjustment will be different.
In the video, watch the winding of braid on a spinning reel:
Main nuances
Attachment to the spool
The complexity of the attachment should be based on the type of fishing planned (spot or mobile - on a boat). Based on this, you need to choose the tension force of the fishing line. Most often, high tension is used when fishing on the spot, and moderate tension is used when moving on a boat.
There are a huge number of types of knots. Each fisherman chooses his own. Most often, throughout his fishing practice, he uses one type of knot that is better for him than others. Before winding, it is better to secure it with a stopper, and then tie the braid.
The most common mounting method can be described in three points:
- We get a loop from the end of the fishing line using any knot;
- We draw the main part into a loop;
- Roll into a figure eight shape.
To prevent it from spinning, you need to provide for winding it along the bend in the rotation of the spool.
Backing-rewinding
When filling the spool there will likely be some distance to the beads. This is excluded, since it can cause inconvenience up to the point of replacing the reel while fishing. Therefore, for proper winding of the spool, a gasket is needed. This type of laying or winding is called backing. It will fill the coil up to the sides. As a material for backing, you can use electrical tape, nylon cord or fishing line of a larger diameter.
Spool winding
Winding the bobbin is a very important process.
Here it is necessary to calculate the tension reserve. Also, do not forget about strength. When using heavy and large baits on long casts, there is a risk of the upper turns cutting into the lower ones, with subsequent difficulty casting over long distances. When winding, you need to know its exact quantity.
If the coil capacity is low, it can be wound completely.
With high capacity and expensive fishing line, it is recommended to save space and the material itself by using electrical tape at the base of the winding. Otherwise, it is possible to use backing (cheaper fishing line) for winding to the edges, and a more expensive one for the main winding.
The winding is adjusted using washers located on the spool.
What is backing and why is it needed?
As stated earlier in the article: backing is the spacer between the main winding and the side of the spool. It is necessary in order to eliminate difficulties due to cutting in of turns during long casts. It can be calculated:
- wind the main line onto an additional reel;
- tie a nylon thread and wind it to the edge;
- remove the additional spool and install the main one, then winding it in reverse.
After this, the winding will take a lower position, and the main line will take place under the side.
Spool winding
There are several types of bobbin winding:
- flat or cylindrical;
- chaotic;
- trapezoidal or sloped
The winding on the spool will determine its tangling and durability, as well as casting distance. The position of the turns on the spool depends on the type of reel.
The first two windings are used in good quality coils.
The coils lie evenly in them. Chaotic winding occurs in low quality coils.
Their use is not recommended as they can cause many problems during fishing. When winding on the spool, it is necessary to use a load, and 1 - 2 mm must be left to the edge. The more loops there are, the further you can cast.
How to wind braid onto a spool?
It is necessary to secure the end of the braid when winding, or install a rubber gasket under it. This is the main difference between winding braid and fishing line. If you wind the braid directly without fixing, then there is a high probability of it twisting around its axis. The rest happens the same as when winding the fishing line.
How to reel on a spinning rod?
Spinning is a method of catching predatory fish using natural or artificial bait. There is a distinctive feature here. The fisherman creates an illusion: the bait is a live fish (using a fishing rod and line). Predatory fish react based on their hunting instincts.
Spinning rods can be divided into three groups:
- light;
- average;
- heavy.
The division is based on the weight of the bait accordingly:
- up to 15 g;
- up to 40 g;
- more than 40 g.
The bait is divided according to the weight of the fish:
- 2-3 kg (ide, perch, etc.);
- more than 3 kg (pike, pike perch, etc.);
- large freshwater fish (shark, stingray, etc.).
Based on the above classifications, each angler can choose a spinning rod that suits them.
Spinning tackle includes: rod, line, reel and bait.
Let's look at the step-by-step instructions for winding fishing line on a spinning reel:
- Attaching the reel to the fishing rod.
- Winding onto a reel using guide rings. Initially, the spool of fishing line with the protruding end is pulled through small rings on the fishing rod. Then pass through the next rings until the bobbin is reached.
- Providing winding resistance prevents twisting.
- Binding with a minimum number of nodes.
- Slow winding of the tensioned line without the formation of circles and sagging. When stopping during winding, loops may form, so they must be eliminated.
- It is wound up all the way and the bow is closed.
There are several types of spinning reels:
- inertialess;
- multiplier;
- closed.
Inertialess is highly accurate and is mainly used when fishing on the spot. When the bite starts, you need to start turning it. At this time, the fish is held on the line. With the right brake setting, it's easy to pull in big fish.
The multiplier is a powerful device that allows you to catch large fish from great depths. It is otherwise called inertial (with a gear ratio). Mainly used for spinning. It is called so because the principle of its operation is based on the force of inertia. A distinctive feature of this type is the presence of many technological units for the precise execution of fishing operations and simple interaction of parts. Benefits include:
- distribution of rings on top, so it is super sensitive;
- long casting length;
- when winding the reel, the line does not twist;
- load up to 60 kg (catch weight).
Closed spinning is characterized by a closed bobbin. It is equipped with a closing device - a cap. The line comes out of the hole in the cap. This model was improved with a reel movement mechanism. However, semi-closed coils are currently preferred.
Tips for beginners on choosing a multiplier
When using a multiplier reel, the use of fishing line with a diameter of less than 0.3 mm is allowed only if the weight of the bait does not exceed 15 g. In other cases, there is a high chance of the fishing line breaking when casting.
A line with a diameter of 0.3 mm can support a bait weighing up to 30 g, and with a diameter of 0.4 mm - up to 40 g. When choosing a fishing line for a multiplier, we advise you to give preference to soft types, as they allow you to feel the bite better and have less flutter when casting.
A braided cord can conflict with the chrome-plated wire of the line guide, as well as with the surface of the guide rings, the inserts of which are often also negatively affected by the braid.
If you plan to mainly fish with jig baits on a small river or lake, it is better to limit yourself to low-profile multipliers. For jig fishing on deep lakes or large rivers, it is appropriate to use barrel-type baitcasting reels.
For those who love trolling fishing, it would also be a good idea to first determine the fishing locations and the weight of the baits that will most likely be used. This will allow you to select the optimal coil model. It’s better to take a multiplier with a special line counter, which is very useful when trolling with all kinds of wobblers.
Line for reel
It must be chosen correctly, since it has its own classification :
- Monofilament (monofilament) - made from nylon material. It is most often transparent, and in certain cases it can be colored. It is classified according to physical properties:
- conditionally sinking (it cannot submerge itself in water, it is immersed with the help of a weight and is usually used when fishing for carp);
- sinking (able to sink on its own due to water absorption, but loses strength by about 15%).
- Fluorocarbon is an “invisible” type because it cannot be seen in the water. This factor is extremely important, because if the fish notices it on the bait, it will not swim towards it. This type is not subject to deformation, has high strength, but low elasticity. It is one of the most expensive on the market, so it is not publicly available.
- Braided line (or braid) is perfect for spinning fishing. It has a number of advantages: inextensible and resistant to breaking loads. There are two varieties regarding its density: braided;
- thermally soldered.
When choosing such a fishing line, you need to pay attention to its surface. If the surface is rough, it will eventually cause the coil to break due to the high coefficient of friction.
Depending on the types and characteristics, each angler can determine for himself the best option for purchasing a particular variety.