10. Grinner
Durable and versatile knot. Suitable for attaching: hooks, swivels, 2 ends of fishing line and floating pop-up baits used in feeder fishing. It's not difficult to tie. The breaking load is 89%, but when connecting 2 lines with such a node, it is reduced to 75%.
Used for all types of fishing lines: monofilament, braided and fluorocarbon.
Methods for tying a swivel to a fishing line
So, let's divide the methods into categories:
- The simplest knots.
- The most reliable nodes.
- Tying a thick fishing line.
- Tying braided fishing line.
- Tying fluorocarbon fishing line.
Two separate cases can also be distinguished:
- Knotless connection.
- Tying the fishing line to a swivel with a metal leash.
Read the article
This article is an extended guide to a post on our website about tying a swivel to the main line.
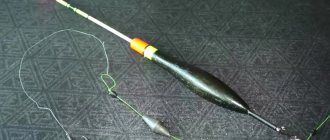
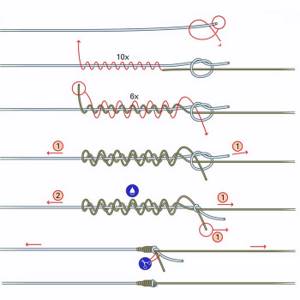
Marker node
Used for feeder gear. Usually a special elastic material is used, which is attached to the main fishing line and serves to mark the measuring marks.
This is the strongest fishing knot and does not slip along the fishing line. If necessary, you can quickly remove it: pull the ends of the elastic thread and pull it out of the knot. After removal, a slight deformation will remain, but it will not have a negative impact on the performance of the fishing line.
Knots for tying fishing line to reel
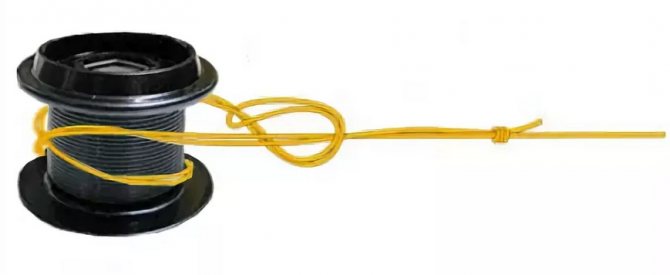
Arbor knot
The Arbor knot is the simplest and most reliable knot for tying fishing line to the reel spool. The knot has an ancient history; in old times it was used to tie the string to the bow. By design, the Arbor knot is self-tightening.
To tie line to the reel spool using an Arbor knot, follow these steps:
- Wrap the line around the reel spool, leaving a small end just enough to easily tie a knot.
- Wrap the free end of the line around the main line and tie a knot in it so that it slides along the main line
- Tie a knot at the free end of the fishing line, which will act as a stop knot and will not allow the first knot to come undone
- We wet the knot, carefully tighten it, cut off the excess end of the fishing line so that it does not interfere with winding the fishing line onto the spool
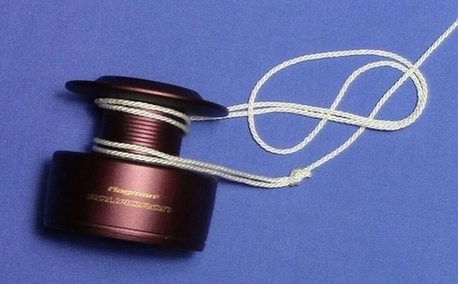
Attaching line to the reel spool using a loop
A simple and reliable way to tie line to a reel is to use a self-tightening loop. With this method of tying the line to the reel, the knot is tightened even tighter under load, does not turn, and can easily be removed from the spool if necessary.
To tie the line to the reel spool using a self-tightening loop, follow these steps:
- We make a small loop at the end of the fishing line, using a figure eight knot for this, tighten the knot tightly so that the knot is motionless
- We thread the main line through the resulting loop to form a large self-tightening loop
- We put a large self-tightening loop on the reel spool
- Rotate the reel handle to wind the line onto the spool
You may be interested in: Grayling
If when you turn the reel handle the loop turns on the spool, remove it and put it on the other side.
Tying the fishing line to the reel using a long loop is in many ways similar to the previous method with a self-tightening loop and is an improved version of it.
To tie the fishing line to the reel spool using a loop length, follow these steps:
- Make a loop about 15 cm long at the end of the fishing line using a figure eight knot, the knot should be motionless
- Thread the main line through the resulting long loop to create a large self-tightening loop.
- Place a large self-tightening loop on the reel spool
- Throw another round of loop over the spool and tighten the loop
- Rotate the reel handle to wind the line onto the spool
This method of tying fishing line to the reel spool has the same advantages as the previous option: it is tightened even tighter under load, does not turn, and can be easily removed from the spool if necessary.
Spool Knot
The Spool Knot is used to tie line to the spool of a reel, somewhat reminiscent of the Clinch Knot.
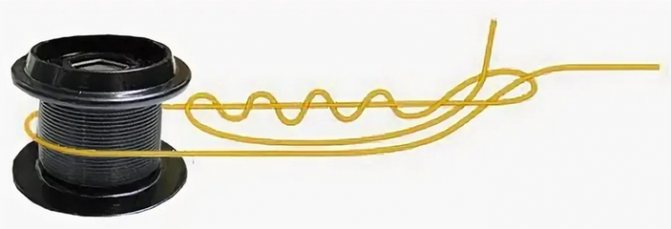
To tie line to the reel spool using the Spool Knot, follow these steps:
- Wrap the end of the line around the spool
- At some distance from the spool, we bend the end of the line around the main line going to the spool
- We make 4-5 turns with the end of the line around the line coming from the spool
- Pass the end of the fishing line through the resulting loop
- Wet the line and tighten the knot
- We cut off the excess end of the fishing line, rotating the reel handle, and wind the fishing line onto the spool
The knot is self-tightening; the greater the load on the line, the stronger it is tightened on the spool.
8. Palomar
It is recommended that beginners master this knot first. Used for attaching hooks. Strength is 80%. They are considered good fishing knots that can withstand the attack of an aggressive predator. Suitable for both monofilament and braided line.
There are several varieties: single, double and triple. The latter is used for spinners and for baits with a large eye.
To monofilament line
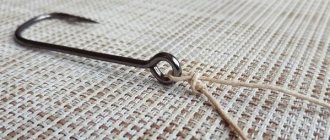
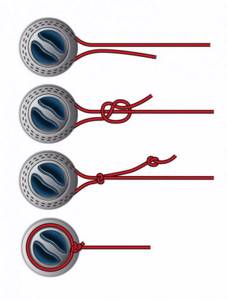
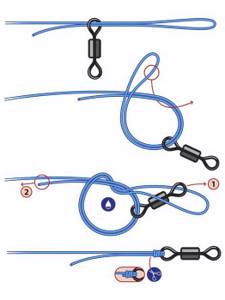
Grinner knot
Grinner is most often used for monofilament fishing line.
It has a good strength indicator: 85%. This fastening method is simple to implement, yet lasts a long time and has good load-carrying capacity. In addition to the swivel, this method can be used to correctly knit hooks and carp sinkers.
How to tie a Grinner
- The tip of the thread must be threaded into the ring of the swivel. In this case, the length must be at least 18 cm.
- The other tip needs to be folded in half to form a loop.
- The area where the two tips intersect must be grasped with two fingers and wrapped with at least six turns of fishing line.
- You need to thread the other end of the fishing line into the larger loop and carefully tighten the knot, after wetting the fishing line with water. When pulling, the knot should be pushed towards the swivel loop by the main loop.
- Trim the excess line at the tip by 2 mm.
Homer node
This knot is extremely popular among fishermen due to its reliability. The strength of this unit is as much as 98%.
How to tie a homer
- Measure the fishing line 15 cm long.
- Pull the tip of the fishing line into the eye of the swivel.
- Wrap the free end of the fishing line twice around the main fishing line and thread it into the resulting loop.
- Do not tighten the resulting knot, holding it with your hand, wrap the other end of the fishing line around the main fishing line 6-8 times.
- Pull the other end of the fishing line into this loose loop.
- After wetting both the main and working lines, tighten them simultaneously.
- Push the resulting knot towards the swivel ring so that it rests against the eye of the clasp.
- Trim the excess line, backing off a couple of mm.
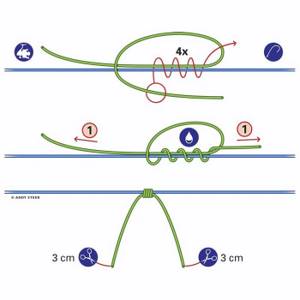
4. Carrot
This is the strongest fishing knot. It is used when you need to fasten 2 ends of a fishing line of different diameters and types and to attach a shock leader to the main fishing line. Fluorocarbon and braid are often combined.
The strength of the knot is up to 70% and does not depend on the properties of the lines used. It is very easy to tie. The knot is strong, but can loosen, then you can simply tighten it tighter.
For connecting lines
The most popular question of all beginning (and sometimes practicing) fishermen is how to tie a fishing line to a fishing line with a fishing knot? In a situation where there is no spool of fishing line at hand or there is a desire to re-weave all the gear, simple ties come to the rescue. You can connect both the ends of a torn tackle and fishing lines of different diameters. Of course, standard weaving will unravel almost immediately - the edges will slide and will not adhere to each other. Also, such a ligament easily unravels under any load, and if it is overtightened, it breaks.
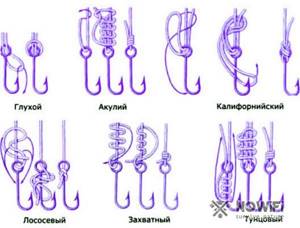
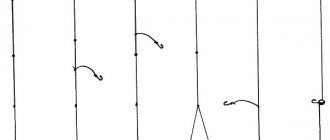
Figure 1. Fishing knots are quite varied
Before moving on to the list of the most popular connections, let's talk about which fishing lines are suitable for fishing knots. Indeed, sometimes making the correct weave is not enough, since the tackle will not be able to satisfy your potential as a fisherman and will break off on an ordinary pike.
Gear is divided into three types according to the material of manufacture:
- Nylon (or monofilament):
most often presented on store shelves for fishermen as colorless, less often it has a light transparent tint. It is considered the cheapest material and has fairly low strength indicators. - Fluorocarbon:
the most popular material in the fishing environment. In water, the thread is completely transparent, so the fish do not notice it and are more willing to bite the bait. Its tensile strength is much higher, and the flexibility of the material can also be noted, due to which it can withstand heavy loads (unlike the stiffer and more fragile nylon). However, flexibility also becomes a disadvantage of fluorocarbon - it stretches a lot, due to which the tackle can get tangled on algae or underwater snags during active biting and resistance of the fish. - “Braided”:
if you are interested in water hunting only for large predatory fish, then a dense and minimally stretchable braided thread will help to replenish your fishing collection with a new specimen.
For all types of weaving, the principle is simple: we attach the leash to the main fishing line and be sure to check for breakage. Otherwise, you can make a mistake in weaving and miss the bite at the very last moment. Next, we will look at the most popular weaving methods for fastening a leash.
Water
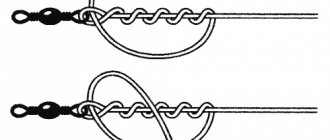
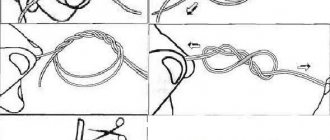
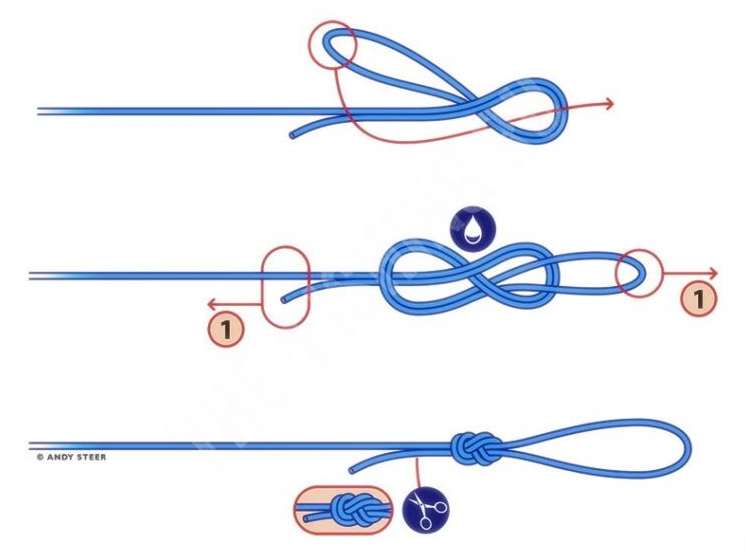
The fishing knot first appeared in the maritime sphere approximately 800 years ago. It was widely distributed in European fleets, both military and commercial. One of the main advantages of such fastening is the increased strength of the connection due to the grinding of microvilli to each other. It has dynamic properties, taking advantage of increased loads on the rope, stretching (Figure 2).
With the advent of more advanced weaving, it began to be gradually abandoned. Despite its positive qualities, the plexus is difficult to separate. This always came out sideways in emergency situations when it was necessary to quickly release the rope. Its next drawback was the deterioration of the quality of the cable due to constant rubbing. As a result, the fibers tore, and the tensile strength of the main rope decreased.
Nowadays, it is suitable as a way to tie two ends of a fishing line - quickly, reliably, for a long time. But, unfortunately, the weaving will deteriorate the strength characteristics of the gear themselves, so that their specific resistance to heavy loads will decrease. Not recommended for spinning fishing.
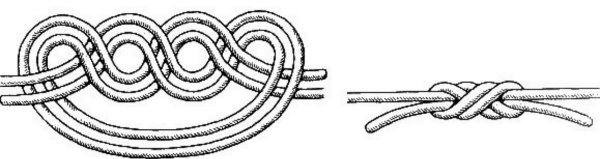
Figure 2. Diagram of the water unit
So, weaving is carried out in several stages:
- To make learning easier, take two different colored laces, place them parallel and fold them together into one sling. For professionals, a fishing line threaded into a ring for a fishing knot and folded in half is better suited.
- Form a closed ring-loop by bringing the running ends under the sling.
- Using the running tips, make three turns around the upper strap of the resulting loop.
- Pull immediately on the two connected loose ends of the left side and the hook loop on the right, tightening the bundle.
- Be sure to ensure that the laces do not twist and remain parallel.
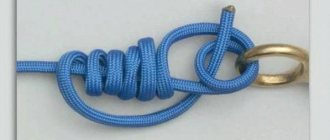
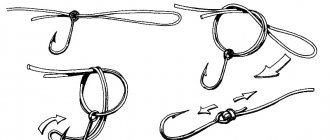
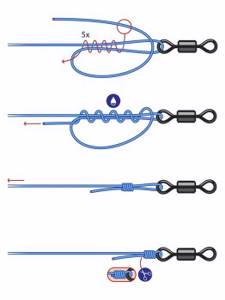
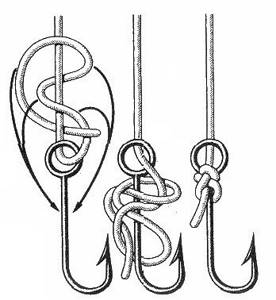
Advanced Clinch
To fasten the hook to the fishing line, you can use a simple clinch weave. It is considered one of the most popular among fishermen, since the tackle retains up to 97-98% strength and is durable. The most suitable types of fishing lines are nylon and monofilament with a diameter of 0.1-0.4 mm. Braid is suitable for catching small fish, and is also not suitable for fluorocarbon or braid (Figure 3).
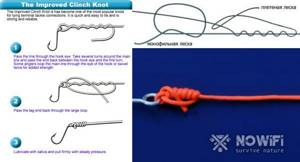
Figure 3. This is how the improved clinch works
How to tie a reliable fishing knot like Clinch?
- Insert the string into the eye of the hook.
- Wrap the lace around yourself with the free end.
- The number of revolutions should be from four to seven. However, this value will not affect the strength of the plexus in any way, so you can get by with four.
- We lower the free edge of the lace to the eyelet, insert it and tighten it.
- Insert the free end into the resulting loop and tighten.
- The clinch weave is ready.
1. Snell

This is the simplest fishing knot on a hook, which is used for different fishing lines: monofilaments and braids of various diameters. It is attached to the forend and has excellent strength. When fishing, it distributes the load across the entire equipment. Therefore, aggressive jerks of the fish will not damage the fishing line.
All nodes are very strong. Thanks to them, the equipment will be held securely and the trophy will not fall off the hook and will not spoil the equipment.
Knots for tying wobblers
Rapala knot
The Rapala knot is recommended for use by the world famous Finnish company Rapala. The knot is used for tying wobblers to a fishing line, but can be used for tying any other baits or hooks. The main advantage of the Rapala knot is that while providing reliable connection strength, it still maintains free play of the bait. The Rapala knot can be used with both braided and monofilament lines. The tensile strength of the knot is 90% of the tensile strength of the fishing line.
To tie a wobbler to a fishing line using a Rapala knot, follow these steps:
- Make a simple knot in the line without tightening it all the way.
- Thread the line through the eye of the wobbler and thread it through this knot
- Make 4-5 turns with the free end of the line around the main line
- Bring the free end of the line back and thread it through a simple knot and immediately through the resulting loop.
- Wet the line, tighten the knot, cut off the excess end of the line
To fluorocarbon line
Rapala knot
It is believed that this type of knot helps maintain the greatest strength of the fishing line due to its structure. In addition, a knot according to this pattern allows the spoon to move most naturally and naturally.
How to tie a Rapala
- Step back 10 cm from the end of the fishing line and tie a loop without tightening it.
- With the end wrapped around the loop, thread it through the swivel ring and then through the loop.
- Make 3 turns around the main line and wrap the tip back towards the loop, then thread it through the loop. You should get a large and small loop.
- Thread the tip into the large loop and tighten the knot, after moistening the line with water.
- Trim off the excess end of the fishing line.
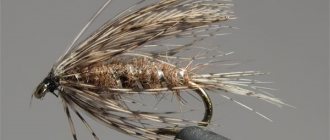
Salmon knot
One of the most reliable and effective is a connection that is widely used in fly fishing. The knot covers the hook shank from several sides, so its quality always remains at a high level. In addition, it is almost impossible to untie the fastening; any loosening only tightens it. The free end of the fishing line is passed through the eye, unrolled and made several turns around its axis, running into a loop formed near the ear. Then the top loop is lowered to the hook and the free tip is also passed through it. The knot must be tightened with great care to achieve high-quality fastening. The complex design gives an undeniable result.
Clinch Knot
Clinch
This scheme is a modern, improved version and is often used for monofilament type cables. For the “clinch”, experts advise using only fishing line with a diameter of no more than 0.4 mm, in this way it will maintain a load capacity of up to 97%.
However, this option is completely useless for materials made of fluorocarbon or wicker type.
First you need to thread the fishing line into the eye of the hook, leaving a 10 mm free end, and wrap the working side around the main cable about 6-7 times.
After this, wrap the working thread back and make a loop by threading one end of the working line into it. Tighten the cable a little, but do not tighten it too much, and be sure to hold the base with your fingers.
Soak the knot in liquid and only then tighten the main cable, thereby gradually moving towards the previously made loop at the eye of the hook. Remove the excess part, leaving no more than 2 mm at the end.