Every fishing enthusiast has once gone on vacation for the first time. Of course, every fisherman always faces a question, and misunderstandings arise about how to properly wind the fishing line onto the reel itself.
This happens due to the fact that the equipment of the fishing rod plays an important role in the entire fishing process.
If you reel it in correctly, your fishing will be successful. If you reel in incorrectly, you will very easily lose your fish from the hook of your fishing rod.
Of course, incorrect winding can ruin your mood and your rest. To avoid disappointment, let's take a closer look at how to properly wind fishing line onto a fishing rod reel.
How important is it to spool the line onto the reel correctly?
As you probably already understood, correct and competent winding of fishing line onto the reel of your spinning rod or fishing rod is a very important part of successful fishing.
If you do the winding incorrectly, you will lose your catch and then you will not get any results.
Of course, going fishing and returning without fish is a disappointment for every professional and beginner. To avoid such disappointments, you need to know the basic rules and specifics of winding fishing line. Let's take a closer look.
Why do you need to adjust the spinning reel?
Imagine the situation - you bought a new reel, wound a brand new cool Japanese line and went fishing for the first time with a new reel, and this is where the surprises begin. Especially, they lie in wait for those who like to fish with twitching, i.e. jerk wiring. The main problem is the dropping of loops, or “beards” as they are called.
Unraveling them takes a lot of nerves and time, and when fishing there is never enough of it. And often we don’t untangle them, but simply cut off the tangled piece of braided cord. If she often sheds these same “beards,” then you can lose half of the line on just one fishing trip. To avoid this, you just need to try to adjust the winding profile on the spool and in 90% of cases, this will help avoid loops.
But, not the ones we use with bolts and nuts, but very similar. Based on the above, our task is to obtain a reverse cone. With which there will be the least number of loops and “beards”, in most cases there will be none at all.
The essence of adjustment using washers is essentially very simple:
- We take the reel and perform the standard procedure for winding the braid onto the spool.
- We look at the resulting winding profile. If after winding we get a light reverse cone, then we leave everything as is.
- When the profile is far from the reverse cone, you need to try to change it using washers that are located under the spool. Usually, it is enough to remove the washer or replace it with a thinner one and you will get a reverse cone. But it often happens that this cone is too steep and this is bad. Then the adjusting washer should be thinner. This can be cut out of plastic, which is used in boxes for wobblers and spinners. It is just a little thinner than the standard washer that comes with the spinning reel.
After all these adjustment manipulations, only real fishing will show whether we have adjusted the winding profile correctly. If during the entire fishing there was not a single beard or loop, then everything is normal, but if there were problems, you still need to work with the washers.
Before you get ready to wind fishing line or braided cord onto a reel, you need to decide what type of laying you need. This choice determines such parameters as: the probability of loops being dropped (the cause of the “beard”) and the maximum possible casting distance. It just so happens that there are only three types, so I suggest you pay attention to each one.
We invite you to read: Catching crucian carp with a spring - On a fishing trip!
Laying the cord in a “reverse cone”.
They say that this method of laying has recently been considered the most common among experienced spinning players. Whether this is true or not, we will see in the reservoirs, but this form of styling should be given its due, the likelihood of a beard actually decreasing. And we will have to pay for such luxury in terms of casting range.
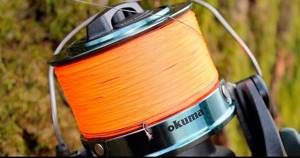
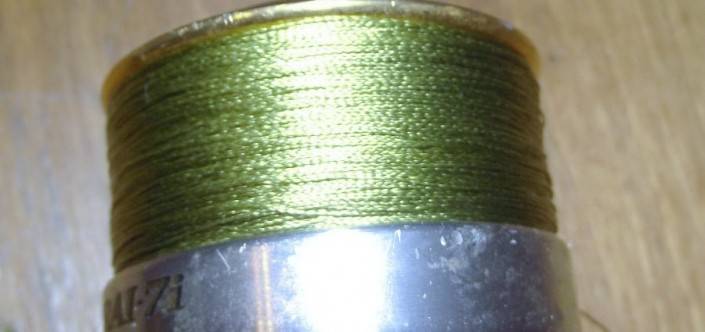
This effect is achieved by reducing the winding pitch to the side of the spool. Pay attention to the photo. You've probably seen this form before.
Laying the cord in a “simple cone”
In the previous case, we reduced the likelihood of a beard and sacrificed casting distance. And now we will do everything exactly the opposite. With this installation, when the winding pitch increases from the top edge of the spool to the base, our cast in theory can be further by 15%; of course, these are approximate calculations.
“Cylindrical” cord laying
When purchasing a new reel from the factory, most likely it will be configured specifically for a cylindrical shape, i.e. straight, with a uniform step from the top edge of the spool to its base. Perhaps this is an excellent compromise between casting range and the ability to “catch a beard”. I don’t know why many people write that the “reverse cone” is considered the most popular. It seems to me that “cylinder” should occupy the top line of the chart.
Actually, now we know how the types of styling differ from each other, their advantages and disadvantages, and we can choose the option that is more suitable. That is, to focus on casting distance or reduce the likelihood of “catching a beard,” or even settle on the golden mean.
To obtain one or another type of installation, it is enough to add or remove an adjusting washer (sometimes even several) from the rod. Usually a set comes with 3 to 5 of these things. To understand how your coil is initially configured, you need to make the first winding.
Surely your reel comes with some kind of instruction, in which everything is clearly drawn. And, of course, it is unlikely that you will be able to achieve the desired result the first time. Because each reel is unique, you will have to experiment with the number of shims, rewinding the braided line 5 times until you come to your ideal.
So, we have chosen one of the types of laying, configured the spool as needed, and now all that remains is to wind it correctly. And before we get down to business, I would like to note some fundamentally important points: the winding should be tight, without sagging, bumps and depressions. Otherwise, the “beard” cannot be avoided, and with it, as you know, fishing turns from relaxation into torture. And if the wicker is also expensive, then it’s no time for jokes.
Backing. What is it and what is it for?
We invite you to familiarize yourself with: Asp and chub in spring on a water-filled float
It's time to say a few words about backing. For a longer cast, it is necessary that the cord be wound almost under the very edge of the spool. It is enough to leave a distance of 1 - 1.5 mm so that there are no discharges. As a winding, they usually use old braid or fishing line similar in diameter to the main one.
They also say that they use electrical tape. However, I am skeptical about this alternative for one simple reason: I have seen what happens to such materials in the heat. But sewing thread, on the contrary, is a very interesting option and is recognized among many fishermen. Well, let's finally get to the point?
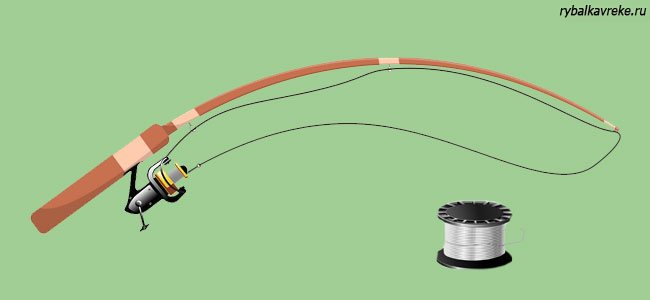
So, let's go in order. What we need to wind the cord onto a reel:
- The reel itself and the main braid or line;
- Spare spool (there is one);
- Volume “War and Peace” (no matter which one);
- Backing (winding: sewing thread, fishing line, cord);
- A comrade or a basin, but a comrade is still better;
- Patience.
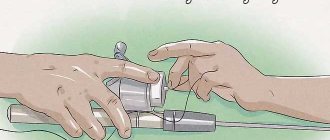
If all of the above is available, then you can proceed. However, first of all, I would like to pay attention to the following point - how to tie the fishing line to the reel. It just so happens that without this fastening nothing good will definitely happen.
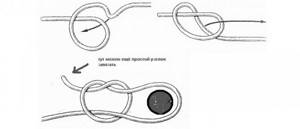
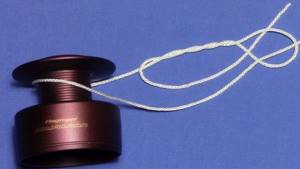
In expensive reels, some manufacturers have a special recess on the working surface of the spool, where you can easily hook the cord and continue winding. But this is the exception rather than the rule, because most models do not have this option, so you will have to tie it the old fashioned way. Yes, so that the braid does not slip, but holds relatively tightly. Perhaps this is the only requirement for the node.
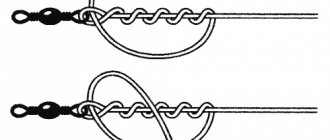
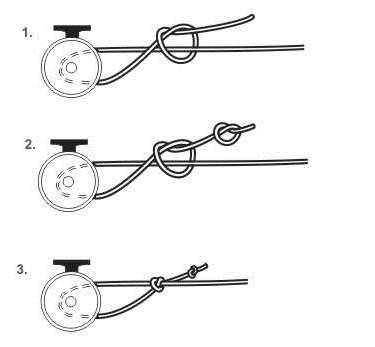
Look at the photo, there is a diagram here. Everything should be clear, and most importantly, reliable. I prefer the top knot, it just so happens.
Let's assume that we have tied the main line to the spool. Next, we take out “War and Peace” (or any other thick book), open it somewhere in the middle and put fishing line between the pages. We safely close the reading and move on to the next stage. By the way, the book is needed so that the fishing line or cord is wound under uniform tension. You can also press the whip against the rod with your finger, just be sure to wet the cloth so as not to damage the skin.
If you have a friend next to you, you can ask him to hold the reel, exactly opposite the reel, in the same plane as the direction of the fishing line (mirror it). This way we can avoid excessive curling, which can later turn into a “beard”. The cord will simply twist to a critical value and a fiasco will inevitably happen, a matter of time.
But if there is no friend, some kind of container, basin or deep cup will do. Just put the bobbin there and it will not jump out, preventing you from doing normal winding. It’s not as convenient, of course, as with the help of a friend, but you can manage!
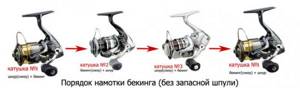
So, now everything is ready to begin the actual winding. The line (or lash) is under tension, the reel is also fixed, we begin to twist the reel. As soon as the main line runs out, you need to tie the backing to it and reel it in until there is 1 - 2 mm left to the edge of the spool. If everything turns out smoothly and you are satisfied with the type of installation, we rewind the result back to the spare spool.
We suggest you familiarize yourself with: Donkey reels
If there is no spare spool, you will have to tinker longer. And the principle itself changes a little. We also tie the main fishing line or cord to the spool, wind it to the end (until it runs out), and finish off the remaining capacity of the reel with backing. Next, we wind the backing separately onto one reel, fishing line or cord onto another.
Main nuances
So, first, let's talk about the main points that relate to winding fishing line. First of all, it should be noted that you need to understand and realize how much material you need in order to carry out full winding on your reel.
It should be enough to ensure that your reel is completely filled with it, but without creating a “hill”.
Another important point is how much force you will use to wind. There is no need to make the tension too tight, otherwise the line will not fly long distances when the tackle is called.
Another important aspect is the correct direction of winding the fishing line.
As you probably already know, the spool can rotate in a clockwise direction and also rotate counterclockwise. It is necessary that the direction of your winding coincides with the rotation with which the spool rotates.
Spool Attachments
The most common fastening is fastening using knots. It is important that the knot does not interfere with the casting process and that it does not come undone in the future.
However, some anglers do not actually use a knot system at all. You don’t have to tie the monofilament, but just attach it to the existing stopper and start winding.
In stores you can find reels that already have a stopper or a kind of clip to which the braid is attached. Some fishermen prefer not to attach, but simply reel in a large amount of fishing line.
It is important that the knot does not interfere with the casting process and that it does not come undone in the future.
Backing winding
A very common case is when there is a large distance left from the fishing line. Winding is needed in order to completely fill the field of the coil.
Backing is made from a cord, the material of which is made of nylon. It is also possible to make it from fishing line with a larger diameter. Some fishermen prefer to use electrical tape.
In high temperatures, especially in summer, this can lead to the fishing line itself sticking together and, as a result, you will have to use a new skein again.
Backing is calculated in several ways:
- Winding the main part of the fishing line onto an additional spool.
- Tying nylon threads and bringing the homespinning to the edge.
- Removing the additional bobbin and installing the main bobbin for winding in the reverse order.
Winding line onto the spool
It can be of several types:
- Chaotic mechanism.
- Cylindrical mechanism.
- Winding with tilt mechanism.
Option for winding fishing line on a spool
Backing
Quite often, fishermen are faced with the fact that there is not enough fishing line to fill the reel spool to the required level. Therefore, it is important to know not only how to tie a fishing line to a spinning reel and wind it, but also how to put it into working condition. In this case, its depth is reduced using electrical tape or adhesive tape. But there is another, better way. It consists of filling the remaining space with the required amount of another fishing line, which is called backing.
To do this, you will need an additional spool of the same size as the main one. First, the fishing line is wound around it. When it ends, backing is tied to the end and winding continues until the spool is filled to the desired level. The knot for the fishing line on the reel is strong and reliable. Then it is removed from the reel, and in its place the main spool is installed, onto which the cord is rewound. In this case, the backing will fill the bottom layer, and the working line will be on top.
How to attach fishing line to the spool?
For correct and proper fastening, you need to create a reliable and strong knot that will tighten on its own. Let's figure out how to do this most correctly.
First, make a whole turn of the fishing line around it. For your convenience, when inserting the knot, leave one end of the fishing line so long that it is sufficient and you do not have to later catch the short end to insert it into the loop.
However, it is worth noting that an end that is too long will cause you inconvenience during the tying process. Then you need to pass the end through the fishing line, which is the main one. With this movement, we create a loop.
Next, we need to make three to four turns with the end of the fishing line around the entire base. In the end we got a loop. At the beginning of the twist, you need to thread the tip and tighten it with a knot.
In advance, moisten the end with saliva for your convenience. The node will be considered ready. Trim off any excess tip and press it into place.
The knot turns out to be quite small, but will not interfere with you in any way, and will never unravel, which is extremely important. It is impossible not to note the ease of execution.
Winding technique
Before winding, we place the reel on a fishing rod or in a special machine for winding fishing line. Then we pull the tip of the fishing line or braided cord through the rings, starting from the last one and all the way to the spool.
Before you start winding, you need to tie the fishing line to the reel.
First way
- We wrap the fishing line or braid around the spool.
- We cross the end over the main vein, creating a loop.
- On the loop we make a twist of four to five turns.
- All that remains is to tuck the tip of the cord into the loop at the beginning of the twist and, after wetting the knot, tighten it.
Second way
- At the end of the fishing line or braid you need to tie a small loop.
- We introduce the main vein into it, forming a large loop.
- We throw a large loop over the spool and tighten it, the main thing is not to confuse the winding direction.
Third way
- A double loop is wrapped around the bobbin.
- We wrap the tip of the fishing line around the part of the double loop that it forms.
- We insert the tip into the newly formed loop.
- Tighten the knot. It turned out to be similar to a clinch knot with a large additional loop.
After tying, the fishing line is wound onto the reel. To do this, you need to create some tension on the cord. Use helpers or some kind of device to wind the fishing line.
An assistant holds a pencil or other rod that is used as an axis. The purchased fishing line reel is put on the axle. During this work, one person turns the “meat grinder” handle, and his assistant brakes the reel with his finger, creating the necessary tension.
The simplest device for winding fishing line is a plastic bucket. The reel is placed on its bottom, and the bucket itself is clamped between the soles of the feet. Thus, a reel with monofilament or braid is constantly under visual control. The tension adjustment is controlled by the winder himself, passing the vein between the fingers of the hand with which he holds the spinning rod when laying it.
Machine
To facilitate this process, you can purchase a machine for winding fishing line in a store or make your own. There are a huge number of modifications today, but the basic operating principle of the installation for laying the cord is standard.
- The device is secured to a table or other surface using a clamp, suction cup or stand.
- The bracket has an axis with one or two springs and clamps.
- The bobbin is installed on the axle and clamped onto it.
- By decreasing or increasing the pressure on the springs, we change the tension created during winding.
What is backing and why is it needed?
Backing is, in other words, a cord or fishing line. It is applicable in cases where large fish are caught.
Backing is a cord that is made of synthetic fibers and is a thin cord. Backing is available in the form of coils, which are sold individually, separately. These reels are available in 50 and 100 meter lengths.
In stores you can buy any footage from small to large. The fiber from which it is made consists of Dacron material.
The advantage of this material is that this thread does not deform when wet, as well as when dry.
If you purchase a poorly made backing, it will subsequently become deformed and subsequently change the spool of your reel. As a rule, such reels are available for sale in fairly bright colors for the convenience of fishermen.
Backing
For rewinding, as a rule, 0.3 mm fishing line is selected. Using a thicker line risks the fact that further laying of the main line may not be level enough. It is also not recommended to use cotton or nylon thread as backing, since if they get wet, they will take a long time to dry.
How much fishing line do you need for reeling? This can only be determined practically. And for this you will additionally need a replaceable spool, on which you initially need to wind the main line, and on top of the backing line, also not reaching the side 1-2 mm. After this, you should install a working spool on the reel and rewind everything on it in the reverse order - first the winding, then the main line. If there is no replacement spool, you need to do the same thing using the main spool, from which you then need to rewind it onto a bobbin or some other reel, and then in the right order again to the main one.
Attention: for ease of winding, you can use books. Tie the line/braid to the reel and push the line through the book. Close the book and start turning the reel handle. As a result, tension is created using the book, which allows you to evenly wind the fishing line onto the reel.
Winding fishing line onto a spool: methods
There are several different ways in which the fishing line will be wound. Let's look at each method.
Flat (cylindrical)
The cylindrical method is quite universal and the most common among fishing enthusiasts.
If there are no manufacturer's marks on your spool, then the gap during winding should be left from one to one and a half millimeters.
The cylinder is the most optimal form of installation for the feeder reel. This applies to cases where the thrown load varies in the range from 50 to 150 g. This can be used both in a spinning rod and in a mast.
With slope (trapezoid)
This type of winding is characteristic of exceptionally good reels. In this case, the turns are superimposed equally, one to one, which is very important during all fishing.
When winding fishing line onto a spool, it is also necessary to leave a gap of one to two mm to the edge. The largest gap will lead to spontaneous reset of the loops, and we certainly don’t need this.
Chaotic
This winding method is a sign of a cheap reel made in China.
This method will create you many problems and inconveniences, as a result of which you will definitely not enjoy your vacation. It is better to refuse this kind of methods immediately.
Preparatory moments
When you have selected a thread suitable for a particular fishing direction, you need to decide how much fishing line to wind on the spinning reel. To do this, the manufacturer always indicates on the spool how many meters of nylon or cord of a specific diameter this model can accommodate.
There are several options for laying fishing line on the reel spool:
- straight conical;
- reverse cone;
- straight cylindrical.
In addition, the bobbin can wind the thread crosswise or lay it turn to turn. It depends on the mechanism of the inertia-free model. It is believed that the first option is better, although this is not an axiom.
How to wind braid onto a spool?
So, now let's take a closer look at how to properly wind braided wire. This process has a number of features and is of particular importance for fishing.
As a fisherman first and foremost, you urgently need to calculate the tension reserve. This must be done in advance and the correct calculation must be made. It is very important. Don't forget about durability.
When using large and heavy baits when casting over long distances, there is a risk of cutting the upper turn into the lower one.
This should be avoided. If you have a low coil capacity, you can wind it completely, rather than partially.
With high capacity, it is recommended to save space directly with the material. As mentioned earlier, you can use electrical tape.
However, as already noted, not all fishermen risk doing this in high temperatures in the summer. Some people consider this impractical in fishing conditions.
Winding braid occurs in the same way as winding fishing line. The only distinctive and characteristic feature is that it requires the use of a clip.
This must be used without fail. This is still an important aspect, so do not break this rule.
You must secure one end of the braid with a rubber lining and wind it. The winding process is quite simple and does not take much time. It is enough to know only the base for winding.
Briefly about backing
Often, an angler buys fishing line in a standard unwind, which is 100, 110 or 150 meters, and the spool capacity exceeds the length of the thread on the reel. If you do not wind the required amount of cord onto the reel, the range of the bait when casting will significantly decrease. For these purposes, it is customary to use backing.
Backing is an additional layer of fishing line that is installed from below and is necessary for correct winding of the main thread so that it does not reach the edge of the spool a few millimeters. You can use it as:
- spent braid or nylon;
- cheap monofilament;
- nylon thread.
The backing diameter should not be too large. The optimal fishing line for these purposes is threads with a thickness of about 0.30 mm.
If a fisherman needs to use backing, then the process of winding braid onto reels looks like this: 1. Install the reel with a spare spool on the rod.
2. Attach the main line to the spool and wind it completely.
3. We tie a backing to the free end of the main thread.
4. We wind the fishing line until there is 1–3 mm left to the side of the spool.
5.Now all that remains is to put the main spool on the reel and rewind it in the reverse order.
As a result, the backing will be at the bottom, and the working section of the cord will be at the top. If the fisherman does not have a second spool, then the diagram for how to wind the line onto a reel undergoes some changes:
- We wind the backing and cord onto the spool.
- We rewind them onto a free reel.
- From the first bobbin you need to twist the thread to the second. Then the backing will be on top.
- All that remains is to thread the backing onto the spool and wind the braid.
That’s it, the reel is ready for installation on any spinning rod and can be fully used for fishing.
Properly wound fishing line does not guarantee its durability and strength. She needs to be looked after all the time. In the off-season, it should be dried and reeled from the spool onto the bobbin. Should be stored in a dry, dark place.
Source: intellifishing.ru
How to wind fishing line on a spinning reel?
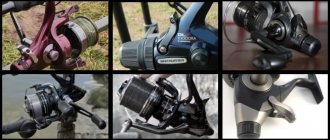
As you already understand, the variety of coils is very extensive. Let's look at each type separately.
Inertia-free
This type is a complex technical device that is designed to store a supply of fishing line.
Just like a reel is involved when casting equipment and when landing fish. Fishermen call it a meat grinder.
It ensures, first of all, smooth running, winding speed, and power. Agree that this is important. This type is ideal for beginners.
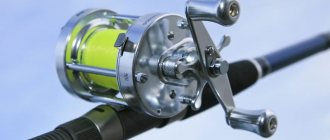
Multiplier
This type is intended for use with all types of gear. In practice, it has been proven that all the money spent on this type of reel fully justified itself and the hopes of the fishermen.
These species are used more often for catching large fish.
The operation of the mechanism allows you to delay the casting of the bait. If you are a beginner and decide to purchase this type, then you need to purchase a baitcasting reel with a digital brake.
Closed
This type is made using a technique that allows fishing to take place in the most comfortable conditions and makes it easier for the fisherman to cast the fishing rod itself.
In addition, this type of reel does not tangle the line while fishing.
We wind the fishing line correctly
Initially, it is necessary to put the reel with fishing line on a rigidly fixed rod, the diameter of which must be such that the reel can rotate freely. Then pass the line through each ring of the rod one by one and tie it at the tip. To thread the line, you first need to fix it on the spool. To do this, lift the stacker shackle, loop the line around the spool and secure it using the Arbor knot, tighten and return the shackle to its place.
When using a braid, you need to stick a piece of adhesive tape under the place of fixation. In this case, the braided cord will not slip on the spool. After this, you can begin winding the line by rotating the handle on the reel evenly. When threading, you must hold the line, ensuring its tension.
It is recommended to wind the line until 1-2 mm remains to the sides of the spool. A fishing line wound flush with the sides can subsequently cause loops to spontaneously shed and beards to form. And if you leave more than 5 mm free on the sides, this can negatively affect the casting distance. Backing – winding under the working scaffolding – will help prevent such troubles.
Backing
On the reel spools there is information about how many cores of a certain diameter will fit on it. If the bobbin you purchased is clearly not enough to completely fill the bobbin, there are two options for getting out of this situation:
- Wrap insulating tape or adhesive tape around the spool, thickening the core.
- They use additional winding made of thread or old vein, the so-called backing.
In order to properly wind the fishing line onto a reel using backing, it is best to proceed as follows.
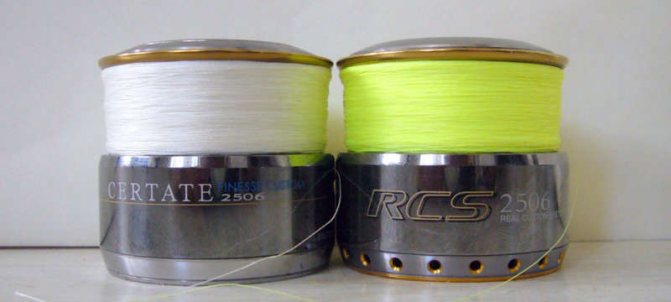
- Take a spare spool. Many modern “meat grinders” are equipped with two of them: one with a metal side, the other with a plastic one.
- We wind the purchased braid or monofilament around it.
- We tie the backing to it with a double slip knot to the desired filling level.
- Remove the spare spool and install the main one.
- Now you need to rewind the cord from the spare spool onto it. Now there will be backing inside, and a new braid on top and in the required quantity.
When using insulating tape or rolled adhesive plaster as a backing, the thickness of the layer is selected in a practical way.