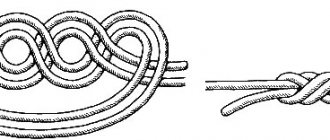
Bloody knot - we knit line to line. Tying two lines
It happens that you break the fishing line and need to reconnect it securely. So how to tie two fishing lines correctly? To be honest, I usually throw away the shortest piece of line. Firstly, it is not so expensive and in short supply these days, so you can donate. Secondly, an extra knot on the reel always means an additional brake when casting, hooks and, of course, less reliability . But sometimes you still have to splice the line. Let's look at the most reliable way of tying fishing line to fishing line.
I use the old proven figure eight knot. Tie the line with the most ordinary knot, but make not one, but two overlaps. When tightening, take your time, a figure eight will form. Insert the opposite ends into the formed rings. Everything can be delayed. This unit has never let me down.
The video shows well how to knit this knot. Nothing complicated:
This method is also suitable for tying a leash (a fishing line with a thinner diameter than the main one) to a float rod.
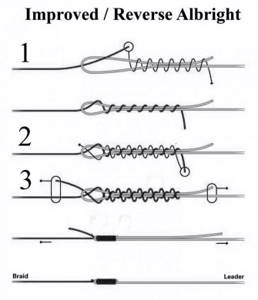
Method number 1: “Albright node”
This method is perfect if the difference in the diameter of the fishing lines is significant. That is, with such a knot, you can tie 2 fishing lines of different diameters. Also, this knot will be very useful if you need to tie the leader to the fly line. But in general, in this way you can tie a fishing line to a fishing line of any diameter.
Node execution:
- We make a loop on a thick fishing line, about 10 cm long.
- We thread the thinner line into the loop of the thick line so that after the loop we have about 20 cm of thin line left.
- After threading it through the loop, we lower the thin fishing line down to the base of the loop, and press the thin fishing line to the very base of the loop.
- Now you need to wrap the thin end of the fishing line around the loop and itself about 10 times.
- After plus or minus 10 turns are made, we thread the end of the thin line into the remaining loop from the same side from which the beginning of the thin line comes out.
- We tighten the knot, stretching the thin and thick fishing line in different directions. Before tightening, do not forget to wet the knot.
- We trim off the excess ends, leaving a margin of about 2 mm.
How to tie a lead leash to the main line
There are several ways to tie a leader to the main line, but I use two. The first one is very convenient and fast. First you need to prepare the leash itself. We tie the hook to the fishing line and cut it to the required length. At the end we tie a knot with a double overlap. Now on the main line in the right place we make a loop with a knot. We insert the end of the leash into the loop and tighten it. Done, the knot on the leash will prevent him from jumping out of the loop. This method is very simple, but I do not recommend using it on heavy gear for large fish.
The second method is more complicated, but also more reliable. You need to fold the main line and the leader line together, and then wrap them in a loop, without overlaps, just in a loop. After this, with the free ends, together, we make three turns and run the ends under the first turn. After this, you can tighten it and trim off the excess line.
Video on how to tie a leash to the main line:
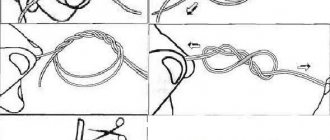
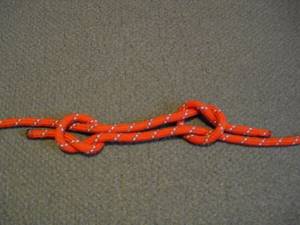
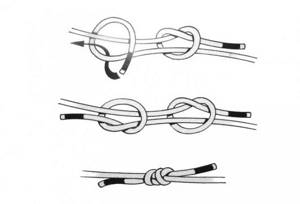
Method number 2: “Bloody knot”
This method is also used to tie two fishing lines of different diameters. The good thing about the knot is that the junction of the fishing lines is almost invisible and it will pass perfectly through the rings of the spinning rod or feeder. Another advantage of the bloody knot is its durability - 87%. This is a very decent indicator.
Node execution:
- Both fishing lines must be overlapped - in the letter “X”, so that after crossing the ends remain about 15-20 cm.
- We pinch the place where the lines cross with two fingers.
- We begin to wrap one of the lines around the other. We make about 5 turns and return the end of this fishing line to the intersection of the two fishing lines, circling it around the free end of the other fishing line and clamping it with two fingers.
- In the same way we wrap another fishing line around the first.
- We also return the end of this fishing line to the intersection, only now it is necessary to thread this fishing line into the resulting loop, in which the end of the first fishing line is now located. We just thread the second line from the other side.
- We wet the half-finished knot and pull the main lines in different directions. During the tightening process, you need to make sure that the ends of the fishing lines do not come out of the loop, otherwise the knot will unravel.
- Trim off the excess ends. We have a very reliable and strong unit.
We tie the leash to the fishing line on the spinning rod
Of course, you can buy ready-made equipment at a fishing store, attach it to a carabiner, attach bait and cast. But the equipment is not always connected well, and sometimes it simply comes off due to a snag. Then you need to show skill and learn how to knit leashes yourself.
For leashes we need a fishing line with a thickness of 0.3 -0.4 millimeters. At the end of it we make a loop of 10-15 centimeters. We make a double overlapping knot on the loop and tighten it. We have a loop that we pull into the sinker hole several times. We insert the other end of the fishing line into the loop.
Once the load is secured, you can begin tying the leashes. Three or four leashes can be prepared in advance. These are hooks of the required size with tied ends of a fishing line 15-20 centimeters long. The leashes will become shorter, but we need to leave a free length for manipulating the knots.
Let's say we want the length of the leash to be 12 centimeters from the hook, then at this level we knit a knot with a triple overlap.
Now we select the place where the leash is attached to the fishing line, which is tied to the load. At this point we knit a double knot, which, when not fully tightened, forms a figure eight. All that remains is to thread the end of the leash through the first and second ring of the figure eight and you can tighten it. The same operation must be done with the remaining leashes and the tackle is ready. Attach a carabiner ring to the end, and the tackle becomes removable.
If you need to tie a leash made of steel and fluorocarbon, then the knot on the leash is tied in the same way as on a carabiner or swivel:
The use of compounds depending on the fishing method
Depending on the fishing method, sometimes it is necessary to mount not only a fishing line, but also a metal leash, or even several units of them to form a garland. Using examples of the most popular types of fishing, let's look at optimal and practical methods that allow you to rationally connect the leash to the base line.
How to tie a leash to a fishing line on a spinning rod
Spinning fishing is distinguished by the possibility of using most of the types of connections described above. In particular, tying a lead leash and tying a carbine and fastener are the most common connecting manipulations during spinning hunting.
Feeder
In feeder equipment, almost all leashes are attached using a loop-to-loop connection, including all kinds of fittings and an additional leash, which is often required for method and spring feeders. This type of fastening in feeder fishing, despite its not the highest final breaking load in terms of materials, is justified by the speed of installation and the specific requirements of fishing for frequent changes of the leader material.
Float fishing
In float fishing, both blind connections and connections through fittings are used. These features depend on the type of reservoir. In particular, on currents, anglers try to switch to fasteners through fittings, which makes fishing more comfortable, especially if the equipment uses a second leash, which is placed through a swivel. And in moments when the fish are not so active and you have to experiment with the sizes of hooks and leash lengths, often changing these accessories, fasteners significantly save time. In still waters, blind anchorages are mostly used, since the factors of current forces do not play any role here. The only nuance may be the fishing distance.
Important! When casting long distances, the equipment has to be assembled with a reel, resulting in twisting of the cord, which will be prevented by the inclusion of a swivel in the lead element of the equipment.
But it is worth remembering that any addition to the equipment with fastening and connecting elements entails a loss of its sensitivity and unnecessarily alarms the fish.
We tie the jig to the fishing line
A jig is the same fishing hook, but connected to a weight, and often decorated to look like a fly, bug or fry. And as a rule, the jig has a hole somewhere for attaching a fishing line. You need to pass about 15 centimeters of fishing line into this hole.
We wrap the fishing line around the shank of the hook towards the “body” of the jig, but leave a loop. After this, we pass the free end of the fishing line into the loop and tighten it. The result is an elegant, strong knot and, most importantly, reliable. The jig is ready for fishing. Excess line needs to be trimmed. Leave the tip of the fishing line no more than one millimeter.
Albright
This knot is ideal for power casting; it is very durable; it is used to connect the cord and the shock leader. This knot can connect fishing lines with different diameters.
- Make a loop using thicker fishing line.
- We thread the thin fishing line into the loop and begin to wrap the thick fishing line with it in the direction of the loop.
- A thin line is threaded through the turn of a thick one.
- The knot is tightly tightened.
Every fisherman knows that the ability to tie knots is very important when fishing, the catch depends on it, so it’s worth spending half an hour learning knot connections.
Attach the hook to the fishing line
Without the ability to tie a hook to a fishing line, a fisherman becomes one of the losers. Not only will not every fish bite on a carelessly tied hook, but even a fool who has bitten is guaranteed to get caught with the hook.
If you are going to make tackle for small fish, such as roach, rudd, bleak, then you can use the old proven method. Using a double knot, we form a figure eight on the fishing line and thread the shank of the hook into the first and second rings. We tighten it, and the hook sits firmly on the fishing line.
It is somewhat more difficult to create a knot on large hooks. We make a small loop of fishing line and lay it along the shank of the hook. With the free end we make three or four turns around the forend along with the loop and place the same end into the loop. We tighten it. You don't have to worry - the fish won't escape.
Video illustration of tying a hook with the most popular and reliable knot:
weaving knot
Since it often becomes necessary to tie two different fishing lines with a knot, it is worth learning this knot connection; it is strong and not very large.
- Let's make a loop.
- We thread the second line into it and wrap it around.
- We pass the working tip into the loop.
- Tighten the knot.
How to tie a line to a fishing rod correctly
It would seem that tying the fishing line to the fishing rod is not a difficult task; I tied it with an ordinary knot, and that’s all. But a real fisherman won't do that. He doesn’t need the equipment to fly away during casting or simply float away with an uncaught trophy.
To start, I would recommend purchasing a connector and gluing it to the end of the rod. If you don’t want to spend money on a connector, you can tie a paper clip to the tip of the rod with threads, but be sure to glue the connection with glue. This will be a secure end ring for attaching the fishing line.
All that remains is to tie the fishing line. So that you can change the equipment, do not tie the line tightly. Make a loop at the end large enough to fit all the rigging through, thread it through the hole in the paperclip, and pull the line and rigging through.
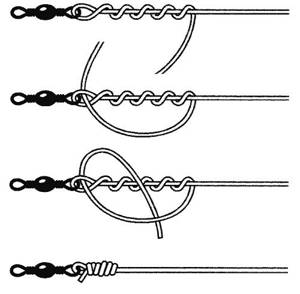
How to tie a swivel to the main line
The swivel is easy to attach. We make a loop and pass it through the swivel ring. We tie a loop with a fishing line using a double overlapping knot. A very interesting detail, which, by the way, applies to all knots - warm up the fishing line or braid in hot water before tying a knot. You can also heat the knot, for example, with a curling iron to 90⁰C. But don't overdo it.
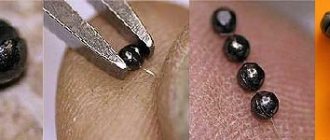
Photo instructions on how to tie two fishing lines
Note!
How to tie a fishing line to a reel - methods, tips on how to tie correctly and an overview of the most reliable knots (85 photos and videos)
Cuts for wobblers and spinners - how to make a simple homemade cut. 110 photos and videos of practical tips
How to tie a hook to a fishing line - advice from professionals and the best patterns for beginners (115 photos and videos)
Help the project, share on social networks 
1+
Tying leashes to the main line on a winter fishing rod
Ice fishing enthusiasts often use a retractable sliding leash. It is very easy to attach to the main line. You need to prepare the leash itself. We tie the hook to the fishing line, put the cambric on the fishing line and tie a loop at the opposite end of the hook. A little higher than the weight, we wrap a loop around the main fishing line and thread the other end of the leash into it. Tighten and fix the knot with cambric. Also, cambrics can be installed on the main line, above and below the leash assembly.
The following video shows how to organize lead leads on the main line in winter gear:
The strongest knots for tying a braided line with a monofilament line
“Shock Leader knot” The first knot we will pay attention to is the “Shock Leader knot”. This knot was originally used mainly in fly fishing, but over time it became widespread in all types of fishing. This knot has a compact size, thanks to which it easily passes through the rings on the rod, and also has a fairly high connection strength. Let's consider the method of knitting it:
- We take the end of the monofilament and tie an ordinary (edge) knot without tightening it.
- We pass the edge of the “braid” through the loose knot to a length of fifteen centimeters.
- Tighten the knot on the monofilament.
- We take the fifteen-centimeter edge of the “braid” and wrap it around the “monoline”. Usually six to eight turns are made.
- We bend the end of the “braid” remaining after the turns back to the very first knot, then thread it between the fishing lines, at the place of the first knot and the beginning of the turns.
- In the loop formed after this, pass the remaining end of the “braid” and, after wetting the knot, tighten it by pulling the remaining part of the braided line.
- Grab the long parts of the “braid” and “monoline”, pull them in different directions - the resulting knot will tighten.
- We cut off the ends, leaving from one and a half to two millimeters.
Blood knot
The next knot we'll talk about is called the Blood knot. It also has good strength and is used to tie two fishing lines together, as well as monofilament and braid. It should be remembered that this knot should be used with lines of equal diameter, or with lines that do not exceed a thickness difference of thirty percent from each other. Let's consider the method of knitting it:
- We take the ends of the fishing lines and fold them with their tips towards each other. We will get two ends of the fishing line lying parallel. The length of the tips is twenty centimeters.
- We wrap one end of the fishing line around the other. Typically five to eight turns are performed.
- We return the tip of the fishing line used for winding back to the beginning of the turns and pass it between the fishing lines.
- We take the end of the fishing line that we wrapped and use it to perform a similar procedure. We also thread the tip between the fishing lines.
- We pull each end in turn - tightening the winding.
- We wet the knot and, holding each line, pull in different directions, tightening the resulting knot.
- We cut off the ends, leaving one to two millimeters.
How to properly tie a fly to a fishing line
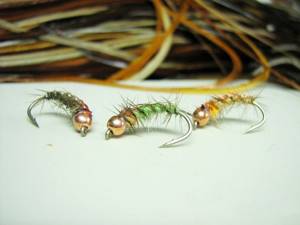
The fly, the favorite bait of fly fishers, is often one they make themselves and, of course, tie to the tackle themselves. In Siberia, many fishermen tie the fly in a slightly special way, so that the hook is in the water with the shank down and the hook itself up. In this case, hooking fish that hunts for floating insects is much more reliable.
The principle of tying a fly is no different from tying a hook, but the leash is rotated so that the fly rests on the water with the hook up.
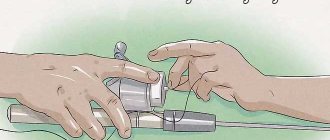
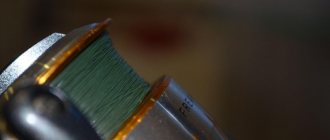
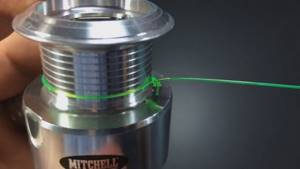
How to properly tie fishing line to a reel
Actually, I never bothered with this topic, because there was always a triple supply of fishing line on the reel, until I cast and realized that I had lost all the equipment along with the bait, which safely flew away to the center of the Dnieper. I thought about it and started doing this.
I make three or four turns of the fishing line around the reel pin, and at the end of the fishing line I make a loop, which I wrap around the “output” end of the fishing line. I wrap the free end of the fishing line around the base of the loop. The famous figure eight is formed, and I thread the free end into its rings. We tighten it and your tackle will not fly away.
You can also look at an alternative option for tying the fishing line to the spool, which is also quite simple:
How to tie line with fluorocarbon?
In many fishing directions, it is customary to use fluorocarbon fishing line as a leash. It is invisible to the fish in the water, so it does not alarm or scare it away, increasing the number of bites. Fluor also has increased resistance to abrasion, which is why it is used when fishing for pike, protecting the equipment from the sharp teeth of the predator. Naturally, fishermen have a question about how to tie fluorocarbon to the fishing line so that the tackle does not lose strength or break when fishing or gets caught slightly.
The best option for securely tying fluorocarbon to the main line is the Carrot Knot. It came to spinning from caprfishing, quickly took root and is popular, from ultralight to heavyjig. This is done as follows:
- On a piece of fluorocarbon we tie a simple single knot, but do not tighten it, leaving a loop.
- We insert the free end of a fishing line or braided cord into this loop.
- We make about ten turns around the fluorocarbon, winding the turns in one direction.
- Then we make the same number of revolutions in the opposite direction, moving towards the loop.
- We thread the free end of the main line into a loop.
- All that remains is to slowly tighten the knot, after wetting it.
The specified knot can be used to tie fluor to the fishing line, but it is more advisable to use it to attach fluorocarbon to a braided cord. It is better to fasten monofilament with Albright or Shkotovy knots.