Published: 03/11/2011
Feeder selection
The feeder is an extension of your eyes and hands. It should show you everything that is happening on the bottom with your feeder and bait, show you the weakest bite, what kind of fish got on the hook, the bottom topography and much more that you will begin to notice over time. That is why choosing it is a very important stage in preparing for fishing.
You will break a lot of hooks, lose dozens of feeders, rewind the cords, scold the reels, but the feeder will serve you for a very long time if it really “feels” in your hand.
Now in any store and market you can find many models of feeders from well-known companies with proven quality and completely unknown brands. The average price of feeders is from 40 to 200 USD.
For us, such characteristics of the feeder rod as length, action, test (class), number and sensitivity of tips, and the material from which the rings are made are important.
Feeder length selection
The longer your feeder, the farther and with less effort you will cast your bait feeder. But is this always necessary? Basically, of course, you have to fish on the edges, and they can start a few meters from the shore. But it often happens that the fish stands far from the shore, for example during the heat, and moves in search of food very inactively. Then there is a need to deliver the bait “under the nose”.
The length of feeders varies from 2.5 to 5 meters. When determining the required length, it is necessary to start from the conditions of future fishing.
For a small river or small lake , where the casting range will be no more than 20-30 meters, a model with a length of 3.3 meters is suitable. It will also be more convenient when there is limited space around the fisherman. Well, if you plan to fish at long distances , then you can take the average model of 3.6 m or 3.9 m. They are the most popular sizes and will easily deliver your feeder to distances of up to 60 meters.
Feeders with a length of more than 4 meters are used for fishing with ultra-long casts and in strong currents. With a strong flow of water, the fishing line or cord (although the cord is much smaller) becomes tense and control over bites is lost. Therefore, the rod is installed at a steep upward angle, and its long length allows you to keep the arc of the fishing line above the water, so the sensitivity of the tackle does not change.
Feeders with variable lengths are also available for sale. They come with an additional elbow (extension), by inserting which you can increase the length of the feeder, for example, from 3.6 to 3.9 meters. In this case, the structure of the feeder is somewhat disrupted, but there is an advantage when fishing in different bodies of water. If such a model from a reputable company suits you, you can safely take it, since they have proven themselves to be quite good.
Advice: It is better, of course, to have several rods of different lengths, for different fishing conditions, but if this is your first feeder and you cannot decide on the length, choose a length of 3.6 or 3.9 meters, because this is the optimal choice for still water and current.
DIY feeder for feeder fishing
Hello, dear readers and DIYers!
Surely many of you like to fish, but the prices for consumable equipment are quite high.
In this article I want to tell you how you can make your own feeder for feeder fishing from scrap materials. I’ll say right away that I didn’t come up with it, but came across the idea on the Internet and decided to try it myself, which I hasten to share with you.
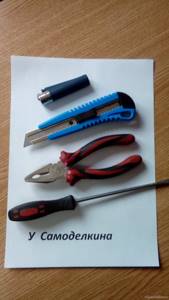
Materials for the device (conductor):
— A piece of cutting with a diameter of 25 mm and a length of 10-15 cm — Two nails (in my case 70 mm)
Materials for the feeder itself:
— Wire (copper, aluminum, knitting) of your choice — a plastic tube (empty paste from a pen, a cotton swab, Chupa Chups stick, etc.) - matches or lighter
Tools:
— A piece of sandpaper (for processing the handle) — A hacksaw — Pliers — A flat-head screwdriver — A knife
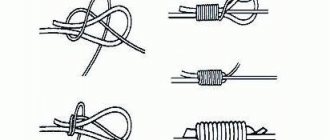
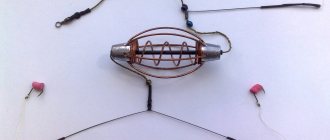
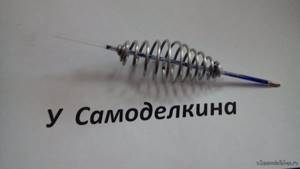
The process of making a conductor.
We take a piece of a handle (in my case, a handle from a rake with a diameter of 25 mm and a length of 11 cm) and use sandpaper to round its ends. Then we drive nails (in my case, 70 mm nails, since their diameter coincides with the diameter of the paste from the handle that I will use in the center of the feeder) into the center of each side, leave a centimeter and a half in length and saw off the excess. It should look something like this...

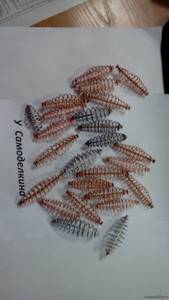
That's it, our conductor is ready. Now we can start making the feeder itself.
Feeder manufacturing process
Next we need a tool and hands.
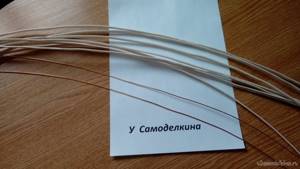
We take any wire (I took copper wire 1.5 mm thick to start with) and remove the insulation from it (if any), but very carefully so as not to make nicks. In my case, I cut it 70 cm long (but you can cut it longer or shorter, the final size of the feeder will depend on this). On the cleaned wire, mark the middle with a marker (since the ends of the feeder are mirrored, we will do them one by one).
Let's do one side first.
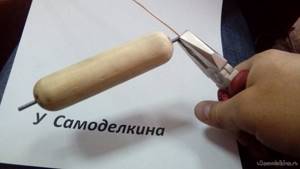
Holding the end of the wire, we make several turns around the nail.

Then we move the wire close to the handle and, holding it with pliers, continue to wind the spiral until the middle of the wire. It should turn out like this...
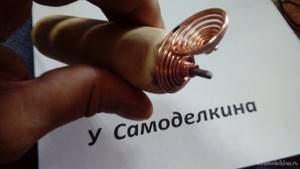
Next, remove the workpiece from the jig and combine the two halves.
I hope that this homemade product is useful to you. Good mood to everyone, good luck and good fishing!
Become the author of the site, publish your own articles, descriptions of homemade products and pay for the text. Read more here.
Test load
The test or class of a feeder rod shows what kind of load it is designed to cast.
Suppose you are fishing on a river with a medium current, with an 80 gram feeder. To its weight you need to add 10-20 grams for the weight of the bait. Then you need to use a feeder designed for 100 grams.
A specific load in grams or ounces can be written on the form of the rod, or it can simply indicate the class of the rod, like on spinning rods.
Light feeder (light feeder class) is designed for loads up to 60 grams. Suitable for standing water and ponds with little current.
Medium feeder (medium feeder class) is designed for loads from 80 to 100 grams. Suitable for both still waters and currents.
Heavy Feeder (heavy feeder class) is designed for loads from 100 to 120 grams. Good for current.
Extra Heavy Feeder (Extra heavy feeder) is designed for loads of 120 grams and above. Used in strong currents and for ultra-long casts.
When fishing, it is highly undesirable to exceed the load recommended by the manufacturer; this can simply lead to breakage of the rod. If your feeder is designed for 120 grams, then all equipment (feeder + bait) should not exceed this value.
Tip: for a river, the optimal choice would be a feeder with a dough of 100-120 grams (Heavy Feeder), for standing water up to 60 grams (Light feeder).
Basic principles of bottom sounding with a marker weight
It is very important to determine the relief in the area of the proposed fishing. This is the basic starting point for experienced anglers. Fishing with a match and a feeder involves fishing from the shore, when the casting distance is approximately 100 m, so it is extremely difficult to know where the depth is greater or less. You can scan with a special device - a marker with 0.2-0.3 mm monofilament equipment, a 3000-4000 m spinning feeder reel, and a 4 m rod.
The necessary tackle is assembled on the basis of a large high float attached to the end of the fishing line and a weight that must slide along the monk. Marker weights used for such purposes must exceed the weight of the signaling device.
After completing the preparations:
Read more
Which fishing line to choose for the feeder?
- the equipment is abandoned;
- the fishing line is stretched;
- the “bomb” with the top falls to the bottom.
With a weakened clutch, the monofilament begins to bleed until the float appears above the water surface. The length must be fixed.
Then the tackle is shifted to the shoreline between a distance of 0.5-1.0 m. Use the rotation of the reel and wait for the tension of the equipment. When the load begins to rise, the length of the displacement along the length of the fishing line is determined as accurately as possible. Then the monk is released again, testing the depth. Using the principle described above, you can scan a body of water, detecting: driftwood, snags, edges, holes.

Today, there are three main ways to study the topography and structure of the bottom (jigging, pulling or dragging and measuring the depth with a marker float)
Experienced fishermen make marker weights with their own hands. Take:
- cold welding;
- drill;
- three screws;
- screwdriver;
- a sinker that looks like a cylinder, a drop, an olive.
Next they begin to measure the locations for drilling. Drill 3 holes and tighten the screws. For spikes leave 5-6 mm. Streamlined side linings are formed by welding. Simply leaving the screws is not recommended. When fishing, after throwing out the gear, they will collect various debris from the bottom. Gluing spikes without a skeleton is also undesirable. They will fall off when pulled through rocks and hard ground.
Feeder structure
Build in other words is the flexibility of the feeder. Fast action refers to rigid rods. If you pick up such a feeder and jog, you will see that it bends in the first third of the length (the top and the next knee). Such rigidity allows you to completely control your fishing and throw the load over long distances without fear.
Feeders with a slow action bend completely, along the entire length, when loaded. They allow you to smooth out the jerks of the fish when fishing, and feel every beat on the hook. If you pull even a carp that weighs only 1.5 kilograms, then with such a rod action, it will seem like a true giant to you and you will feel its every desire.
Advice: for the first time, choose a fast system, you will be able to cast the feeder further and not be afraid of a possible breakage of the feeder.
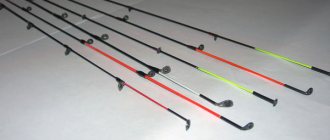
Vershinki
The feeder comes with 3 or 4 tips made of fiberglass or carbon fiber. They are the bite alarms.
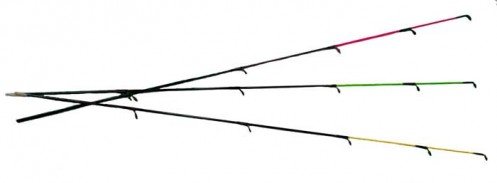
The tips differ in hardness and have their own test, which is measured in ounces. Color marking of their tips is accepted. Typically, the red tip is the stiffest tip in the set, the yellow tip is medium, and the green tip is the most flexible.
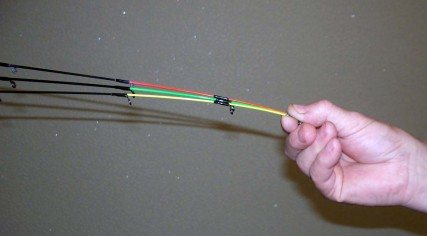
When casting the feeder, the tips do not participate, but are completely bent, transferring all the load to the feeder. The choice of tip depends on the current and the weight used. It is clear that the sensitive tip transmits bites better, but it will bend too much even with an average current or when the feeder moves. If you take the tips by the tips, you will see how different they are in flexibility.
You don't have to choose the tops. In any case, they will fit the test for which the feeder is designed. But it’s not uncommon to pick up tops to replace broken ones. And no matter how trite, it’s all about the fisherman’s carelessness.
There is an article on our website that describes the most common causes of feeder tip failures. Here we list the main ones. The cord often gets tangled in the last two rings of the tip, which leads to their breakage when casting. Hence the advice: when swinging, check that the cord can slide freely through the rings by slightly pulling it towards you. If the cord is tangled, you will feel it.
It happens that when a fisherman is filling the feeder, he pulls it closer to him, a little more, and a little more, and the tip of the feeder rests, for example, on the stand, and as a result, the tip does not stand up. But it’s good that the tips are sold separately for some models, and with the help of sandpaper they can be modified for other rods. But of course there are tips with a non-standard diameter. So, when purchasing, it would be a good idea to inquire about the availability of spare tips for the selected model.
Basic method (jigging)
The jig method of scanning the bottom is the main one. Amateur feeders must know a simple technique for studying a reservoir if they dream of becoming professionals in a difficult task.
There are plenty of advantages to this simple method:
- study in detail the depths in the designated area;
- actually thoroughly determine the relief;
- find out the structure of the soil;
- with a high probability of choosing a promising fishing spot.
Scanning with a jinning line is not difficult; you will need: a set of sinkers, a fishing rod, and the fisherman’s attentiveness to determine the moment the equipment touches the bottom.

Holding the end of the rod as low as possible, we pull the load along the bottom with the rod
It is advisable to divide the bottom exploration tactics into stages:
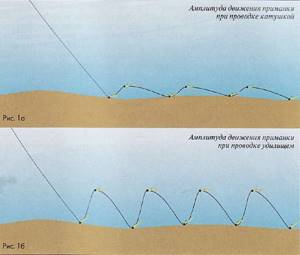
- The feeder throws the equipment to a given point and from the moment the marker touches the water - the marker reaches the bottom - remembers the time period.
- After the load lands, the fisherman jerks his rod upward. The concept is that the load should rise from the terrain after each movement of the fishing rod. Experienced anglers must time the drop of the sinker with each jerk, repeating the amplitude and strength of the exercise.
An increase in the time of lowering the load means the presence of a hole. If the interval is shortened, the deepening of the reservoir decreases.
Bottom dragging method
Another method regarding the question of how to measure depth while fishing is dragging along the bottom. The tactics of use are based on determining the structure of the relief and are used at the final stage of studying the visually outlined zone of the intended catch of fish, when suitable places, differences, and thresholds are identified. The prospects for the chosen method are a high percentage of finding sandy, hard surfaces, algae, silt, shell shells, and pebbles.
Read more
Fishing for crucian carp with a feeder
Dragging tactics involve the use of a heavy marker, when the rod slowly drags the load without the possibility of surfacing when reeling in. Scanning steps:
- The fisherman throws a marker to a given point and waits for it to sink to the bottom.
- Further, the pulling of the load proceeds slowly.
- They pull the rig along the ground to the shoreline.
- The marker moves smoothly on a flat bottom and begins to catch on the edges.
- Using this method, a general picture of the topography of a reservoir is created.
To use drawing, it is necessary to cast a weighty sinker in the shape of a pear or ball.
On the pull we determine the structure of the bottom, on the jerk we keep score
Sequential cast method
Several common methods of scanning reservoirs have been outlined above. Each has pros and cons, which affect the definition of terrain to varying degrees. Many beginners use the sequential casting method to find out the characteristics of the bottom. They throw the equipment into different fishing zones, time the time of falling, lowering to the ground - counting out loud: one, two, three, four. Then the casting range is reduced by a certain amount by turning the reel, and the actions are repeated.
The indicated tactics of how to check the bottom before fishing have many disadvantages:
- the structure is not determined, the relief is approximate;
- before each subsequent cast you need to step back or adjust the distance using the reel;
- a large number of throws is a waste of time.
The question of how to use a depth gauge is relevant along with other methods of determining the properties of the bottom, but only as an initial method. The device is attached to the surface of the part, then the depth of the hole or groove is assessed. If necessary, additional rods are attached for extension. The depth dimension is transferred to digital format. Don’t forget about cleanliness, so after use the depth gauge should be wiped with machine oil.
Passing rings
Fishermen say about good rings: “they are able to hold a line.” When fishing with a feeder, they mainly use a line, which creates a large load on the rings, rubbing them. And here there is a requirement for the quality of the material of the ring inserts. Any inserts on the rings will wear out over time, but this could be one fishing trip or more than one hundred. Therefore, pay attention to what materials they are made of. Good feeder rods have excellent quality guides (Fuji, Balzer, DAM) with inserts made of high-strength materials (SiC, Gold Cermet).
Pay attention to the fastening of the rings; it should consist of three legs, not two.
128 comments
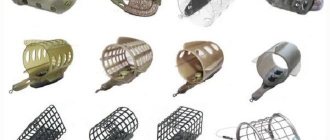
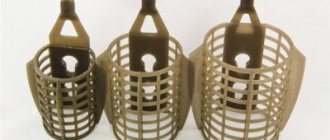
Photos of feeders
Note!
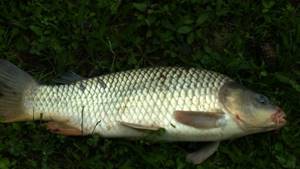
Catching carp on a feeder: the subtleties of fishing and advice from professionals on how to catch carp using different methods (110 photos)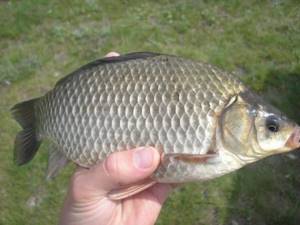
Catching crucian carp on a feeder - tips and secrets of professionals. 115 photos and videos master class for beginners
- Bait for the feeder - popular mistakes, recipes and do-it-yourself bait. Ingredients for bait (110 photos)
Read here Which feeder is better - the basics of fishing and beginner mistakes. What kind of fish are caught on the feeder? (135 photos + video)
Help the project, share on social networks 
0