Reasons to make a folding table with your own hands
Today, a potential buyer can easily find a huge number of folding tables of various types and designs on sale. However, making a round folding table with your own hands will not pose any difficulties. Moreover, this is almost always more economically profitable and rational:
- The dimensions of the table can be precisely selected based on your needs.
- The choice in the type of table designs is also unlimited. Choose what best suits your needs.
- The design of the table varies freely depending on the interior of the room and personal preferences.
Materials and tools
To start making folding tables from wood or metal, you don’t have to complete a carpentry course. To get started, buy all the necessary materials and be patient.
If you have ever done minor repairs around the house, then most likely you already have all the necessary tools. To assemble a wooden table, use only high-quality timber and boards. The miser pays twice, as they say.
Before starting work, prepare the basic fasteners, varnish and primer for wood. Here is a list of materials that will be needed:
- timber for legs;
- boards for making a table frame;
- plywood sheets for shelves and tabletops;
- hinges;
- stainless steel screws;
- metal dowels.
Before starting assembly, it is recommended to find drawings and diagrams of folding tables. With their help, it will be easier and faster for you to assemble the structure. And also don’t forget to prepare the legs and frame.
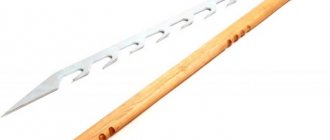
On the beams intended for the frame, cut grooves approximately 2 cm wide at a distance of several centimeters from the edges. Make cross-shaped cuts on the future legs. Now you can be sure that the table frame will not warp in the future.
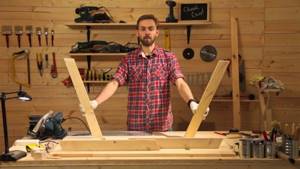
Table assembly
For high-quality and quick assembly of the structure, it is advisable to have a drill and a circular saw in your arsenal. The assembly process at first glance seems complicated, but only at first glance.
The workpieces are connected according to the following algorithm:
- First of all, start assembling the frame for the tabletop. After aligning the grooves, the joints must be secured with countersunk hexagon screws.
- Pre-prepared legs with cross-shaped cuts are mounted on the frame.
- The next step is to cut out the shelf. To ensure that it stands securely and without distortion, we install it on each leg at a distance of 22 cm from the bottom along a metal dowel.
- To assemble the retractable supports, boards are inserted into the grooves on the timber and securely fixed with countersunk hexagon screws.
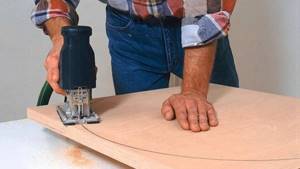
- Before painting, all parts of the table must be sanded with fine sandpaper and coated with wood primer. First, the slats, tabletop and footrests are painted.
- Now we begin assembling the internal lintel for the shelf. We connect the side beams to the main beam. Holes are drilled at one level to secure the support rails.
- The next step is to fasten the base of the lintel to the frame, and don’t forget to install additional slats.
- We attach legs to the jumper, which will extend in the future.
- We connect the tabletop to the frame.
Now you can exhale, the table is assembled and almost ready for use in any conditions. You can download a photo of a folding table from the Internet and compare your result with the picture.
It is important to remember that it is best to treat wood before the assembly begins, and not after it is completed. If you have any difficulties, you can watch visual assembly video tutorials on the Internet.
Preparation of materials for work
You can make a feeder attachment table yourself at home. This option will not be disassembled, but in general it will also not take up much space. A folding table requires a more careful approach, but its demand will not be too frequent. And even when assembled, it does not take up much space in any vehicle. If you still want to have folding legs, then you should use special corner fasteners that will control bending and firmly secure them in the required position. A DIY fishing table requires the following tools for its manufacture:
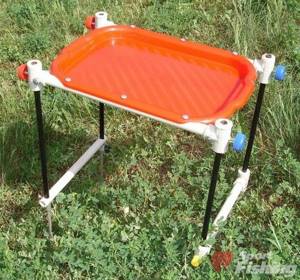
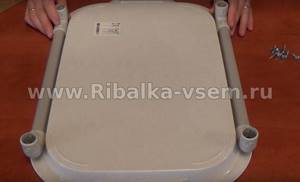
- The tray is the size you choose, the material of the tray does not matter.
- PVC pipe for electrical cable.
- Corners for securing the legs of a fishing table.
- Plugs.
- Stainless steel screws.
All installation work can be carried out at home. We begin to make a table with our own hands for fishing from the main frame, which will consist of pipes and to which the tray will be attached. The corners serve as frame holders; they help make the structure more durable and strengthen the legs. The legs are subsequently attached to this frame, and all the attachments in the form of plugs are put on last.
You can decorate the table with special hooks on which you can hang bait when the opportunity arises. You can also put a cover with a pocket on it, creating additional space for small fishing items. When fishing, the convenient location of the devices is of great importance, because the correct reaction plays an important role in this matter.
If you know how to make a fishing table with your own hands, you can save yourself from spending extra money.
For men, this will be good practice and training for their construction capabilities. Moreover, you will not be able to find such an option that you have built for yourself in any store!
DIY fishing table with feeder
Do you still put bait and tackle on the ground? It's time to get a special table. The prices for it in fishing stores are rather high (USD 30-100), but you can pick up a small suitable table for a picnic and convert it to your needs.
But you can also make a table with your own hands that will make life easier when fishing and can be useful for outdoor recreation. Bait, bait, flavors, dips and necessary feeder accessories - all this can fit on the table and be always at hand. And this is time saved that can be put to good use.
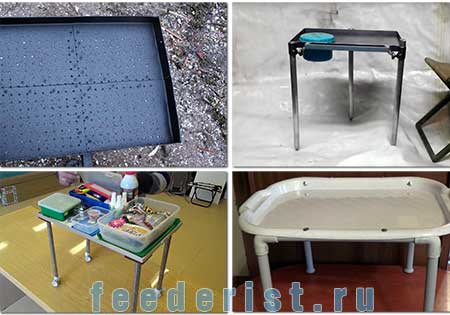
Homemade fishing tables can be divided into several types:
- According to the materials used in the frame and legs. They come in metal (usually aluminum) and PVC materials (usually water pipes or electrical wiring).
- According to the material of the tabletop. The simplest tabletop is a plastic tray of the required size. Instead, you can use laminated plywood, window sills, galvanized and aluminum sheets.
- By design. More often they make simple models that cannot be disassembled. Although such tables are small in size, they require space during transportation. More complex designs have removable legs that are adjustable in length.
Making a fishing table with your own hands
A table for summer fishing is a very important thing. Without it, it’s basically a mess on the shore, you’re always looking for little things in the grass and preparing gear on your knee.
Therefore, I was actively interested in tables in stores and on the Internet, but came to the conclusion that the designer who would design a table to suit me had not yet been born. Sometimes small, sometimes tall, sometimes uncomfortable, sometimes unreliable. And those tables with legs cost a lot of money.
So I decided to make a table myself, to suit my requirements and with my own hands. I thought for a long time about coming up with something like this, so that it would be easy to manufacture, would not require the use of special tools, would be easy to use and transport, and would be inexpensive.
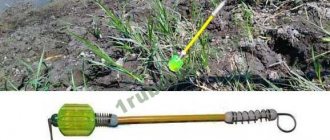
How to make a fishing table for baits with your own hands
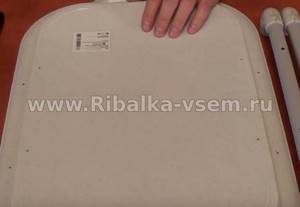
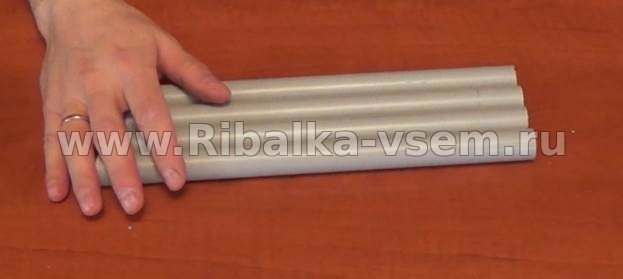
First you need to cut two tubes, slightly shorter than the larger side of the tray. They will be used to attach the legs.

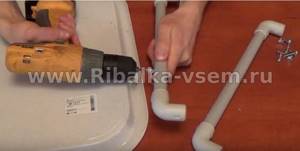
After this, we attach the corners to the tubes. These corners consist of two halves. To prevent these halves from detaching, the fastening points must be lubricated with good glue and pressed well.
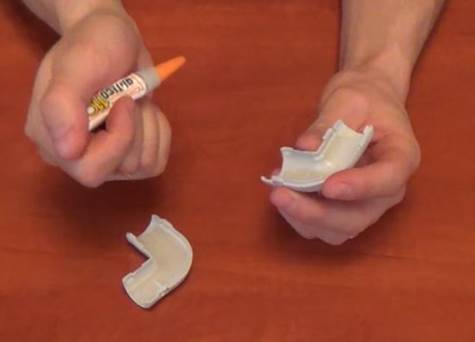
The corners of the tube must be greased with PVC glue and then placed on the tubes.

As a result, we should have the following two fasteners.
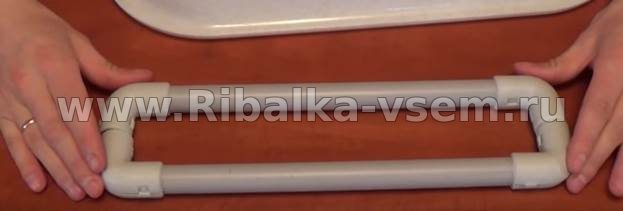
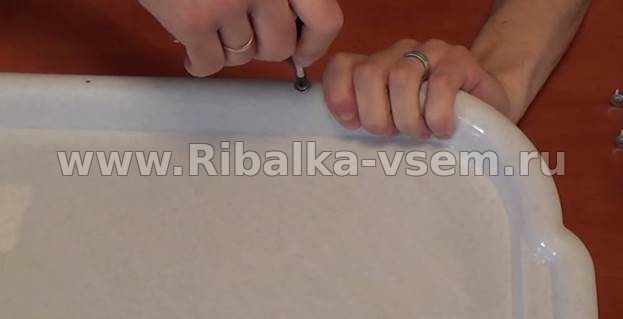
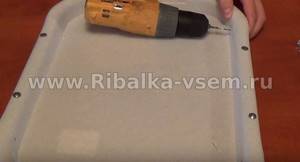
The next stage of work is that we must screw the tubes at the bottom of the tray with self-tapping screws.
First, you need to make markings in the places where we will attach the screws. Take a marker and make marks on the tube and on the tabletop.
After this, we drill holes using a screwdriver at all marks.
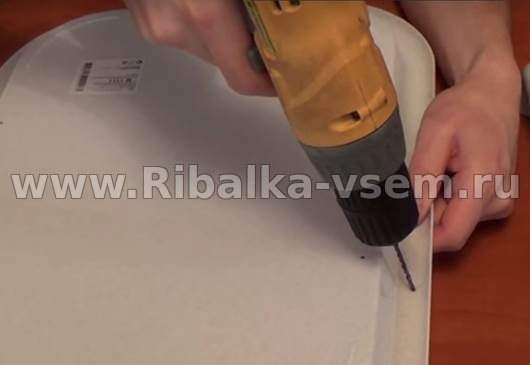
Drilling into a countertop is easier than drilling into pipes. Therefore, it is necessary to hold the tube well so as not to miss.
After all the holes are drilled, we begin assembling our table. We take self-tapping screws and screw them in from the top of the table, having first placed our tubes under them.
This stage is the most difficult, since you need to ensure that the holes on the table and tubes match. This operation must be carried out very carefully so as not to damage the parts.
If everything is done correctly, you should end up with something like this:
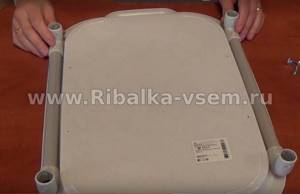
For reliability, you can screw one self-tapping screw on each of the 4 sides of the tray where the corners meet the side.
It will turn out like this:
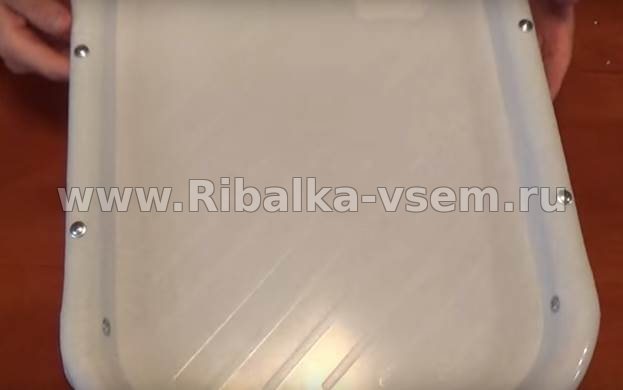
It should be noted that the resulting design is quite reliable. Everything holds up well, and you don’t have to worry about the integrity of the table in the future.
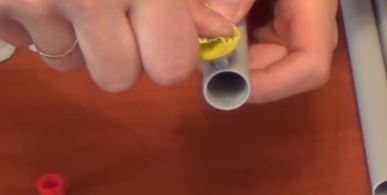
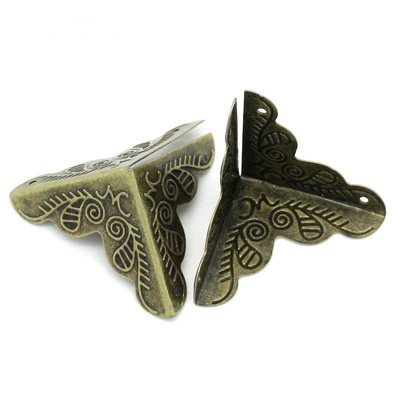
The final stage will be making the legs and threading them into the corners. The length of the legs is 30 cm. We cut them out with a hacksaw. We pre-measure and make marks with a marker at the required distance. The result should be identical legs like this:
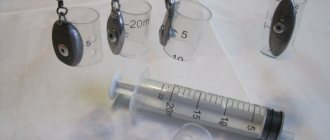
We will also need rubber plugs of this type:
They can also be purchased at an electrical supply store. These plugs will allow you to install the table on various surfaces. Thanks to them, our product will take a stable position, and dirt will not get inside the legs. We choose plugs with the same diameter as our tubes.
Before putting the plug on the leg, lubricate the outer part of the tube with glue to firmly fix this element. The glue is suitable for rubber or for PVC products.
After this we put on the plug, and we should get something like this on all legs:

The very last stage of work is threading the legs into the holes in the corners:
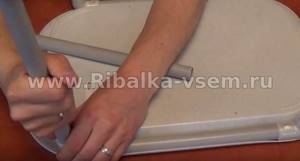
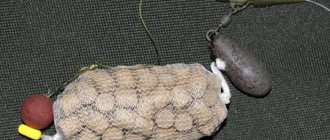
After all the work, we will have this neat and functional table for baits and various fishing little things:
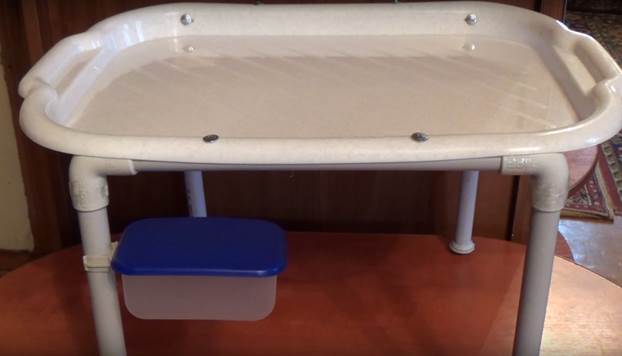
We see that the box is attached to one of the legs using a plastic fastening element - a clip. It looks like this:
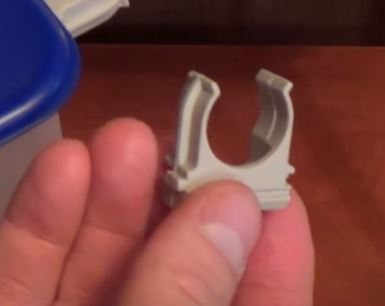
It can be purchased at the same store. By screwing this clip with self-tapping screws to a plastic container, we can fix it to the leg.

You can place attachments in this container and place it under the table so that direct sunlight does not damage it. You can attach several similar containers and place bloodworms, maggots, worms and other baits in them. This way you will extend their life and they will remain useful throughout the fishing session.
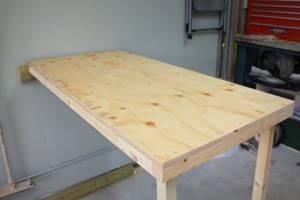
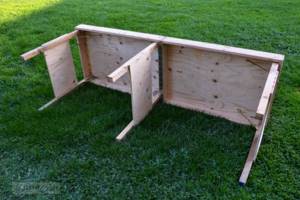
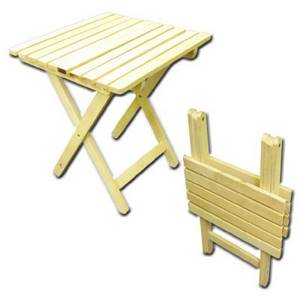
DIY camping table
Who are you, my 25 subscribers? ) Especially for you and everyone who is interested.
what amazingly huge backgammon!
The corners need to be protected with something, otherwise they will get beaten or pricked.
the middle will sag over time, it needs to be strengthened with pins
I think clearly) yellow - these are loops
Respectos. I don’t quite understand - do the legs fit inside?
As an option/advice - a shoulder strap, it may be more convenient to carry when folded.
Oh, well, is there even an option “from the car and immediately lay it out”? Got it.
I was thinking something a little more mobile)
And then why would you have hands at the table, clinging to clothes?
There is practically nothing to complain about. Solid, reliable, simple.
But not everyone has welding etc. Therefore, an option without welding would be interesting.
as an option. When folded it will be a little bigger.
Would you suggest another option?
) if you go by minivan to barbecue, why not? The person asked for something simpler and without welding, but there were 20 slats and 2 bolts and 0 welding. All requirements have been met. In general, in nature you need to sit on the ground
Although, if you have an old table, then it’s somehow easier to saw it and make it foldable. -_-
. no jigsaw, stand, workbench, skills)))
excellent style and hands
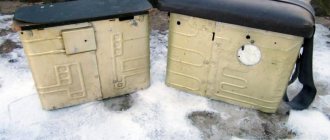
It turned out to be very heavy(
Put it on the boat. in any case, the lighter the better and when assembled it is too big. I’m just going to do the same and chose a different design))) And everything that you can’t do yourself is all good_))
We make an attachment table from a metal structure
In the first version, the entire frame is assembled with your own hands from a PVC tube, and the surface is from a tray. The main disadvantage of such a device: it cannot be disassembled.
For this design we will need:
- Tray of suitable size. Serves as a tabletop and work surface. It should accommodate the feeder's necessary things for fishing.
- Rigid PVC pipe for laying cables (electrical wiring).
- Corners - for attaching table legs.
- Plugs.
- Stainless steel self-tapping screws.
A frame for the tray is made from the pipe. The frame is fastened with self-tapping screws, and a corner is attached to its ends. Legs of the required length are soldered or glued to the corner.
The easiest way to make a feeder attachment table is to use a bookcase. Some plastic bookcases are sold by section. You just have to choose a model that fits the size. We get a finished surface with small legs, which can be extended with the same PVC pipes. The easiest and most inexpensive way
Aluminum is the most commonly used material for a homemade feeder table. Its main advantage is its strength and low weight. They use an aluminum corner for the frame, pipes for the legs, and sometimes sheets for the table top.
The first option for fishing from Vladimir Kruglov. For it you will need:
- Aluminum corner.
- Pipes made of the same material.
- A suitable piece of window sill - used as a table top.
The corner serves as a frame; its edge prevents feeder accessories and baits from falling during fishing. The legs are made of two pipes of different diameters, which allows you to adjust the height while fishing. Window flashing (painted sheet metal) provides a durable and pleasing surface.
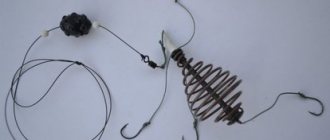
The next option for a metal fishing table. In this option, the frame and fastenings for the legs are welded, which makes the structure even stronger. To reduce weight, the author suggests using three legs. You can cut a circle in the tabletop for a container with maggots, another attachment or bait for the feeder.
In the next video, the author offers a model of a fishing table made from sheet aluminum. The corner for fastening the structure is not used. The plate is bent at the edges, forming sides. For this option you will need:
- Aluminum sheet.
- A strip of metal for the frame.
- Metal pipe for legs or attachment to a fishing chair.
Here a sheet of aluminum is used for the table
And another option with telescopic legs. Although this attachment table is more suitable for ice fishing, it is not difficult to convert it to attach to a chair, or add legs to place it on the ground separately. Model with extendable legs
It is ideal to devote your day off from morning to evening to a walk and sports games, but we must not forget that you also need to restore energy with snacks.
Areas equipped with tables and chairs for those interested are not so often conveniently located outside the city, where it is calmer, the air is cleaner, and the place is secluded enough to relax with your own company.
When looking for places specially designed for active pastime, people are often limited by the specific requirements of campsites. And lightweight portable furniture allows you to solve the problem of choosing a place and diversify your vacation by visiting new areas for relaxation.
Different models of portable folding furniture for tourism and camping provide excellent outdoor recreation for both one person and a whole group of friends.
And yet, society strives to leave the tradition of young people relaxing as “savages”, and to make their own time spent in nature more cultural and calm.
A vacation planned in nature may involve many “surprises,” including thunderstorms or rain.
A very successful device for accommodating a group of friends or family, ensuring that vacationers can take free poses and conveniently use the table area for arranging dishes (plates, glasses, especially disposable plastic ones) is a folding picnic table. And in case of bad weather, you won’t have to spend lunch outdoors sitting on wet grass or cold ground. Chairs and a table conveniently located relative to each other in height will allow vacationers to sit in comfortable positions and make their weekend complete. A folding picnic table will also be appreciated by people of the older generation or a group in which girls prefer to dress neatly even for a walk in nature.
When folded, camping furniture is very comfortable to transport, since it does not take up much space in the trunk. A folding picnic table with chairs is one of the main devices, which, when folded out, forms a frame complex of a tabletop and benches or chairs. The main requirements for tourist furniture are:
- compactness,
- ease,
- strength.
Among the materials for folding tables, fabric ones are the leading ones (the fabric must include polyester, since it optimally withstands various weather conditions, and caring for such fabric will not require much effort). Often chairs and tables are made of plastic.
This material copes well with various types of dirt, is easy to clean and does not require maintenance. The only thing that should be taken into account when choosing such furniture is some fragility, which plastic is susceptible to at cold temperatures. Such furniture also needs to be hidden from large hail.
Therefore, fabric bases are often attached to an aluminum frame, and when folded, such a table literally occupies the area that is formed by the metal parts of the structure folded together.
We love to spend evenings, weekends, and organize vacations with family or friends in our own yard or in nature. When traveling outside the city to your favorite clearing with a large group, you want to relax in comfort.
If you have a car such as a van or minivan, transporting such a pleasant place of rest as a folding picnic table is no problem.
In addition, this will allow you to increase the limited space in the yard by removing the transforming picnic table with benches on occasion. Often such structures are created in a universal wood design that fits into any landscape.
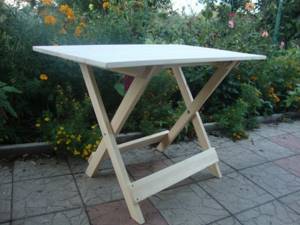
When folded, a folding picnic table looks like a large box or suitcase, which, when unfolded, transforms into a structure of chairs (four or six) and a tabletop that is quite stable and reliable. Having golden hands and a little inspiration, you can make a folding picnic table with your own hands. If you want to limit yourself to a lightweight design made of fabric and aluminum, you will need:
- bend aluminum pipes, ensuring correct and symmetrical dimensions;
- secure the thick fabric cut to fit the seats with rivets or a tight seam made from synthetic thread for the seats;
- think over movable fasteners that will allow the chairs to be installed when the structure is opened;
- make a tabletop from MDF wood board (it will also be the sides when closed).
As a rule, the standard sizes of chairs used are 30 cm x 30 cm x 40 cm or 33 cm x 28 cm x 36 cm, and table sizes for four are chosen 85 cm x 82 cm x 70 cm or larger, for a company of six, 120 cm x 60 cm x 70 cm.
If you have plastic parts with large smooth surfaces on hand, you can use them. The most creative craftsmen can add LED lighting and speakers powered by a player to create such a table for two.
You can use a ready-made scheme for a simple and reliable design that can be easily used in your yard of a country house, on a summer cottage, or on the lawn in front of your house within the city if you live in the private sector.
The drawing of a folding picnic table presented above can be used as a reference; the dimensions can be easily changed proportionally. But you can relax in comfort with this design anywhere.
A practical and functional folding table can be easily painted in your favorite color or several colors, and when folded, can be used constantly as benches.
And here are recommendations on how to make a folding picnic table with chairs if you are planning the most reliable design.
- If you have a grinder and a welding machine, you can design a folding table with separate chairs that will fit inside the table when folded, which is convenient and compact for transportation.
- The chipboard tabletop can be painted any color, but it is recommended to treat the side edges with an antiseptic.
- A square profile made of ferrous metal is welded along the lower perimeter, then the same welded metal legs are attached inside it through pre-drilled holes, as shown in the figure.
For chairs, a square profile made of ferrous metal 20x20 mm in size is welded in the shape of the letter “P”.
https://www.youtube.com/watch{q}v=zyWTlSjMvI0
Their dimensions: internal part 450x280 mm, external 450x320 mm.
At the level of 230 mm, holes should be drilled through which the folding legs will be attached to each other.
To give the structure a beautiful appearance, the metal parts should be painted, PF-115 paint is suitable.
Seats made of awning fabric will make the chairs durable and easy to wash.
Your imagination will suggest other options that are more convenient for you.
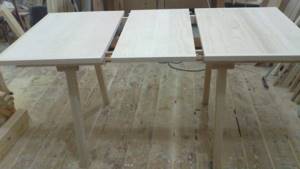
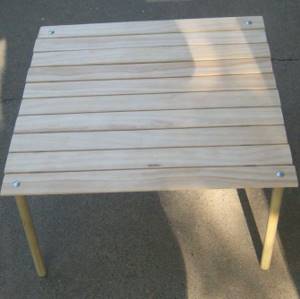
And I thought about a table that I could take with me. Purchased models are usually designed for a company of 4 people, which did not suit us. And so, after some thought, I assembled this table.
I made it for a certain date and “from what was available.” For example, I cut out the elements of the tabletop itself from a 10 mm thick OSB board.