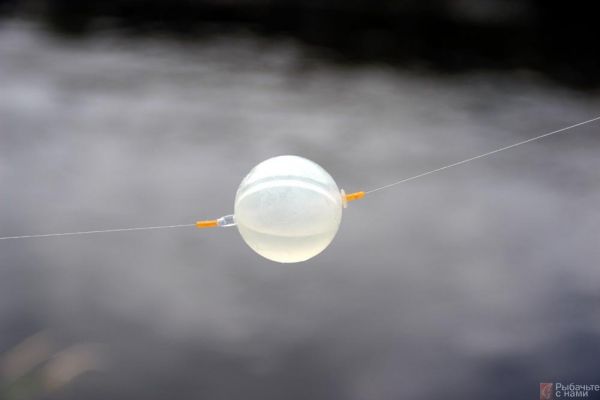
Water-filling float
Currently, many anglers are keenly interested in float fishing using a round transparent float, and it is important to cover this topic in detail. This is a really interesting method aimed at catching various fish. Moreover, the capabilities of the ball are much wider than its traditional surface fishing for insects and their larvae. The transparent ball-float catches almost everything that floats, throughout the entire thickness of the water, including at the bottom, and even bottom fishers can learn a lot of interesting things from the capabilities of this signaling device.
Transparent balls - floats made of organic glass, have been present in our stores for many years, and recently more carefully made imported models have appeared. A transparent water-filled float appeared in the fishing world as a competitor to classic fly fishing gear, and the method of fishing with a ball, as they say, was a success. The simplest float equipment with it made it possible to make long casts using a reel and makes it possible to quickly fish large areas of water. However, fishermen did not stop only at the possibilities of surface fishing, but increasingly tried to diversify fishing, which began to be carried out in the middle water horizons, and even from the bottom.
Let's look at various options for using a transparent float ball, which is actively used by both domestic and Western European fishing enthusiasts. Based on the information presented below, almost every fisherman can expand his experiments with this float, creating some of his own, sophisticated equipment, or a cunning method of wiring. But to do this, you need to clearly understand what a transparent ball is, what it is capable of, and where it can go wrong.
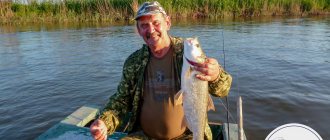
Asp and chub in spring on a water-filling float
fishx 04/08/2018, 14:35 2.2 thousand.
In this article I will tell you how to catch asp and chub in the spring using float tackle with a water-filling float.
Catching predators with a spinning rod in the spring is limited to a fairly short period between the opening of rivers from ice and the onset of the spawning ban, when you can only fish from the shore and only with a fishing rod. And then there comes a long pause until the summer, when, in fact, real open water fishing opens up. But it is possible to catch a large predator with a fishing rod. Probably, in some regions, fishing for pike during the spawning period is prohibited, but you can indulge your soul in the excitement of asp and chub fishing.

These silvery fish, seemingly peaceful, are real predators that fiercely attack both live and artificial fish. But both predators are very careful fish. And it is not always possible to take them on a spinning rod from the shore, since the places are often not very convenient for casting if the banks are overgrown with bushes and trees, and these fish can clearly see the angler if he is standing on a sandbank. And they won’t take any of the most expensive and natural-looking baits when swings of the rod and hands are being made before their eyes, especially if the fisherman is also wearing bright clothes.
Bad alarm
It should be noted right away that the ball is very bad as a bite alarm; it can’t get any worse. The diameter of the ball reaches 4-5 cm, and even if you paint it in a bright color (which can alarm large fish, especially in shallow waters), we will not see a bite “on the rise”, and when there is a “flood” and “moving to the side” the fish will immediately will feel the inertia of the massive float, and if self-hooking does not occur, it will simply spit out the bait. It is for these reasons that the ball is made transparent - there is nothing to look at it, because practically nothing is visible from it.
Casting technique
In order to make casting easier, it is better to position yourself on the windward side. Then the wind blowing from the back will contribute to an accurate throw.
The pond itself will tell you where to throw it. There are many promising landmarks. First of all, this is aquatic vegetation, snags and boulders protruding from the water, floating islands, etc.
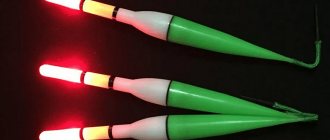
In clear water, the border of the near edge, visible to a trained eye, water areas near riffles, micropools, etc., are attractive. When the fishing range is impressive, and vision does not allow one to clearly distinguish bites, the float can be painted in a bright color, say red or yellow.
In difficult conditions with an increased risk of snagging, it is useful to clip the line. Or slow it down with your finger after casting, but before the float splashes down.
The second option seems more rational to me. Since fishing is associated with constant movement: fishing does not take place in one sector. And from each place on the shore, water areas of different distances are fished.
Even a far-abandoned water-filling float is clearly visible from afar against the background of the water. And therefore there is no difficulty in controlling the bite. When this happens, the ball begins to dance on the water, forming circles.
Then it gradually moves to the side, signaling the need to perform a short but sharp hook. If a fish is spotted, I fish it out; if not, I act depending on the bait.
When there is a shitfish or other delicate larva on the hook, a recast is required. Because the bait on the hook will be nothing but scraps. When there is maggot, you can take your time and let the bait stay in the water for some more time.
Even when sucked, it can attract the attention of fish. However, regardless of the bait, you should follow the rule of bringing the hook tip out. This will not negatively affect the number of bites, but their quality will definitely increase.
Wide possibilities of water-filling float
But any float is not only a simple bite alarm, but also a float tool with which wiring is carried out, and the ball has wide possibilities here. It also plays the role of a sinker, and a wonderful sinker that easily allows you to change its weight depending on the amount of water inside. In parallel, as the mass changes, the degree of its buoyancy also changes. And, for example, a ball completely filled with water will slowly sink. A great advantage is its significant weight, which makes it possible to use not only spinning reels, but also inertial reels for long-distance casting. So, for example, a ball with a diameter of 4.5 cm, even unfilled with water, weighs about 10 g; half filled with water – 30 g; completely filled – 50 g.
It is worth noting that transparent floats can also be oval, more streamlined when guiding, or sbirulino floats, which generally cut through the water column like a knife through butter, but we are not talking about them today, but about the classic of the genre - a round, transparent float.
But let's try to build several float rigs, and we will try to avoid the influence of the negative properties of the ball in them, using its advantages to the fullest.
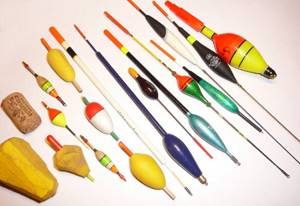
How to make a float with your own hands?
Depending on the imagination and skill of the fisherman, the following materials are used to create a float:
- Styrofoam.
- Wine cork.
- Cane.
- Goose or duck feather.
- Syringe.
- Plastic tube.
- Tree.
- Balsa.
- Additional materials used: multi-colored acrylic paints, wire with a cross-section of 0.5-1mm, waterproof glue, regular and long toothpicks...
In order for the materials to acquire the desired shape after processing and fit tightly with the component elements, it is necessary to use the following tools:
- Drill.
- Drill with a diameter of 2-3mm.
- Sharp knife.
- File or sandpaper.
- Vise.
- Calipers.
- Chisel.
- Awl.
Each homemade float has its own parameters and is designed for different types of fishing.
Facts to consider include:
- Light float (0.2-0.8g) is designed for fishing in the coastal zone. Its light weight reacts to the slightest bites and is designed for catching crucian carp, rudd, and roach.
- Medium weight floats (0.8-2.5g) are designed for catching fish in the current. They facilitate casting gear over several tens of meters, where you can catch decent fish - bream, large crucian carp, carp, silver carp.
- Heavy floats (3-10g) with a voluminous body are used to cast gear at least 50m, where you can catch a hefty carp or catfish. Due to their size, the floats are visible even at a considerable distance.
It is simply necessary to select the weight of the float and the corresponding load, because the visibility of the bite and further hooking of the fish primarily depends on this.
The material for the sensitive and practically weightless float is a feather from the wing of a goose or duck. To make a float, it must be cleared of fluff; for this, use a sharp knife or razor blade.
Initially, the feather has a milky tint and in bright sunlight it is difficult to see on the surface of the water. To improve visibility, its surface must be painted with bright acrylic paints (light green, orange, bright red...).
It is attached to the main fishing line using two rubber rings, which are located at the bottom of the float and approximately in the middle. The body of the float is quite delicate and requires careful handling.
To make a simple and unpretentious float in 10-15 minutes you will need a plastic straw (you can use a cocktail straw). The length of the tube should be within 10 cm with a diameter of 4-6 mm.
This procedure must be repeated several times in a row to achieve the desired result. This technique is also used for the other side of the tube. When the two sides are completely sealed, one of the sides is heated again and immediately pressed with pliers to create some flatness.
In this form, the float is half ready and in order to bring its surface to perfection, it is necessary to cut the upper end to the point of visible fusion, and round the lower flattened part. You also need to make a hole in it in which a carabiner or swivel will be attached.
The final stage will be sanding it with sandpaper and painting it with bright paint. Thus, the float is ready for installation on the fishing line.
Making a float from these materials is quite simple, because they practically do not differ from each other, except that the cork has greater porosity.
They are characterized as light and sensitive. From such materials you can make floats of various shapes - ball, barrel, drop, olive.
How to catch more fish?
I have been active fishing for quite some time and have found many ways to improve the bite. And here are the most effective:
- Bite activator. Attracts fish in cold and warm water with the help of pheromones included in the composition and stimulates its appetite. It’s a pity that Rosprirodnadzor wants to impose a ban on its sale.
- More sensitive gear. Reviews and instructions for other types of gear can be found on the pages of my website.
- Lures using pheromones.
You can get the rest of the secrets of successful fishing for free by reading my other materials on the site.
To begin with, a square or cylindrical blank of the required size is cut out from a single piece of dense foam plastic (length 5-7cm, thickness 1-2cm).
Next, a long toothpick is inserted ⅔ into it, and its outer part is inserted into the drill chuck. The drill must initially be firmly secured in a vice so that there is no vibration.
When the untreated workpiece is fixed in the drill, it must be turned on and set to high speed.
During the process of high-speed rotation of the workpiece, fine-grained sandpaper or a file is slowly pressed against its body.
By running a grinding material over the workpiece, rough shapes are gradually removed and the workpiece is visually rounded.
If the mold needs to be given a different shape, the sandpaper should be kept in one place a little longer and, if desired, at a different angle.
After sanding the surface of the workpiece, the toothpick is removed from it, and a new one is installed in its place.
To keep it inside, it is “set” on glue (the height should not exceed 7-8 cm).
So that the float can be attached to the main fishing line, a swivel carabiner is attached to the bottom of the workpiece. The body of the float is painted with bright nail polish, and it is advisable to coat the wooden insert alternately with several colors of varnish.
Next, excess putty must be removed by sanding, manually bringing the surface to perfect smoothness. After this process, the “antenna” and the lower hinge system (swivel carabiner) are attached.
The coloring of the entire float is left to the color preferences of the craftsman.
Making a wooden float is quite difficult at home, but it is quite possible if you put in some effort and ingenuity. First, you need to have at your disposal a piece of hard wood (larch or oak).
The manufacturing process goes like this:
- Initially, a square piece of wood (1.5-2cm thick and 4-5cm long) is cut out.
- Next, a through hole with a diameter of 1-1.5 mm is drilled through the center of the workpiece.
- A rigid metal wire of the appropriate diameter is passed through the hole. The wire release from the edges of the workpiece should be 2-3 cm.
- These ends are inserted into the chucks of 2 drills clamped at the same level in a vice and clamped until they stop.
- One drill should be in a calm (neutral) state, and the second should gradually gain speed to a level of 600-700 rpm. With a gradual increase in speed, the two chucks will simultaneously rotate in the same direction and will not create vibrations of the workpiece.
- The workpiece is cleaned with a file or sandpaper, but this process can take several hours, unlike processing cork material.
- After processing, the workpiece is removed from the “holders” and is ready to be combined with the “antenna” and the lower ring (for sliding along the main line).
- To align with the upper “beacon”, the hole in the center of the workpiece is slightly expanded (drilling) to 2mm.
- The prepared “antenna” with a height of 7-8 cm and a diameter of 1.8 mm is coated with glue and immediately inserted into the workpiece. It fits quite tightly, and the glue ensures that the components are held together.
- With the lower part the process is identical, only instead of a wooden “antenna” a piece of wire with a diameter of 1 mm is used. At one end it is necessary to make a ring, and it is advisable to bend the other end in the form of a spiral and slowly screw it into the body of the float. Then fill the space in the float with glue.
- To prevent the wooden parts of the float from swelling from water, they must be opened with varnish, and then an appropriate coloring must be applied to the surface.
We invite you to familiarize yourself with: Sliding float: equipment and installation, fastening, device
A reed float can be made even while fishing while fishing. To do this, you will need to cut off the main part of the plant and begin refining the surface. A perfectly round base without visually visible cracks or other damage is suitable for the float.
The float length may vary, but 9-13cm is recommended.
To make such a float look more elegant, its edges are ground down to a cone shape.
Since the inside of the reed is soft, a small thin “antenna” with a height of 2-4 cm is inserted into the upper part of the float.
After this, the entire surface is covered with multi-colored varnish and allowed to dry for half an hour.
To secure the reed float to the fishing line, you need several rubber rings passed through it.
One is attached at the very bottom, and the second ring is approximately in the middle. This type of float does not require special care and can last quite a long time.
During the manufacturing process you will need materials such as:
- Ear sticks (4 pcs).
- A rubber tube, which, when exposed to heat, shrinks greatly with a diameter of 3-3.2mm.
- Shrink tube with a diameter of 5.8-6mm.
- Wire with a cross-section of 1 mm, which is designed to form a loop of attachment to the lower part of the float body.
- Plastic or wooden “antenna” with a height of 10 to 25 cm.
When the “antenna” rod is ready, it is necessary to install a concentration tip on its top. To do this, a conical plastic mold is installed at the end, not exceeding the weight of 0.5 g.
Classic version with blind equipment
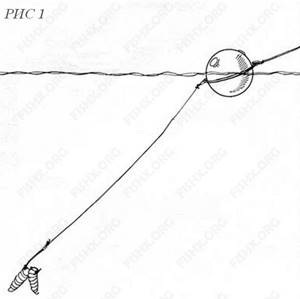
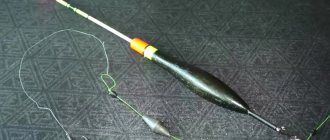
This is the most common “fly fishing” option (Fig. 1), standing at the very origins of the use of a transparent ball. The float rig is simple: the main line is tied to one eye of the ball, the leash with bait is tied to the other eye. The equipment is good, allowing the bait to approach the fish before the float on the river during surface fishing, without scaring it away. But the equipment also has several disadvantages.
Firstly, tying by the ears, especially if the holes in them are not perfectly processed, is not very reliable - thin fishing lines can fray under load, which threatens an offensive breakage. But this problem can be easily solved - you can either carefully polish the holes of the ears, or knit a fishing line through thin, soft plastic cambrics. In good, high-quality balls, brass bushings are pressed into the holes of the ears, which are gentle on the fishing line. However, if the fish is not very careful, then the leashes can be attached to the eye of the ball using metal fasteners (to which it is good to add a swivel), which, in addition to the reliability of the fastening, allow you to quickly change the leashes.
A more significant drawback of such equipment is the danger of overlap when casting, especially if the leash is long. And cautious large fish can force us to use a long leash (often exceeding 1 m), because they are often afraid of a large alarm. It is, of course, practically transparent, but if it does not move in the general rhythm of the flow, then the fish is perfectly recognized as something foreign, and what is not visible is even worse: an incomprehensible, invisible danger is always alarming. But the problem of overlap is only a problem of casting technique. Here we can recommend the traditional “counteraction”: at the final phase of casting before splashing down the equipment, it is worth slowing down the run of the fishing line from the reel spool, while the leash will “overtake” the float and, stretching out in a straight line, will lie on the water without tangling.
It often happens that a fish (primarily a small one) completely ignores the ball, treating it completely indifferently, and sometimes even plays with it, pushing it with its nose, which is especially typical for small, bold chubs. In this case, it is better to put a short leash, with which there will be significantly fewer overlaps, and the number of empty bites should decrease. The biggest disadvantage of a blind rig is that there is no direct connection between the bait and the tip of the rod, and the fish, if it is not hooked by a heavy float, can spit out the bait, alerted by the same weight of the ball.
Equipping a fishing rod with a liquid float
Looking at the photo of the device of this gear, it becomes clear that there is nothing complicated about it. There are several design options, not counting homemade ones, but in design they are all approximately the same. The main fishing line is attached to the top, and a swivel with a thin leash and a hook at the end is attached to the bottom.
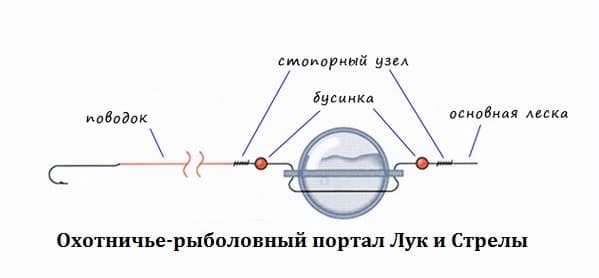
It is worth mentioning that the main line can pass through the upper ring and be wound into the lower swivel, where the float will slide along the line. In this case, stopper knots and beads are placed below and above the main line (they prevent the knot from breaking when casting) to limit its movement. In the first version of the rig, a non-sliding version is made, because the main scaffold is tightly tied to the upper ring. And a separate piece of thin fishing line (leash), for example made of fluorocarbon, is mounted to the lower swivel.
This method is used to catch not only perch, but also other white fish: roach, rudd, chub, bleak. The length of the leash should be selected depending on the location, depth and fishing conditions. More often its length is from 20 cm -1.5 m. The main advantage is its versatility. With one tackle you can achieve different weights by adjusting the volume of water poured, which is undoubtedly a plus. Read the article about catching perch with a fishing rod; in it you will find a lot of useful and interesting information.
In windy weather or when casting far, fill it more, increasing the weight. This way you can fish in weather when a simple float would be constantly blown away by the wind. When fishing in the current during the retrieve, all you have to do is lower the tackle into the water and gradually release (unwind) the line. Thus, the perch will believe that the insect (maggot, bloodworm, worm) is being carried away by the current, and without sensing a catch, it will boldly take the bait.
Blind paternoster
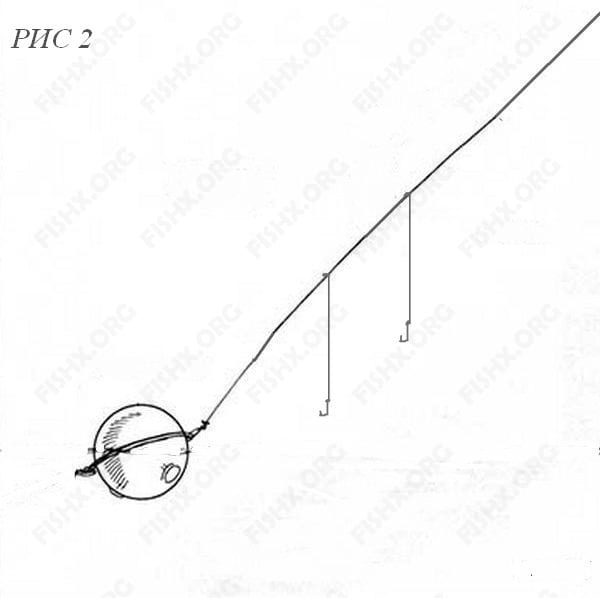
Another blind rig with a transparent float ball is a very interesting design (Fig. 2), and practically does not suffer from overlaps. A fastener with a swivel is attached to the main fishing line, and a ball is attached to the fastener. We tie a leash (or several leashes) to the main line above the float. Fishing with a water-filled float will tell you how much higher, it all depends on what we want to get from the equipment in specific fishing conditions. This multi-lead rig allows you to use a wide variety of baits, both natural and artificial. For example, we put a grasshopper on one hook, a maggot or worm on the second, and an artificial fly or a small, light spinning spoon on the third leash. It is worth noting that this multi-hook rig with a transparent ball is prohibited in a number of countries. Apparently due to “too high catchability.” But in our country, so far, fishing is not prohibited.
Now let's look at some interesting sliding equipment that can be made based on a transparent ball with two ears.
From a plastic tube
To make a float, a tube made of juice, a balloon, a flag or cotton candy can be suitable. Finding it is not difficult. This float is similar to the one described above, only the tube requires a little more modification before use. Its only difference from floats made from waterfowl feathers is its appearance and strength.
The main problem that fishermen face when they want to make such a float with their own hands is making the tube absolutely tight. But there’s nothing complicated about it, just heat the open edges of the tube with a lighter and seal the holes.
It is best to use a soldering iron to avoid leaving burns on your fingers. After all, an open fire is always an increased fire hazard. With a little experience, you will be able to seal the edges of the tube perfectly evenly.
Some fishermen prefer to fill the tube with liquid silicone or plug the holes with it. But such actions require silicone, which not everyone has, and additional time for it to cool. Transparent silicone is best suited for such purposes.
As soon as you make the tube airtight, consider that the float is ready, all that remains is to secure it to the main fishing line. If the color of the tube does not suit you, then again nail polish can come to the rescue. The homemade float is attached in the same way as the first option - on the nipple.
Video
It's worth spending 5 minutes of your time to watch a video on how to make a straw float in a matter of minutes. The tube from the flag was chosen as the main material. Just watch and repeat the actions after the leader.
Sliding equipment
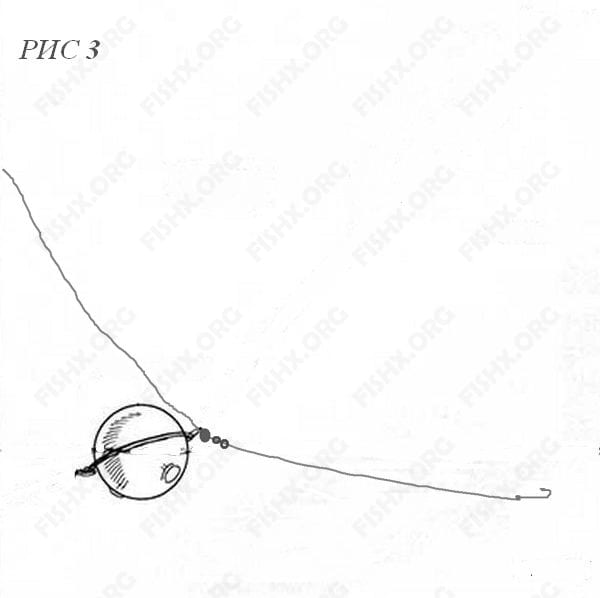
This is also a very catchy installation (Fig. 3.). We pass the main line through one eye of the ball. Then we pull a round rubber stopper onto the fishing line, the role of which can also be performed by a suitable piece of plastic insulation from various wires. Now we tie the main line to one eye of the swivel, and tie a leash to the second eye. A soft stopper in the rig is very desirable, because it prevents the massive float from hitting the swivel when casting, which can threaten to break the eye of the float and seriously load the line assembly that holds the swivel. This equipment is good because the fish does not feel the resistance of the float when biting, because the fishing line slides freely through the eye of the ball. However, for the same reason, the fish will not be able to hook itself and hooking is required. The same free passage of the fishing line through the float will help you not to miss a bite. The bite itself is clearly visible, or it is “heard” by the finger holding the line near the reel.
You can fish with such equipment not only on the surface, but also in the middle horizons, and in shallow waters even at the bottom. To do this, you just need to load the leash with one or more lead pellets. Thus, fishing is good in shallow, fast-flowing waters with an “irregular” current and often “jumping” depth. That is, in those fishing conditions, where no matter how you choose the shape of a traditional float, no matter how you load it, you still won’t be able to clearly distinguish a bite.
How to attach a water ball to a fishing line
In principle, it is very simple to mount the tackle: we tie the main fishing line to one eye in any way. It is still better to use a carabiner for these purposes, but first you need to check whether the tackle is threaded through the loop. The option with a snap hook is perfect when you plan to fish different bottom layers. Thus, you can quickly replace this model of float equipment with a conventional one (and vice versa).
A leash is attached to the other eye of the float using a “loop-to-loop” method. The thickness of the leader line should be small: from 0.14-0.18, because such tackle is mainly used for catching small-sized fish. Depending on the size of the fish, select the length of the leashes from 0.5 to 1.5 m.
In the area of the hooks, the tackle is loaded with several 0.2 gram lead pellets. This way you can distribute the weights more evenly along the entire length of the leash. Hooks can be used in a variety of models.
Shot clamp on fishing line
Here it is appropriate to make a small digression and dwell on this important topic. It is not without reason that in all the “floating times” the main disadvantage of all lead pellets was the “pinching” of the fishing line, as a result of which the fishing line was deformed and lost its strength. And this drawback is all the more significant, the thinner the fishing line. Therefore, the thinnest lead tape, twisted and slightly compressed around the fishing line, was considered a more correct load. But today, few of the fishing fraternity are engaged in such loading, still preferring pellets, especially since there are well-calibrated sets of soft lead pellets on sale. And there is no problem in clamping such a pellet on the fishing line and, moving it higher, securely fixing it. But if during the fishing process you constantly change the location of the pellets on the fishing line (and sometimes you actually have to do this, adjusting to the fish’s bite), then the pellets no longer hold securely and slide out of their places, or even fall off the fishing line altogether. Problem? Yes. An interesting solution was suggested to me by an experienced fisherman - a floater. He suggests clamping the pellets on the fishing line through a small piece of thin cellophane; after clamping, the excess cellophane is carefully removed with scissors. After such an operation, the fishing line is not deformed, and the pellet moves up and down without problems, tenaciously holding on to the fishing line. The option itself is somewhat labor-intensive, but interesting and justified for a floater who wants everything in his equipment to go without a hitch. After all, success in fishing often depends on this.
But let's return to our transparent balls - floats, namely to a very cunning and effective equipment.
A method for making a water-filling float at home
To prepare this gear we will need:
- tennis ball, or any other round-shaped plastic case;
- plastic straw (for example, from juice);
- lead weight.
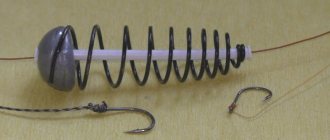
We melt the plastic rod at one end so that a rim is formed on it. We drill the ball (or use a heated awl, as in the picture) in the center of both halves so that the diameter of the hole is slightly smaller than the diameter of the straw.

Then, we put a pre-drilled lead pellet on it. We place one part of the case on the tip of the straw, and move the pellet on the rod close to the plastic shell (the pellet should fix the lid from the inside).
Transparent float with a blade of grass
This equipment can be successfully used when catching the most cautious, distrustful fish that are capricious in clear water. The main idea of the rig is to make the fish's leash completely invisible, eliminating even the slightest suspicion. To do this, some fishermen use a thin reed or some suitable hollow grassy stem that can easily be found on the shore. The equipment is the same as the previous one, only a reed or grass is put on the leash and only then a hook is attached. When retrieving, the picture looks like this: the rig goes upstream along the river, the float goes behind, the leash with the hook in front. A reed (blade of grass) with its edge rests directly on the hook, completely masking the leash. Yes, the fish sees the grass perfectly well, but this is the most ordinary object, which is constantly being chased back and forth by the river current, and it does not alarm the fish in any way. And then there was such a seductively moving bunch of maggots, a grasshopper or a worm clinging to the edge of the reed...
Improved clear float sliding rig
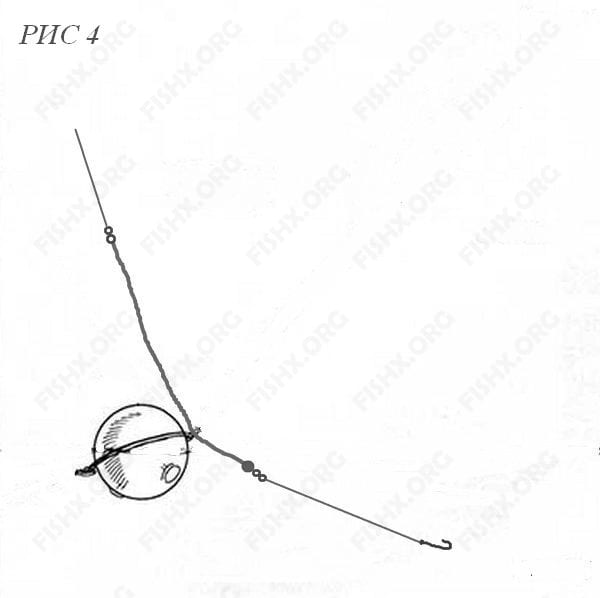
This float equipment (Fig. 4.) is somewhat more complicated in design, but it works clearly, without overlaps, and is even able to hook the fish itself after a bite. A transparent ball is launched through one eye on a half-meter piece of thick fishing line (diameter about 0.4 mm). Then swivels are tied to the two ends of this piece of fishing line. As a result, the float slides between the swivels on a piece of thick fishing line 30-40 cm long. Keeping in mind the shock loads during casting, here too it is better to secure the float with a stopper, installing it on a thick fishing line near the swivel to which the leash is tied. Accordingly, we tie the main fishing line to the second swivel. A thick fishing line along which the float slides behaves more stably when moving, remaining in a straightened state, and the float glides along it better. Self-hooking of the fish occurs at the moment of pulling, when the float rests on the upper swivel, which is the stroke limiter for our transparent ball.
Classic equipment
The sbirulino float is made in the form of an oval shape from plastic or unsinkable wood - balsa. Inside the float there is a plastic tube, the edges of which extend beyond the boundaries of the sbirulino.
The installation is as follows: the main fishing line is passed through the tube so that the thickened part faces the hook. Then a stopper is put on; it can be a piece of elastic or a bead. Then the carbine. The stopper will not allow the carbine assembly to slip inside the float. A leash with any bait is attached to the carbine through a system of swivels, two or three. Several swivels are a necessary condition for installation. This fastener prevents the line from twisting.
The leash length range is very large: from short 15-30 centimeters to 3 meters. But the length of the leash cannot be greater than the rod itself. Fishing in the surface layers requires the use of a long leash; in the bottom layer it is advisable to use a short leash. The size of the leash is also influenced by the type of fish; for predators it is short, peaceful fish are caught with a long one.
You still need to get used to casting a long leash. The bombard itself slides freely along the fishing line. The bombard has an optimal aerodynamic shape, which allows you to make casts with high accuracy; a dart-like tail is attached to it.
Due to its streamlined shape, the bombard flies well even against the wind.
Paternoster for the float track

The following equipment (Fig. 5) is considered more suitable for fishing on lakes from a boat, but it has also been successfully tested when fishing from the shore with long-distance casting. The equipment is made as follows. A stop knot is tied on the main line, then a transparent ball (not filled with water) is passed along the line through one eye, then a swivel is tied. We tie a fishing line to its second eye, taking into account the fishing conditions, length and thickness, equal to the main fishing line or a little thinner. A sinker is attached to the end of this line. We tie several leashes on the sides - a regular paternoster.
There are two possible options here.
In the first case , the load is heavy and it sinks the float, which, due to its buoyancy, maintains the equipment in a relatively vertical position. Floaters usually value this type of equipment while rowing, slowly moving around the water area, looking for fish sites. This method is very good for searching for perch, which has a decisive grip and which often hooks itself. On the hooks of leashes you can put not only natural bait, but also artificial things, for example, small, well-playing twisters, Christmas tree rain, strips of inflatable balls and other homemade and branded baits. This method of perch fishing can be successful not only from a boat, but also from the shore: we cast, slowly pull up, the transparent ball acts as an assistant, because it tends to help the equipment take a vertical position, which benefits our paternoster, especially if there are a lot of leashes .
The second version of this equipment implies that the transparent ball remains afloat, which means that we select a light weight, weighing less than the carrying capacity of a ball not filled with water. In this case, the working descent can be varied both by the length of the fishing line to which the leashes are attached, and by the location of the ball on the main fishing line, because the locking unit can be moved up and down.
Making a float
Making a water-filling float from a deodorant ball is as easy as pie.
Initially, it is possible to select “raw materials” of the required size. I know of three balls of different diameters used in deodorants, and I consider the smallest one to be the most popular, because its size corresponds to the size of real bubbles appearing in water.
At the same time, its own weight, coupled with the sphere filled up to half with water, makes it possible to fish the coastal zone without effort. Larger balls are good for casting over long distances, especially in poor visibility conditions.
I remove the ball from the used bottle and wash it well to remove the smell. I make a through hole with an awl comparable in size to the rod, since with this option it will subsequently narrow and press tightly.
The factory mark at the junction of the two hemispheres of the ball helps to symmetrically punch a hole.
I first melt one end of the rod with a lighter and flatten the end on a flat surface to form a hat. Subsequently, I restore the slightly swollen hole by turning it with the tip of a knife.
Having inserted the rod into the hole until it touches the cap, I cut off the opposite part with a knife, leaving the end a few millimeters long. I cut this end into a cone, so that later it will be convenient to insert and remove the tube when filling the sphere with water.
As a result, the tube simultaneously serves as both a float plug and a channel for passing the fishing line. The water-filled bite alarm is ready, the whole job takes no more than 5 minutes.
To fill the ball with water, simply pull out the tube and lower the sphere into the water. Having collected the required amount of liquid, I close the holes again with a rod-tube.
Considering that during fishing such an operation sometimes has to be performed repeatedly, increasing or decreasing the amount of water inside the ball, I do not make blind equipment.
After passing the fishing line through the ball float, I limit its movement along the fishing line on both sides with silicone stoppers. He lifted the top stopper, poured in water and again moved the stopper towards the ball.
In addition, the lower stopper also acts as a bump stop, since I tie a small swivel to the fishing line and attach the leash to it.
This design additionally allows the equipment to be used as a sliding one, for which it is enough to move the upper stopper along the line.
However, judging by my practice, this only makes sense when fishing with a short cast, when there is good visual control of both the float and the line.
If the bite is weak, it is better to experiment with the length and thickness of leashes, baits, etc.
We suggest you read: When is the best time to catch pike with a spinning rod?
Bottom transparent balls and suspenders
And about one more very interesting way of using a transparent ball, interesting primarily for donkeys. As you know, when fishing for carp, crucian carp, tench, and large rudd, bottom sinkers fall into the muddy bottom and fishing becomes poorly controlled. But here, too, our transparent ball - a float - can come to the rescue. This time it will perfectly fulfill the role of a sinker, because completely filled with water it slowly sinks, lies on the bottom and weakly gets stuck in the bottom silt. At the same time, the ball is practically invisible at the bottom and has sufficient mass for long-distance casting even with an inertial reel of the Nevskoy type. But it may not be possible to give significant tension to the fishing line (for example, to bend the tip of the feeder), because the ball, although heavy, easily drags along the bottom soil. For the same reason, the ball does not perform well as a blind sinker trying to hook a fish, and it is more profitable to use sliding rigs, for example, those that use lead sinkers, the main thing here is the idea.
If the ball is not completely filled with water, leaving a small air bubble inside, then we can achieve neutral buoyancy from our transparent sinker, for example, sinking as slowly as possible in the water column, which allows us to use a very effective technique in summer - using a slowly-slowly descending nozzle. This technique may be the only one that is able to activate biting even during a period of total no-biting.
Fishing with a transparent float ball
Water-filling float
The transparent ball-float catches almost everything that floats, throughout the entire thickness of the water, including at the bottom, and even bottom fishers can learn a lot of interesting things from the capabilities of this signaling device.
Transparent float balls made of organic glass have been present in our stores for many years, and recently more carefully made imported models have appeared. A transparent water-filled float appeared in the fishing world as a competitor to classic fly fishing gear, and the method of fishing with a ball, as they say, was a success. The simplest float equipment with it made it possible to make long casts using a reel and makes it possible to quickly fish large areas of water. However, fishermen did not stop only at the possibilities of surface fishing, but increasingly tried to diversify fishing, which began to be carried out in the middle water horizons, and even from the bottom.
Let's look at various options for using a transparent ball-float, which is actively used by both domestic and Western European fishing enthusiasts. Based on the information presented below, almost every fisherman can expand his experiments with this float, creating some of his own, sophisticated equipment, or a cunning method of wiring. But to do this, you need to clearly understand what a transparent ball is, what it is capable of, and where it can go wrong.
Bad alarm
It should be noted right away that the ball is very bad as a bite alarm; it can’t get any worse. The diameter of the ball reaches 4–5 cm, and even if you paint it in a bright color (which can alarm large fish, especially in shallow waters), we will not see a bite “on the rise”, and when there is a “flood” and “moving to the side” the fish will immediately will feel the inertia of the massive float, and if self-hooking does not occur, it will simply spit out the bait. It is for these reasons that the ball is made transparent - there is nothing to look at it, because practically nothing is visible from it.
Wide range of possibilities
But any float is not only a simple bite alarm, but also a float tool with which wiring is carried out, and the ball has wide possibilities here. It also plays the role of a sinker, and a wonderful sinker that easily allows you to change its weight depending on the amount of water inside. In parallel, as the mass changes, the degree of its buoyancy also changes. And, for example, a ball completely filled with water will slowly sink. A great advantage is its significant weight, which makes it possible to use not only spinning reels, but also inertial reels for long-distance casting. So, for example, a ball with a diameter of 4.5 cm, even unfilled with water, weighs about 10 g; half filled with water - 30 g; completely filled - 50 g.
It is worth noting that transparent floats can be oval, more streamlined when guiding, or sbirulino floats, which generally cut through the water column like a knife through butter, but we are not talking about them today, but about the classic of the genre - a round, transparent float.
Bottom and suspenders
And about one more very interesting way of using a transparent ball, interesting primarily for donkeys. As you know, when fishing for carp, crucian carp, tench, and large rudd, bottom sinkers fall into the muddy bottom, and fishing becomes poorly controlled. But even here our transparent float ball can come to the rescue. This time it will perfectly fulfill the role of a sinker, because completely filled with water, it slowly sinks, lies on the bottom and weakly gets stuck in the bottom silt.
At the same time, the ball is almost invisible at the bottom and has sufficient mass for long-distance casting even with an inertial reel. But it may not be possible to give significant tension to the fishing line (for example, to bend the tip of the feeder), because the ball, although heavy, easily drags along the bottom soil. For the same reason, the ball does not perform well as a blind sinker trying to hook a fish, and it is more profitable to use sliding rigs - for example, those that use lead sinkers, the main thing here is the idea.
If the ball is not completely filled with water, leaving a small air bubble inside, then we can achieve neutral buoyancy from our transparent sinker - for example, sink as slowly as possible in the water column, which allows us to use a very effective technique in summer - on a slowly-slowly descending nozzle. This technique may be the only one that is able to activate biting even during a period of total no-biting.
Homemade - no worse
You can easily make a float ball yourself. The manufacturing technology is known to experienced homemade fishermen. You can recall one of the simple and accessible methods. You will need thin plexiglass (two squares approximately 10 x 10 cm) and a metal ball with a diameter equal to the planned diameter of the float. When heated, the plexiglass becomes plastic, and using a metal ball we squeeze out two hemispheres.
After cooling, the excess plexiglass is cut off with a jigsaw and the two hemispheres are glued together. Instead of ears, you can simply weld two wire loops into the ball, to which we will attach the main fishing line and leash. Two holes with a diameter of about 3 mm are drilled into the ball, which will help fill the float with water and drain it after fishing. We fit suitable dense plugs under the holes. Ready. You can also make very small transparent balls with a diameter of 1–1.5 cm, which are very difficult to find on sale, but which are excellent for fishing with a short fly rod on top, for example, bleak or roach. Almost ready-made ball floats can be found among all sorts of market junk and jewelry, you just have to look at it carefully with an inquisitive fisherman’s eye.
Classic version of blind equipment (pictured)
The classic version of the float rig is the simplest in design: the main line is tied to one eye of the ball, the leash with bait is tied to the other eye. The equipment is good, allowing the bait to approach the fish before the float on the river during surface fishing, without scaring it away. But the equipment also has several disadvantages.
Firstly, tying by the ears, especially if the holes in them are not perfectly processed, is not very reliable - thin fishing lines can fray under load, which threatens an offensive breakage. But this problem can be easily solved: you can either carefully polish the holes of the ears, or knit fishing line through thin, soft plastic cambrics. In good, high-quality balls, brass bushings are pressed into the holes of the ears, which are gentle on the fishing line. However, if the fish is not very careful, then the leashes can be attached to the eye of the ball using metal fasteners (to which it is good to add a swivel), which, in addition to the reliability of the fastening, allow you to quickly change the leashes.
A more significant drawback of such equipment is the danger of overlap when casting, especially if the leash is long. And cautious large fish can force us to use a long leash (often exceeding 1 m), because they are often afraid of a large alarm. It is, of course, practically transparent, but if it does not move in the general rhythm of the flow, then the fish is perfectly recognized as something foreign, and what is not visible is even worse: an incomprehensible, invisible danger is always alarming. But the problem of overlap is only a problem of casting technique. Here we can recommend the traditional “counteraction”: at the final phase of casting before splashing down the equipment, it is worth slowing down the run of the fishing line from the reel spool, while the leash will “overtake” the float and, stretching out in a straight line, will lie on the water without tangling.
It often happens that a fish (primarily a small one) completely ignores the ball, treating it completely indifferently, and sometimes even plays with it, pushing it with its nose, which is especially typical for small, bold chubs. In this case, it is better to put a short leash, with which there will be much less overlap, and the number of empty bites should decrease. The biggest disadvantage of a blind rig is that there is no direct connection between the bait and the tip of the rod, and the fish, if it is not hooked by a heavy float, can spit out the bait, alerted by the same weight of the ball.
Mairis TEKUSKOVS, amateur fisherman, specially for TODAY.