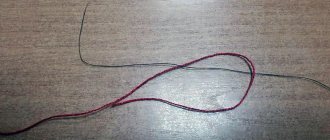
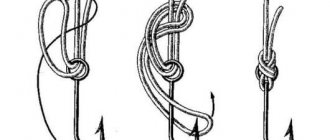
Knots for connecting lines
To connect two fishing lines, you can use one of the suggested methods:
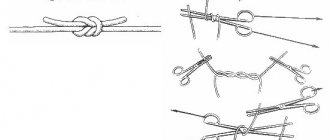
Water node
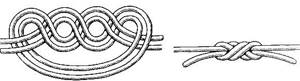
Easy to knit, quite reliable and famous since ancient times. It is used for tying two fishing lines, as well as attaching leashes. Known since 1425, which indicates its suitability.
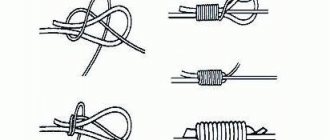
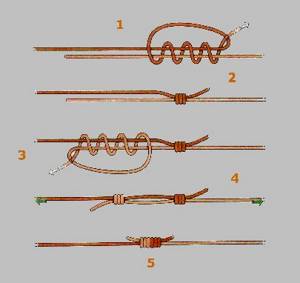
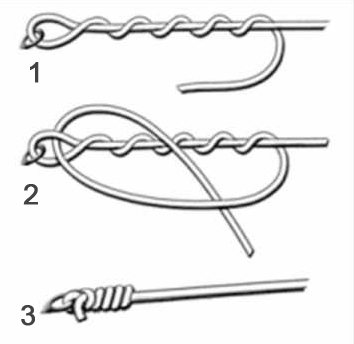
Improved clinch knot
Used to attach a hook (with a ring) and a leash, in turn a swivel with fishing line. As a rule, monofilaments with a diameter of up to 0.4 mm are connected through this knot. The continuity of the connection reaches 95%, but the strength decreases if the knot is knitted on a thick wire.
Fluorocarbon knots
Double Loop Junction
This is the classic way of attaching the leash to the main line. Recently, fluorocarbon leaders have been used primarily.
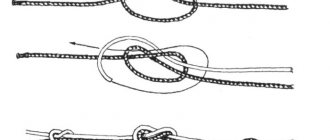
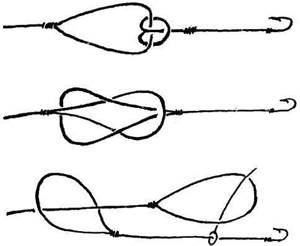
Bloody Knot
Capable of reliably connecting 2 fishing lines that have different diameters. Differences in diameter can reach 40%, while the connection retains its strength by 90%.
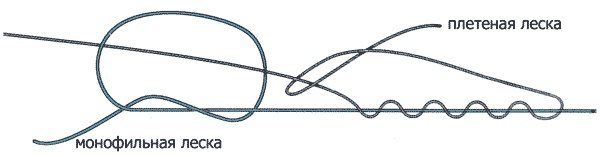
Double sliding knot “Grinner”
Designed for tying braids and monofilament fishing line, which have differences in caliber up to 1/5.
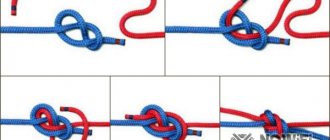
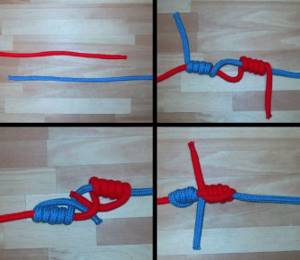
Albright knot
In addition, it is suitable for reliable connection of fishing lines of different diameters. The knot is more complex in knitting technique, but comes out very compressed and easily passed through the guide rings.
How to tie two fishing lines. ALBRIGHT KNOT HD
Bouquet of white chrysanthemums
Such a small and simple element as a blind loop has not only practical and applied applications. Using it you can make interesting interior crafts, as well as decorate clothes or accessories with flowers.
Let's knit a chrysanthemum according to the proposed pattern:
For the flower we knit several round tiers of different sizes, crocheted with a fringed edge.
- 1st row: to knit one tier, you need to tie a sliding loop with the 6th st. without nac.;
- 2nd row: dial 4 v. p. and 1 p. rise and tie a chain of 4 sts. p. from top to bottom with connecting loops; we knit up to the 1st row, using a connecting loop we make the transition to the next loop and again cast on a chain of 4 sts. p. and tie it with connecting loops from top to bottom; and so on in a circle until the first petal;
- we knit the next tiers larger than the previous one;
- We place the finished parts on top of each other in descending order and fasten them together.
Article on the topic: Openwork pullovers knitted from angora and mohair with diagrams and descriptions
If necessary, make a stem and leaves. The flower is ready. Using the same pattern, you can knit a bouquet of dandelions. This little helper, the connecting loop, is so widely used in creating knitted items.
If you show your imagination, there are many more options where this loop will be useful.
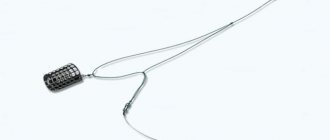
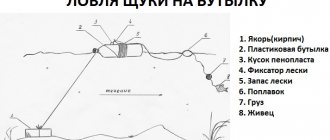
Knots for shock leader
Shock leader is a piece of fishing line of large diameter, the length of which is about 8-11 meters. This segment has increased strength due to its large diameter, so special units are used to secure it.
It is better to fix this connection point with a drop of superglue. This will not only strengthen the connection, but will also make it easier to pass it through the rod guides. During fishing, you should control the location of the knot: it should always be at the bottom so that when casting the fishing line does not cling to it.
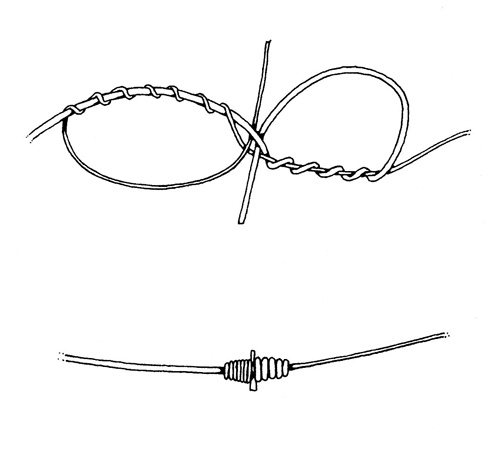
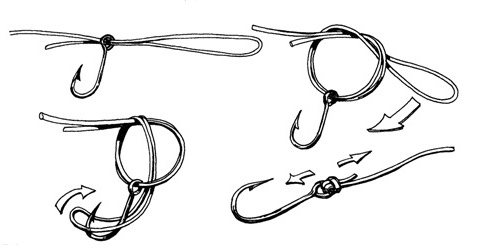
"Carrot" (Mahin knot)
It has small compact dimensions, and with its help you can tie several monofilaments and a shock leader from the same fishing line.
Albright Special Knot
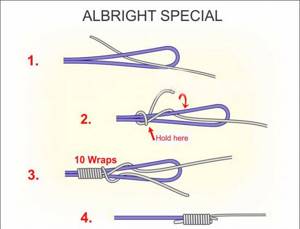
Refers to a series of simple knots, but reliably connecting the main line with the shock leader. You can see it in the video above.
Blood knot
It is used when tying fishing lines that differ in thickness by no more than two times. The reliability of the connection is 90% of the strength of the fishing line.
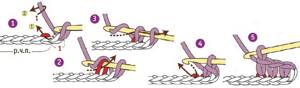
Crochet single crochet
1. Insert the hook under the two arcs of the loop, pr.r. 2. Capture a slave. a thread. 3. Pull out the loop; two loops have formed on the hook. 4. Capture a slave. thread and knit two loops. 5. Knit the row to the end, knitting loops in two arcs of the loop, pr.r.
Single crochet behind the back wall
Single crochet how to crochet video
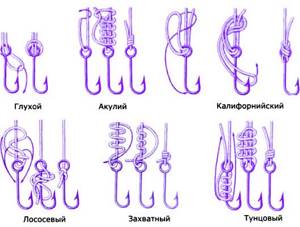
Knots for tying a hook
Palomar knot
Almost all fishermen know this. Its purpose is to attach swivels to the main fishing line, as well as connect twisters to hooks that have eyes. Unfortunately, knitting it requires that the fishing line be folded in half, and this increases the overall dimensions of the knot.
"Crawford" knot
Very often used for tying hooks with eyes, since the knot strength reaches 93% of the strength of the fishing line. It can be used on any fishing line (braid or monofilament), where it shows excellent strength results, and knitting it is quite simple.
"Bayonet" knot
It knits well on monofilament fishing line, but it is not recommended to use it on braid.
"Fisherman's Eight" and "Canadian Eight"
They have good reliability when attaching a hook and eye. If desired, such knots can be easily untied.
"Grab" knot (Clinch)
Perfect for connecting braided fishing line and a hook made of thin wire. However, this knot is not recommended for use on thick wire, including for attaching the winding ring.
Knot "Stepped"
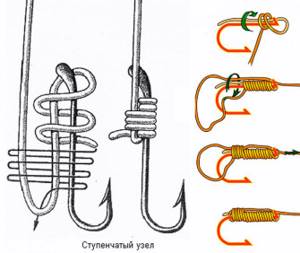
Intended for tying hooks that have a spatula rather than an eye. Hooks with a spatula have increased strength, as they are created using forging methods. The reliability of such a unit is quite high and corresponds to the stability of the fishing line itself (that is, 100%).
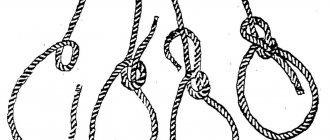
Twisted Dropper Loop Knot
With its help, you can tie a hook to the main fishing line at any point, but before that you need to form a loop on the fishing line. It is often used in sea fishing, when it is necessary to very often change one hook for another or the bait of one type for the bait of another.
Centauri Knot
Does not affect the strength of the fishing line, therefore does not reduce the reliability of the connection.
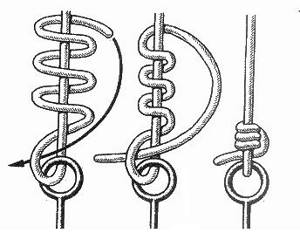
"Hangman's Knot"
It is one of the most reliable units in terms of strength.
"Scaffold Knot"
Refers to sea knots, where you need to tie hooks to a fairly dense fishing line.
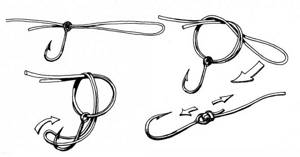
"Snelling A Hook"
A fairly complex knot, but it is reliable and durable and is intended purely for tying hooks to fishing line.
"Turtle" knot
Easy to knit but has good strength when crocheted with eye hooks. Ideal for drop shot rigs.
How to tie a hook to braid
Several ways to tie hooks to fishing line.
Clinch Knot
There are many different knots, but as a rule, fishermen use 2-3 knots. Clinch knot.
Manufacturing:
- The end of the braid is threaded into the eye of the swivel at a distance of 7-10 cm.
- We bend the braid at the ear to form a small loop, which we pinch with our fingers.
- Make 5-7 turns with the end of the cord around its main part. We hold the turns around the main line with our fingers.
- Then the end of the cord is threaded into the first loop, which we clamped with our fingers.
- Next, the cord is threaded back into the large loop.
- Tighten the knot.
Knot "Palomar"
A universal knot, not only for hooks.
Manufacturing:
- Bend the end of the cord in half at a distance of 7-10 cm from the edge.
- We thread the double end into the eye of the hook 3-5 cm.
- We make a regular knot on a double section. Do not tighten the knot.
- We thread the hook through the loop at the end of the double cord.
- The knot is tightened after wetting it.
Knots for spinning baits
A hook knot in which the line is not tied around the shank is excellent for attaching spinning baits. These include:
- Palomar knot;
- "Step Knot";
- cape method;
- "Crawford" knot;
- double “clinch” and “clinch” gripping;
- Twisted Dropper Loop node;
- Scaffold Knot;
- "Shark" knot.
All of the listed nodes are described in detail earlier in this article.
Other types of knots for spinning baits
Double stevedoring
The knot is about 100% reliable and will firmly hold any bait on the main line.
"Eight"
The simplest knot, with the help of which a loop is formed, to which you can easily and quickly attach any bait. This connection method allows you to change the bait in a short time.
Small and remote
Let's look at all the options for using a connecting loop using examples with photos:
- connection of crocheted parts.
Separately knitted elements that are connected to each other using a connecting loop to form a large web. For example, plaid, skirts and tops made of ribbon lace.
Such a connection can be invisible, or it can be decorative at the request of the master.
- stitching knitted or crocheted products with a connecting loop.
Article on the topic: Summer openwork blouses knitted from cotton: patterns with descriptions
Used when sewing thin knitted or openwork fabrics. This seam does not stretch and perfectly maintains the shape of loose products. You just need to remember that such a seam is quite voluminous, so it needs to be done with a thin thread.
- joining rows when knitting in the round.
To complete the row evenly and imperceptibly, a connecting loop is used in circular knitting. With this method of joining, the circle turns out to be very beautiful. All rows are strictly parallel to each other.

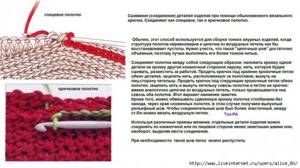
- strengthening the edge of the product.
To protect the edge of the product from stretching and deformation, we process it using connecting loops.
To do this, knit 1 stitch from the first loop of the edge. P.; then insert the hook into the 3rd stitch from the chain stitch and pull the working thread through both loops. So we knit until the end. After such strengthening, we obtain a dense edge of the product. This is especially important when you plan to use large and massive buttons.
And if you need to quickly tie a string or lace, then a chain from c. The item must be tied on both sides with connecting loops.
- decoration of the product with a decorative chain of connecting loops.
It happens that the edge of a knitted fabric looks sloppy and boring. In this case, tying with connecting loops in a contrasting color will be an excellent finish to the product, which will also keep the edge within the required limits.
Using a chain of connecting loops, like a pencil, you can draw any patterns on the canvas. It is convenient to darn woolen socks with such a loop. The patch is invisible and very durable.