“Rapala knot” is a fishing method of fastening baits, developed and offered by . This is a popular Finnish manufacturer of artificial fishing baits.
The unit is designed for wobblers and spinners produced by the company. Its brand name is from . Each product package contains detailed information on how to tie such a loop.
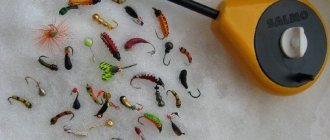
Rapalava fasteners can be used when installing other different types of baits, flies of different weights, streamers, hooks.
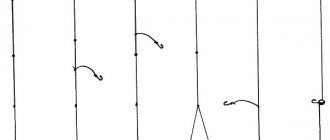
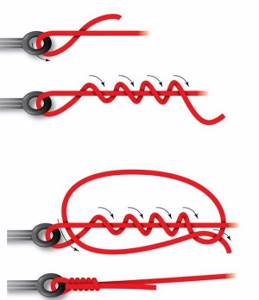
Step-by-step knitting pattern
Tying a knot is easy if you know the order of steps:
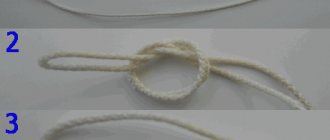
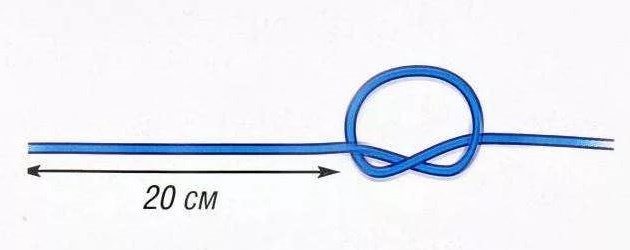
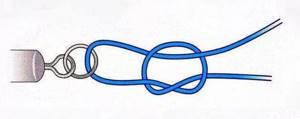
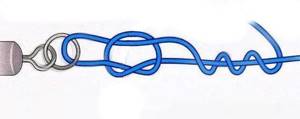
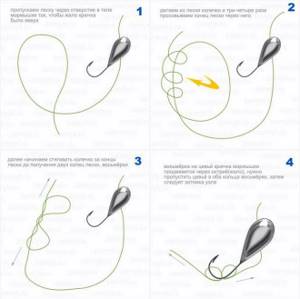
| 1. At the end of the cord, make a simple knot (15-20 cm not reaching the edge), do not tighten it. |
|
| 2. The free end is passed through the eye. |
|
| 3. It is inserted into the loose loop of the knot. |
|
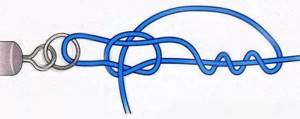
| 4. The free edge is wrapped around the main cord at least three times. A loop of the required size is formed near the eyelet. |
|
| 5. The end of the winding is put back into the loose loop. |
|
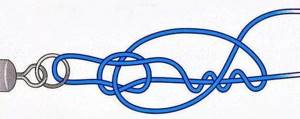
| 6. Passed into the loop between the running and root ends of the fishing line. |
|
| 7. The knot is wetted and tightened. The excess end of the fishing line is cut off. |
|
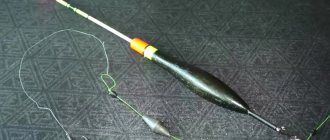
It is better to use a non-slip loop with a rapala knot for a wobbler directly. Without an additional leash or other devices. This will improve the performance of the bait. However, it will increase the risk of losing it while fishing for pike. She'll just bite the line.
This fastening method is suitable for almost all produced fishing materials:
- Kevlar;
- fluorocarbon;
- braided;
- monofila.
Before tightening the knot, the line should be wetted. This will make it more durable and extend its service life.
Knots for tying mothless hooks with holes
The basic requirements for winter knots are dictated by fishing conditions.
If in the summer nothing prevents you from calmly tying up the torn tackle, then in the winter it is more difficult to do this due to frost and wind. The knots for equipping winter fishing rods are simple and durable. They knit quickly, but it will take a little practice. A jig always consists of a body and a hook, but the methods of attachment may differ, and they depend on the configuration of the bait. Despite the variety of models, they come in two types:
- With an ear (ring);
- With through hole.
Based on this, nodes are selected. Almost all jigs with a ring are suitable for tying ordinary summer hooks with an eye. The most popular ones:
- Clinch;
- Palomar;
- Trilene;
- Rapala for light lures.
If you tie it incorrectly, the fish will not be hooked. If the knot is weak, the loss of the bait cannot be avoided. The effectiveness of fishing and the safety of the gear depend on how correctly the jig is tied.
To tie a rewinder with a hole in the body, we use the same methods as for the forend with an eye. Only the fishing line, accordingly, is passed from the side of the sting into the body of the jig. Again, do not forget about the influence of the suspension method on the angle of the bait in the water. If it is necessary to position the bait vertically, we attach it to a loop, passing the monofilament through the body of the reelless bait.
The knots of this method are the same - the clinch and the fishing loop (Canadian knot). Devils with a through hole are tied in a similar way - the fishing line is passed through the body of the bait and tied to the shank of one of the hooks. Reelless reels made of soft metals (tin, lead) can still injure the fishing line at the ends of the hole over time.
Eight on the forend
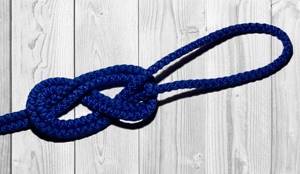
Fisherman's Loop (Canadian Knot)
In principle, the same components are used for a tungsten reelless machine. However, some measures are being taken to protect thin monofilament from damage from hard metal. The fishing line can be especially damaged when a large fish is pulled or tugged at the ends of the hole. Solutions to the problem:
- Equipping the hole with cambric;
- Tying through braided line;
- Forming an additional contour around the body of the mothless (to distribute the load);
- Carefully tighten not through the body, but on the fore-end itself, so as not to rub the line against the edge of the hole. The slack used for tightening is then pulled out.
For more details, see the article on tying jigs.
You need to tie a tungsten reelless reel to the monofilament very carefully, without damaging the fishing line at the moment of tightening - otherwise you can easily lose an expensive bait with even a weak tug of the fish on the hook.

Through the braid
Pros and cons of the node
The obvious advantages include the ability of the bait, on such a loop, to create natural, natural movements. The knot allows you to make the size of the loop sufficient for the free play of the wobbler (spinner).
Another plus is that most of the strength of the fishing line is retained. The load is transferred to the loop through the center turn, which is ensured by the knitting structure of the knot.
The downside is the inability to use the knot with very thin fishing lines. It has too high (cutting, compressive) forces inside itself.
Well suited for catching perch and pike perch without the use of an additional leash. Its use directly is not advisable for pike fishing.
Features and Application
Initially, the Rapala knot was recommended by the Finnish company for attaching its baits. It was indicated on the packaging of wobblers from a famous Finnish manufacturer as the preferred installation method, and a mating diagram was included. Of course, the scope of its application is not limited to this. This installation method is well suited for any wobblers. First of all, it is relevant for small and light models.
But the Rapala knot performs well not only with wobblers.
It is also, for example, perfect for small light-weight spoons, heavy flies and streamers, as well as for many other lures. Thanks to its use, catches can be significantly increased. Reference! The Rapala knot is well suited for winter fishing, where it can be used to tie any bait - jigs for fishing with bait and reelless ones, spinners, balancers, cicadas, ratlin wobblers for vertical fishing and others.
This installation method is especially relevant for mothless ones. The Rapal loop has significant advantages, which determine its relevance in wobbler fishing and beyond:
- A bait or equipment element mounted with a Rapala knot has a maximum degree of freedom, since the eye can move inside the loop. In the case of a bait, this allows it to play very naturally. As a result, it turns out to be as attractive as possible to fish. It is precisely so that anglers can maximize the potential of its wobblers through better play that Rapala suggested anglers use this installation method. The smaller and lighter the bait, the more its performance can be improved by using this knot. This is especially true for those of them that must undergo any vibrations in the water. In summer, the Rapal loop is applicable, in addition to wobblers, primarily to small oscillating spoons, and in winter – to reelless baits. The latter, if they are tied to the tackle with a Rapala knot, begin to make additional movements - swinging. When fishing with lures, the game is not so important, because there is a strong additional attractive factor in the form of bait on the hook.
- Despite the fact that the bait tied using the Finnish knot has a large degree of freedom, it is attached to the tackle very securely. Highest strength and reliability is the second advantage of this installation method. There are no strong kinks in the fishing line when knitting it, so it retains about 90-95% of its original breaking load. This is a very good indicator, which most knots used by the majority of fishermen do not reach.
- Another advantage is that installing the bait with a Rapala loop does not involve the use of any fasteners. These elements of equipment, on the one hand, have noticeable weight and can also worsen the performance of the bait. On the other hand, in some situations they reduce the number of bites, as they alert the fish.
- The Rapala loop is well suited for both monofilament and braided fishing line.
But this installation method also has its disadvantages:
- The Rapala loop is far from the simplest knot. Many people even find it difficult to remember it so that they can later repeat this montage while fishing. Having learned how to knit a Rapala loop once, you can easily forget it after some time. But tying such a connection is accessible to everyone, including anglers with thick fingers, poor eyesight and not very good fine motor skills. If difficulties arise, it is enough to simply use a longer piece of fishing line as a working one when tying. True, in this case the following disadvantage of the Rapal loop is more clearly manifested.
- Tying this installation involves a fairly large consumption of fishing line. This problem is aggravated by the fact that every time the bait is changed, it has to be tied again - after all, the Rapala knot does not involve the use of carabiners or winding rings that would allow it to be quickly changed. If the bait is tied to a monofilament, everything is not so bad, because such fishing line is inexpensive. But the best option for spinning is braid, and if the bait is attached directly to it, without a leash, it is the cord - the most expensive type of line - that will be quickly used up. For sports fishermen during competitions, and even during training, this does not pose a problem. But amateur fishermen do not need such a decent consumption of expensive fishing line, which the Rapala knot suggests.
- The scope of application of the Rapal loop is small. Its use is really justified only in the case of light baits, mainly those that must make various vibrations in the water. However, in many situations it is impossible to use the Rapala loop - for example, when fishing for pike, when using a metal leash that is resistant to the sharp teeth of this predator.
The features and advantages of the Rapala node are described in this video:
What can replace the Rapala knot?
For a wobbler to play well, as intended by the manufacturer, it requires minimal restriction of its free movement in the water. This can be achieved by eliminating all kinds of winding rings, clasps, swivels, and steel leashes. The Rapalava knot does this very well. You can replace it using the following similar fasteners:
Tight loop
Can be used for wobblers and fly fishing.
Knitting pattern:
| A simple flat knot is formed (12 cm from the edge of the fishing line). The free end is threaded through the eye of the wobbler, leaving a loose knot (leaving approximately 9 cm of working length). |
| The knot is tightened (distance from the ear 2 cm). |
| On the main line, using the free part of the tip, another knot is made, wetted and tightened. |
Historical information about the node
The appearance of some nodal connections has become an extreme necessity due to the birth of new equipment and artificial baits. The mass fascination with wobblers among spinning anglers has revealed a number of negative aspects associated with connecting the bait to the fishing line. It turned out that with a rigid installation option, the mobility of the wobbler is lost. And predatory fish are distrustful of the slightest disruption in the action of the bait. Specialists from the famous Finnish company Rapala tried to solve the problem of attaching wobblers to fishing line. They noticed that when the wobbler is connected to the thread using a sliding mount, the fish bites better than in the case of a fixed mount. Thus was born the popular Rapalovsky knot, which received the brand name Jam Knot. This is the option recommended in the insert when purchasing wobblers from this Finnish company. What are the strengths and weaknesses of this type of bait-line connection?
How to attach a reelless jig with an eye
Thin fishing lines of 0.06-0.14 mm are used on a reelless fishing line, so the formation of knots must be approached carefully - such a thin monofilament can easily be injured by careless tightening. The general diagram of any node looks like this:
- Formation of the selected node.
- A gentle tightening so that all the weaves fall into place.
- Wetting the node.
- Final tightening.
- Trimming the end of the fishing line.
We invite you to read: What gear is needed for winter fishing: what to take with you [2019]
Careless tightening leads to damage to the monofilament, so you need to tie it as carefully as possible. Some tying methods used for conventional jigs will not work. Typically, a mothless fish (with the exception of devils and the like) in the water should be located perpendicularly or at an angle to the vertical.
The game of the bait depends on this. However, all reelless fishing is a constant experiment. Perhaps using a suspension at a different angle will, on the contrary, make the rewinder work better. With this issue, the fisherman needs to constantly experiment in search of a working option. Let's look at how to properly tie a reelless jig to a fishing line.
If you dig everything up, you will find hundreds of ways to attach baits. The angler does not need to know them all. Typically, each individual angler uses several proven knots in all cases. When choosing a method for tying a jig with a ring, you must not forget about the angle of suspension of the bait. Here are some ways to tie.
Direct suspension
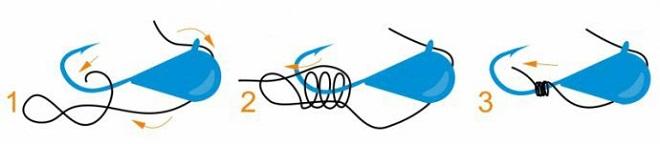
For direct suspension with a ring, diagrams and instructions can be found on any website or in a fishing publication. This is a standard suspension for hooks, lures, swivels, etc. In reelless fishing it is used for ringed devils and baits that require a strictly vertical position in the water. Naturally, you cannot use a simple knot - the fishing line will lose up to 60% of its strength at the point where it is tightened. You can use the usual methods - a palomar fishing knot, a clinch or a suspension in a loop. Let's take a closer look at how to tie a jig with a ring.
Palomar knot. The scheme is simple and reliable. However, it may not be feasible in cases where the reelless ring is so small that the fishing line does not pass through it twice.
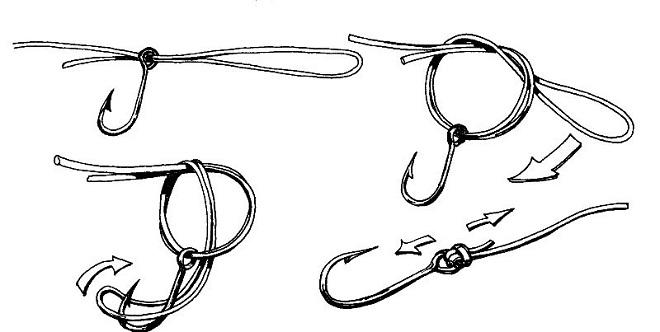
Palomar assembly diagram
Clinch. Another common and reliable node. You can use both a regular and a reinforced clinch, when the end of the monofilament is once again additionally threaded into the loop.
Improved Clinch
Loop
Attaching a reelless jig in a loop somewhat changes the game of the bait. How this will affect the fish can only be found out in a reservoir under specific fishing conditions. Due to the fact that the reeler runs freely in the loop, and its front part at the attachment point moves due to the hinge joint, the reel will make a more “cheeky” play when reeling.
Devil in a loop
Figure eight knot. Please note that the bait is threaded into the loop immediately when tying it (to run freely along the line). The spinning method, when the loop itself is threaded through the bait and then the object of the tie is inserted into it, will not work. Otherwise, the meaning of the loop node – free movement – will be lost. The loop is made small - no more than 1 cm long.
Forming a figure eight loop
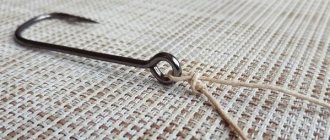
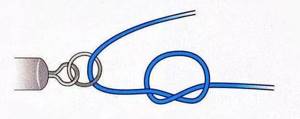
Rapala knot. This knot is recommended for tying wobblers and rattles because of its reliability and loop strength. Also suitable for jigs with a ring for direct suspension.

Rapala knot
Forend suspension
To tie a jig with an eye at an angle to the vertical, the end of the monofilament is threaded through a ring (like a hole in the body) and tied to the fore-end with a clinch or a regular fishing self-tightening loop. Due to the change in the tension vector, the hook rises slightly to the side.
Suspension with a pass through the ring behind the forend
Learning to knit a joint
The Rapala knot is also great for jigs. It is more reliable than other options. As you can see, this node has enough advantages. And it is suitable for different elements and purposes.
Many fishing professionals advise making this knot on fluorocarbon fishing lines and installing a swivel on it. The result is excellent motor function and reliability. Just be sure to pay attention to the fishing line. It should be free of dents, tears or bends.
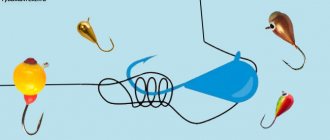
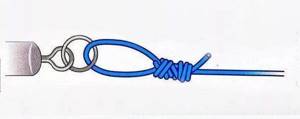
The Rapala knot is designed for elements with a loop or eyelet fastening. First, a regular knot is made, then the end of the fishing line should pass through the hole of the wobbler. Thus, the knot is knitted obliquely.
The end that will be the running one must be wrapped around the axial one three times. After this, it is threaded into the eye of the wobbler with a twist back. Next you need to pass it through the loop. Next, the knot is tightened.
There are different fishing knots for leashes, but the Rapala knot is indispensable for tying baits.
Source: sezonribalki.ru
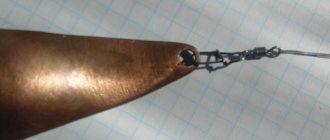
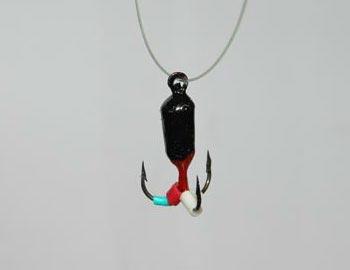
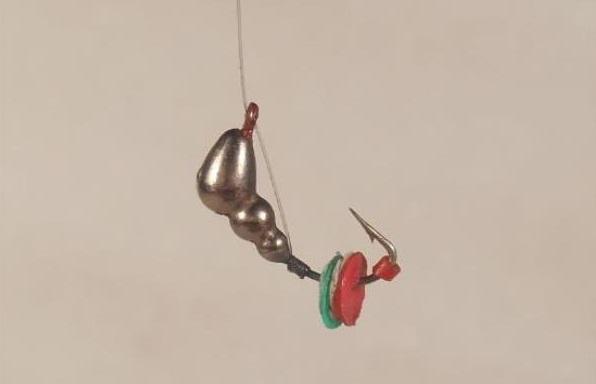
Tungsten jigs
Lures made from tungsten are heavier than lead baits. This allows you to quickly lower them to great depths, but it is difficult to make through holes without chips, burrs and roughness in this material. Therefore, they often fray the fishing line. A break occurs.
To avoid this, they use knots that minimize the contact of the line with the metal. To do this, they install braided leashes or modify the hole in the jig - insert a cambric in the manner that we have already described.
We suggest you read: How to Correctly Wind a Line on a Mower Reel
If you decide to use braid, then the sequence of actions is as follows:
- The main line is passed through the hole on the fore-end side;
- Form a loop out of it and pass the free end back - on one side of the hole you will get a loop, on the other - two ends of the fishing line;
- Pull the braid through the loop;
- Pull the two ends of the fishing line so as to pull the braid towards the point of the hook;
- Now a braided loop is formed (it will act as an ear), its height is 1-2 mm;
- You need to wrap the hook around the free ends of the braid (we wrap it clockwise with one end, and counterclockwise with the other);
- We tie a regular knot, the ends of the braid need not be cut, they will act as a kind of plumage that attracts fish;
- We tie the main fishing line to a braided loop using any of the fishing knots.
If you don’t want to deal with modifications, purchase soldered models made of tungsten and other dense metals with an eye. A ring that is too thin increases the likelihood of breaks, so the thicker the wire, the better.
There are instructions on the packaging that detail how to tie the jig to the fishing line, but most fishermen have been using the same proven, automated knots for years. There are not as many of them as you might think. For a beginner, universal ones such as the clinch and palomar are quite suitable.
What are the methods for attaching a wobbler?
Every self-respecting fisherman who is keen on hunting for predatory representatives of water bodies should imagine how to tie a wobbler without subsequently having problems with its loss. You need to have a clear understanding of when, in what way and with what knot, depending on the material of the main cord, you need to fasten it.
There are a number of ways this manipulation occurs:
- The wobbler can be attached to the main cord through a leash with a clasp or by direct connection to the cord.
- The wobbler can be secured using a winding ring.
Attaching the bait through a leash is useful when fishing exclusively for pike. Her teeth do not spare either fishing line or braid. Here a steel leash is a mandatory precaution. As a rule, steel leashes are sold equipped with a swivel on one side and a metal fastener on the other.
To give the bait greater degrees of freedom, and it is no secret that the leash seriously inhibits the play of all wobblers, it is recommended to remove the swivel and make special demands on the fastener.
Important! Unlike spoons and especially spinners, wobblers do not twist fishing line or braid. Consequently, the swivel does not provide any useful component in the equipment and can not be used.
The fastener is selected based on the size of the bait. The best option would be a fastener made of strong wire in the form of a hairpin. The fastener is attached directly to the eye, mounted into the body of the wobbler, without any kind of transition elements. The leash itself is tied to the main cord with a blind knot, the types and features of which we will talk about below.
How to properly tie a wobbler directly to the cord, without limiting its movements, can be understood by considering the knots that ensure the formation of a tight loop at the end of the braid or fishing line. Using these features of some nodes, you can tie a wobbler, leaving it all degrees of freedom absolutely without restrictions. As a result of fastening through a tight loop during retrieving, and especially during their pauses, the wobbler for these moments is completely deprived of connection with the rod and cord, showing the maximum of qualities invested in its ability to play by the manufacturer. According to the presented type, baits are knitted for catching fish such as perch, asp, rudd and even pike perch. The absence of a toothy mouth gives confidence in the integrity of the bait and line during the bite.
Important! When the bait is tied directly to a fishing line or braid, its most vivid and expressive game is ensured.
The use of a fastener to attach the bait can be considered only a conditionally direct method of fastening. After all, the fastener during wiring, no matter how miniature it may be, will in any case affect the freedom of operation of the wobblers and limit their capabilities. But many fishermen, omitting this nuance, are happy to use this method of equipment. After all, it is convenient for quickly changing the used artificial fish to another, without wasting time on tying knots and saving the length of the main cord on the edges. If you frequently change bait and retie during one fishing trip, you can lose from one to three meters of the useful length of the cord.
To tie a wobbler, minimizing the restriction of its freedoms and, in addition, avoiding constant tying, you can attach an artificial fish using winding rings. With this method, a winding ring is knitted to the end of the braid or fishing line. The same ring is inserted into the fastening loop of the wobbler; experienced fishermen have probably noticed that some models of wobblers are initially equipped by the manufacturer with this accessory for fastening this type.
The winding ring on the cord is knitted according to the principle of a tight loop. The fish is secured by inserting one ring into another. When the bait is working, the rings do not affect its game, rolling freely over their surfaces, relative to each other, at 360 degrees. The inconvenience is the not very quick change of baits. Although, once you get the hang of it, this manipulation is quite doable within a couple of seconds, and the inconvenience, especially during passive fish activity, pays off with more frequent exits due to the more natural play of the wobbler.