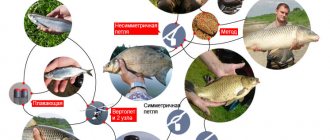
Tying a hook to a fishing line so that the knot is easy to tie, but at the same time maintains the tensile strength of the fishing line, is not as easy a task as it might seem at first glance. Over thousands of years, fishermen have come up with dozens, if not hundreds, of ways to tie a hook to a fishing line. The modern fisherman can only choose one of them.
When choosing a knot for tying a hook, an angler must consider the type of hook used, the material from which the fishing line is made, its diameter, and the approximate size of the fish that is intended to be caught.
In our article we present all the main fishing knots that are used to tie a hook to a fishing line. Choose one or two knots for yourself, try tying them at home, and when you remember the principles of tying them, you can use them in real fishing.
How to tie a hook to a fishing line
To properly tie a hook to a fishing line, the angler must take into account the influence of the material of the fishing line and its shape on the choice of the appropriate knot. When tying a hook to a fishing line, you should take into account the diameter of the fishing line, its rigidity and its breaking load.
Nylon, fluorocarbon and braided lines require different tying methods and different knots.
For example, using a knot designed to tie a hook to a braided line on a nylon line will most likely lead to the knot loosening, untying and losing the trophy.
The force with which the knot is tightened also has a serious impact on the final strength of the knot. Nylon and fluorocarbon, as a result of friction when tightening the knot, are susceptible to burnouts and complete loss of strength. To reduce overheating of the fishing line from friction when tightening the knot, the fishing line must be moistened with water, or simply with saliva.
Braided fishing lines are susceptible to abrasion and subsequent rupture at friction points. For this reason, self-tightening knots should not be used with braided lines, especially if large fish are expected to be caught.
The basic principle of knitting any fishing knot is to minimize deformation of the structure of the fishing line material, for which the knot is formed from many loops and rings that duplicate each other. This same set of loops and rings prevents the knot from loosening and self-untying, increasing its strength and reliability.
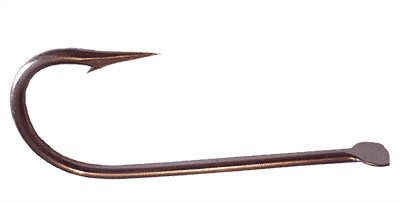
Hook with spatula
Many anglers often use eyeless hooks. For example, almost all branded carp hooks are made without it. Let's figure out how to tie a hook with a spade to a fishing line, because the knots provided above will not allow you to do this, with the exception of a universal one.
Never tie a hook without an eye using a Palomar knot.
. If the end of the fishing line is not pulled through the eye, the knot may unravel spontaneously. Tie only using knots described below.
The strength and reliability of such connections have been personally tested by me and I can vouch for the fact that your trophy catch will not be lost
at the most crucial moment. So, let's get started and figure out how to properly tie a hook to a fishing line.
Universal knot for hook without eye
This knot is quite simple, it is suitable for tying hooks with an eye or a spatula
. It is very easy to knit. The strength is quite high and it is not inferior to the Clinch knot. Below you can see a photo illustration of how to properly tie a hook to a fishing line.
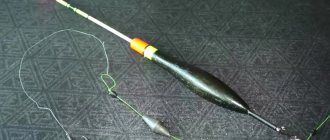
Place the edge of the main line parallel to the shank of the hook (if the hook has an eye, pass it through it). Then make a small, loose loop. The working end of the fishing line needs to be wrapped around the forend 3-7 times ( small hooks are tied with 3 turns
).
Lay the line very carefully, making sure that the turns lie close, but do not intersect. Crossing the turns will prevent the knot from being tightened properly.
When you have finished laying the line and are sure that the turns are even, wet the knot and tighten it. Try to pull both sides of the line with the same force
. Usually, the tightened knot is located in the middle of the shank, but it can be easily pulled with your fingers to the blade of the hook.
Please note that if the turns cross, the knot will break at the slightest effort, which is not good. Now the most interesting part - I recommend that you watch a video on how to tie a hook to a fishing line.
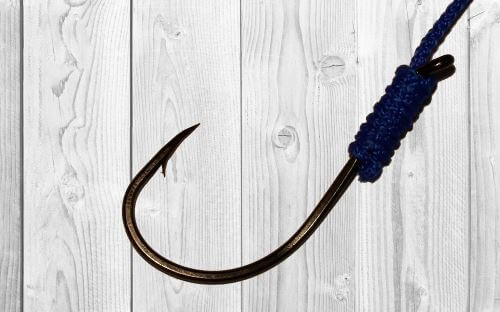
Snood node
Hooks without an eye are often tied with a Snood knot, which is excellent for fixations of this kind and purpose. The main advantage of this connection is that it is suitable for thin and medium lines
. Just always remember: the thicker the line, the fewer turns you wind.
It has been proven in practice that you need to use 5 turns and no more.
Now let's move on to the step-by-step instructions:
- Take the free end of the fishing line and use it to make a loop around the blade of the hook;
- Take the hook in one hand and the edge of the line in the other and wrap about 5 turns around the shank of the hook;
- Moisten and tighten the knot;
- Remove excess line.
And again the time comes to watch a video on how to properly tie a hook to a fishing line so that it does not come loose and hangs firmly and securely.
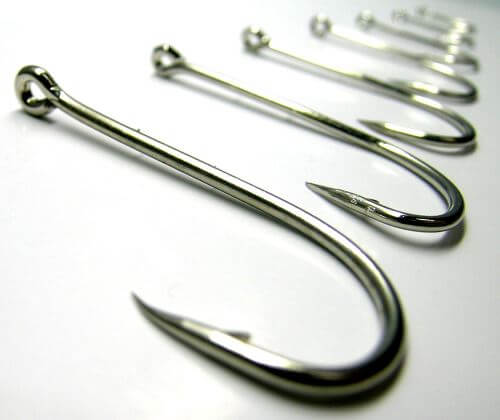
How to tie fishing line to a hook without an eye
Hooks without an eye are a special type of fishing hook; such hooks have a special blade instead of a ring for tying fishing line. Beginner fishermen most often avoid hooks with a spatula instead of an eye, because it seems to them that when tying a fishing line to such a hook, the connection between the fishing line and the hook will not be strong and reliable. In fact, tying a hook without an eye is no more difficult than a regular hook, and if you use the right type of knot, the connection will be no less strong and reliable than that of a hook with an eye.
When using hooks with a spatula instead of an eye, there are a number of nuances to their use:
- The spade hook is better suited for catching wary fish where a neat presentation of the bait to the fish is required.
- The knot of the hooks with the spatula is placed on the fore-end and therefore turns out to be more compact.
- When tying a hook without an eye to a fishing line, the shank of the hook and the fishing line are positioned in a straight line.
- It is better not to use hooks with a spatula when catching strong fish; when the fish jerks, the knot can slip and become damaged, which will lead to the loss of the trophy.
- It is easier to tie a knot on a small hook; if it is a hook with a spade, the angler will not have to thread the line through a very small eye.
- The numbering of the sizes of hooks with a blade completely corresponds to the numbering of the sizes of ordinary hooks with an eye.
- Hooks without an eye of the right size and shape are much more difficult to find on sale.
- When buying hooks in a store, you should choose only high-quality hooks from well-known companies.
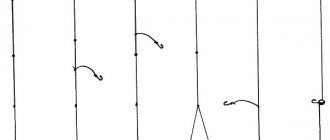
Step knot
A step knot is designed for tying fishing line to a hook without an eye. The strength of the knot is 90-95%. The knot is well suited for monofilament and fluorocarbon fishing line, but slightly less suitable for braided fishing line. Doesn't work well with very thick lines.
To tie a fishing line to a hook using a step knot, do the following:
- Fold the free end of the fishing line along the shank of the hook to form a loop
- We make 2 turns around the shank of the hook and one side of the loop, placing the turns from top to bottom towards the bend of the hook
- Then we make another 3-5 turns around the shank of the hook and both sides of the loop
- We thread the end of the fishing line through the loop and tighten it
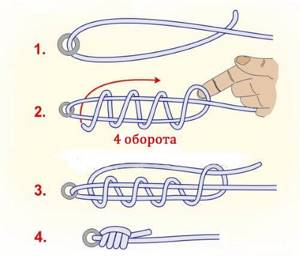
Spiral Dumhof knot
The simplest knot for attaching fishing line to a hook with a spatula. It is better suited for large hooks; it is more difficult to perform on small hooks with a short shank. The strength of the Dumhof knot is 75-80% of the breaking strength of the fishing line.
To tie a fishing line to a hook using a Dumhof knot, do the following:
- Form a loop on the fishing line and attach it to the shank of the hook.
- Make 4-7 turns with the free end of the fishing line around the loop and fore-end, moving along the fore-end towards the bend of the hook, lay the turns one to one so that they do not creep on each other and do not overlap.
- Thread the free end of the fishing line through the loop, slide the knot toward the blade of the hook, wet the fishing line and tighten the knot tightly.
Snell node
The Snell knot can be used with either a hook without an eye or to tie several hooks with an eye to one leader. The strength of the Snell knot is 90% of the breaking strength of the fishing line.
To tie a fishing line to a hook using a Snell knot, do the following:
- Make a large loop at the end of the line, which should flow freely over the bend of the hook.
- Make 7-8 turns of the loop around the shank of the hook, the size of the loop will decrease with each turn.
- Slide the knot along the fore-end towards the blade, wet the line and finally tighten the knot, holding both ends of the line.
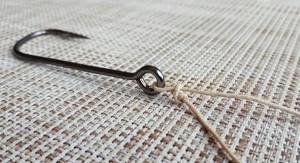
Hook with eye
Many fishermen argue about how to properly tie a hook to a fishing line if it has an eye (and most hooks do). Part of the reason for the controversy is the choice of one node or another. But no one takes into account the variety of fishing line and the thickness of the wire from which the hook itself is made, and this is a mistake.
We have selected a rating of 4 of the simplest and most reliable knots suitable for tying an eye hook to regular and braided fishing line. True, there are exceptions among them, so study the material more carefully
so that there are no troubles later.
Give preference to fishing hooks made of thin wire, as they can be tied with almost any knot. Tying a hook with a thick eye can be difficult for inexperienced fishermen.
Pitzen node
The Pitzen knot is one of the most reliable and simple knots that are suitable for attaching a hook to the main line or leader. Its peculiarity is that it retains 90% of the strength of fishing line of any diameter.
when tightened correctly. Also, the speed of knitting allows you to make leashes directly on the pond.
- Pull the fishing line through the eye of the hook and then unfold it back, folding it parallel to the main one.
- With the free end, wrap the resulting loop of two lines (3-4 turns will be enough) towards the hook.
- Now pull the free line through the loop that is furthest from the hook.
- Moisten and tighten the knot.
- Cut off the excess line.
Now I recommend that you familiarize yourself with the knitting pattern for this knot and watch the video in order to fully secure and master the technique of tying a hook.
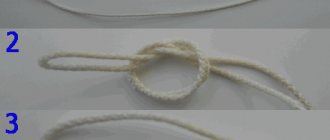
Palomar Knot
The Palomar knot is one of the strongest and simplest fishing knots. Many fishermen say that this is the best way to mount a hook. With some skill, it can be tied even during night fishing in conditions of complete lack of light.
Let's look at a step-by-step guide to learn how to properly tie a hook to a fishing line:
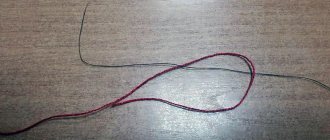
- Take the edge of the fishing line and fold it in half (you should get a loop);
- Now pull this loop through the eye of the hook;
- Tie a regular knot in the loop;
- Place a loop at the end of the hook as shown in the diagram below;
- Moisten and tighten the knot;
- Remove excess line.
The main disadvantage
knot is the need to pull a double loop through the eye of the hook. If you use a fishing line with a thick diameter or fluorocarbon fishing line, or a hook with a small eye diameter, this will not work.
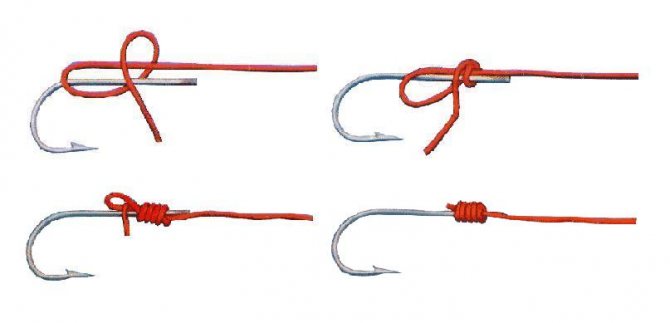
Bloody knot
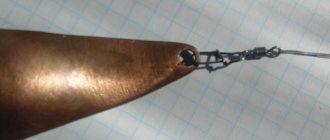
The bloody knot is suitable not only for tying a leash, but also allows you to tie a swivel to the main fishing line, spinners, wobblers and other baits. Mostly suitable for small diameter fishing line
, when tightening a thick fishing line, certain difficulties may arise.
Some knots are tied based on the basics of installation of the knot described below. The biggest disadvantage of the knot is that you cannot tie the hook to the braided line
. Its strength is quite high, and is 75% of the strength of the fishing line, which allows you to fix the tackle quite firmly and reliably.
Knitting instructions:
- The end of the fishing line must be threaded through the eye on the hook;
- Around the axis of the main line it is necessary to make 4-7 turns;
- A loop should form near the eye of the hook, into which you need to pull the free end of the fishing line;
- The knot must be moistened and tightened;
- Cut off the excess line with scissors or a blade.

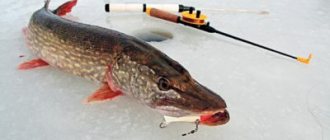
This knot can be used to tie a fishing line to the hook of a winter fishing rod.
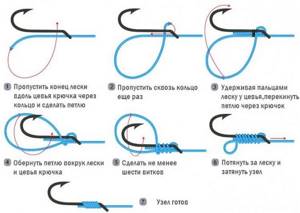
Universal node
Over many years of fishing practice, anglers have finally found a universal knot
, allowing you to attach a hook with a ring of any diameter to thick and thin fishing line, or braid. It is knitted as follows:
- Pull the line through the eye of the hook, leaving about 10 centimeters free;
- Make a loop at the free end of the fishing line;
- Make 4-8 turns of the line around the shank of the hook;
- Pass the free end of the fishing line through the loop created in step 2;
- Moisten and tighten the knot;
- Cut off any excess line.
Types of nodes
A large number of knots have been invented for tying a hook with a spatula to a fishing line. There are several connections that are distinguished by ease of knitting and reliability.
Simple
The simplest knot is called simple .
A simple knot
is formed on the basis of a milking or triple surgical knot .
You just need to twist the surgical knot into a figure eight shape, put the structure on the forend, wet it and tighten it. The advantages of such a knot are ease of manufacture, compactness, formation of the knot outside the hook, which makes it easy to form a knot even from very thin monofilament for the smallest hooks.
Cons : Not the most reliable node connection. Suitable for hooks with a large spatula. With enough force it can slip through the shoulder blade. You can be confident in it when catching small fish up to 2 kg.
Python
Refers to self-tightening snake knot joints. Universal in use and reliable.
- We form two monofilament loops in the shape of a figure eight around the shank of the fishing hook closer to the blade. We simply twist a single knot into a figure eight and insert the shank of a fishing hook into both loops.
- We pull the running tip of the monofilament one by one into the upper loop of the figure eight, then into the lower one.
- We pull on both ends of the monofilament, forming a knot connection.
- We wet it.
- We tighten it completely.
The disadvantages of this knotted connection include its too high density when wet , leading to the impossibility of untangling the knotted connection and to a significant loss of strength of the monofilament.
Trombone loop (nodal connection with outer loop winding)
- Fold the monofilament in half to form a bend.
- We apply the bend to the hook so that the end of the bend is located at the back of the hook.
- We make two turns at the shoulder blade with the tip of the running monofilament thread.
- We pinch two turns of monofilament thread near the blade and shank of the hook with our fingers.
- Using the tip of the running monofilament thread away from you, we continue to wrap both bending threads turn to turn.
- Having created another six to eight turns, we pull the tip of the running thread into the loop.
- Holding the entire structure of the nodal connection with your fingers, carefully pull the main monofilament.
- We wet the structure and carefully pull both monofilaments until we finally fix the nodal connection.
The knot is designed for monofilament and braid. Reliable. Reduces strength by only 10%. Suitable for catching fish of any weight.
Stepped
- Attach the hook to the main monofilament thread with a spatula towards the end of the thread. The length of thread behind the shoulder blade should be 12 cm.
- Near the shoulder blade, fold the thread in half.
- We pinch the formed bend and the blade of the hook with our thumb and forefinger.
- Using a 12 cm free piece of thread, we twist the shank of the hook and the main thread.
- After 4 turns we stop and at a distance of 3-4 cm we fold the main thread again, forming a new bend at the back of the hook. We return the main thread to the fingers. It is best to grab it with your thumb and forefinger, without unraveling the already made turns.
- We continue to wind the running thread onto the forend and the body of the newly formed bend.
- After four turns, we pull the tip of the monofilament into the loop.
- Carefully, alternately pulling the monofilament line at both ends, tighten the knot.
- Wet it and tighten it until it is completely fixed.
The result is such a strong fixation of the fishing hook fore-end that even without a spatula the fishing hook will hold on to the monofilament under a sufficiently high load.
The stepped knot practically does not reduce the strength of the monofilament line .
“Universal” Eyelet knot (loop knot connection with external passage of the end of the fishing line)
Designed for monofilament, braid, fluorocarbon. For fishing hooks with an eye, a ring, a spatula.
- Fold the monolesa in half, forming a 10 cm bend.
- With your thumb and forefinger, simultaneously grasp the fishing hook at the back of the head and the end of the 10 cm bend.
- Using a free 10 cm piece of thread, twist the shank of the hook and the main line from the back of the head to the shoulder blade.
- Make five or six turns turn to turn.
- Pull the end of the line into the formed loop at the back of the head.
- Pull both ends of the scaffold gently and alternately.
- Moisten.
- Finally tighten the knot.
Snood
- Create a large circle-loop from monofilament. The end of the monofilament should extend beyond the beginning of the formation of the circle and form a segment equal in length to the shank of the hook (line segment A).
- Place the hook over the circle with a spatula at the beginning of the circle, hold the spatula, circle, segment A with your right hand.
- Adjust the circle with the fingers of your left hand so that the circle becomes an oval, where the shank of the hook is located above the upper arc of the oval and a piece of fishing line A.
- Using the lower arc of the oval, wrap the fore-end of the fishing hook, the upper arc of the oval, segment A.
- Having created 5-12 revolutions, carefully, in turn, evenly pull out the right and left ends of the fishing line.
- We wet it.
- We finally tighten it.
This knotted connection only loses 5% of the monofilament's strength . Suitable for thin and medium lines of all types.
Sliding Snood
Designed for attaching a fishing hook with a spatula in any place on the main monofilament line .
- Cut the monofilament to any length.
- We repeat operations 1-4 for a simple snood on a piece of monofilament.
- After five turns, we apply the main monofilament line on top through the loop.
- We continue to wrap the lower arc of the oval around the hook, covering the fore-end, the upper arc of the oval, segment A and the main monofilament line.
- We create five more revolutions.
- We pull the ends of the piece of monofilament in different directions.
- We wet the knot.
- We finally fix the knot.
Sliding Snood is designed for securely attaching several hooks with a spade to the main fishing line . Since no manipulation is performed on the main line, its strength does not change.
Snell (leash)
- We create a large circle - a loop 10-12 cm from the end of the line.
- Place the fishing hook on the top of the circle.
- With the free tip of the line we cover the forend of the fishing hook and the inside of the circle.
- After 5-6 turns, we remove the end of the line from the circle, carefully pulling the ends of the line in different directions.
- We wet and finally tighten the joint connection.
Many anglers prefer to use this knot because it is easy to make and does not greatly reduce the strength of the fishing line .
Difficult
- We create a not too large loop-circle from the thread.
- Place the hook on top of the loop, point down.
- We wrap the free end of the thread behind the shank and pass it inside the loop.
- Encircling the fore-end and the loop from the inside, we create loose turns, maintaining the structure of the turn to the turn.
- After 4-5 turns, we remove the end of the thread from the loop.
- We pass the end of the thread through the entire system of loose turns and extend it beyond the shoulder blade by 1-2 cm.
- Carefully pull both ends of the thread, not allowing the knot to slip off the shoulder blade.
- We wet it.
- Finally tighten both ends of the thread.
The result is a reliable compact connection that reduces the strength of the fishing line by no more than 10%.
Despite the name, a complex knot is not difficult to knit after a little practice.
To make tying easier, you can use a needle with a large eye to pull the end of the fishing line through the line of turns:
- In this case, the needle is applied to the shank of the hook with the eye to the sting.
- Using the end of the monofilament thread, we twist the loop thread, the shank and the needle at the same time.
- After the formation of turns, the tip of the monofilament is threaded into the eye of the needle.
- We pull the needle through the system of turns, pulling the end of the thread outward.
- We wet and tighten the knot at both ends of the monofilament.