Fishing with a jig is very popular among fishermen who engage in winter ice fishing. The jig can be used for fishing in the summer season. The maximum effectiveness of this bait is possible only in clean, transparent water of small, slow-flowing rivers.
A jig consists of a hook that is soldered into a lead or tin pellet, thus simultaneously loading the tackle and “making” it attract fish with a polished metallic sheen. Fish are caught with a jig without using bait; the predator is attracted by the shiny hook and rarely swims past without tasting it.
You can catch decent sized fish with this rig, so it shouldn't have any weak spots. To cope with catching large fish, you should use only high quality parts and accessories. First of all, you should tie this bait to the fishing line correctly.
How to tie a jig with an eye
In order to reliably tie a fishing line to a jig with an eye, it will take very little time, and the process of correctly installing the bait can be mastered even by an angler who went fishing on a pond for the first time in his life.
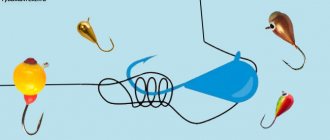
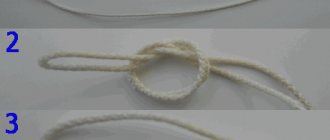
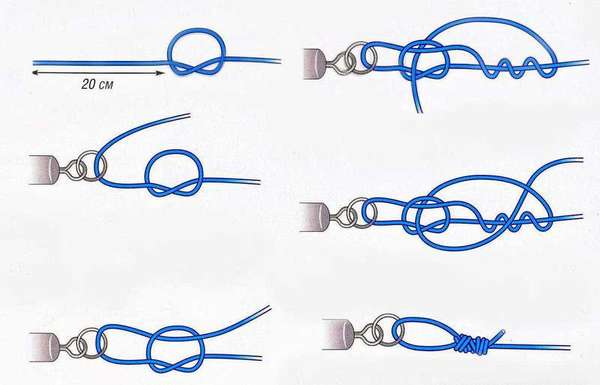
Installation is carried out in the following sequence:
- The line is inserted into the eye and led down parallel to the shank of the hook.
- The line turns in the opposite direction , where the shank of the hook turns into a curve.
- The fishing line is brought parallel to the forend to the place where the hook is soldered into the lead , turns around, and makes several turns around the forend in a downward direction.
- At the final stage, the fishing line is threaded into the resulting loop and tightened securely , using force applied to both ends of the fishing line.
Tying the jig with the eye is finished.
This connection is very reliable: a correctly executed fastening will not come undone. The force that can be applied to the hook during fishing will act as an additional tightening factor each time the fish is landed.
Excess fishing line that will extend beyond the loop must be carefully trimmed.
The line is brought parallel to the fore-end to the point where the hook is soldered into the lead, turns around, and makes several turns around the fore-end in a downward direction
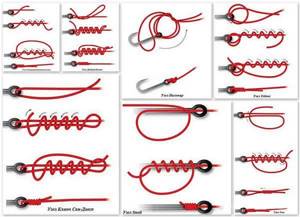
Knots for jigs
So, the most common knots for jigs with an eye are Trilene, Improved clinch and Palomar. Of these three knots, the Improved clinch is the leader for jigs with an eye.
— Trilene is a very strong and reliable unit. Its reliability is ensured by the fact that a double loop passes through the eye of the jig;
— Improved clinch – the same clinch, only improved. One of the most popular and most frequently used. Designed mainly for monofilament fishing line of small diameter, since thick fishing line will be impossible to tighten.
It is absolutely not suitable for braiding, as the knot begins to creep and after a short period of time the equipment will become unusable;
- Palomar - this knot is knitted quite simply, and is also used for knitting braided cords, which makes it even more attractive.
This knot is used almost everywhere possible, both in winter and summer. They fit perfectly with both spinning baits and jigs (with or without an eye).
For classic, simple jigs, you can use ordinary knots, with which you, for example, tie ordinary fishing hooks to the fore-end. It’s just that when you tie a jig, you first pull the fishing line through the entire body of the jig, and only then tighten the knot on its hook.
How to tie a jig. Best Fishing Knots | Video
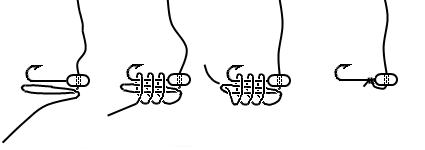
How to tie a jig without an eye
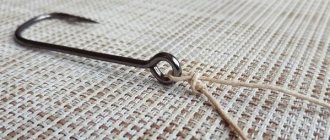
If the jig is not equipped with a special eye for fastening, then it can be secured to the fishing line using various variations of the standard hook attachment with a “spade”.
This option will not be inferior in reliability to the fastening described above and is carried out in the following order:
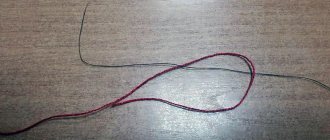
- The line is passed through the hole inside the metal ball and is guided along the shank of the hook and turned in a loop near the curve.
- The line is drawn in the opposite direction and turns around the lead ball.
- The fishing line is wrapped around the shank several times , threaded into the loop that is formed at the bottom of the hook and tightened.
This results in a reliable connection of a jig without an eyelet with a fishing line.
The line is passed through the hole inside the metal ball and is guided along the shank of the hook and turned into a loop near the curve
Features of fastening jigs made of soft and hard materials
In addition to jigs made of lead and tin, there are baits that can be made of rubber or silicone. The peculiarity of tying such a jig to a fishing line is that the thin nylon thread does not damage the material of the jig while fishing.
Fastening a soft product is carried out as follows:
- The line is passed through the bait and a knot is immediately formed.
- A piece of fishing line with a knot is drawn parallel to the shank of the hook, then drawn in the opposite direction , unfolded near the silicone part of the bait and wrapped around the shank several times. The line is then threaded through the loop and tightened with considerable force. Excess line must be trimmed.
- The section of fishing line with the knot is securely “bandaged” to the hook in this way and will not have any impact on the soft part of the bait when fishing.
Features of knitting jigs
Not all fishermen pay enough attention to how to properly tie a jig to a winter fishing rod. They knit by analogy with hooks that have a blade, and even using the same knot. And this is not always justified due to the fact that there are many nuances associated with the peculiarities of winter fishing:
- The size of the knot plays a significant role because tiny lures are often used for winter fishing. If it is bulky, it can significantly increase the dimensions of the jig, worsening its characteristics.
- Winter fishing takes place in extreme conditions, which puts special demands on the strength and reliability of all elements of gear, especially connections.
- The bait on the fishing line must occupy a certain position in space, facilitating the reliable hooking of the very fish for which it is designed. In simple terms, the angle of inclination of the hook and the bait itself depends on the type of knot and the correctness of its knitting.
- The action of a jig, especially a reelless one, is a very important factor in fishing success. The amplitude of vibrations and its ability to attract aquatic inhabitants depend on how it is tied.
- It is impossible not to take into account the material from which the jig is made. In winter fishing, a wide range of baits are used, made from materials that differ significantly from each other in type and hardness (silicone, lead, tungsten). An unsuccessfully tied knot can cut one jig, while another can cut the fishing line itself.
Artificial baits with a ring
A common mounting option, especially among carbide lures. There are several ways to tie a jig with an eye to a fishing line:
- “Clinch” is characterized by sufficient strength (about 77%). It is tied by threading the fishing line through the eye of the bait. The tip of the thread makes several turns around the main fishing line and then threads it first through the resulting loop near the eye of the jig, and then through the loop that is formed between the turns of the fishing line and the working thread.
- "Palomar" is a simple and reliable knot with very high strength (about 95%). To tie it, you need to fold the fishing line in half at the end and thread it through the eye of the bait. Wrap the end of the resulting half-loop around yourself - as if you were going to tie a regular knot - and pass through the hook and body of the jig to its eye, where you tighten it.
- Non-tightening loop - provides better bait play. Make a regular knot on the fishing line, but do not tighten it. The end of the fishing thread is threaded through the eye of the jig and through the knot on the fishing line. After this, the working end of the fishing line is made about five turns around the main thread away from the knot located on it. Then the working thread is returned back and again threaded through the knot on the base, after which the connection is tightened, forming a loop.
The listed units for jigs have both pros and cons. "Palomar" and "Clinch" provide a rigid, strong connection that limits the maneuverability of the bait. Because of this, their use on those baits with an eye for which there are serious requirements for the ability to play in the water column is not recommended.
The best option would be to use these knots on devil-type baits, where movement in the water is carried out in a vertical plane.
The non-tightening loop and its varieties are also not without drawbacks. The knot is not the smallest, which can have an impact on fishing with ultra-small jigs. The main requirements are for the strength of the connection - the ring presses on one layer of fishing line, bent at the attachment point. The shortcomings are more than compensated by the quality of the game due to the fact that the non-tightening loop does not limit the movement of the bait in the water. Reelless equipment is the scope of application of various loop units.
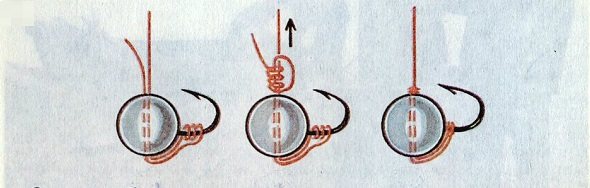
Fishing tackle with a hole in the body
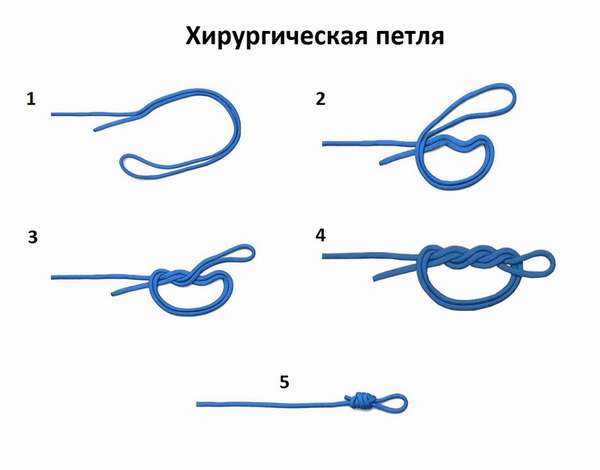
To tie a bait that has a hole in the body, the classic method is often used, designed for hooks with a spatula. The method involves tying a knot on the shank of the hook. What is the best way to tie jigs for winter fishing with a “Spindle” knot:
- The free end of the fishing line is threaded through the hole in the bait.
- The threaded fishing line is laid along the fore-end of the jig, forming a loop.
- The end of the fishing thread is made four turns around the loop and forearm away from the body of the bait.
- The free end is passed through the loop, after which the connection is smoothly tightened.
And this method of knitting has both pros and cons. The “spindle” has high strength, almost without losing it at the junction. Small sizes do not interfere with the correct action of the bait. Placing a knot on the shank of the hook significantly complicates its use for tying reelless jigs that have beads on the shank - they get stuck on the knot and do not “play.” The beads on the shank should hit each other and the body of the bait, as the resulting noise will attract fish.
Non-standard methods of binding
Anglers continue to experiment with methods of tying lures for winter fishing. The results are not always clear, but knowledge of these methods can be useful:
- A jig with a hole resembling the eye of a hook. The method involves tying baits with a hole with knots designed for tying hooks with eyes. Any connection designed for such purposes can be used. The advantages include the fact that the fore-end of the bait remains free from the knot, without interfering with the play of beads or the baiting of various baits. With this scheme, you can arbitrarily change the angle of the hook while fishing without retying the bait, which can be useful. The disadvantages are the same as when using the Clinch and Palomar nodes - difficulties in the “game”.
- Sometimes fishermen use an option in which they thread the fishing line two or three times through the hole in the jig and then fix the connection on the shank of the hook using a regular knot. The positive aspects include good strength. The disadvantages are more significant - rigid fixation and a knot on the fore-end.
- Some anglers attach jigs by tying a regular locking joint at the end of a fishing line threaded through a hole in its body. As a result, you can tie the bait quite quickly. In this case, she plays poorly and slides freely along the fishing line. When fishing with a bait from the bottom, this minus is insignificant. It is not uncommon for a jig to be lost due to the stopper untying or its slipping through a hole in the body of the bait.
Tungsten fixtures
Tungsten jigs with a ring are tied similarly to those made of lead. Lures with a hole in the body are less common and require special care when tying - the fishing line can be cut due to the sharp edges. Ways to get out of this situation:
- Most often, the problem of sharp edges is solved by threading a piece of cambric into the hole so that it protrudes slightly beyond the edges. The cambric will protect the fishing line from damage by the sharp edges of tungsten.
- In some cases, fishermen independently make rings for tungsten jigs with a hole. They are made from braided fishing line - it is folded in half and threaded through a hole in the bait, forming a loop to which the main fishing line will then be attached using any knot suitable for baits with a ring. The free ends of the braid are tied to the fore-end of the jig with two ordinary knots.
Alternative way
There is a method that allows you to tie both a tungsten jig with an eye and a lead jig with a hole in the same way. This option becomes possible due to the non-standard placement of the unit on the forend:
- The fishing line is threaded through the eye of the tungsten bait, after which the “Spindle” is knitted onto the fore-end.
- The fishing line is threaded through a hole in the body of the lead jig, after which a “Clinch” is tied onto the shank of the hook.
The advantage of such a connection is that the main part of the assembly is located outside the fore-end, without interfering with the play of the bait. Among the negative aspects, it is worth noting a slightly lower strength due to the fact that the entire load falls on one revolution of the fishing line.
How to tie two jigs to a fishing line
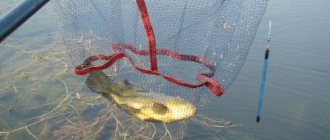
Two jigs can increase the probability of catching fish by exactly 2 times. This approach is especially effective when catching schooling fish.
Securing 2 hooks on one tackle has its own characteristics and secrets:
- Hooks should be placed at a distance of at least 30 cm from each other, otherwise the leashes may overlap and constantly tangled baits will significantly distract the angler
Two jigs are attached in such a way that the bottom one is slightly heavier than the bait located above.
- The upper part is attached to a leash no more than 15 cm long.
- The leash with the top hook must be connected to the main line so that the distance between the lower and upper baits is at least 30 cm.
- The tackle is attached to a fishing line depending on the model ; you can simultaneously equip the tackle with two different baits to increase the fish catch.
You can use several jigs at the same time, but such gear will bring a significant fish catch only if the main fishing line is placed strictly vertically and there is minimal current in the reservoir where fishing is planned.
Hooks should be placed at a distance of at least 30 cm from each other, otherwise the leashes may overlap and constantly tangled baits will significantly distract the angler from his main activity.
Methods for attaching a leash
Spare the main line. She is always under load. The root of the problem is that threads tend to stretch. Braid has the greatest resistance to dynamic deformation, due to the many fibers along which the tension is distributed. Roughly speaking, it doesn’t even stretch, statically maintaining its original length. The disadvantage of this factor is the increased risk of rupture under loads twice as high as recommended. Monofilament thread, on the contrary, is flexible, but here lies a different kind of problem. Due to stretching, certain areas of the fiber become thinner, weaken and break.
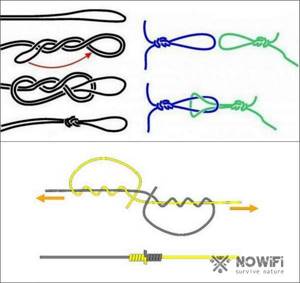
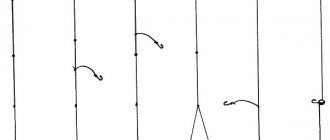
Figure 6. Options for attachment points for leashes
The likelihood of rupture depends on wear. Factors to consider: load, age, storage conditions, length. As a result, it turns out that you need to somehow secure the base. This can be done by tying a leash with a hook to the main fishing line. A leash is a piece of thread 10 to 30 cm long, on which tackle and related parts such as feeders are attached. Its task is simple - to take the blow or jerk of the fish. And if everything is clear about how to properly tie a hook to a fishing line, then what to do with the leash? The main task is to form a loop on the main thread and attach it to it with a piece of leash. There are many knots for tying a hook, but we are interested in those similar to the “Cat’s Paw” or “Palomar” (Figure 6).
Recommendations for knitting leashes:
- For the leash, use inexpensive material, it is consumable.
- Make several samples in advance.
- Fasten to the base with a quadruple “Palomar” or “Cat”.
- Keep the length within 30 cm.
- Try to use transparent thread.
- Do not clutter the leash with braids.
Blitz tips
- How to increase the catchability of jigs: Some fishermen string bait on the hook to additionally attract fish. If a bare hook and a lead ball are used, then the fish begins to bite after visual detection of the bait. To attract fish with the smell of bait, the hook is equipped with bloodworms or maggots. You can use a “sandwich” of various baits attached to one hook.
- Canned corn can also be used as bait. Its smell attracts many peaceful fish.
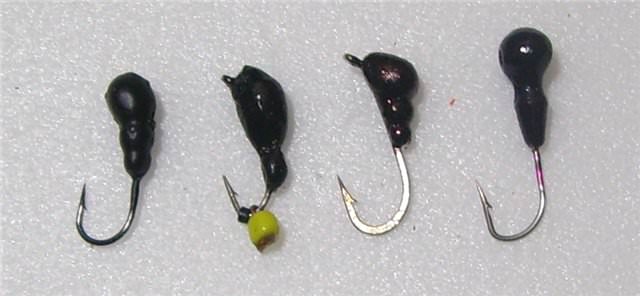
- If the tackle is used with a bare hook , then here you can “work” on the attractiveness of the lead pellet. You can polish lead with automotive polishing pastes.
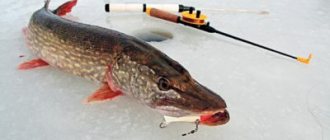
- You can paint the pellet black. During winter fishing, you can successfully catch pike perch and pike perch with this bait.
- The red cambric placed on the shank of the hook attracts predatory fish well, both in winter and during fishing in the summer months. Fish are caught especially well if the jig is constantly in motion. This twitching of the bait provokes a large number of bites.
- Good results when fishing with this tackle can be obtained if you use beads. Small beads are strung on a hook and secured to the shank. The shine, which is visible to fish in clear water for tens of meters, will help increase the catch using such bait.
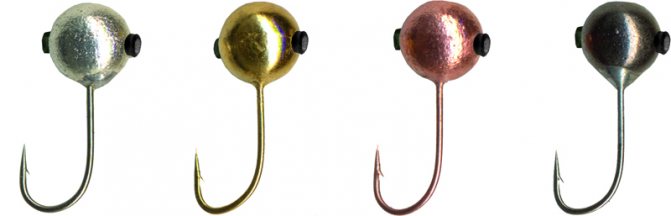
- Golden jigs , which can be prepared at home, have very high catchability.
You can gild tin or lead bait; the process is carried out in 2 stages:
The product must be coated with a layer of copper
For this, the electrolytic method of applying a thin layer of metal is used. To perform this operation you will need the following materials and tools:
- Copper sulfate.
- Water.
- Sulfuric acid.
To prepare a solution for electrolytic coating, 40 g of copper sulfate is dissolved in 100 ml of distilled water. The mixture is thoroughly mixed and 2–3 ml of sulfuric acid is added. The acid must be concentrated, so it should be added to the mixture very slowly, taking precautions. Be sure to use rubber gloves and safety glasses.
The mixture is poured into a glass container and copper plates connected to the positive pole of a direct current source are lowered into it. Then a jig attached to a steel conductor is lowered into the mixture, to which the negative pole of the battery is connected. A 12 V battery can be used as a power source. After several hours, the part will be covered with a sufficient amount of copper film.
Useful tips
Knitting jigs is not particularly difficult, but the process itself can be simplified and the result more reliable. Some tricks will help the fisherman:
- When tightening any knot, you need to moisten it with water or saliva. This is done so that when tightened it does not overheat due to friction and does not damage the fishing line.
- The protruding piece of fishing line remaining after tying the knot must be melted with a burning match until a ball forms at the end. This is done so that the fish does not prick itself or get scared ahead of time.
- The connection can be made stronger by treating it with superglue. It is necessary to take into account that its size may increase.
A fisherman needs more than just good advice. Some simple and affordable tools may also be useful for tying jigs:
- a razor blade or a sharp stationery knife is an indispensable thing that allows you to easily and accurately trim the excess after tying a bait or cut off an unnecessary knot; it is also convenient for cutting cambric,
- a small pin or needle from a syringe - you can use them to clear the hole in the jig if it is clogged with something, they are also convenient to use for untieing knots,
- lighter or matches - melt the end of the fishing line after cutting.
What can you advise anglers in tying winter lures? Be careful and picky about the quality of connections and they will not let you down.