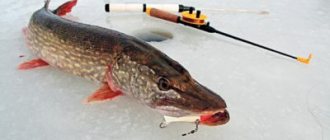
The correct methods to tie a lure to a fishing line can be useful not only for beginners, but also for some avid anglers. Sometimes a person has been using one method for a long time, and this method is not optimal. This leads to losses of fish during fishing and breakage of expensive installation components.
There is a mess on websites on the Internet - in articles about tying spinners, information is collected in a heap, nothing is clear. The same components are called by different names, and false information is provided about their reliability and appropriateness of use in specific equipment. The same nonsense is copied.
In this article we will figure out how to properly tie a spinner to a spinning rod. Let us also consider in what variants certain types of fastening are used to obtain a strong and reliable connection.
Weak link
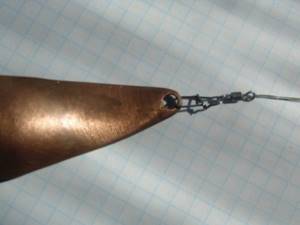
Attaching the spinner to the equipment is the weak link of the installation. The bait itself is often attached to a carabiner or twisted steel leash. But the fishing line or braid is already tied to a swivel or clasp. Therefore, it is technically correct to consider not tying the spinner to the fishing line, but the attachment points to the swivels and fasteners. But sometimes you need to tie a fishing line directly to the bait - the article also considers these special cases.
Beginners often tie simple knots without thinking - and lose their lures. In spinning fishing, the load on the system is high, especially when working with heavy equipment (on casting), stubborn wobblers on twitching or when fishing for strong fish. In order to properly tie a lure to a spinning rod, it is important to understand that for each method of attaching the bait and type of fishing line (monofilament, fluorocarbon, braided cord), the strongest knots are different.
Out of date table from books
Attaching the spinner to the braid
There are several main attachment points for attaching the spinner to the braided line:
- "Palomar".
- Double clinch.
- Rapalovsky knot.
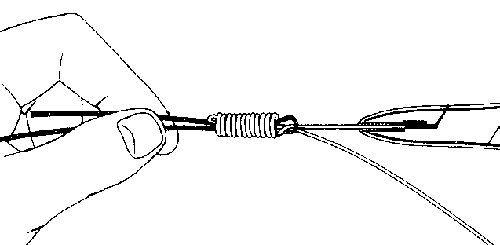
Palomar
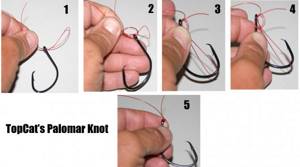
Palomar is a simple and durable knot that is suitable for all types of fishing lines and can withstand a load of more than 10 kg. Disadvantage of the knot: when tying it, the leash is significantly shortened due to the use of folded fishing line.
The knot tying technique is as follows:
- Pass the line folded in half through the eye of the spoon and form a simple knot with the main line.
- Throw the elongated loop from the knot over the bait and tighten tightly.
- Cut off the remaining free end of the fishing line.
Rapalova knot
The Rapal knot, which ensures freedom of “play” of the bait, is as follows:
- Form a simple knot on the fishing line.
- Pass the end of the fishing line from the loose knot through the eye of the bait and return it inside the knot again.
- Next, make 4-5 turns around the main line with the free end.
- Return the end of the fishing line back inside the original loose knot and immediately thread it into the resulting loop.
- Tighten the knot, after wetting it, and cut off the excess end.
The disadvantage of this type of knot is that it somewhat reduces the strength of the fishing line.
Double clinch
The double clinch is a fairly simple knot with high efficiency, making it versatile and unique.
The technique of knitting it consists of sequential actions:
- Thread the end of the fishing line into the bait ring twice, but do not tighten it (first loop).
- With the free end of the fishing line, make 3-5 turns around the main fishing line (second loop).
- Next, pull the end of the fishing line through the two previously formed loops and tighten the knot, after moistening it.
- Trim off the excess part of the free end of the fishing line.
The advantage of the double clinch, in addition to the ease of tying, is its ability to withstand up to 10 kg. The disadvantage is that it is impractical for lures with a wide eye and large line diameter.
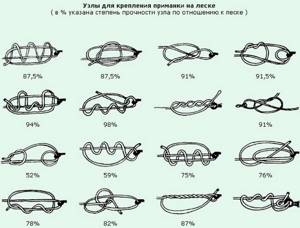
Knot strength
There is a lot of information on the Internet regarding the concept of knot strength. The sites provide tables with percentages and dozens of unnecessary nodes that no one ever uses. An ordinary fisherman needs one or two reliable and simple knots for a spinner, no more.
Some advise complex fastenings with ornate patterns, with a thin fishing line laid between the turns - but who needs such troubles? Everything is much simpler, but you must first understand what is used for what.
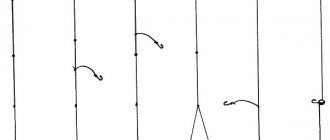
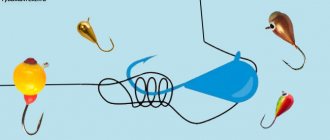
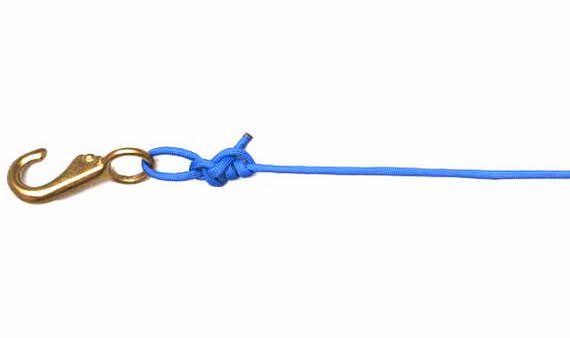
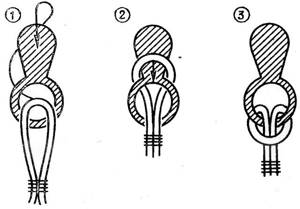
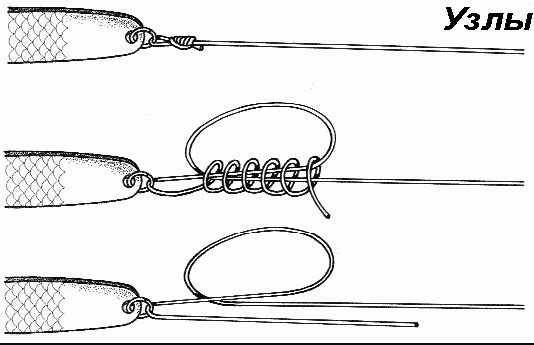
Fishing units for quick replacement of lures
The figure shows three fishing knots used to quickly replace spinners and other gear attributes.
And, to be more precise, the spoon is not even tied, but is simply fixed in a pre-tied fishing knot.
If a fisherman often replaces spoons in the process of catching predatory fish, then for him such fishing knots in the form of end loops can save a lot of sometimes very expensive fishing time.
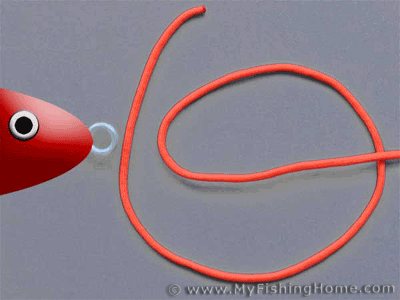
Let’s say that for many years I have been using the simplest and most reliable fishing unit to quickly replace spinners, which I have tinted scarlet in the image for this occasion.
And I don’t remember a single case where a knot in the form of a simple single loop came undone when hooked or jerked by a predatory fish.
A fishing knot in the form of an end loop is convenient because when you quickly replace the spinner with bait for different purposes and build it, you don’t have to constantly cut it and tie a new knot.
Let’s say that a vertical perch spoon can be quickly replaced with a devil or a bolda during winter fishing. Read the next article for details.
Directly
When using a spinning rod, you may need to tie the bait directly to the fishing line. For example, in the event of an emergency on a reservoir, when there are no spare parts. Or in ultralight, when the lightest and thinnest possible equipment for a small oscillating bait is required in case of poor bite on passive fish.
There is no clasp, no winding ring either. If you tie the lure with a blind knot, its performance may deteriorate, since there is no hinge. The solution is to tie the bait to the cord with a blind loop. For this, the most suitable and reliable knot is a rapala , and not the familiar figure eight and loop in a loop.
Rapala
Rapala Knot
However, if we get attached to the winding ring, we use the same tight clinch or palomar. The knot should not move and move around the ring in a loop - otherwise the fishing line may be injured by the sharp edges of the wire cuts of the ring.
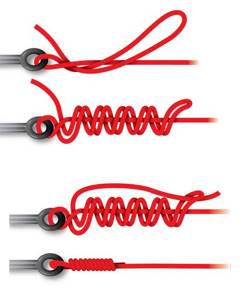
Fishing knot for free spinner play
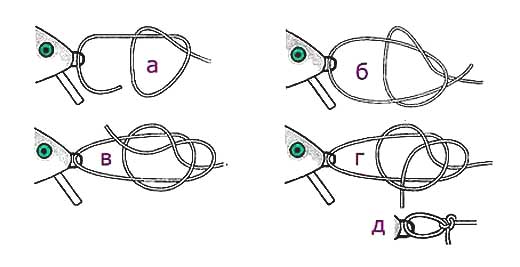
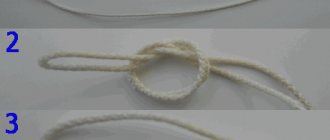
Shown here is the sequence of forming a fishing non-tightening knot for free play on the fishing line of a spinner, wobbler, or fly.
Form a simple fishing knot in the form of an “a” loop on the root line.
Pull the end of the fishing line through the loop of the attached spoon and the tied fishing knot “b”.
In the opposite direction, wrap the fishing line around the tied loop “c” and pass between the two loops “d”.
Position “d” shows the appearance of a tightened fishing knot, with the help of which your lure will be securely tied to the fishing line and which will not interfere with its free play when retrieving.
Directly tying the leash to the main line
Leashes made of fluor or leash material are usually made with a swivel, clasp, or crimp tubes. But there are times when you need to attach the spinner spoon to the main fishing line directly. Also tied, for example, is a shock leader - a thicker cord for casting a heavy bait with a light spinning rod with very thin braid that is not intended for this purpose, so that there is no shooting.
It is better not to rely on a figure eight, a stevedoring knot or a simple noose - it is too weak. A reliable knot for this is carrot, albright or bloody.
Carrot
Albright
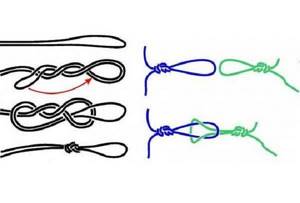
Knot theory
Experienced fishermen know that the line breaks before or immediately after the connection.
When tying, the line stretches and becomes thinner at the base of the bundle. It is not the knots that need to be strengthened, but the segments that become thinner when tightened. This can be done in several ways:
- Do not tighten the thread completely, or use a self-tightening, movable knot. To do this, a ring-loop is tied on a piece of fishing line, and a ready-made leash with a loop is pulled through it. The end of the thread is put back through it and tightened a little. This knot is the most movable, but it is inconvenient to tie;
- When tying, a piece of thin fishing line is placed under the main thread; after pulling, the pieces are cut off. This method increases strength, but is inconvenient due to its labor intensity;
- Tied in a spiral (the most practical). This way you can attach hooks, fishing line, and make loops.
- Attaching any bait to is done using a swivel, which prevents the line from twisting;
- Fixed fastening of the bait makes its play poor; knots should be distributed evenly along the entire length of the cord;
- When tying, it is important to prevent the loops from stretching;
- Be sure to wet the nodules.
There are many connections in the fishing world, but experienced anglers use three to five, often not the most reliable ones. The success of fishing depends on the choice of knot
Some manufacturers indicate the types of connections on the packaging of their fishing lines. When tying, you need to make sure that the thread has no visible damage.
Retractable leash
Sometimes you need to properly tie a spinner to a spinning rod with a retractable leash. This may be necessary for fishing with light or ultralight at depth with small spoons, but so that the spoon goes higher without catching the bottom grass. For bait on a diverter, you can use standard methods of attaching the diverter to the main line, as in a jig. This refers to the unit for attaching the outlet to the base.
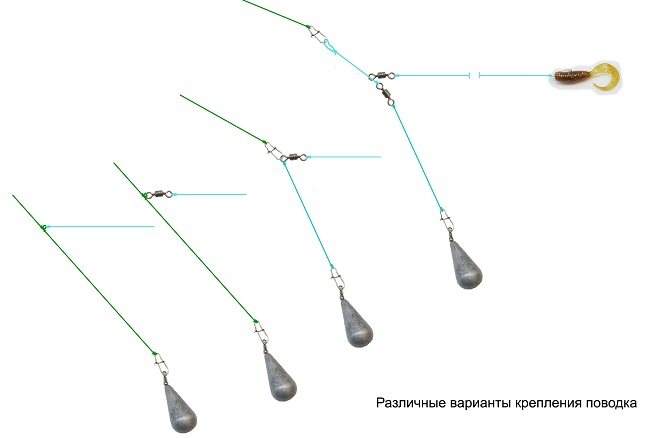
We tie the bait to the outlet using the methods that have already been discussed, depending on the equipment. You may also need a small hook under the front sight above, like a provocateur - we tie it on as well. More information about the retractable leash in a spinning rod
How to attach a lure to a leash
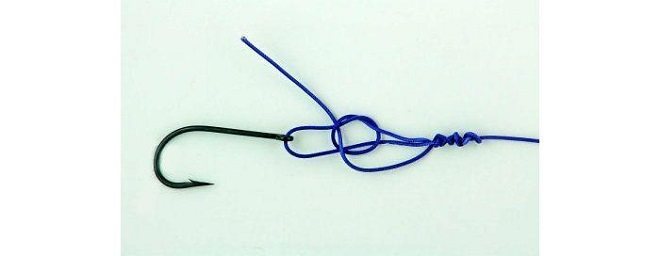
The lure is attached to the leash with special knots. These include: “figure eight”, “surgical loop”, as well as Albright.
"Eight"
If you plan to frequently replace baits, then it is best to pay attention to the “eight”. However, the presented type of knots cannot be used when catching large fish. Despite this, it is considered one of the most popular and simplest. Although the “eight” cannot be called strong. If someone does not know how to tie a spinner, then it must be said that it is done like this: the end of the fishing line is folded in half, and then a loop is formed. Next, turns are made around the loop, and the free end is inserted into the already formed loop. After this, the knot is tightened.
"Surgical loop"
This type of knot is very similar to the previous one, but unlike it, it is more durable. To create it, two people fold the fishing line and create a loose single knot. And then several windings are made around it. After this, the end of the excess fishing line is tightened and cut off. This technology will be appropriate when a fisherman fishes with a spinning rod.
Albright
If you want to tie combined leashes, where you need to connect a soft line with a hard monofilament line, you need to use the Albright knot. Many fishermen do not have the patience to tie it, because it is not easy to do, but the work is worth it. To begin with, the end of the fishing line is folded in half. Next, the end of the driving thread is pulled through the loop that has formed, and seven turns are made. Five more turns are made on top of the wrap in reverse order, and then the free end is pulled through the loop that was originally made on the side where the “entrance” was. After this, the moistened thread is pulled into a knot. Next, all the turns of the material are glued together.
The first time, it may be difficult to understand how to properly tie the spoon, but if you practice, everything will work out by itself.
How to tie a spinner with a sinker
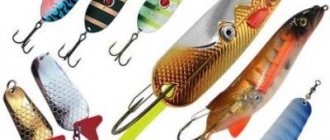
Sometimes you need to load the spoon. This is necessary when a light bait needs to be lowered to great depths. Applicable for all types of decoys, but more often used with turntables and small vibrators. There are several ways to place a weight in front of the spinner and weigh it down:
- Hang a sinker with an eye in the carabiner.
- Attach the spinner to a Cheburashka, with a clasp, or to a blind eared bait through the winding rings.
- Place a sliding weight or a ball with a swivel on the main line. You can limit the free movement of the sinker with rubber stoppers.
It is better not to knit any additional knots, so as not to weaken the linear equipment. A sinker is also needed for installation with a diverter. We tie it to the end of the main line with a palomar.
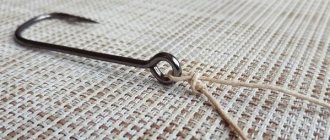
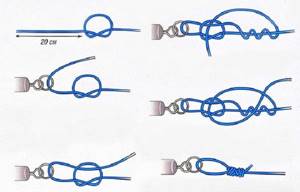
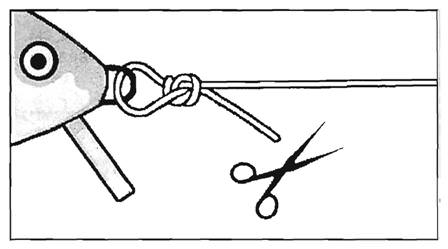
Non-tightening knot for tying a spinner
A fishing knot for tying a spoon called a “non-tightening loop” is shown in the picture.
Tie a straight slip knot on the line and pass the line through the spinner ring or swivel. In reverse, pass through loop “a”.
Twist the running end around the root line several times and thread it into loop “b”. Tighten the fishing knot "in". A knot that does not tighten will have minimal impact on the performance of the attached lure.
The number of twists in the fishing knot depends on the rigidity and thickness of the fishing line to which the lure is tied. The thicker and stiffer the fishing line, the fewer turns of twist there can be in the formed knot.
How to tie a spinner with other knots
Less common methods for attaching spinners to a spinning rod that may be needed. We will not consider a simple, universal or blind knot - they are weaker than non-servi and palomars.
For monofilaments:
- Linderman;
Another option is to tie the spinner to the braided line with a blind loop:
- Homer is essentially the same loop as in Rapala
For a loop-to-loop ligament:
- Noose
Subscribe to the channel:
YouTube channel RYBAFAN
We are VKontakte
Options for attachment points for spinners
In fishing, various types of bait fixation units are used, the progenitors of which are:
- Universal node.
- Simple knot.
- Tight loop.
- Knot with a “blind” loop.
Universal knot

Based on the use of monofilament and braid. Its peculiarity lies in its effectiveness in hooking fish during hooking.
The following stages of node formation are distinguished:
- Thread the line through the eye of the hook.
- Pull the end of the fishing line 10 cm from the eye and form a loop.
- Wrap the end of the fishing line around the shank of the hook 5–7 turns.
- Thread the previously prepared loop with the free end of the fishing line.
- Be sure to wet the knot before tightening it by stretching the line into two opposite ends.
Tip: it is advisable to thread the line from the inside of the eye, which will ensure stable fixation of the hook and effective hooking.
Simple knot
A simple knot is somewhat better than a universal one, since when tying it, the probability of deformation of the fishing line, at which it loses its strength, is minimal.
However, not all types of fishing line are suitable for a simple knot, the formation principle of which is as follows:
- Thread the line through the eye of the hook.
- Twist it 8–10 turns around the hook (both ends of the fishing line are held by hand).
- Form a loop from the free tip of the fishing line at the eye.
- Thread the other end of the fishing line into the above loop.
Tight loop knot
The “tight loop” knot is designed for free movement of the bait in the water column.
Its knitting consists of the following stages:
- Thread the fishing line into the eye of the bait, extending the end by 12-15 cm and form a simple knot, without tightening it.
- Thread the working end of the fishing line into the eye of the bait again and, at the exit, through a simple knot on the main fishing line, tightening it.
- Wrap the main line again with the free end, making another simple knot, tightening it, and trim off the excess line.
Advice: the more active the spinner’s “play” (wide range of movements), the more productive the fishing.
Knot with a “blind” loop
A knot with a “blind” loop, just like the previous one, ensures a soft “game” of the bait. The disadvantage is the use of a fishing line with a dense structure due to the tightness of the knot, which significantly undermines the strength of the thin threads of the fishing line.
Algorithm for creating a node:
- Pull the free end of the fishing line through the eye of the bait, first forming a simple loose knot.
- We pass the working end, 10-12 cm long, through the middle of the formed knot, bringing the end above the main fishing line.
- Again we pass the working end of the fishing line through the original knot, slightly pulling it.
- Place the working end into the lower gap between the curls of the fishing line and tighten the knot, after wetting it.
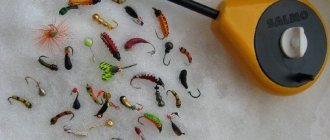
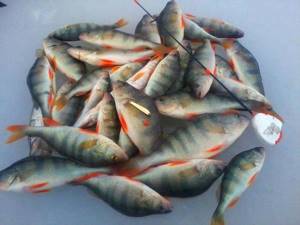
How to catch perch with a spoon in winter
Let's begin to consider the most subtle moment of perch trolling in winter - retrieving and playing with bait. The technique of catching perch with a spoon in winter is a creative moment; over the years, every experienced angler develops his own unique game. Different types of winter spinners require certain wiring. It is better to study this issue at home in advance with a fishing rod in your hand over a bathtub or barrel of water. Playing a spinner for perch in winter determines success. Even if you have everything else - the right gear and bait, a catchable place and time - without the right wiring, you may not get a bite. In general, there is no secret to catching perch in winter with a spoon. The main thing is to choose a game and develop a flashing system. Here are the main points of fishing with spoons:
- Classic winter trolling - toss and pause. After the toss, the fishing rod returns to its original position. The spoon makes its somersault. The pause is maintained until the spinner stops. The amplitude and pause time are selected empirically for each spinner and fishing.
- The first reconnaissance throws are made with a larger amplitude. You need sweeping swings to swing the hole. These movements attract fish from afar. 3-5 such tosses in a new hole are enough, after which we move on to the standard game.
- If after making regular throws there is no bite (within 7-10 series), you need to experiment with the amplitude and time of pauses, and add shaking when the spinner stops.
- Tap the spoon on the bottom, raising a cloud of turbidity - this attracts the striped one.
- Try playing with the lure in jerks, like a jig.
You need to experiment with the hole, choosing on each fishing trip that unique version of the game that will bring a bite. And then throughout the entire fishing use this type of wiring and “sharpen” it.
Mandatory fastening rules
This point is at the beginning of the article for a reason. There are general rules that you need to remember before you start attaching spinners:
- When attaching a rotating bait, it is necessary to use swivels to avoid deformation of the braid.
- There is no need to tie the lure “tightly”, this will complicate the bait’s play and disrupt the hydrodynamics.
- Before cutting off the ends of the knot, moisten the fishing line; do not remove them just under the knot. Be sure to leave the ends 5mm apart to prevent unexpected unraveling.
- The knot itself must be strong and withstand strong resistance from the prey.
Knots connecting the lure to the leash
Of the large number of possible options, we will tell you about the most popular ones, where the spinner is attached through a leash:
Stevedoring knot
- thread the end of the fishing line twice into the bait ring. Then stretch it along the main line and make 3 - 4 turns around it. Then thread this end through the window between the ring and the fishing line at the base of the bait's eye. Wet and tighten.
Eight
- a simple unit, used when changing spinners frequently. It is rather weak for catching large specimens, but is popular among perch fishing enthusiasts.
Fold the end of the fishing line in half and create a loop. Wrap it over the doubled lines and thread it through the resulting loop. Pull the main line and the end, the knot is ready.
Selecting a node and fastening for a specific case
Some novice anglers use direct attachment of the bait to the fishing line. But this method takes time when fishing, so they use others. The bait is attached through a carabiner, which is tied to the fishing line.
Rules for attaching baits:
- Non-rotating ones are tied through a swivel. It prevents the tackle from getting tangled;
- A correctly placed knot does not impair the performance of the bait;
- A metal leash is used to catch pike.
Methods for attaching bait to fishing line:
- Straight;
- Through a swivel (carabiner);
- Through the winding ring.
- The most exciting is the simplest. Pass a cord through the hole in the eye of the spinner, run this end 3-4 times around the working line, pull the free end into the loop at the beginning of the bait and tighten. Cut off the unnecessary piece;
- Homer is highly reliable. After threading the thread through the eye of the spoon, make a loop out of it.
Wrap the other end of the main line 5-6 turns, pull it into the initial loop, tighten;
- Grinner is easy to tie. Start by inserting the line into the eye of the spinner, making a simple loop. Make a couple of turns along the working line and pass it into the initial loop. Twist the working thread and tighten;
- Liedemann - more suitable for monofilaments. The fishing line is passed into the upper hole of the spoon 2-3 times, a loop is formed. Then pass it back through the eye, making a double loop. Pull the end of the fishing line through this double loop again and wind 4-5 turns, tighten;
- Clinch is the most common fishing knot. Stretch a thread 10-15 cm into the hole of the bait, fold it in half, and twist the bait around its axis 5-6 times. Now hold the free end near the eyelet and tighten;
- Double clinch – more suitable for braiding. Pull through the top eye 15-20 cm twice, making a double loop. Tie the working end around the main line, pass through the loop, tighten;
- Stevedoring knot - common for spinning lures. Pull the line twice into the upper hole of the bait. Place one end along the main line and make 3-4 turns around it. Then bring it into the formed ring near the eye of the bait and tighten it;
- Figure Eight - used for urgent replacement of baits, it is easy to knit. The thread is folded to form a loop. Use the long end to twist it from above, pull it inward, tighten the connection;
- Albright - used when connecting fishing line and leash, complex in execution. Fold the thread twice, pass the end of the leash through the loop of the fishing line and make 5-7 turns on top of the double fishing line. Make 5 more turns on top of these turns and thread the remaining end into the loop where you first threaded it. Tighten the knot and glue it.
One of the varieties is locking knots. They are used to restrict the movement of floats and loads. Although there are special locking devices, nevertheless, such a knot is convenient to use directly during fishing.
Knitting is simple: a piece of another fishing line, already folded in half, is pressed to the fishing line. With one end, wrap all three threads towards the loop. After 7-10 turns, this end is threaded into a loop and slightly tightened. The knot should move along the main thread with some effort.
How to properly tie a fishing line to a carabiner or a swivel should not bother spinning anglers. The connections are quite simple:
- “Executioner” - the fishing line is pulled into the eye of the carabiner, this end is twisted around this very thread entering the eye. With each turn it must be pulled through the loop. After 5-7 turns, tighten the connection and cut it off;
- “Offshore swivel-knot” - a 10-15 cm loop is pulled into the eye of a swivel or carabiner, while the loop and scaffolding should be directed upward. Turn the carabiner 5-6 times around its axis and tighten.
How to attach a wobbler to a spinning rod - the fisherman must first think carefully. After all, this is an expensive bait.
Rapala connection: a knot is tied on the thread at a distance of 20-25 cm from its end. It is pulled into the eye of the wobbler and into the knot on the fishing line. The end is wrapped around the main thread, again pulled into a knot on the fishing line, then smoothly tightened.
But with the bait secured in this way, there is a possibility of losing it. The pike can simply cut the line. Therefore, she should still be tied to a leash. A moving figure eight will do. And if braid is used, then Albright is suitable.
How to properly tie a lure for a fisherman is one of the important issues. An angler, especially a beginner, should be able to knit a dozen different connections. The correct knot is the key to preserving the bait.
The main criteria for choosing spinning tackle are:
- Fishing conditions in the reservoir.
- The predator for which the bait is selected.
- The spinner's fishing style.
When choosing the length and material for gear, the fishing conditions on the reservoir play an important role, since the bottom of the reservoir itself, aquatic vegetation, the presence of flooded trees and snags, and the grass cover of the banks require an appropriate leash length.
For example, for pike, it is necessary to use a strong, medium-length tackle, but for perch, an elastic thread is better, even with low strength indicators in relation to the core of the field cable.
We suggest you familiarize yourself with: The best baits and lures for catching grass carp
Of course, there are no trifles in fishing. The leash and bait play one of the most important roles here. Choosing them incorrectly can greatly affect the result. So, what circumstances should be taken into account when choosing it?
First of all, let’s decide in what cases is it needed and in what cases is it not? It is generally used for two reasons.
Only a wire leash can save the situation. In any other case, the bait will be lost. Another reason for using it is that when using different baits, it may be convenient to prepare several options in advance, and when fishing, only connect them to the main part of the fishing line.
If you need a leash, then choose it based on your specific situation. Let's consider this issue in more detail.
Fishing conditions
If you are fishing from the shore, which is overgrown with reeds, then casting a spinning rod far will be problematic if both the rod and the leash itself are too large. In addition, an important role in choosing it is played by whether the fishing will take place from a boat, or whether the spinning rod will be cast from the shore.
The nature of the bottom surface and water transparency also influence its choice. For example, for catching pike it is customary to use steel tackle due to the fact that the pike cannot gnaw through it. However, such a choice may lead to the fact that she will be able to see him and the bite will not occur.
Some fishermen consider it justified in such cases to use a more transparent and inconspicuous leash using some inexpensive bait. In this case, there will be a greater chance that the fish will bite and not fall off the hook (even if the bait disappears several times).
Character of the fish
As you know, the behavior of each species of fish has its own characteristics. For example, if you catch pike, you must take into account that this predator has sharp teeth. If the main property is its invisibility, and not strength, then it is more profitable to use a fluorocarbon leader rather than a steel one. Of course, if it exceeds a certain thickness, it becomes noticeable to the fish, and if it is thin enough, then it performs its function perfectly.
Fishing style
Almost everything is important in fishing. We are talking not only about the characteristics of a particular type of fish. Many other factors also matter.
- Time of day.
- Illumination.
- Water transparency.
- The nature of the bottom surface.
- Bottom color.
- Wind strength and direction.
- Food supply for fish at the fishing site.
- Dimensions of the fishing item.
- The degree of its activity.
- And also other factors.
Depending on the specific situation and on the knowledge, experience and luck of the fisherman, its various properties may come to the fore when choosing a leash. Sometimes we are talking about strength, sometimes about softness (so that the game of the bait is not disturbed), sometimes about transparency (so that the fish cannot detect it) or about its other features.
How to properly tie a spinner to a fishing line - installation options
The correct methods to tie a lure to a fishing line can be useful not only for beginners, but also for some avid anglers.
Sometimes a person has been using one method for a long time, and this method is not optimal. This leads to losses of fish during fishing and breakage of expensive installation components. There is a mess on websites on the Internet - in articles about tying spinners, information is collected in a heap, nothing is clear. The same components are called by different names, and false information is provided about their reliability and appropriateness of use in specific equipment. The same nonsense is copied.
In this article we will figure out how to properly tie a spinner to a spinning rod. Let us also consider in what variants certain types of fastening are used to obtain a strong and reliable connection.