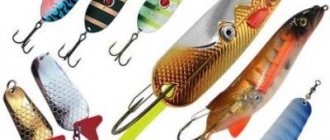
Fishing lines: their properties and differences
Reliable equipment is the first step in a successful fishing process. Even a primitive knot is capable of changing the strength of the connection due to the deformation occurring in the state of the material. Without knowledge of the structure of materials it is impossible to make a reliable connection:
- The structure of nylon monofilament is uniform. It has significant plastic properties and a high elongation coefficient.
- Braided cord contains several polyethylene fibers woven into one thread.
The second has a much greater degree of rigidity and strength than the first, but a lower elongation coefficient. At the moment of their connection, the internal layers of the structure shift unevenly, and the connection turns out to be less strong. This makes the overall strength lower.
Even a novice angler can tie braided line to a fishing line.
Node requirements
The connection will only be strong if it meets the following requirements:
- the knot has no gaps (there are no voids in it, since the threads fit tightly to each other);
- it does not slip (if you pull the threads to the sides by the ends, it does not unravel);
- it is compact and thin (passes through the rod guides and spools onto the reel with minimal friction).
Not all fishing knots meet these requirements. Only a few of them are suitable for connecting braided cord to fishing line. But even among them you need to choose taking into account the characteristics of the threads being connected.
What determines the strength of the braid?
The desire of many fishermen to use the simplest braided connections is understandable. But it is much more important to perform the knot efficiently. If the load on the rod is too high, the braid will come undone, and you will lose your catch and part of the equipment.
It is worth tying the fishing line tightly to the braid in order to catch larger fish and successfully pull it out if the prey resists strongly. With a high-quality knot, a rich catch is guaranteed. But the strength of the cord does not depend on it alone, but also on other things.
Thickness
The thicker the braid, the greater the number of threads in its structure, the less it is deformed. With a thinner thread, the change when tightened is more noticeable.
Any deformation reduces the strength index. Therefore, the connection is stronger with thicker threads.
The knot is stronger if fishing lines that differ little in diameter are tied.
Wetting
It is well known that wet threads glide and stretch better. Therefore, you can strengthen the connection by first moistening the tightening area with water.
Spinning braid
The one that is pulled dry will change its structure in the water. There is too high a risk that the fish will unravel it and take part of the tackle with it.
It is recommended that knots of any complexity be wetted. Water absorbs heat. When tightening occurs, the fishing line heats up, and as a result, its integrity and structure are damaged.
Section
A high-quality connection is formed when a braided thread that is round in diameter is used. It deforms much less than flat. When tightening the latter, the twisting is much stronger.
Categories of fishing knots
In general, there are two types of fishing knots for undergrowth:
- For attaching a side leash . A special feature of these nodes will be their location directly on the thread itself.
- For tying a leash at the tip of the rig - for fastening to the edge of the thread.
When tying knots for maximum endurance and strength, you need to use some facts that will ultimately increase the reliability of fishing gear:
- It must be tightened as tightly as possible.
- You need to pull the line evenly, with constant pressure.
- When knitting, use long working edges so that the knot does not end up breaking.
- Wet the thread with saliva, water or oil to glide easily and reduce friction.
- Don't cut the tip too close to the knot.
- To secure the knot tightly or make it smooth, you can use a drop of superglue to remove the formed burrs.
Knots for braiding
Known methods for tying braided thread allow you to assemble any kind of equipment. This results in a strong connection to the cord that can withstand significant loads.
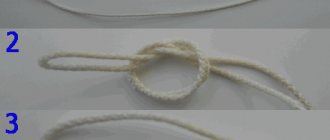
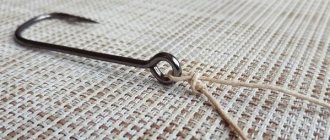
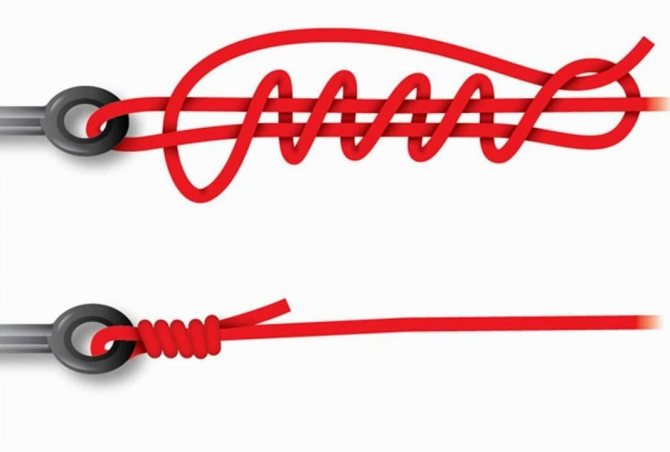
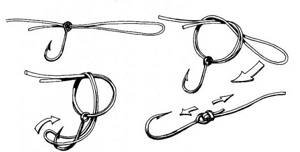
Clinch
The knot is used to attach fishing elements such as a carabiner, swivel or hook to the fishing line. It is so simple that any beginner can tie it. It's done like this:
- Pass the end of the cord into the eyelet and push it out 10 cm.
- Make 6-7 turns with this short section of the long piece of thread.
- Place the end with which the cord was wrapped into the loop that formed at the eye of the hook. It turns out another one, now bigger.
- Pull the knot slightly, wet it and tighten completely.
- Trim off the excess.
Despite the simplicity of execution, the connection is very reliable.
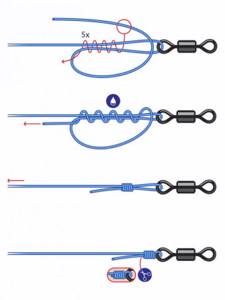
Grinner
Suitable for tying braids. Experienced fishermen call him one of the best.
Easy to knit:
- Pull the cord through the eye of the hook to form a loop.
- Make 5-6 turns, then make another loop.
- Place the end of the braid over the resulting loop.
- Wet the entire structure and tighten the knot.
- Trim off the excess.
The Grinner
Grinner knot is durable because the wear of the joint itself and the material is kept to a minimum.
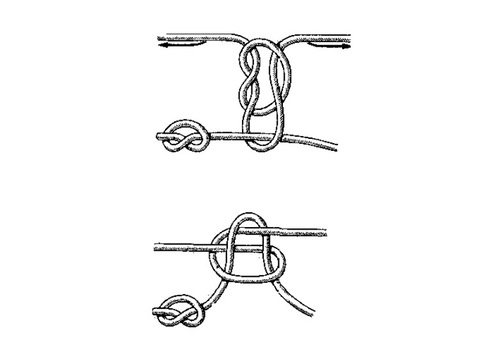
Knot for tying thick “braid” and thin “monoline”
Sometimes, you need to tie together loess of different diameters.
We will analyze the method of knitting thick braid and thin monofilament:
- Let’s take the tip of a braid about twenty centimeters in length and make a loop;
- also 20 centimeters long, into it
- We wrap the end of the monofilament around the part that we threaded through the braided loop;
- We make about 10 turns of the monofilament, and we pull the remaining end of it into the rest of the braided loop;
- We wet the knot, tighten it, and cut off the excess;
Attaching the braid to the reel spool
When fluorocarbon, monofilament, or braided thread needs to be spooled onto a spool, it helps to know how to tie it to the spool. You shouldn’t reel in extra meters, ignoring good knots and making the excuse that you won’t be able to cast the bait too far.
Tying braid to a spinning reel can be challenging for a beginner. Typically braided cord is too slippery to use self-tightening knots. It is better to find out in advance which knot is best suited for connecting to the spool in order to correctly attach braid to the spinning reel:
- Wrap the cord around the spool. Its end goes around the main part of the thread.
- Make 4-6 turns, from the spool to the bending point. The thread will end up in a sliding loop.
- Thread the end of the cord into the loop around the main part of the braid again.
- Moisten the place of the ligament and tighten the knot.
To prevent the cord from slipping, use an adhesive tape.
How to tie braid to fishing line
You can tie a fishing line and a braided cord using various methods that differ from each other in the complexity of the technologies and different final values of the breaking load. In further material of the article we will describe to the fisherman the simplest, but at the same time reliable types of knots. After ten minutes of training, the knots for fishing line and braided cord presented to the reader’s attention will be able to knit right on the shore of a reservoir in real fishing conditions without much time investment, but with iron confidence in the reliability of the equipment.
shock leader knot
Shock leader knot is a compact and strong knot that easily passes through the winding rings of the gear.
Important! The knot is used to connect materials of the same diameter.
So, we knit this knot step by step:
- Initially, a monofilament line is taken at the end of which a regular knot is formed, but it is not tightened to the end.
- We pass the tip of the 20 cm braid through the remaining loop and tighten the connection.
- The free end of the cord is wrapped with monofilament, for which it will be enough to make 8 turns.
- We stretch the remaining tip of the braid to the original knot and thread it between the fishing lines.
- We stretch the tip of the braid into the newly formed loop, moisten and tighten the knot by pulling the long main pieces of monofilament and braid.
- We cut the remaining ends of the fishing line and cord to 2 mm.
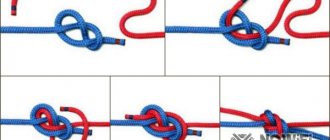
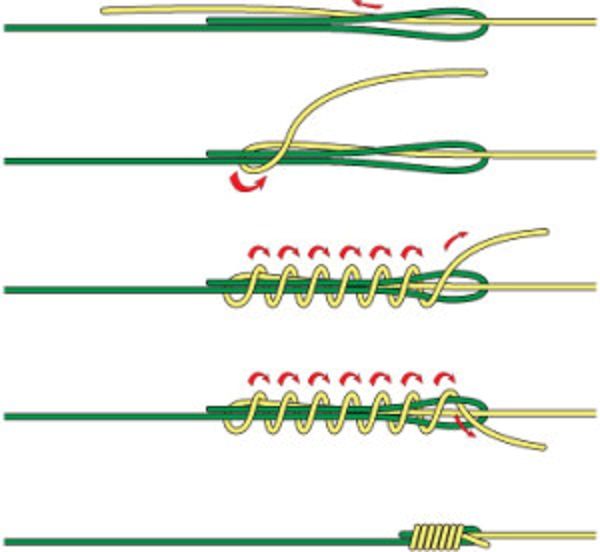
Bloody Knot
Tying using the blood knot method helps tie the braid to the fishing line with the smallest differences in diameters and a loss of only 10–15% of the initial breaking load.
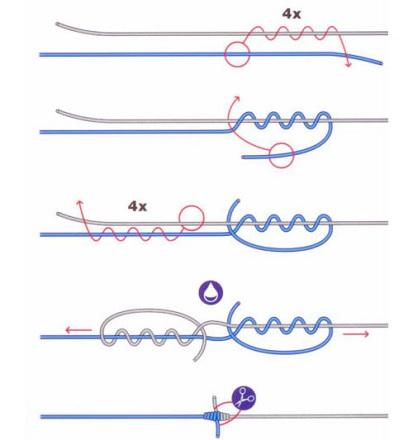
Step by step:
- To begin with, the ends of the fishing line and cord are crossed, where the end of the braid is 15 cm long, and the monofilament is 5–7 cm long.
- Using a braided line, we wrap 12–16 turns around the nylon axis towards the main line.
- Holding the ends of the lines to be connected in the center of the twist, we separate the materials, forming a small loop between them.
- Take the end of the braided cord and thread it through the resulting loop.
- Following this manipulation, opposite the threaded end of the braid, we insert the end of the monofilament into the loop.
- We moisten the unstretched tie and after this action we tighten the main ends of the forest until a compact knot is formed.
- After tightening, cut off the excess ends, leaving millimeter trimmings.
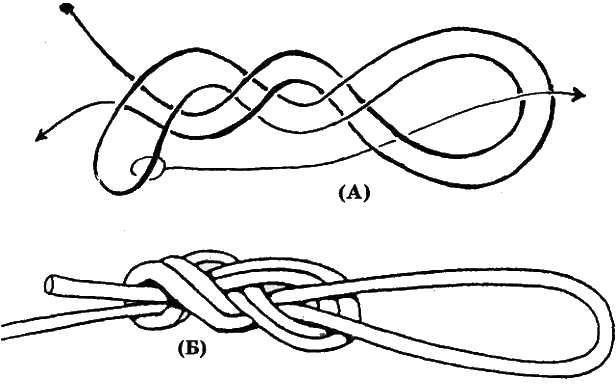
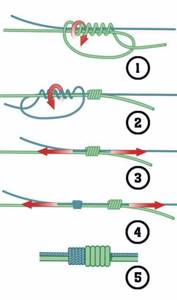
Liana knot
This is a simple knot, but quite strong, and is not prone to slipping when tightened. It is also noteworthy that this knot for tying fishing line with braid can be easily untied by moving any of the loops near the main body of the knot.
This connection has the following knitting algorithm:
- We form a closed loop from the base of one of the fishing lines, feeding the short tip forward and, after throwing it over the base, directing it immediately down.
- On the second piece of fishing line, we carry out a similar operation, only first we insert the end of the cord into the already formed loop of the first fishing line.
- After performing these manipulations, we wet the materials in the tightening zone and tighten the knot with a uniform, jerk-free movement.
Albright node
Another strong knot for tying is the Albright, widely known to many anglers. This is a universal knit for both homogeneous and dissimilar materials.

Important! The Albright knot is suitable for connecting materials of different diameters.
- Taking a thicker thread, fold its tip into an open loop, through which we pass a thin piece of fishing line.
- We wind a turn of thin fishing line around the open loop, forming a loop from the thin cord, located opposite the loop of thicker material.
- Around the loop obtained from a thin fishing line, make about 10 turns with the free tip of the thread and pull the remaining end into the loop previously formed with a thick cord.
- We wet the winding to prevent loss of strength on the knot due to friction and tightly, alternately pulling the ends of the lines, clamp the loops together.
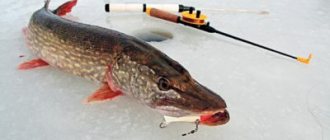
Tying a wobbler on a spinning rod
Many novice fishermen do not understand the importance of this unit of spinning equipment and do not pay due attention to tying the bait. But it is only possible to fully realize its potential with proper installation. It provides:
- Fine balancing. Any excess disrupts the wobbler's play.
- Mobility of the connection so that the bait plays.
- Rigidity. If you tie the leash correctly to the braided line on a spinning rod, during the jerk it will end up to the side, and the hook will not reach it.
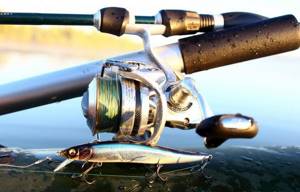
How to tie a wobbler
A fisherman can correctly tie a wobbler to the braided line on a spinning rod using thick fluorocarbon, a soft metal leash, or attach it directly to the braided line.
Most popular types
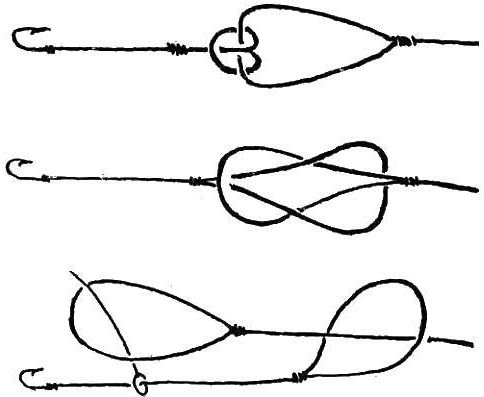
Lesochnye
Types of forest knots:
- Eight, the peculiarity of which is that it can be easily untied even despite prolonged loads. It is mainly used for tying hooks, spinners, and wobblers. Step-by-step instruction:
- pass the thread through the ring on the hook;
- wrap around the forend;
- insert through the ring in the hook;
- a closed loop has formed;
- enclose around the main end;
- stretch the running edge into the circle of the hook;
- carry it into the loop that has formed around the forend.
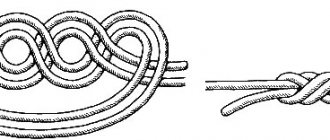
- Loop in loop – an incredibly tight connection that can be easily disassembled to replace one leash with another. Suitable for all types of leashes: from fishing line to metal. Step-by-step instruction:
- retreat 32 - 36 cm from the edge of the main line;
- lay this part in half;
- tie a regular knot from the folded thread;
- insert the joined part twice into the skein;
- a surgical node has formed;
- Once wet, pull off the binding;
- form a surgical knot on the leash;
- place the driving loop on the main one;
- insert the remaining tip of the leash through the gap on the main part;
- pull the two parts in different directions - trim the ends, leaving 1 mm.
- Bloody loop perfectly suited for threads with a difference in diameter of 40%, while, very importantly, maintaining 91% of the load capacity. Step-by-step instruction:
- lay two fishing lines overlapping, clamp with your finger, leaving 22 cm edges for work;
- wrap the working part of the first thread around the second 6 times;
- stretch the working edge to the beginning of the winding, insert it between two fishing lines, and pinch it with your finger;
- Using the working edge of the other thread, carry out the same procedure, insert it into the hole that formed between the two cords;
- tighten first the first knot, then the second;
- pull the threads in opposite directions, cut off the ends.
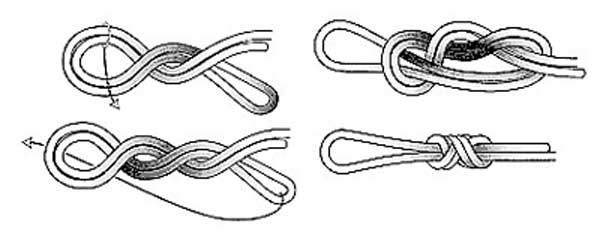
- Running - the simplest knot that forms a tightening loop. If you pull the root end, it will tighten; if you pull the running end, the loop will increase. Knotted in any part of the thread. Step-by-step instruction:
- fold the working end into a loop;
- pass the root edge through the gap from above;
- tighten.
Running
Bloody loop
Loop in loop
Eight
On a braided cord
Types of knots on a braided cord:
- Double palomar used to attach fishing line to a fly, hook, or wobbler. The main advantage of the unit is that the hook in it can rotate freely, while withstanding a load of up to 9 kg and a strength of 85 - 90%. There is one drawback - it is not used for small rings. Step-by-step instruction:
- bend a piece of fishing line in half;
- pull them through the eye in the hook;
- twist a regular knot on a thread;
- pass the curved part of the fishing line over the hook, above the knot, into its circumference;
- pull up the ends, fix, trim the edges.
- Uni (Duncan) – a multifunctional method, used to connect two fishing lines, while being fixed around one of them; if it is necessary to secure the hook, then around the shank of the hook itself. It is an adjustable loop. It retains strength better if tied around the eyelet. Reliability is lower when tying two lines (75%). Step-by-step instruction:
- pull the end of the thread into the eye or forend;
- twist a whole loop on the short end of the fishing line;
- wrap the part of the thread that remains five times around both ends, passing the line through the resulting gap;
- tighten until the loop forms a spiral;
- form the required size of the loop by tightening the threads;
- trim the end that remains.
- Albright – a knot used to tie two lines whose diameter differs by more than 1/3. The most common application is to combine a fly line with a backing line (extension line). Step-by-step instruction:
- cross two ropes to form a loop;
- pass the end of the thread through the gap and wrap it around itself and around the loop ten times;
- pull the end of the cord through the loop lying nearby;
- tighten the knot;
- cut off the ends.
- Stren – combines a universal simple knot and an improved clinch. Step-by-step instruction:
- fold the ends of the two threads together so that they touch each other for 26 cm;
- make the end of the leash the first loop of the universal knot;
- wrap the leading edge 3-6 times around the cord (remember that the thinner the thread, the more turns you should make);
- secure the knot by pulling the ends in different directions;
- tie an improved clinch on the main part of the leash, near the universal knot;
- Use the running edge of the cord to tighten the clinch, making sure that the turns lie parallel to each other;
- tighten and trim the ends.
Palamar
Uni (Duncan)
Albright
Stren
Valuable Linking Tips
It is important to correctly perform the knot that connects the braid to the fishing line or tackle. You need to know how threads from different materials behave when knitting.
- The degree of deformation during connection can vary quite significantly. The thicker the line, the less it changes, and vice versa.
- It is advisable to use fishing lines that, if not equal in diameter, then differ by small values.
- It is important to apply the turns evenly without overlapping. Their impact on structural integrity is well known. They are able to reduce final breaking loads.
- We must not forget about the mandatory moistening of the knot before tightening.
Experienced fishermen even recommend soaking the joint with quick-setting glue to enhance the strength of even the most reliable equipment. Then the integrity of the connection is ensured.
Practice tying each of the proposed knots. If you don’t know an experienced fisherman who can show you how this is done, look at our educational materials: photos of patterns, instructions for tying knots, videos. During the process, you can choose those that suit you.
The strongest knots for tying braid with fluorocarbon
Here we will look at how to tie a carrot knot or “Mahin leader knot”:
- Take the tip of the fluorocarbon loess and knit an ordinary knot without tightening;
- no more than 20 centimeters long, into this knot
- With the inserted end, we make turns around the fluorocarbon;
- After returning the turns to the knot, it is necessary to insert the end of the braid into the loose knot on the fluorocarbonate;
- Wet the knot and, pulling the ends in different directions, tighten it;
- The ends need to be trimmed.
Double Uni Knot Method:
- We lay the two ends of the loess opposite each other;
- A loop is made in the opposite direction;
- Using the remnants of the braid, we draw turns around two threads in the middle of the ring;
- Using fishing lines we make a knot;
- The same operation is performed with the fluorocarbon tip;
- We tie a knot by pulling it in different directions;
- Cut off unnecessary ends.
What is special about the knots used for braiding?
Fishermen know that braid can be created in two ways:
- several threads are intertwined into one common cord;
- To create a cord, several fibers are glued together.
If the product label does not indicate the method of execution, it can be determined by eye. When creating a knot, several nuances should be taken into account, depending on the method used to make the braid.
For braids whose fibers are soldered together, knots should be used in which a small number of tightenings are expected. Cords with a braided structure are highly resistant to deformation, however, they are afraid of knots that are tied too tightly. If you tighten the knot, a fraying effect occurs - the fibers can break from excessive tension.