What tools and materials are needed for work?
Before you begin, you need to prepare the appropriate tools and materials. The list of everything you need consists of the following items:
- PVC glue;
- industrial dryer;
- screwdriver;
- plywood 24 mm thick;
- brush;
- acetone;
- 2–3 m² PVC awning fabric;
- jigsaw;
- impregnation for wood;
- epoxy resin;
- sandpaper.
During the work process, you may also need auxiliary tools.
Removing the old transom
The first stage of repair is dismantling the old transom. The procedure should be carried out carefully so as not to damage the canvas of the boat itself. The process of removing the old part is as follows:
- In most cases, the lower part, which deteriorates from constant contact with water, falls off and comes unglued on its own.
- Through the hole in the bottom glued seam you can partially pull out the rotted plywood.
- The top glued sheet must be removed using an industrial hair dryer. Heat the seam until the glue softens.
- After this, gradually tear off the PVC sheet. Then you can remove all the plywood.
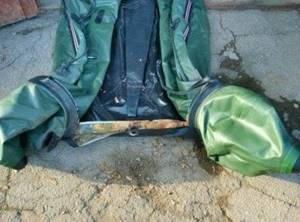
Removal of the old transom must be done as carefully as possible.
To make it easier to glue in new plywood later, the side areas from the inside should be sanded with sandpaper. This will help remove any remaining pieces of wood.
Preparing the plywood
How to properly store a PVC boat
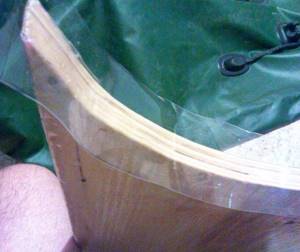
It is important to properly prepare the plywood from the beginning. Otherwise, it will deteriorate just as quickly as its predecessor. The following manipulations need to be performed:
- Cut 2 rectangles from the main sheet with approximate parameters of 1x0.5 m.
- Glue 2 pieces together with epoxy resin. The part will dry for about a day. In this case, the air temperature must be at least 15 C°.
- Using a jigsaw, form protrusions and cutouts like the original part. Adjust to size.
Attention! Sand the cuts with sandpaper so that the sharp edges do not damage the PVC boats.

It is important that the surface of the plywood product is as smooth as possible.
PVC boat cut repair
If you need to quickly repair a puncture or cut, then decide whether you will install a temporary or permanent patch. Often, when you install a temporary patch while on a hike, you never return to a full-fledged repair, so unless you are in extreme conditions, I recommend immediately installing a permanent patch. The difference between a permanent and temporary patch is that the first will come off easily with slight heating (a little more than from the sun), while the second will come off only with more significant heating. To apply a temporary patch, simply cold glue it and do not use professional adhesives (do not glue with two-component adhesives, or industrial adhesives like the popular Kleyberg 900I). If you want to install a permanent patch, do the opposite. Having good glue with you will almost completely solve the issue of repairing a PVC boat, because... When using it, you will no longer need to follow all the rules for high-quality gluing. Tests show that the “quick on the knee” patch adheres well when using professional glue.
Method of installing a patch on a PVC boat (on a lowered boat, if possible, on a hard surface):
- Cut a patch of the required size from a piece of PVC (with a margin to fit the cut).
- Apply to the cut site and mark the area (if possible) and make sure that the markings are correct.
- Degrease both surfaces (PVC has two sides: one smooth and the other rough, you need to glue the rough one to the rough one or the rough one to the smooth one, different manufacturers glue boats with different sides outward, take this into account).
- Apply glue to both elements (a little extra will not go amiss).
- Wait for the glue to dry and apply a second layer.
- After the second layer has dried, heat the puncture site and the patch with a hair dryer, a lighter, a hot mug or a hot stone (if you glue “hot”, the connection will be more resistant to temperature and will be stronger, but if you can provide sufficient temperature; if you glue “in cold weather”, be aware that adhesion will be weaker, and some adhesives begin to leak in the sun).
- Apply the patch to the intended area without pressing, take a hard object in your hands.
- Start rolling the patch with strong pressure from the center to the edges, expel the air from under the patch, when rolling, keep in mind that it is important not how long you roll the patch, but the force of pressure, for this it was recommended to carry out repairs on a hard surface. You can continue to heat the patch while rolling.
- Wait 5 minutes and the repair is complete - you can continue using the PVC boat.
Once again, professional glue will greatly facilitate the task of repairing a PVC boat, so take good glue and many of your flaws during gluing will be smoothed out by its quality. If you need to repair a very large cut or make complex repairs, read this section.
Pasting plywood parts
After the wooden part has completely dried, we glue the PVC fabric. This must be done carefully and carefully to cover all the edges of the sides.
Gluing protective sheets must be done in stages
This is additional protection for plywood from water. There is some trick. The edges can be sealed not with fabric, but with strips cut from a children's pool. This material will have to be applied in 3 layers, but it will not increase the thickness of the part and will perfectly protect the wooden base from moisture penetration.
Installation of plywood
Once the inside is ready, you can begin gluing the transom itself. The process goes like this:
- It is good to coat the transom edges on the boat itself with adhesive.
- Lubricate the plywood base with dry glue.
- Lower the boat a little and insert the wooden base through the bottom (you will have to undo the bottom seams to do this).
- It is normal to pump up the boat and install the transom.
The part should be completely in place. Otherwise, problems will arise during the next stages of installation.
Complex repair of a PVC boat
To carry out complex repairs, I strongly recommend that you contact specialists; if you want to repair the boat yourself, then stock up on PVC material. For self-repair, the only complex repairs you can do are large cuts or transom repairs; you cannot completely replace the transom or repair the transom holder at home. To repair large cuts, you need a hard, flat surface, otherwise you won’t get a high-quality connection, use the gluing technology described above and proceed:
- Prepare two patches of the same size
- Degrease them and the cut inside and out
- Apply glue to the patch and to the inside of the balloon
- Wait for the glue to dry
- Place the patch inside the balloon and position it so that it covers the entire cut.
- Carefully place the balloon at the cut site on the patch on a flat surface and check the evenness of the resulting seam
- Heat and roll the inner patch
- Bend the cut of the balloon and coat the cut area with glue, leave to dry for several hours
- Pump up the boat
- On an inflated boat, install an external patch according to the technology.
Popular sections: Hunting boats, Fishing boats, Low pressure boats, Motor boats, Rowing boats. Popular boats for motor: Aqua Boats, Riviera Boats, Apache Boats, Piranha Boats, Hunter Boats, Frigate Boats, Stealth Boats, Flagman Boats, River Boats, Polar Bird Boats, Inzer Boats for motor. Popular rowing boats: Inzer boats, Aqua Optima boats, Aqua Master boats, Frigate rowing boats, Piranha rowing boats, Stefa rowing boats, Monsoon boats.
Other articles
Final works
Now we glue the rubber base onto the transom. This is the simplest stage of work and does not take much time. You need to heat the rubber using mounting glue, lubricate it with glue and stick it on the transom.

The rubber is glued to the transom using mounting adhesive.
The same needs to be done with the bottom of the boat. If any seam has become unstuck, then the procedure should be repeated in that exact place.
“Decorating” the transom
After the boat part has completely dried and no defects have been noticed, you can begin installing additional elements. These can be rubber or plastic pads or devices. To fix them, you should use stainless steel screws, which are pre-lubricated with sealant.
***
Expensive repairs to the rear part of the PVC boat, called the transom, can be done by yourself. It is enough to prepare simple tools and materials, and also spend some time on the work. If everything is done correctly and carefully, you will get a transom no worse than the factory version. As a result, you can significantly save on expensive service repairs and enjoy the work. Additionally, the boat will gain a second life and will serve for a long time.
Stage 6. Miscellaneous stuff.
Now we attach to the transom various elements removed from it earlier. For fastening, you can safely use self-tapping screws, for example 4*25; in the store we ask for stainless steel ones. We planted the self-tapping screws after thoroughly covering them with sealant so that water would not go under the self-tapping screw.
After that, we decided to glue another layer of glue on the corners of the transom from below, in order to protect them even better from water.
Well, the general view came out like this:
The drain valve had not been installed yet, so we decided to swim several times without it. To be honest, I don’t have the courage to make a hole in plywood that is well sealed from water =), but then I’ll still have to make that too.
fishspace.ru
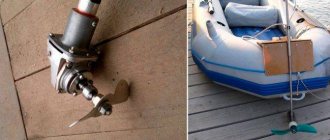
First of all, transoms are classified depending on the type of attachment to the hull of the vessel. According to this parameter, they are divided into removable and glued. The former are used for almost any boat. Most often, removable transoms are used in boats with outboard motors whose power does not exceed 7.35 kW. On boats with weaker engines (up to 2.20 kW), such transoms slightly increase the weight of the boat, as well as the amount of time required for assembly.
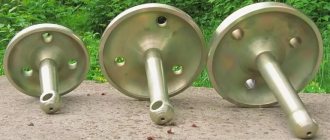
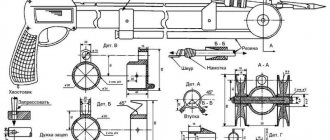
The most common option for attaching removable transoms is mounting on a bracket. It is mounted to special parts, most often located in pairs at the top and bottom. O-shaped and Y-shaped boats with an inflatable can at the stern are equipped with specific brackets in the form of a curved frame that follows the curvature of the side of the vessel.
There are also brackets made in the form of a pair of tubular frames. The rods of the latter are curved along the length of the side, and their ends at the stern are adjacent to the can or placed at a short distance from it, which ensures accurate installation of the transom for the motor. The transom is attached to the hull of the vessel in different ways. For example, it can be fastened or laced to the side.
Transoms are most often glued in at the optimal distance from the bow (4/5 of the hull length), at an angle of 7-8 degrees. By following these requirements, you increase the safety of the vessel, its speed of movement, and improve the conditions for going on plane.
Sometimes the transom is also fixed in the central part of the vessel in order to get the stern part for use for various reasons. The motor is installed at a specific height, which is why a special cutout is often made in the transom of massive boats to lower the motor to the required depth.
Movable pads are also used to adjust the height of the transom. And to make the stowage of large boats with a fairly rigid bottom more compact, the transom is made of two hinged parts, and an important condition is the location of such a connection above the water level.
fisher-book.ru