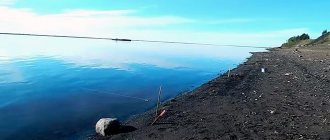
Any more or less experienced fisherman knows that the correct knot with which the leash is tied to the main fishing line is an important key to success during the fishing process. The fact is that the moment it is immersed in water, the fishing line loses up to twenty percent of its strength. Moreover, if the knot chosen to connect the leash with the main line turns out to be unsuccessful, then the chance of breakage increases by another thirty percent or more.
It turns out that a leash well attached to the main line plays no less important role than, for example, a bait, a powerful reel, a strong rod, etc.
After all, no matter how good the bait is, no matter how high the reel rating is, no matter how strong the rod is, if the leash comes off from the main line due to a poorly chosen or incorrectly tied knot, then you won’t see a catch at all (the only consolation is some knots can be mated without problems and quickly literally in the “field” conditions.
Another thing is that tying hooks to a leash is somewhat more difficult. And time is running out and you may not notice how the bite suddenly ends, and you can leave with nothing at all). So, this matter, that is, tying the leash to the fishing line, should be treated no less responsibly than other, at first glance, more important, even primary things.
But there are several good options for attaching the leash to the main line, which will definitely not fail at the right moment. Some of them are simple and easy to learn, while others are quite the opposite. But it is important to remember that the more a person practices something, the easier it becomes over time.
Basic options for attaching a leash
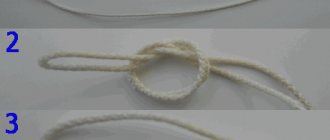
And the simplest of them is the so-called “loop-to-loop” method. Although it is worth noting that “simple” does not equal “unreliable”.
The dressing order is as follows:
- Two ordinary, but elongated loops are knitted at the ends of the desired leash and the main fishing line.
- Then the end of the fishing line with the loop is folded in half and wrapped a couple of times around its axis.
- The initially tied loop of fishing line is threaded through the ring formed at the end of the “structure” and then simply tightened.
- The loops of the fishing line and the leash are fastened together and that’s it, the fastening is ready.
There is a so-called “improved fishing knot”. It is knitted in the same way as “loop to loop”, easily and quickly. It is important that it can be done right on the spot and no special devices are needed for this. The knot turns out to be universal.
And this happens as follows:
- You need to attach the main line and the leash to each other.
- Then wrap a leash around part of the fishing line and pull its end up.
- Pass the same end into the resulting loop without tightening it.
- Wrap the end of the leash around the loop once.
- Pull the knot.
- Take the end of the main fishing line and do the same operations with it, tying it to the leash.
A knot called “Nail” has good strength.
It is not as easy to implement as the other two, but its effectiveness is worth all the effort:
- You need to tie a stop knot on the main line.
- Place the main line and the leash parallel.
- Thread the leash line under the main one.
- Make a turn around the main line.
- Thread some oblong hollow through object such as a pen into the resulting loop.
- And make a few more skeins around this item and the main fishing line.
- Then pass the end of the leash through the object and tighten the knot (this should be done very carefully, holding the turns so that they do not overlap each other and get tangled).
- Trim off the excess part of the remaining leash.
Another knot that is very popular among experienced fishermen is the figure eight knot. Simple and uncomplicated in its essence, it copes with its duties perfectly and firmly holds the connection between the leash and the main fishing line.
How it fits:
- The fishing line and leash are placed parallel to each other.
- A figure-eight loop is knitted according to the “Flemish loop” principle.
- The knot is tightened.
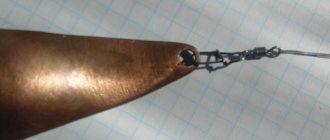
Fastening with swivels and carabiners
Plus, quite often anglers use a knot called “Improved Clinch”. To say that it is very strong is to say nothing: its strength reaches ninety-five percent, which is an excellent result and gives every reason to believe that even the largest specimen of a pond (weighing up to ten kilograms) will not be able to tear the leash from the main fishing line (naturally , both the fishing line and the leash itself must withstand such weight. There is no other way).
And the process of its complete production is as follows:
- The free end of the fishing line is threaded through the swivel of the leash.
- Then, the same end wraps the fishing line around its axis about four or even five times, without tightening the knot.
- Then you need to pass the end through the hole formed near the swivel ring.
- And finally, after wetting the knot first, tighten the knot in the usual way.
But it is worth considering that it is not recommended to use this type of knot if the reel is wound with braided fishing line rather than ordinary one.
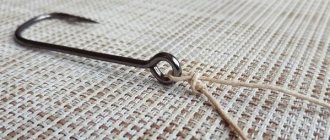
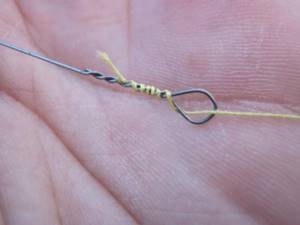
It was mentioned above that the leash has a swivel. But for him to appear there, he needs to be tied. To do this, you can use a simple unit, which is made according to the following scheme:
- Scheme for tying the swivel to the fishing line
Insert the swivel.
- Fold part of the leash in half.
- Fold the folded part again.
- The fishing line is fixed a couple of centimeters from the bend (by hand).
- Make two or three turns around the line.
- A double fishing line is threaded into the resulting loop at the end of the leash.
- The knot is wetted and tightened.
- Everything that is three or four millimeters from the end of the knot is cut off.
Such a knot, by the way, turns out to be motionless.
In addition, you can attach a side lead leash using a swivel and carabiner. And this is done like this:
- A sinker is attached to the end of the main line.
- The leash is tied twenty or thirty centimeters above the sinker (here it is important to take into account that the lead leash must be perpendicular to the main line).
And we need to say more about the second point. If you tie the leash directly to the fishing line, the chance of tangling this gear sharply increases. If you do this with a swivel and a carabiner, then the likelihood of entanglement is reduced significantly. And then you need to tie the swivel itself with a carabiner to the main fishing line, and attach a leash to it.
Methods for tying a leash to a fishing line
How to tie fishing line together: types of knots
Sometimes when fishing various situations arise in which it is necessary to splice a broken thread or tie a new leash. An experienced fisherman will not even notice this problem and will easily overcome this difficulty within two to three minutes.
For a beginner, this is not all so prosaic, but a little theoretical knowledge and a few days of practice will turn him from an amateur fisherman into a professional.
There are a large number of methods for connecting fishing line to fishing line. And every year the number of new methods and binding schemes only increases.
Note! This article will discuss the most popular connection methods. There is no need to apply them all in practice, but it won’t hurt to know for your horizons.
Surgical knot
One of the most common nodes. It owes its popularity to the simplicity of knitting and the strength of the resulting knot. It is used for all types of scaffolding: fluorcarbon, wicker, monofilament. Using this technique, not only threads of different materials are connected, but also threads that differ from each other in diameter.
There are several ways to connect line to line using a surgical knot.
Method 1
The easiest and fastest way to connect:
- From two cords, with their tips together, they form a double surgical knot - a simple loop with an additional two turns.
- Wet and tighten.
- Excess ends are cut off.
Method 2
Like the previous node, this method is simple and reliable:
- A regular (single) loop is made on one of the cords being fastened.
- Another line is threaded into the resulting loop, from the side where the tip exits.
- After this, a regular loop is knitted on the second line.
- The knot is wetted and tightened.
Method 3
This unit is an example of reliability and ease of execution:
- Two threads are applied to each other so that there is a distance of 15-20 cm between their ends.
- Then one of the ends is bent into half a loop and threaded through it, grabbing another fishing line, several (3-5) times.
- Wet and tighten.
- Next, take the other end of the fishing line and repeat a similar operation.
- After this, the fastened threads are stretched in different directions.
Method 4
This knot is very similar to the “carrot” knot, the difference is that not a simple knot is tied on the main line, but a double surgical one.
One of the best knots, connecting not only two fishing lines, but also a thick fishing line with a braided cord. This knot is a little more complicated, but has increased strength - the thread breaks anywhere, but not in the knot.
Another advantage of this fastening is that it is less traumatic to the fisherman’s hands, since the tips of the fastened monofilament threads are located together and parallel to the vector of the main fishing line.
- A double surgical “figure eight” knot is made on the main fishing line - the tip of the fishing line is threaded through a regular loop twice and slightly pulled up (it turns out to be a “figure eight”).
- Another fishing line or braid is threaded into the figure eight ring from the exit side of the thread tip.
- Then they thread it into the second ring of the figure eight, repeating the main line.
- With your fingers, hold the ring closest to the main fishing line and wrap the tip of the second fishing line around the “figure eight waist” several (3-5) times and thread it into the second ring in the same way as it entered.
- Wet the knot and tighten it.
Herbal knot
This node is elementary.
Used to tie two cords of the same diameter:
- Two threads are applied to each other so that there is a distance of 15-20 cm between their ends.
- The end of the first line is brought from above behind the second and brought out over the first (half-loop, the tip of which lies on top).
- The tip of the second line is passed through the first in the same way.
- The knot is carefully tightened.
Let's celebrate! This knot is quite strong. When tying line to line using this method, the knot may unravel, so it is equipped with additional stoppers.
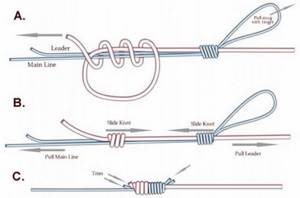
Albright knot
This fishing knot is universal. It is used for tying monofilaments, fluorcarbons and braided cords of various diameters, in various combinations.
To tie threads of different diameters, do the following:
- Large diameter scaffolding is folded in half.
- Through the resulting half-loop, another line is passed 15-20 cm.
- Fixing the loop with the second monofilament thread with your fingers, wrap it in the opposite direction several (7-10) times.
- Thread the tip of the second line into the remaining loop from the first.
- Wet and tighten.
Let's celebrate! With the same cords and scaffolding proceed in the same way.
Single or double clew knot
A maritime knot that takes its name in the 15th century, although it began to be used several thousand years ago.
Today it is actively used in fishing for tying synthetic cords of different diameters - it allows you to connect the main monofilament thread with a leash.
- The initial loop is formed.
- A monofilament is threaded into it from below and wrapped around the base of the loop once.
- Finish knitting by skipping the end between the newly formed and the initial loops.
- Tighten the finished knot with the ends of the monofilaments.
Good to know! Single and double clews are distinguished from each other by the fact that in the second case the tying is completed not after one wrap around the base of the initial loop, but after two. This one, double clew, is more reliable.
"Counter Eight" or Flemish Knot
This method of tying threads came to fishing from navigation. It can be used to knit both thick and thin monofilaments. It is reliable and works great for the benefit of the fisherman and protects his hands from cuts.
In order to connect fishing line to fishing line, you need:
- Knit a figure eight on one fishing thread - make the first loop, put it under the base of the thread (you get the second loop).
- We thread the tip through the first loop.
- We insert the second thread into the first loop from the exit side of the tip of the first thread.
- We thread the second thread in the same way as the first, i.e. along it - the mirror method.
- We tighten it.
Let's celebrate! This connection of fishing line to fishing line in its correct execution is beautiful in its own way and resembles an intertwined figure eight.
"Academic Knot"
A very reliable type of fastening of fishing line with fishing line. Appeared thanks to the direct and surgical joining method. It has features of both fasteners.
To connect two twines, you must perform the following operations:
- First things first, you need to cross both twines and twist them together once (half knot).
- We bring both ends in one direction - up.
- We cross and intertwine with a half-knot, like the lower half-knot.
- Carefully tighten and obtain the required connection.
"Nail"
A “nail” will help connect fishing line to fishing line of different thicknesses. This hitch is good because the resulting connection of fishing line with fishing line practically does not reduce the strength of the tackle - record strength has been shown: up to 98%!
It owes its name to the additional device necessary for knitting it - a nail (you can use a rod, tube or nail).
- We apply the twine to each other (the distance between the ends is 20cm).
- We press the tube to them and wrap one piece of string (thinner) in the opposite direction 5-7 times.
- We take out the tube from the resulting turns along with the string threaded through it.
- Wet and tighten.
Let's celebrate! This hitch is good for its strength and compactness. It also works with thin monofilaments, although it is difficult to knit.
Scheme "Centaurus"
Another universal pattern for knitting leashes to the main thread, which has a high degree of reliability, is “Centaur”.
- Two strings are placed parallel to each other in opposite directions.
- The first twine forms a spiral (5-7 turns) around the second one and threads it from the beginning of the spiral, tightening it.
- A similar operation is repeated with the second string.
- The ropes are stretched in different directions.
- The excess is cut off.
"Water"
This scheme is excellent for tying a leash and is used for equipping “Paternoster” type donks. The principle of the knitting method is borrowed from the “Surgical” method.
- A leash about 50 cm in length is attached to the main line.
- An eyelet is formed at a distance of 15 cm from the edge of the leash on the side where the future feeder is attached.
- A lead leash with the main line is threaded into the resulting eyelet 4-5 times.
- The knot is tightened and the tip of the leash is cut off.
"Weaver's Knot"
In cases where the main thread is so thick that it does not allow complex operations to be performed with it, this method is used.
- The main thread is formed into a half loop.
- On the reverse side, a monofilament is inserted and this half-loop is tied 2-3 times, threading between the loop and the fishing line included in this loop.
- The resulting structure is tightened.
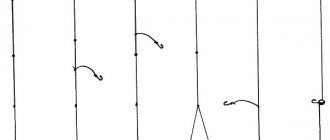
Features of attaching multiple leashes
Moreover, more than one side leash can be tied to the main line. There can be several of them, up to three pieces (!). But they need to be connected correctly. And this must be done not only so as not to tangle the leashes, but also so as not to tear them off from the main line.
And this is best done with the help of the so-called “snake knot”, which is knitted like this:
- Scheme for tying several leashes with a snake knot
You need to place the main line parallel to the leader line.
- Make several turns (literally two or three) with the end of the leash around the main line.
- Perform a similar operation with the end of the main line.
- Thread the ends of these lines through the loop formed in the middle of the structure.
- Tighten carefully.
It turns out one already tied leash and two freely protruding ends, to which, if you initially make them long, you can tie a couple more leashes. For reliability, you can attach swivels with carabiners to them and attach leashes to them.
In this case, everything depends on imagination, the main thing is not to overdo it and not to make a structure that will clearly scare away the fish. If there is no need for three or even two leashes, then it is better to simply cut off the ends.
Thus, it turns out that there is nothing complicated in attaching a leash to a fishing line and anyone can do it, even without the proper skill. The main thing is to acquire a little patience and perseverance, because the fishing line is thin, and the knots themselves are small in size and it’s quite normal if it doesn’t work out the first time.
As they say, it was not the gods who fired the pots. It’s better to practice many times, so that later, if an unforeseen situation arises (for example, a break in the leash right in the pond), you can quickly fix the problem and not lose precious time, which is so important during the fishing process.
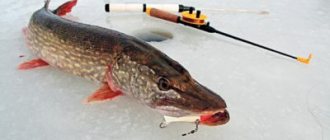
DIY fluorocarbon double leash for pike
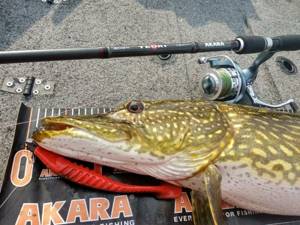
As a rule, most anglers use metal leashes to catch pike and don’t bother too much. There is no doubt that under normal conditions, on most reservoirs, you can get by with a string or an ordinary store-bought multi-strand leash. In recent years, fluorocarbon leashes have become increasingly popular. I am also a big fan of flurik and use it almost always, with the exception, perhaps, of those fishing trips when I fish with twitching. A titanium leash is well suited for twitching, although this pleasure is not cheap.
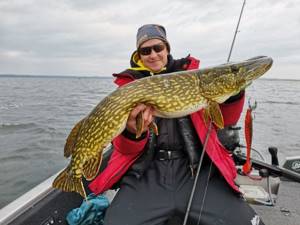
But there are exceptions when a standard leash is not enough, and you have to confuse a little to make a tackle that would bring maximum bites from a cautious pike. This is especially true on some large glacial lakes with very clean and clear water. For example, on Lake Naroch.
In general, we initially encountered this in 2014 in France at the Boat Spinning World Championship. Having been in preliminary training for some time, we first encountered the fact that pike very often followed the bait all the way to the boat. At best, she hit the bait once, but for the most part she simply came to the surface and did not dare to bite at all. We thought that maybe it was a problem with the bait, but after changing the next and next bait, the situation did not change, and the pike continued to mock us.
All this disgrace continued until one day we met one of the local fishing guides on the water who lived on this lake. We noticed that all his spinning rods have very, very long leashes. More precisely, it was not just a fluorocarbon leash, but a whole system.
The trick was that it was not just a long leash made of thick flurik, but an additional piece of thinner flurik, and of quite a long length, was also pre-attached to it. The thickness of the leash itself was about 0.8-0.9 millimeters, about half a meter long, and the thickness of the undergrowth itself was about 0.5 millimeters in diameter and about a meter, or even one and a half, long. This couldn't help but catch my eye. Fortunately, the guide and I knew English well and were able to communicate normally. He said that he had come to such a leash a long time ago. He was not surprised when I complained about the huge number of pike coming to the surface. The thing was that the lake had very clear water, the bottom was visible at a depth of about 7-8 meters. And this could not but affect the behavior of the pike, which was not so easy to persuade to bite.
After this conversation, the next day, we knitted ourselves “French” leashes, fortunately flurik of different diameters was available, and things went well. The number of idle exits has decreased significantly and the number of realized bites has increased significantly. The only thing that took some time was to master the knot with which it was necessary to tie the fluril undergrowth to the braiding itself.
Since then, we very often use this “French” leash on different bodies of water. This is especially true on glacial lakes.
Of course, I will not say with 100% certainty that this is a panacea. But!!! There have definitely been fishing trips where such equipment increased the number of bites significantly. After all, among spinning anglers there are ardent adherents of fishing exclusively with fluorocarbon fishing line instead of braided line, who claim that the use of fluorine in many conditions significantly increases the number of bites from a cautious predator. But it is not always possible to find flurish of a suitable diameter in an unwinding of 100 meters or more to wind it on a spool. This is when the “French” leash comes to the rescue. I’ll tell you how to tie it correctly in the next video. I hope this will be useful and help you deceive the cunning, seasoned pike.
Blitz tips
- To tie the leash to the fishing line, you can use a simple loop-to-loop method.
- To prevent the main line from tangling with the leash , it is recommended to use swivels with carabiners.
- Swivels with carabiners can be tied using a fixed knot.
- It is possible to attach up to three leashes to the main line .
- To tie three leashes , it is better to use a “snake knot”.
- For the “snake knot” it is better to leave long ends of fishing lines and leashes if you plan to attach two additional leashes.
- Each knot has its own specific strength (a list of all knots given in the article indicating their strength will be given below).
- Absolutely everyone, even the most inexperienced fisherman, can cope with any knot. The main thing is patience and perseverance.
- A correctly tied leash to a fishing line plays a huge role in fishing: if the connection between the gear is weak, then the fish can easily tear it off and leave with the hook.
- Each knot, having its own specific strength , at the same time partially weakens the fishing line and somehow increases the chances of breaking by several percent.