Float fishing rod with a sliding float: what is it for?
The use of sliding floats is not limited to float fishing. It is used in bottom, carp, and winter fishing. However, most often sliding floats are used for a summer float fishing rod, so further we will talk about it.
A float fishing rod consists of a fishing rod, a fishing line attached to the fishing rod in one way or another, a float that is fixed on the fishing line with weighting elements, and a hook with bait. The simplest such fishing rod is a fly rod. It consists of a rod without any rings and a fishing line with equipment that is attached directly to the tip using a connector or other means.
A fly fishing rod is used in places where long casting is not required and the fishing distance is short. When you need to fish at a long distance, you need to cast with a reel. For these purposes, the British came up with a new type of float fishing rod - a match fishing rod. It has a shorter rod length than a fly rod, but is equipped with rings and a reel, which allows you to cast like casting with a spinning rod, but with some nuances. Match fishing is special. It has many nuances; its floats are the most complex and expensive, but they perform many functions.
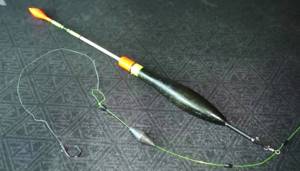
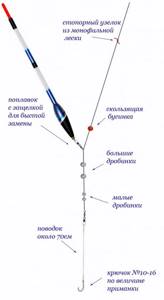
Often when casting long distances you have to fish at depths exceeding the length of the rod or comparable to it. Naturally, this makes throwing inconvenient. For such purposes, sliding floats were invented. They are not tightly attached to the fishing line, but slide freely along it. The float slides along the line until it reaches a certain limiter - a stopper. This way the fishing depth is set. The stopper has the form of a knot tied from the same fishing line in a special way, or is made from special stop materials.
In this case, when casting, the stopper is located on the line above the upper ring, the float is near the weight or at the additional lower stopper. During casting, it flies into the water to the desired point, carrying with it the fishing line and the stopper on it. After splashdown, the load goes to the bottom with bait, and the float remains on the surface. When the line goes down to the stopper, it rests against the float, and the movement of the weight stops. The tackle assumes a working position, is able to signal a bite and is held in place in accordance with its setting.
The second type of float rods, where a sliding float is used, are fishing rods for vertical fishing from a boat, embankment, bridge, dam, where right near the tip of the rod the depth exceeds its length. In this case, simplified sliding floats are used, because there are no longer such requirements that it flies well, does not confuse the tackle in flight, and there is no long-distance casting at all. However, a regular match sliding float can be used here too. However, it is quite expensive, and if lost, the angler will regret it. Therefore, it is recommended to use other types of sliding floats suitable for this type of fishing.
The structure and significance of the float
A float is a type of gear that performs two important functions: holding a hook with a fishing attachment at a certain depth during fishing, and signaling a bite. The movement allows you to determine when the fish has swallowed the bait and caught the hook.
Tying the float to the fishing line
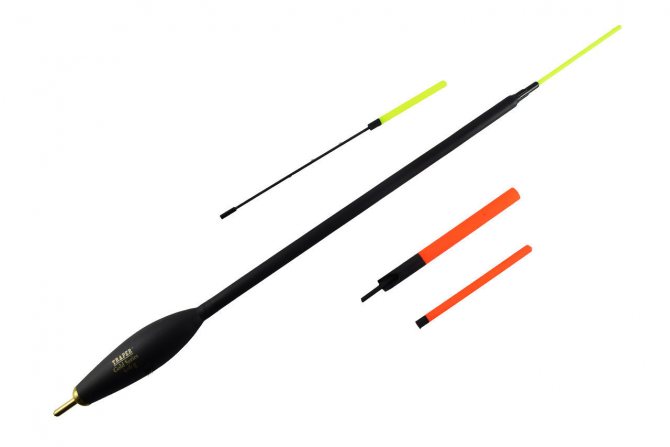
To properly attach the float to the fishing line, it is important to know its design. The standard model consists of 3 parts:
- Cases. The base of the float, made of lightweight materials to maintain buoyancy.
- Masts. The upper end, standing vertically above the water, serves as a bite alarm.
- Kiel. The lower underwater part of the float that holds the main gear (weight, hook with bait).
The float is attached to the bottom of the fishing line using a ring or other fasteners.
Sliding float design
The design itself depends on the fishing method: match fishing or fishing without long casting. First, it’s worth talking about match floats as classic ones, and then about various ones designed for vertical fishing.
Sliding floats for match fishing
Match floats are divided into three types - wagglers, gliders and sliders. The waggler has a blind mount, while the glider and slider are of the sliding type. The division is quite arbitrary. When fishing conditions change, the waggler can be secured using a sliding connector in a sliding manner and fished as if using a sliding one. And among these floats there are many subspecies, the description of the operating principles of which will require more than a dozen articles.
A glider is a sliding float, which involves the location of the main part of the load in the form of adjusting washers on the float. The slider is sliding, but has almost no weight of its own; the entire weight is attached to the fishing line below, near the nozzle. Gliders are used at depths of up to 5 meters, sliders - at greater depths. For gliders, the requirements for aerodynamics in flight are much stricter, since they are larger. For sliders, flight behavior is not so important, since they are significantly smaller. But among sliders you can rarely find match pop-up floats, the bite on which can be seen from a great distance, and gliders are like this most often.
They differ in their behavior in water as follows. After casting and when the tackle is immersed, the glider dives under the water itself, and when the tackle comes into working position, it floats up. The slider usually lies on the surface when immersed, and then assumes a working position.
Sliding floats for vertical and live bait fishing
In this group, there are practically no floats with their own weight, and they are brought into working position by a weight attached to the fishing line. Since there are no special requirements for long-range visibility and long-range flight, smaller and more free-form floats are used. You can come across the most unimaginable designs - barrels, balls, pendulum type, which would be simply unviable for more complex fishing. One important requirement remains here - it must show a good bite. To do this, his body must be in the water, and the antenna must have neutral or minimal buoyancy.
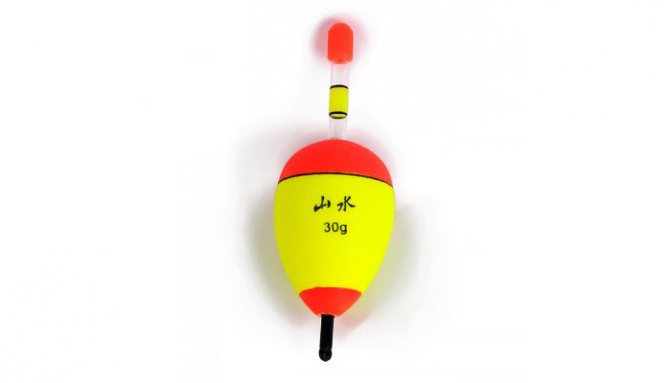
For live bait fishing, floats with a massive spherical body or similar in shape to a ball are used. This type of rig is the most difficult for live bait to sink. Usually the body itself is on the surface and only half recessed, since there are no requirements for great sensitivity of the gear. The bite of a predator is usually expressed in the rapid movement of the float to the side over a long distance, sometimes under the water, then you should hook.
Mounting the float at the lowest point
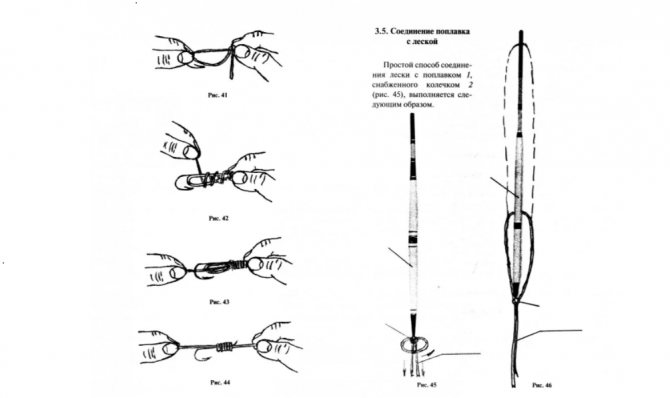
A sliding float for long casting, used in match fishing, is attached to the fishing line only at one lower point. This method can also be used for other types of fishing. Fastening is carried out using a sliding float connector.
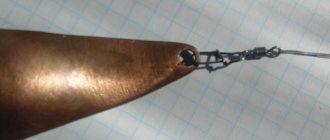
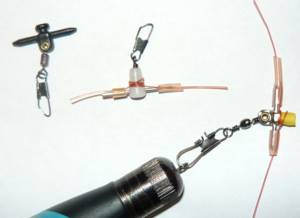
The sliding connector is a plastic bead. It has a metal loop to which a swivel and clasp are attached. The float itself is attached to the clasp through a special loop on it. Of course, you could just pass the line through the loop of the float. But the connector has many advantages:
- The connector bead does not injure the fishing line when passing through.
- The hole in the bead is very small, which allows the use of a minimum size locking knot. This will reduce its resistance when passing through the rod guides and increase the casting distance.
- The swivel gives an additional degree of freedom in flight. As a result, the line gets tangled less, the float takes the position with the least air resistance faster and flies further, quickly taking its working position in the water.
- The clasp allows you to quickly change the float right at the fishing spot if necessary.
Considering these points and also the fact that the connector is very inexpensive and has virtually no effect on the setup of the tackle, it is worth recommending only this method when securing a sliding float at one point, as well as when securing it at two points.
Fastening floats with two attachment points and with a tube
Since they are not used for long-distance casting, you can simply pass the line through the lower loop of the float, but the connector is more convenient. It is very important that the stopper fits freely through the top loop if the float has two loops. If the line is passed through the body into the tube, then the stopper stops at the top of it and should not go further.
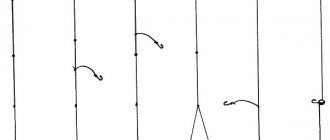
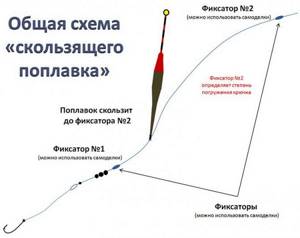
Stopper on the float - how to install
There are two types of stops that are used to limit the upward movement of the float:
- fishing line locking knot;
- locking unit made of marker carp rubber.
It is strictly forbidden to make stoppers from hard materials - metal wire, hard plastic beads, etc. When casting, they will pass through the ceramic inserts of the rings at high speed, hit and injure them, and can also spoil the varnish coating of the blank. As a result, a high-quality fishing rod will become unusable, although it could serve for many years. The fishing line, which wears out very quickly with a cracked tulip, will also be damaged, as will the angler’s mood.
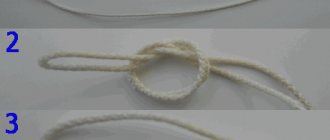
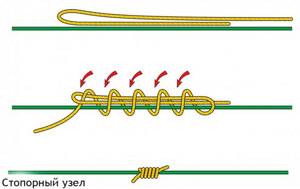
The fishing line stop knot is knitted with fishing line of the same diameter and type as the main one, or a little thicker. It is knitted as follows:
- A piece of fishing line intended for the locking knot is folded in half. This is approximately 20-30 cm of fishing line, so that it is convenient to knit.
- Then the resulting loop is applied to the main fishing line of the rod across.
- One of the ends of the stop fishing line is passed through the loop, wrapping around the main line five to six times.
- After this, the knot is tightened by the second end, and its ends are cut so that they hang 4-5 cm to the sides of the knot. Such a knot will pass through the rings better, as evidenced by almost a century of match fishing practice.
- Some anglers pass the hanging ends of the knot with the blunt side of the knife, as a result they curl slightly. They say that such a knot passes through the rings even easier.
When fishing vertically, when fishing with live bait with a sliding float and a fishing line passing through the body in a tube, a large stopper is sometimes required. It is made from marker carp rubber and knitted with a figure eight knot. The elastic is folded in half around the main fishing line, both ends are passed through the loop several times, the rubber is tightened by pulling both ends, leaving the ends hanging 1 cm long. The fastening is convenient because the marker knots are easily untied and removed.
Anglers typically use two top stops. One is a worker, the second is knitted at a specified distance from him and is a control. During the fishing process, the worker will gradually move along the line under load. The fisherman has the opportunity to notice this by the control stopper and correct the position by moving the working stopper down. Also, sometimes two stoppers are knitted closely to increase friction on the main line and virtually eliminate displacement.
The lower stopper is also used. The fact is that when casting a sliding float over a long distance, when it descends close to the sinkers, the tackle often gets tangled. If you make sure that when casting it is at least half a meter from the sinker, this will happen less often. This is done in the form of a locking unit, as for the upper stopper, on which a silicone bead is placed in front of the float.
Did you manage to solve your problem using the recommendations from the article?
Yes!
100%
No. More answers required. I'll ask in the comments now.
0%
Partially. There are still questions. I'll write in the comments now.
0%
Voted: 2
Fastening on the Bolognese part
The Bolognese fishing rod is excellent for fishing on deep-sea rivers.
But for effective fishing it is worth using a float with a sliding mount. The fishing rod itself is distinguished by its long rod and many guide rings.
Instructions:
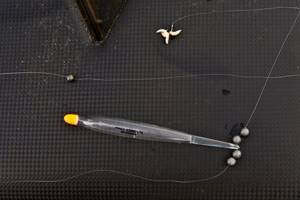
- Thread the line through the ring in the float.
- Prepare three silicone cambrics.
- Secure the fishing line with them.
- Make the remaining cambric longer so that it hangs from the keel; this makes the tip elastic, protecting the keel and line.
- Place the top stopper, the olive, and then the bottom stopper.
- Adjust the desired parameters by moving them along the line
- Attach a leash through the swivel, next to which place a pellet - a podpodok.
Tip: for fishing in still water, reduce the weight of the olive or completely replace it with a group of small pellets. This will significantly increase sensitivity and make the gear invisible to the fish.
A variety of olive that has a rod is used to easily change the weight of the olive to suit the fishing parameters. In this case, it is attached to two cambrics, previously put on the fishing line.