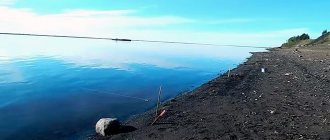
When we talk about a float rod, we are used to implying that we are talking about fishing with one hook. However, some people use two or more of them. What is more effective, the first or second option? Of course, the answer to this question plays a big role fisherman skills.
Some believe that fishing with two hooks is ineffective, while others believe that it is convenient and produces results. Let's look at knots for hooks and leashes in more detail in this article.
Options for placement on a float rod
There are several different ways to place two hooks on a fishing rod:
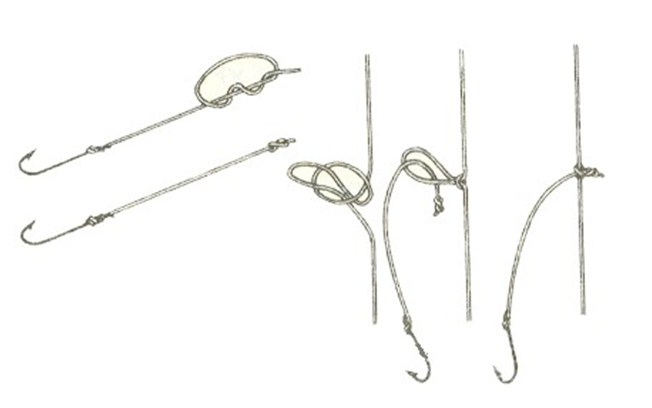
- One option is to attach two leaders of the same length to the end of the main line. This method is considered effective against fish that effectively suck up the bait. For her, one hook may not be enough.
- Another way to position them is to attach leashes of varying lengths to the end of the line. You can equip these hooks in different ways, which will have an impact on the entire fishing process.
- Another option is to arrange the hooks as follows. At the end of the fishing line there is a leash with a hook, then a sinker, then another leash with a hook is attached. This fishing method allows you to simultaneously fish at the bottom and at medium depths.
There is an article on our website that shows many different ways to tie a crochet hook.
Other options
The second hook can be secured in other ways without compromising the reliability, strength and effectiveness of the gear. Some anglers use the method of crimping loops on tied leaders. Here it is impossible to quickly change the leash if it breaks. However, this method works great when catching small fish.
An additional hook can act as a sliding option - it slides from the underhang to the main sinker. Using this option, the distance between the hooks is adjusted, which also increases the fishing efficiency in large depths.
The second leash can be made of soft or hard material with any diameter. You can prevent the occurrence of overlaps by using a leader that is thinner than the main line. To reduce the tangling factor, each leash is equipped with a different weight of undercarriage. A longer leash requires a heavier leash to be attached, a shorter leash requires a smaller leash. Before going fishing, be sure to prepare several options for leashes of different lengths, with different hooks and line thicknesses.
TAGS:
How to tie two hooks to a float rod?
This process is not very complicated. Whether or not to add another leash to the fishing rod is up to the fisherman to decide. Technically there are no particular difficulties for this. There are a few different ways that can work for this.
Here you need to take into account that in some cases, an incorrectly tied knot can weaken the strength of the fishing line and, under heavy load, it can break because of this.
Let's talk about them in more detail:
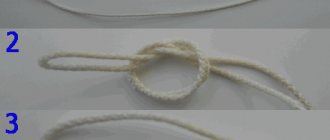
Method No. 1
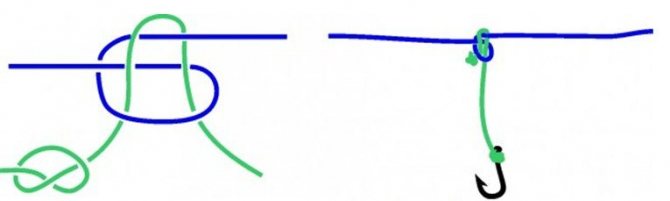
Using this method, you can simply tie one or more additional leashes with hooks to it. Note that when using this method, it is enough to make only a small loop on the main part.
We'll tell you how to tie such a knot correctly:
- on the main line in the place where we plan to attach an additional leash.
- Then we thread the leash through this loop so that it covers the main one as shown in the figure.
- at the free end of the leash and tighten it; this is necessary so that in the future it does not slip out of the loop. The “eight” is suitable as it.
It is called a driving knot made on a running basis. If you tie it correctly, the leash will be perpendicular. This will ensure that it does not become tangled with the main line while fishing.
Another important point is that when tying it, a minimum number of overlaps was used. This, in turn, leads to the fact that the resulting decrease in the strength of the main line will be minimal.
In this article we looked at the question of how to make a diverter leash.
Method No. 2
The next method that we will talk about here is quite simple. We are not talking about a separate leash for the second hook here. Here, first one hook is tied, then, at some distance, another.
Let's tell you in more detail about how to properly bind them in this way:
- First you need to determine for yourself at what distance these hooks will be tied. After this, you need to thread the fishing line into the eyelet, leaving the corresponding section free.
- After this, the free end must be wrapped several times around the shank of the hook. It's best to do this at least five or six times.
- Then, pressing the wrapped fishing line with your finger , you need to pass the free tip through the eye.
- After this, the knot must be slightly tightened. That's it, one hook is attached to the fishing line.
- We remember that a certain section of the fishing line was left free. You will need to tie a second hook on it in the same way.
This method is well suited for those who are going to catch predatory fish with live bait. But its benefits are not limited to this. It is also effective when peaceful fish are caught with bait. One of the important features of such fishing gear is the simplicity and reliability of this method.
Method No. 3
Let's talk about another way to tie a leash. In principle, the two methods given earlier in this article are sufficient to use. In addition, they are most popular in such cases.
However, there are two more ways to tie a leash, which are also quite popular. Let's talk about them here.
For this option, it is necessary not only to make a loop on the main fishing line. You also need to wrap the free end around one of its edges. This must be done at least three times.
After this preparation, you will need to lightly pull the ends of the fishing line. This should not be done too hard, but only lightly. In this case, the loop itself will form a figure eight, its edges will lie on top of each other crosswise.
The tip of the leash line must be threaded into one part of this figure eight and brought back through the other part.
The leash needs to be secured here using the usual knot for such situations. To do this, you need to wrap the free end of the leash around the other end. You need to do this several times.
It is best to make five or six revolutions. Then the free tip of the leash must be threaded through the original loop of the leash. (Where it was passed through the eight.)
After this you need to tighten it. This should be done not in one sharp movement, but alternately by slightly tightening either the leash or the main line. The connection is now complete.
Method No. 4
To knit this knot, you first need to prepare a leash. At its end you need to tie a knot that will prevent it from slipping out. To do this, make a very ordinary loop. The free edge of the leash is wrapped around its edge at least twice. After this, the knot will need to be tightened.
A leash prepared in this way will no longer slip out while fishing.
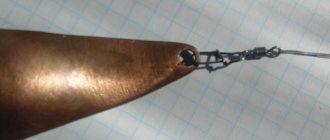
Now we need to prepare the main line. The essence of this preparation is that you need to make a loop that will securely fasten the leash. This is done quite simply. A simple loop is formed on the main line. Another row is made and threaded into the first.
The tip of the leash is inserted into the threaded loop and the main line will now need to be carefully tightened. The process of tying this knot is shown more clearly in the attached figure.
Other nodes
The above types of fishing knots are often used and therefore widespread, however, there are other options for such knots. As an example, we can give the following option.
This knot is tied as follows.
A loop is made on the main line. To do this, you need to fold it in half, make a loop from the double thread and wrap it several times. Then thread the tip through the original loop. If you look closely, here we will see the knot with which a hook is usually tied to a fishing line.
In the same way you need to make a loop on the leash with a hook.
Now they need to be threaded through each other. This can be done in a fairly simple way. You need to thread the loop on the main line through the loop on the leash. Then pull the entire leash through the loop on the fishing line. All that remains is to tighten the knot.
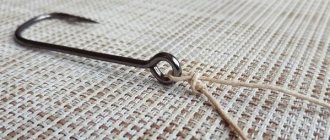
How to tie hooks without eyes
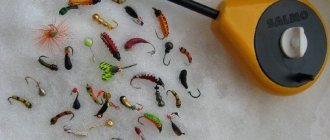
This design of the equipment element is intended for cautious fish. The eye and the knot on it are more noticeable in the water than the slight thickening and neat interweaving of the thread at the end of the hook with the spatula. However, heavy active individuals will disrupt this device. You can tie 2 hooks on the main fishing line without an eye in different ways.
Stepped
The knot is difficult to tie, but the tensile strength of up to 95% is worth the effort.
Proceed as follows:
- Fold the working thread in half, attach the hook so that the fold is in the area of the sting.
- With the short free end, wrap the fishing line (one thread) around the shank twice.
- Press the main thread to the forend, use the same tip to make 3 turns, grabbing the forend and now the double thread.
- Thread the end you used to make the turns into the loop and tighten.
Stepped unit
The stepped unit is ready. It can be used on a regular donk, feeder, or spinning rod.
Spiral knot (Dumhof)
If you tie braided lines with a simple knot and without wetting, they will burst at the bend. Elements with blades require a special tying technology so that they do not fall off the line when tensioned.
Of the dozens of ways to knit fishing knots, Dumhof is the simplest variation.
Procedure:
- Wet the thread.
- Fold it in half, attach it to the fore-end and wrap the free end around it 5-6 times.
- Now pull the tip into the loop formed by the bend of the fishing line.
- Tighten the knot.
The result is a strong connection that has a tensile strength of 90-95%.
Your question to an expert
Leonid Grachev
Fisherman with a lot of knowledge and experience
Ask a Question
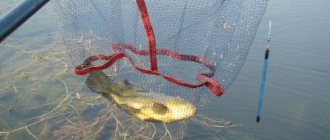
Two hooks on the line of a float fishing rod: advantages
We must remember that both the initial knots and the resulting knot must be tightened. But you shouldn’t do this with one sharp movement: you can make everything crooked or damage the fishing line. You need to tighten the knots with small, careful movements, while adjusting the fishing line if necessary.
Are they needed on a fishing line? There are pros and cons here.
First, let's talk about the benefits this can give to a fisherman:
- If you catch very active fish , then a situation becomes quite real when you may not have time to hook in time. In this case, the fish may simply eat the bait and swim away, leaving the fisherman with nothing. If there is only one hook, then in this case there is only one chance to hook the fish. If there is at least one more, then the probability of catching prey is much greater than in the first case.
- Two hooks have more mass than one. Therefore, they are less likely to be carried away by the current.
- Due to their increased mass, they deepen at a faster rate.
- By equipping two hooks , you can equip them in various ways. This way, you can expect to catch different types of fish at the same time.
- Some fishermen think that using two baits for two hooks attracts fish more. However, this statement is not generally accepted.
- Using multiple hooks is useful for comparing the effectiveness of different types of baits when catching fish.
Multiple hook fastening
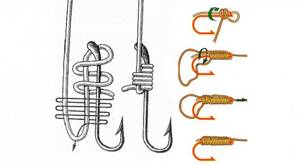
When attaching several hooks, the same knots are used as for fixing hooks without an eye. In addition, there is a special knot - Knot-less. The main purpose of this unit is to attach boilies.
Knot-less
Suitable for braided line of any thickness.
Tensile strength: 93%:
- Thread the fishing line into the eye.
- Attach the fishing line to the fore-end.
- The second edge is wrapped 6-7 times around the shank of the hook and line.
- Pass the same end back into the eye and tighten.
Quick tips:
- All knots are wetted before tightening.
- The remaining ends are trimmed.
prostokaras.com
Every novice fisherman wonders how to tie a fishing hook, which method is more reliable and easier? We offer you 12 ways to tie a fishing hook, where experienced fishermen can also find something new for themselves.
1. Blind node
. This method is considered one of the main and simplest for quickly and securely attaching a fishing hook to a fishing line. After making a loop at the end of the line, carefully thread it through the eye of the hook, and then re-thread the point part of the hook through it. This creates a strong and secure fastening that is very difficult to untangle. This method is especially suitable for thin lines made of polyamide and cotton materials.
2. Bayonet knot
. If you make two special half-bayonets on the shank of the hook, as shown in the figure, the fishing hook can be very conveniently and firmly attached to almost any fishing line. This method is widely used among both amateurs and professionals. The only thing is that this method is not recommended for use in combination with synthetic types of fishing line to avoid slipping.
3. Canadian eight
. But for synthetic fishing lines, another type of fishing hook attachment is perfect - the so-called Canadian eight. In this case, the fishing line is threaded into the eye of the hook, clasps the shank and, describing a figure eight, is directed into the resulting loop. Despite the excellent quality of such a knot and the strength of the entire structure, it is quite easy to untie it if the need arises.
4. Fisherman's eight. This method of fastening is as close as possible to the previous one and provides good strength. The method differs in that after threading the fishing line into the eye of the hook, it wraps around the shank and is threaded back, and only then forms a figure eight. This simple manipulation adds reliability to the entire unit.
5. Turtle knot
. The origin of the name of this node is difficult to explain. What he has to do with catching turtles, no one can say. In its design, the knot is more reminiscent of a kind of pretzel. Tying it is not difficult if you follow the instructions in the picture. First, a fishing line (preferably made of cotton materials) is threaded through the eye of the hook, then appropriate manipulations are done with it. After this, the point of the hook is threaded into the resulting loop, the knot is pulled up and tightened around the eye. Simple and reliable!
6. California Knot
. This original method of fastening was invented in the mid-80s by Californian fishermen. In this way, they tied various gear to a nylon fishing line, without worrying that the structure would come undone. A loop of fishing line is threaded into the eye of the hook, wrapped around the top (above the eye), forming another loop through which the point is passed. The knot is tightened firmly around the eye of the hook. The only drawback is that it is a little big.
7. Step knot
. If you like to use forged hooks without eyes, using the above methods is unlikely to work. There is another method for such gear. Through simple operations, the end of the fishing line is first securely fastened to the top of the hook, and then connects the hook to the rest of the fishing line and tightens the entire knot like a noose.
8. Salmon knot
. This knot is considered the undisputed leader among the most durable connections between fishing line and hook, suitable for all types of fishing line. In order to properly tie such a knot, you first need to form a loop over the eye, but tighten it only after throwing it onto the shank of the hook.
9. Shark knot
. If you use synthetic types of fishing line, many knots are not suitable due to their insufficient adhesion. When pulled, the line simply slides and comes undone. However, this knot is ideal for all types of fishing line. At first glance, this is a rather complex weave, but the secret lies in the formation of the strands and tightening them tightly.
10. Gripping unit
. This is one of the most popular and reliable methods of attaching fishing line to a fishing hook, suitable for all types of fishing line. To make it, the end of the fishing line is threaded through the eye of the hook and then wraps part of the fishing line over the eye using a snake-like method (3 times is enough). The remaining end is threaded into the loop near the eye and the knot is tightened. The result is a practical and compact unit.
11. Tuna knot
. Excellent for synthetic fishing line. In the picture it looks quite complicated, but once you understand the principle of its manufacture, tying a knot becomes very simple. Its main difference from other fastening methods is the presence of two loops on the eye of the hook. Even with excessive load on the hook, such a knot can withstand any weight and not come undone.
12. Leash based on a simple knot
. Another important knot for every angler is the leader knot. There are several varieties of them. To make the simplest one, you should make a simple knot on the fishing line without tightening it. Regardless of the number of leads, they are distributed in the appropriate places, and after they are evenly aligned, the knot is tightened.
Comments on the post 12 ways to tie a fishing hook
kaida-fish.ru
Two hooks on the line of a float fishing rod: disadvantages
Now let's talk about the disadvantages that occur when using them with one fishing rod:
- One of the significant disadvantages is the reduction in the strength of the line where another is attached. Usually a knot is tied there, which is subsequently tightened. With a strong jerk (when hooking a fish), the line may break in this place.
- If you cast a fishing rod in places where the bottom is replete with snags and the like, two hooks increase the likelihood that they will get stuck.
- Another important feature of this fishing method is that the second hook significantly affects the quality of the fishing tackle. In fact, with his inertia, he slows down this game, reducing its attractiveness for fish.
- During fishing, the additional line can easily sag or become tangled with the main line.
Knots for hooks with eyes (rings)
First, I'll talk about methods for attaching eye hooks that are best suited for monofilament.
Palomar
This knot is considered one of the most reliable and popular; it is used for tying hooks, spinners and swivels to thin and medium monofilaments. Ideal for drop shot rigs.
Note! This method of fixation is not suitable for braided wire. Rough equipment will not fasten too securely. With a palomar, sinkers, jig heads and spoons are tied to the braided line, but a triple type of knot is used.
The most reliable Palomar knot is easy to form and retains 94-95% of the line strength. Proceed like this:
- Fold the line in half and pull the loop through the eye of the hook.
- Form a regular knot.
- Place the loop over the forend.
- Holding the hook in your right hand and both ends of the thread in your left, tighten the knot.
Watch how to properly tie a hook to a fishing line using a palomar knot in the video:
"Bloody"
This simple knot owes its name to the fact that it was used to make thick knobs for whips, which were used to punish guilty sailors. This fixation method is suitable for tying jigs, spinner hooks and sinkers to monofilament threads. The knot retains up to 70% of the strength of the fishing line.
Knitting technology.
- Insert the fishing line into the ring.
- Wrap the end around the main fishing line (4-7 turns, the thinner the equipment, the more turns).
- Insert the tip of the fishing line into the first loop (near the ring).
- Tighten the knot.
Cut the end of the rig, but not too short.
How to properly tie a hook to a fishing line with a “bloody” knot (diagram and video):
"Locked Bloody"
Enhanced modification of the previous node. Suitable for tying large hooks, spoons, feeders and sinkers to medium and thick fishing lines.
Retains up to 80% strength. This is quite enough for fishing not at the limit of gear.
- Take the hook in your right hand.
- Insert the line into the eye.
- Wrap the end around the main part of the rig (3-7 turns, the thinner the thread, the more turns).
- Insert the tip of the fishing line into the first loop (near the ring).
- Pass the line through the loop formed in step 4.
- Tighten the knot. Cut off the excess fishing line.
See how to tie a hook to a fishing line using a “locked bloody” knot in the diagram and video:
Pitzen
One of the best fishing knots in terms of compactness and strength. Suitable for tying jigs, hooks and spinners to monofilament threads of any diameter. Retains up to 90% of the strength of the equipment.
How to knit.
- Insert the end of the fishing line into the eye of the hook and pull it back along the main part of the rig.
- Wrap the double line with three turns towards the hook.
- Insert the yarn into the loop farthest from the hook.
Tighten the knot and cut off the tail.
How to properly tie a hook with a Pitzen knot, see the diagram and video:
Turle
This knot is great for tying a sinker/hook to thin or medium-thick monofilament when you're short on time. The tensile strength of the attachment is 80%. Use the method for tying hooks with large rings.
Sequencing.
- Insert the end of the fishing line into the ring, go around the rig and pass the thread into the eye on the other side.
- Tie the tip of the fishing line to the main part with a double knot and tighten it.
- Pull the main part of the thread. Cut off the tail.
How to properly tie a hook to a fishing line using a Turle knot, see the diagram and video:
Knots for hooks with rings (ears) for braiding
Note! Most knots for tying eye hooks to braid will also work with regular monofilament thread.
Marshall Trap
This simple fishing knot is suitable for securely tying a hook to a braided line (diameter at least 0.2 mm). Thinner equipment will slip out. The knot retains up to 75% of the strength of the fishing line.
Act like this.
- Make a loop from the fishing line. Tie its end to the main part with a regular knot.
- Pass a loop through the eye of the hook and place it on the shank.
- Insert the end of the fishing line into the loop.
- Pull the short end of the rig first, and then the main part. Cut off the tail.
To understand how to tie a hook to a fishing line using a Marshall trap, watch the video:
World Fair Knot ("world fair")
This knot is the invention of Harry Martin. With its help, you can quickly and efficiently (65% of the strength is retained) tie a hook to monofilament or braid. Suitable for any tool diameter. The eyelet should be large enough to fit the doubled thread through.
Knitting technology.
- Fold the line in half and insert it through the eye.
- Throw the loop back so that part of the doubled fishing line enters it.
- Insert the end of the fishing line between the double sections, and then into the resulting loop.
- Pull the warp and the end of the thread at the same time. Trim off the excess.
Visual instructions are presented in the video and diagram:
Duncan Loop
Using this method, you can tie a jig, hook or spoon to a small diameter braided line/monoline. Usel retains up to 80% of the strength of the equipment.
Description of the method.
- Make a ring on the line and pass the end through the eye of the hook.
- Passing the end of the fishing line through the eye, wrap the main part of the equipment (4-5 turns).
- Pull the end of the line and tie a knot.
See the diagram and video for more details:
cat's paw
It is difficult to knit, but retains up to 85% of the strength of the equipment. When forming, make sure that the coils lie evenly. Suitable for tying hooks and sinkers to braids and monofilaments of any thickness.
Knitting technique.
- Fold the line in half. Pass the resulting loop through the eye.
- Place a loop over the hook and move it towards the main part of the rig.
- Turn the hook inside the loop several times (3-5) clockwise.
- Pull both ends of the line and tie a knot.
How to properly tie a hook using a cat's paw, watch the video:
Lindeman
Lindeman is the most reliable knot for small and medium diameter braids. Suitable for tying hooks and lures. Retains up to 95% of the strength of the equipment.
Tying instructions.
- Insert the end of the line into the eye.
- Make a large loop towards the main part of the rig and pass the thread through the ring again.
- Wrap the double part of the equipment (3-5 turns).
- Pull the short end.
How to tie a hook to a fishing line using a Lindemann knot (diagram and video):
Which node should I choose?
First of all, you need to take into account that each knot tied on the fishing line significantly reduces its strength. Of course, you can fish with one hook, two or several.
But the more connecting nodes, the less the overall strength of these fishing tackles will be. In addition, we must not forget that the strength of fishing line in water is much less than in air . Therefore, when deciding how exactly you plan to fish, you need to weigh all the available circumstances.
Of course, not all types of knots have the same effect on the strength of the entire tackle. The knot that has fewer bends will be stronger.
The quality of the fishing line also plays an important role in this matter. When choosing it when purchasing, keep in mind that low-quality fishing line means a high risk of it breaking.
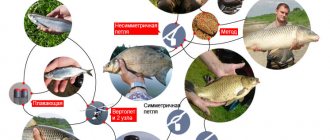
Is a second hook needed?
There is no clear opinion among fishermen about whether it is necessary to use additional hooks on a float fishing rod. Some may consider this unsporting. And others believe that the second one will cause more problems than help.
In any case, it is clear that increasing their numbers is not a panacea for fishing failures. And here an important place is occupied by the ability to choose the right hook in accordance with the type of fish it is for, so that it matches the equipment and bait, and much more.