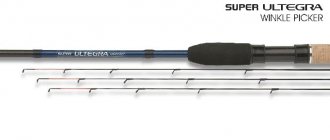
Rod
Any rod (plug-in, telescopic) that allows you to change tips is suitable as a rod. Interchangeable tips are called quivertips.
There are:
- quivertype pickers (tops for using rigs without feeders);
- feeder quivertypes (tops for using rigs with feeders).
The length of the rod depends on the distance at which you plan to fish and ranges from 1.8 to 4.5 meters.
Quivertypes are solely responsible for signaling bites. The rod set includes up to 5 tips. They differ from each other in sensitivity (test, power), which is indicated on the form (they may have different colors to indicate power).
Rods differ in power into classes:
- ultra-light,
- easy,
- average,
- heavy,
- super heavy.
For lakes and rivers with weak currents, quivertypes with a swinging spout are used. For rivers with a current, quivertypes have a trembling nose.
The role of correctly selected and installed equipment
The success of your entire fishing trip may depend on the right equipment, which should also be installed correctly. A well-chosen float can not only significantly simplify fishing, but also make it more profitable for the catch. The float should be selected so that it fully suits the conditions in which the fishing will take place.
Most beginners are left without a catch precisely because they are not able to choose the right equipment, which experienced fishermen had to do through trial and error. The float must be firmly attached to the fishing line using one of the existing fastening methods that is most convenient for the fisherman himself.
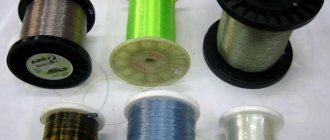
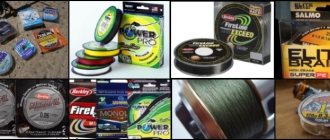
Main line
The main fishing line is used:
- braided fishing line (strong current, requires ultra-long casting, sensitive bite of cautious inactive fish).
- monofilament fishing line (disguise of fishing line in transparent reservoirs, thin sensitive tackle without heavy loads, in cold periods).
In detail and in detail about fishing line, leashes and hooks for catching English donkey.
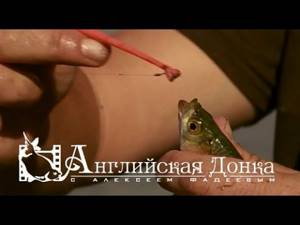
Montage of the English Donka with Alexey Fadeev:
What is an English donka?
Content
Over the course of its existence, bottom fishing has gone through several stages of evolution - from the use of a primitive hook to modern fishing gear.
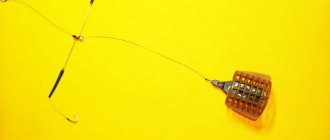
The construction of an English donkey or feeder requires the following main parts:
- a special feeder rod with a flexible tip that signals bites, even the most cautious ones;
- a special type of inertia-free reel equipped with a cord or fishing line of high strength;
- underwater equipment equipped with a feeder and a leash with a hook.
In addition, the use of feeder gear requires the fisherman to master the special technology of its use. There are also subtleties of connecting all the components, secrets of choosing feeders and leashes to ensure a comfortable process of fishing on the feeder, as well as a significant catch. When carefully choosing a leash, it is necessary to take into account its optimal length and the material from which it is made, since these parameters significantly affect the biting activity.
Fishermen are constantly improving their fishing methods, inventing new designs of rigs and gear
Do-it-yourself installation diagram and description
There are more than a dozen schemes for equipping English bottom tackle.
There are:
- For installation of cargo (feeder):
- blind installation;
- sliding installation.
- By type of feeder used:
- with an open feeder;
- with a closed feeder (for live food).
- By placing the leash:
- above the load (feeder);
- below the load (feeder).
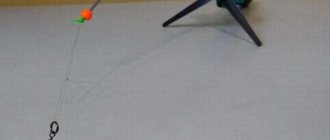
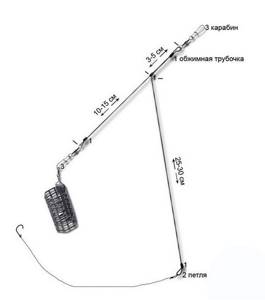
The simplest and most widespread easy installation of blind rigging is Paternoster , if the rigging is knitted on a separate fishing line. If the equipment is knitted on the main line, then you can mount a Gardner loop ,
How to do it yourself:
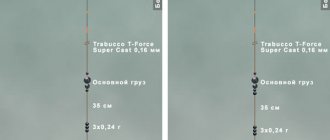
- We cut a monofilament line with a diameter of 0.25 - 0.30 mm and a length of 50 - 60 cm.
- We tie a swivel to one end of the fishing line.
- We put a stopper bead through the other end of the fishing line.
- We pass the line through the anti-twist.
- We put on the second stop bead. The anti-twist ends up between the two beads.
- We tie a swivel to the second end of the fishing line.
- We attach a leash to one swivel, and through the second swivel we tie the equipment to the main fishing line.
- We attach a feeder to the anti-twist with a clasp.
Basic types of installation
Currently, the most common and frequently used are two basic types of equipment installation: blind and sliding. Each of them is divided into two subspecies and has both its positive and negative sides.
Blind equipment
Bolt rig (blind rig) is the easiest to install and is popular among fishermen who specialize in catching carp and carp.
Blind equipment is divided into 2 types:
- attaching the leash above the load.
- below the load.
The weights in this type of equipment are swivel type. They come with single-sided and double-sided fastening. The latter are usually used with the second method of attaching the leash.
Here, on the one hand, the sinker is attached to the main fishing line, and on the other, to the leash. With the first method, the leash is tied above the load.
Advantages:
- Simplicity.
- Good efficiency.
- The tackle is self-closing.
- Possibility of modernization.
Flaws:
- The main disadvantage of this installation of gear is considered to be its poor sensitivity.
- In addition, the fish, having taken the nozzle, almost immediately feels resistance and then it can simply spit out the nozzle.
Sliding (running) equipment
A running rig is a sliding equipment, the main feature of which is that there is no rigid fixation of the load, but on the fishing line, but instead it moves freely along it.

Sliding equipment is divided into 2 types according to the method of securing the load:
- inline - the fishing line is passed through a hole made in the body of the load itself.
- The load is secured using a swivel.
Advantages:
- High sensitivity.
- Good efficiency.
- The option of using swivel weights allows you to quickly change them.
- There is a high probability that after biting the fish will not immediately feel the resistance of the tackle and will be able to freely smooth down the bait.
Flaws:
- The disadvantage of sliding equipment is its dependence on the bottom topography,
- the presence of underwater vegetation, debris, etc., which can turn it into blind tackle.
Paternoster-type equipment
This type of equipment also refers to the blind method of securing the load. The leashes are tied here. The leashes here are tied above the load - the feeder. As a rule, most donkers equip their gear with two leashes.
There are many installation options. The most popular is the loop one. Its characteristic feature is the presence of a large loop for moving from a twist for leashes.
Advantages:
- Reduces the likelihood of leashes overlapping.
- Greater freedom for cargo to slide.
- Practicality and efficiency.
Flaws:
- With powerful casts, overlaps may occur.
- When fishing, the current can lower or rise, which, on the one hand, makes the bait more visible, and on the other, can scare it away.
Asymmetrical loop
This method is very common among both professionals and amateurs. The main thing is to calculate the ratio of the total length as much as possible. Otherwise, this method is flawless.
Advantages:
- Thanks to this type of equipment, it is possible to create the most durable loop.
- This method is universal and is particularly popular.
Flaws:
- Among the main disadvantages of the current type of equipment, it is necessary to highlight the fact that it is one of the most wasteful. This is due to the fact that it takes quite a lot of material.
Recommendations for installation assembly
As a leash we use monofilament fishing line of a smaller diameter than the fishing line on which the feeder and the main fishing line are attached. It is better to lose the leash than the entire equipment when biting a fish that is too large.
If the installation of the equipment is carried out not on the main fishing line, but on a separate one, then we recommend using monofilament fishing line. The swivels and anti-twist slide better on it.
If a braided cord is used as the main fishing line, then it is better to mount the equipment on a separate monofilament fishing line. The strength of the braided cord should be greater than the strength of the fishing line on which the equipment is tied. When connecting the main line to the rig, it is better to use a swivel rather than connecting loop to loop.
Results of the second stage
Bottom tackle has gone through a long evolutionary process.
- The first donks were simple gear consisting of a fishing line, a sinker and a hook. With such throws it was difficult to cast the bait far, much less hit the same place.
- Gradually, anglers began to use sticks and rods to cast equipment. The fishing distance has increased, and bait casting has become more accurate. To attract fish to the bait, lovers of bottom gear began to mount simple feeders on the equipment.
- It was possible to accurately deliver the bait using a rubber bottom, which had to be cast once, after which the fishing continued all day.
- And finally, the crowning achievement of man in the field of bottom structures was feeder gear. Light and sensitive tackle allows you to accurately and far cast bait with a feeder, observing the slightest touch of the fish to the bait.
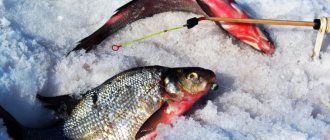
Bottom tackle is a fishing device designed primarily for catching fish that live at the bottom of a body of water. Today, specialized stores offer a lot of such gear, but for a person who knows and understands a lot about fishing, it is always more interesting to make a working tool with his own hands, and in this case, it is possible to take into account all even the most insignificant nuances.
How to make bottom tackle with your own hands will be discussed further.
The standard bottom tackle, familiar from ancient times, is a short-length fishing line that is wound on a reel and this structure is completed by attaching a sinker. A little higher from the sinker there are several leashes equipped with hooks. This tackle is mainly used for catching heavy, large fish.
Despite its design simplicity, bottom tackle is not so easy to use, since catching “giant fish” requires certain skills and abilities, it will be difficult for a beginner to master frequent casting, this requires certain skills, so to speak, the hand must get used to it.
Varieties of donkey
Today, two types of bottom gear are known:
- Donka-elastic band.
- Donka-trick.
In order for every fisherman to know their features and be able to use them correctly and for their intended purpose, then we will talk about the “elastic band” and the “throwaway” separately.
As the name suggests, this tackle first appeared in England, where local fishermen began using replaceable feeders and flexible tips for bottoms, which turned out to be very convenient in the process of fishing. It is the replaceable rod tips that are a characteristic feature of English bottom tackle.
A standard English rod usually has three interchangeable tips, also called nods. They vary in rigidity and are designed for fishing in different currents (slow, medium and fast).
Depending on the weight of the sinker, the feeder and the intended prey itself, they can also be different. The tips are usually painted in a bright (usually orange) color and are put away in the butt part of the rod when it is assembled.
Many fishermen prefer to make their own equipment such as an English donka. Its installation is quite simple, and the tackle turns out to be very catchy.
At the first stage of our training, we will look at all kinds of donks and learn about the possibilities of using them in fishing.
The first article of the bottom fishing course gives an idea of what this type of fishing is, what gear is used and their simplest equipment. Also here you will find tips on equipping a simple donkey.
Perhaps the very first donka used by man for catching fish was the zakidushka. This tackle is so simple and cheap that any novice angler can assemble it.
The use of a rubber shock absorber has significantly improved the quality of bottom fishing. Now it is no longer necessary to reel in and cast the tackle every time; the elastic band allows you to return the hooks with bait to the baited place again and again.
To test your knowledge gained from the lessons of the first stage, we suggest taking a simple test.
Test No. 1. Test on types of bottom gear
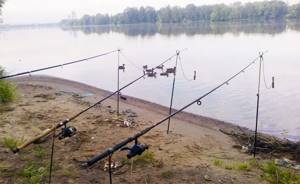
The second part of our training is devoted to modern bottom tackle - the feeder, or English bottom. We will look at the main issues of feeder fishing and help you choose a rod, reel and other elements of an English fishing rod. At this stage, we will also learn how to choose a fishing spot, feed a catching point and throw feeder equipment there.
The starting article of the second stage of training will introduce you to the initial fundamentals and principles of feeder fishing, introduce you to the elements of a fishing rod, and give an initial idea of feeder rigs.
Starting with this article, we will give advice on choosing individual elements of feeder gear. Let's start, naturally, with the main thing. So, the subject of this lesson is the fishing rod.
The second most important element of feeder gear is the reel. The balancing of the gear, and therefore the comfort of your fishing, depends on its choice. In addition, both the casting distance and the landing of the trophy depend on the reel.
Which is better: braid or nylon monofilament for equipping the feeder? This and other similar questions are answered in an article about choosing a fishing line for an English donkey.
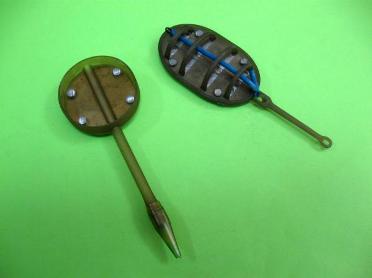
It was this element of the feeder gear that gave it its name; from English “feeder” is translated as “feeder”. The correct choice of feeder is of great importance for fishing; this will be discussed in the next lesson.
Many fishermen do not attach much importance to this element of equipment, considering it an unnecessary waste of material, time and effort. But in some situations, the use of a shock leader is extremely necessary. Read about the importance of a leader in this lesson.
The result of properly equipping the feeder is correct, accurate and long-distance casting. This article will tell you what factors influence the range and accuracy of your feeder tool.
Having learned to accurately cast the tackle, you also need to choose the right fishing spot. Usually, all sorts of bottom relief anomalies are catchable places. You will learn how to find a catch point using a feeder in this article.
Having chosen a fishing point, you need to feed it correctly. You will learn from this article which mixtures to use, which feeding tactics to choose and which feeder to use in a particular case.
The last lessons of the second stage are devoted to types of feeder gear. Short feeder rods with little dough are called pickers. Read more about them in the lesson material.
The initial acquaintance with feeder fishing is over. The next test will reveal how well you understand the topic.
Test No. 2. Test on the basics of feeder fishing
The name of the third stage was not chosen by chance. Having familiarized yourself theoretically and practiced practically, you will gain the skills that every experienced fan of feeder fishing possesses. The basis of the articles in this course will be descriptions of numerous feeder installations. In addition, we will look at changes in feeder fishing by season.
Beginners, inexperienced in feeder fishing, often choose an anti-twist as their first equipment. Installation with a tube is easy to master, and our article will help you understand this in more detail.
The simplest of the loop rigs is the Steve Gardner loop, which is often confused with the similar paternoster. Read about how to knit these montages and what their fundamental difference is in the lesson material.
One of the most sensitive equipment is the symmetrical loop. The knitting principles of this installation and the scope of application are discussed in this article.
The most sensitive equipment for the feeder is considered to be an asymmetrical loop. Despite some complexity in its manufacture, it is truly indispensable in fishing on the current. Read about how to make it in the material for the lesson.
In this installation, the working line passes through a feeder or a specially connected outlet. The second option is the only one currently allowed in international competitions. Read the article and everything will become clear to you.
Often when fishing you have to quickly change the fishing horizon. The helicopter rig helps with this. The article attached to the lesson will tell you how this is done.
If your goal is a large trophy, then when fishing for it you may need a feeder, a special rubber designed to be attached to a leash to absorb the jerks of the fish. What it is and how to use it, read the article.
The article in this lesson talks about how to choose the right gear and choose a rig for fishing on the river flow.
A very important factor in successful feeder fishing is the leash. The article in this lesson will tell you what its optimal length is when fishing in various conditions.
The third stage of training ends with four articles about seasonal feeder fishing. We begin our analysis in spring, a time when fish spawning has a great influence on fishing; all aspects of the spring feeder are discussed in this article.
Summer is the time for warm water and sweet smells. How to seduce fish at this time of year and successfully catch with feeder gear - read the lesson material.
After some summer lull in the bite, a new activation begins. This is primarily due to the fact that underwater inhabitants are trying to gain fat before the long winter. Everything about autumn feeder fishing is in the lesson material.
The third stage material is perhaps the most difficult to master. Therefore, if you answer the questions of the final test well, you can safely classify yourself as an advanced feederist, unless, of course, your practical results differ from your theoretical knowledge. Let's move on to the exam.
Test No. 3. Test for feeder fishing experts
Let us summarize the fourth stage of training. You have to pass the final exam at the Faculty of Bottom Fishing. Good luck!
Test No. 4. Test on feeders and alarms for donks
Donkey attachments
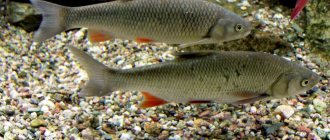
The attachment for the bottom tackle depends on the type of fish you are going to catch. It could be:
- worm;
- maggot;
- bloodworm;
- corn;
- semolina dough;
- boilies.
During the current, it is better to fish with baits that stay on the hook for a long time. For example, dough on a river will quickly wash out.
You can learn more about catching carp with boilies in a special article, which covers such nuances as their choice, the technique of catching carp with boilies, and selecting the right flavorings.
Tips for catching English donkey
Professional fishermen who know almost everything about fishing with English donkey identify three main tactics for using this type of gear:
- The bait must be placed in large feeders, of which five to ten are used. The radius of complementary feeding should not exceed one and a half meters. After which a small feeder is hung, from which fishing is directly carried out.
- The fish are fed during the fishing process. The tackle is immediately equipped with a small feeder, bait on a hook, and frequent recasts are performed, thus getting exactly to the desired point. This tactic is most often used when fishing on the river.
- The bait is thrown in the form of tightly compressed balls with a slingshot. After this, a weight is placed instead of the feeder so as not to scare away the fish when casting. This fishing tactic gives the best results when hunting large fish.
Originally posted 2018-07-04 10:35:52.
Two techniques for catching carp using the “Method” rig
There are two fishing techniques:
- with bait hidden inside the feeder feed;
- with bait lying freely for days;
Both methods have a right to life and both are intended for purely targeted carp fishing.
When fishing with the Method rig, the technique of 15-20 feeder casts is not used, since our feeder is essentially a nipple and food should not be shaken out of it
In the first case, the equipment can be called a “nipple”; anglers often call it that, or in general such fishing is called fishing with a spring. The point is that viscous food is stuffed into the feeder, maybe a whole lump that exceeds the size of the feeder, and a hook with bait is embedded inside this lump, somewhere closer to the surface.
Non-sports anglers also use several hooks so that the carp is sure to swallow one of them. In fact, this is not at all necessary and one hook is enough. In addition, this is a matter of sporting principle - fishing with one hook.
In the second case, the bait lies a maximum of 10 cm from the feeder. A carp or carp approaches, feeds from the feeder and at the same time becomes interested in your bait. The disadvantage of this method is that the carp may like the bait, but not the bait. But it still doesn’t hurt to try this method.