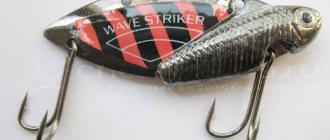
Cicada (bladebait) is a small flat spoon, launched at the head, with a fishing line attached at the top of the back. Creates active high-frequency low-amplitude oscillations when moving. Differs in a wide variety of shapes, sizes, weights.
The spinner has not yet become widespread in Russia, although those who have experienced the cicada in action become its faithful fan.
Thanks to several options for attaching the spinner to the fishing line, the cicada changes the nature of its movement and the frequency of vibration. We can say that these are several spinners in one. It doesn’t look like either a wobbler or a regular spoon or spinner, but sometimes it’s a better catcher than all of them combined.
Wiring Features
On the back of the bait there are from one to five holes for attaching fishing line. The closer the hole is to the head of the spoon, the faster the retrieve can be.
The closer the hole is to the tail, the stronger the resistance of the spinner when retrieving. The reel experiences heavy loads, so in this case large-sized bladebaits are carried out not by rotating the reel, but by pulling it up. The natural result is a stepped retrieve, which is more interesting for a large predator than a uniform one.
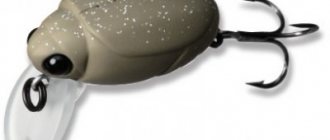
Bladebaits with a concave blade-body have their own attractive play when free falling to the bottom. In this case, stepped wiring can also be effective for small spinners.
Principles of fishing with a cicada lure and making it yourself
Cicada spinners appeared on the market more than 10 years ago. These devices are known to many fishermen as bladebaits. True, despite this, the majority of representatives of the fishing world are in no hurry to purchase and manufacture the part, believing that there is nothing special about it. It is interesting that in the USA, for example, the cicada was banned due to its extreme catchability. It’s not for nothing that many fishermen nicknamed the part “perch killer.”
Cicada is a spinner that has an appearance similar to rattlin. Although it is fair to note that similarities are also observed in the manner of play. As for the differences, they consist in the absence of rattles located inside, as well as a significant casting range. The last point allows you to significantly expand the fishing area.
The principle of operation is that when the bait is lowered into the water, it begins to imitate the movement of small river inhabitants that attract predators. The element is made entirely of lead, so taking into account its mass, it sinks immediately and quickly. That is why the cicada appealed to anglers who fish at depth.
It must be said that there are a couple of holes on the wing of the spinner to which leashes are attached. If you hang them in a different place, then the center of gravity will automatically move. This moment affects the oscillations and play of the bait. The presented element performs well both at depth and in places with strong currents. True, in the second case you don’t need to move the element quickly in different directions, because it will start to float up.
Doubles and tees
Cicadas are equipped with either doubles or trebles.
Doubles are hung with a curved tip to the tail of the spoon. Since the stings of the hooks are directed upward when the cicada moves, there are fewer snags on obstacles, but there are more fish escapes.
In clean water, it is recommended to use tees.
When hooked, the hooks themselves create attractive vibrations and often serve as a point of attack for fish, so there is no need to decorate them with cambrics, beads, feathers and other trinkets.
Features of the use and self-production of cicada spinners
This type of spinners is not very popular with most spinners; both in fishermen’s boxes and on store shelves you can most often see spinners or spinners, while cicadas are rather rare. Therefore, often making a cicada with your own hands is the only way to test such a spinner in practice. These baits are underestimated by many, but with the right approach they perform well when catching almost all types of predatory fish.
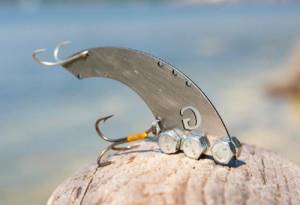
Another common name for the cicada, bladebait, quite accurately conveys its shape. Most models resemble a blade with a weight at the bottom and several holes for attaching a leash at the top.
Most bladebaits are shaped like the petals of spinner spoons, but more diamond-shaped options are often found, as well as more or less realistic insect imitations.
The feasibility of making cicadas yourself
Many companies producing fishing baits have baits of this type in their catalogs, but in many regions cicadas are not very popular, and therefore they appear on store shelves relatively rarely. Diagrams and drawings for self-production are publicly available, and often such homemade products become the only way to test a new type of spinner.
It is also important to consider that branded products, as in the case of other types of baits, may not have the most affordable prices, so a homemade cicada is also a way to save a little. An important argument in favor of making bladebaits yourself is the simplicity of this process - compared to the same wobblers, rotating or even oscillating spoons, this homemade product has the least number of difficult moments during operation.
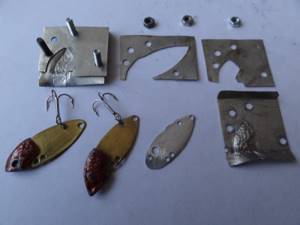
This is the easiest way to make cicadas. First of all, you need to decide on the shape of the body. To do this, you can search for design diagrams and drawings on the Internet, print out the version you like and cut out a template, according to which you can already mark the dimensions of the product on the workpiece. Both soft and easier to process metals such as copper or brass, as well as stainless steel, are suitable as manufacturing materials.
After the workpiece is cut, it needs to be given its final shape using a file, sharp edges removed, and, if desired, polished using a piece of felt and GOI paste.
Lead pellets with a cut in the middle are used as a load. The weight can be secured to the lure with pliers, and then you can check its performance, for example, in the bathroom. If the results are satisfactory, you need to secure the pellets with epoxy resin or other reliable adhesive. If desired, you can paint the spoon in the desired color and varnish it.
This method is more labor-intensive, but the result is much more interesting. After the body of the spinner is cut out, it needs to be prepared. If the surface of the workpiece has oxidized, only the area where you plan to solder the load should be cleaned - this way the tin will not flow beyond the clean area during the soldering process. If the metal plate is initially clean, masking tape is used for the same purpose. A wire loop is also soldered, to which a hook is attached in the finished product.
Next, layers of tin are applied layer by layer using an ordinary soldering iron. The process is quite lengthy, since by applying molten metal on one side, you can overheat the solder on the other - you need to make sure that the load does not flow. Give the final shape with sandpaper. Polish using GOI paste or paint.
One of the options for making a cicada is to use not lead pellets or tin solder as a load, but a metal rod. The body of the spinner is prepared in the same way as in the case of other methods. But as a load, a section of a suitable size is sawn off from a metal rod, with the help of a file it is given the desired shape, after which a longitudinal cut is made with a hacksaw for metal, into which the body of the spinner will be attached. You can secure it using tin solder or any reliable glue. Such cicadas have an interesting game and their silhouette resembles some kind of insect.
This is the most difficult method to master, but the cicadas produced in this way are practically no different, even externally, from factory products. The sequence of actions is as follows:
Leashes
It is not recommended to attach the fishing line directly to the hole. The spoon is narrow and can quickly loosen or fray the joint. To directly connect the fishing line to the lure, you can use a small winding ring inserted into the hole, or a small carabiner.
It is best to use a leash with a carabiner. The carabiner will not limit the vibrations of the cicada and will allow you to quickly change one hole to another.
It is recommended to use a rigid leash to prevent the line from tangling over the hooks.
In pike areas where there is a high probability of attack by a large toothed predator, you can use a string 20-25 cm long.
A fluorocarbon leader of 0.5-0.6 mm is recommended. It is tough enough to prevent line overlaps and can sometimes even save you from the sharp teeth of a pike.
Materials
As for the material, for the cicada petals you will need sheet metal. Copper or brass are ideal. They are easier to process. The sheet thickness should be from 0.4 to 0.8 mm. A thicker petal will play poorly when wiring, and a thin one may not withstand the load. Galvanized sheet metal is also used, which fades over time, which is good for fishing in clear water. Very bright petals in this case can scare away the fish. It is important not to damage the galvanization during the manufacturing process of the “cicada”. If this happens, then you need to polish the petal very well, then it will practically not rust during use.
To make a load for future bait you will need lead. It is better to choose a soft one, with antimony in the composition. It will be easier to work with him. The cable sheath is made from this material. You can also take lead from the battery. It is important to observe basic safety precautions while working. You will also need any plasticine. An exact copy of the “cicada” will be made from it.
As for the gypsum, it will be used to make a mold for casting the future bait. You can use dry construction mixtures containing gypsum. They are more durable, although they take much longer to dry. A well-dried mold is enough to cast several dozen “cycads.”
Store-bought or homemade bait
Fishing stores don't have a large selection of palebaits. This is explained by the fact that these spinners are not yet very popular.
It may happen that you liked a purchased cicada, which worked great in the summer, and you want to try it in the winter, but the shipping weight is not suitable for winter fishing. You can make a copy of the spinner with a different shipment.
Making your own cicada is not that difficult.
You can make copies of purchased cicadas, experiment with the shape of the body, the weight of the shipment, the number and location of holes for attaching the leash and hooks, change the degree of concavity of the petal-body, and much more.
Self-production provides a wide field for experimentation.
Cicada spinner: characteristics, advantages and wiring technique
A universal bait is the cicada. Many anglers know how to use a cicada spoon, but the history of its creation is unfamiliar to them. It was first used in 1957 in America. It is distinguished by its high catchability, for which in some states there is a ban on fishing with this bait.
The cicada spinner, also called a bladebait (translated from English as a blade bait), is made in the form of a thin metal plate, thickened downwards in the front part. There are 3 holes on the top of the body for attaching fishing line. Equipped with 1-2 hooks or 2 doubles.
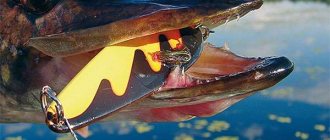
Bladebait looks like a fish fry. Fishermen believe that the bait is similar to a butterfly insect from the song family called a cicada. In the vastness of Russia, this name has taken root.
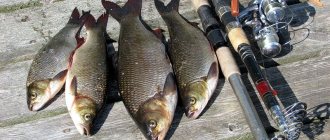
Cicada bait is very effective when catching predatory fish. According to many fishermen, fishing tackle with a cicada is used both in summer and winter. In Russian reservoirs it is used for catching perch, breshe, pike and pike perch.
The correct pace of movement of a catchable spoon in the water attracts catfish and asp; the asp especially reacts to the nature of the hydroacoustic vibrations of the tackle. Roach, ide, chub, and crucian carp are better caught with small baits.
The cicada spoon is made from different metals, including:
The bait is designed to attach 2 tees with Euro sizes 10-12, but often the lure is equipped with double hooks or one part is bitten off at the tee. In this form, the bait plays well, the fish clings to it better, and it is easier for the angler to handle the tackle.
- creates amplitude oscillations;
- easily cast over long distances;
- can adapt to different fishing conditions;
- moves in the water like fish fry and cicada insects.
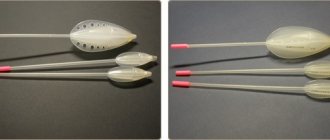
The shape of the device is cup-shaped or concave. Tying the fishing line into different holes on the body of the cicada (there are models with one and 5 holes) changes the frequency of its vibrations and the depth of immersion. Spinners are divided into the following types by weight:
- small or light cicadas, weight 4 g, are hooked to the first or second hole from the front of the bait, used when fishing under the surface of the water;
- medium spoons, weight 8 g, hooked to the middle hole, caught at medium depth;
- heavy cicadas, weighing 14 g, are attached to distant holes, are intended for fishing pits, and can reach a depth of 20 m.
The line is selected for the bait of the required size and weight. The bait behaves well in the summer when fishing with a spinning rod and when trolling, in the winter from the ice in a plumb line.
The color palette for spinning lures is wide. It can be difficult to choose the right one for fishing yourself. Manufacturers of fishing equipment have developed tips for anglers on the use of color:
- in muddy and opaque water, in low light and when trolling, use golden-colored gear;
- on clear days when fishing in shallow water, in clear water, when trolling over long distances, a silver color is applicable;
- in rainy weather, low clouds and deep-sea jigging, red baits are used;
- In winter, they use chartreuse-colored cicadas.
Making homemade fishing bait
Making a cicada from the petal of an old flat or concave spinner and an olive-shaped sinker
Spinner drawing
First, look at the drawing:

Manufacturing instructions
DIY Tools:
- Hacksaw for metal.
- Round nose pliers.
- Drill or screwdriver.
- Metal drill (2-4mm).
- Wire cutters.
- The file is round.
- Marker.
Material:
- Long shaped petal from an old rotator.
- Two doubles or tees of suitable size.
- Lead olive sinker (or two smaller lead olives of the same weight in total).
- “Moment” water-repellent glue for metal.
- Soda.
- Inorganic solvent.
Instructions:
- In the “olive” sinker, a longitudinal cut is made with a hacksaw to the middle. The weight of the olive is chosen independently.
- A location for securing the shipment is selected The shipment is attached to the head part from the bottom of the spoon. The axes of the spinner and the olive should be located at an angle of 15 - 20 degrees to each other. The olive can protrude beyond the petal by 0 - 5 mm as desired. The olive is inserted into the petal, moved to the desired place, and outlined with a marker.
- Select a place to attach the hook in the head of the spoon. Mark the location of the front hook on the olive with a marker.
- The shipment is removed from the petal. The marked area of the olive is bitten out with pliers. You should get a semicircle for attaching a double or tee on the petal. Processed with a round file.
- The olive is put back on the petal in the chosen place and the place where the front hook is attached is marked with a marker. Shipment is canceled
- Holes are drilled in the petal for attaching fishing line from 1 to 5 in the back of the cicada and holes for attaching two hooks from the bottom.
- The place of future shipment fastening is cleaned and degreased with any inorganic solvent.
- is applied .
- The olive is inserted into the spoon and squeezed with round nose pliers to secure it.
- The released glue is evenly spread at the attachment point. If there is not enough glue, additional glue is applied. The glue should be distributed evenly in a not too thick layer over the entire area where the olive adjoins the spoon. Excessive amount of glue is removed with a rag. The glue is sprinkled with soda on top.
- When the glue and soda dries, it forms a hard layer that provides additional adhesion to the cicada's body and the shipment. The hard layer can be sanded.
- Hooks are hung.
Expert opinion
Knipovich Nikolai Mikhailovich
Zoologist, hydrobiologist. I am interested in fishing at a professional level.
Important. Instead of one olive, you can attach two smaller ones and half the weight. Then the place for attaching the hook is chosen between two olives.
Cutting cicada body from metal sheet, fusing shipping
Tools:
- Metal scissors.
- File.
- The skin is fine.
- Soldering iron 80-100W.
- Electric drill or screwdriver.
- Metal drill (2-4mm).
- Pliers.
- Marker.
Material:
- Sheet metal 0.6-0.8 mm: iron, stainless steel (metal from a flexible spatula is best), or brass, or copper, or bronze.
- Battery lead (this kind of lead is best alloyed with other metals).
- Orthophosphoric acid.
- Inorganic solvent.
- Doubles or tees 2 pcs.
Instructions:
- On sheet metal we draw the shape of the cicada's body. Often the cicada is given the shape of a curved fish.
- metal scissors, cut out
- We process the edges with a file.
- We treat the place where the shipment is deposited with orthophosphoric acid.
- Using a heated soldering iron, we fuse the lead layer by layer on one side of the spoon.
- After the lead has cooled, turn the cicada over to the other side and place it on a wet rag. This will protect the spoon from overheating and melting the bottom layer of lead.
- We treat with orthophosphoric acid and layer by layer, gradually, we fuse the lead. It is necessary to take breaks if necessary and wet the rag again, not allowing the bottom layer of lead to overheat.
- After cooling, we process the lead with a file on both sides to give symmetry to the shipment.
- Clean it with fine sandpaper.
- We melt a piece of lead at the place where the hook is attached and sand the area (it’s better to beat off a piece of lead with a semicircular chisel).
- We drill holes in the required number in the upper part of the spoon on the back for attaching the fishing line and two holes for hooks in the lower part.
- We wipe the spoon with solvent.
- The cicada can be painted, although anglers do not see much point in this. With active high-frequency oscillation, color details are not visible.
- We hang hooks.
Expert opinion
Knipovich Nikolai Mikhailovich
Zoologist, hydrobiologist. I am interested in fishing at a professional level.
Important. Instead of a hole for the front hook, you can make an eyelet from 0.8mm ferrous wire. Before surfacing lead, a hole is drilled in the cicada's body above the place where the hook is attached. A wire is threaded into the hole and twisted with pliers. Presses against the body with pliers. Under the cicada's body, the wire is bent with pliers to fit the plane of the spoon's body.
Making your own bladebait using a matrix
Tools:
- Metal scissors.
- Wire cutters.
- File.
- Fine sandpaper.
- Electric drill or screwdriver.
- Metal drills (2-4mm).
Material:
- Battery lead.
- Sheet metal 0.6-0.8mm.
- Battery lead.
- Gypsum.
- Orthophosphoric acid.
- Cut rectangular milk or juice cartons.
- Nail pins.
- Silicone Grease.
- Plasticine.
Instructions:
- is cut out from sheet metal according to a template or according to your own design.
- on the body of a spinner of our own making or cut out from a template according to the shipping form.
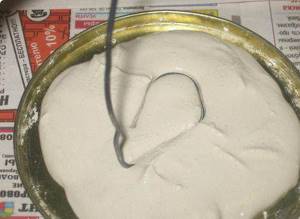
- Pour a creamy gypsum solution (at least 2 cm) into a cut-off milk or juice bag.
- We press a cone-shaped wooden pin coated with silicone grease into the gypsum solution halfway to form a sprue hole. The bottom of the pin should be in contact with the head of the spinner.
- We press the wire coated with silicone halfway to remove air when pouring the melt.
- Lubricate the template with silicone grease.
- We press the template into the thickened plaster.
- We are waiting for the plaster to harden.
- We drill holes in the four corners for the diameter of the pins (a little more than half of the bottom plate of the matrix).
- Lubricate the surface of the matrix with silicone grease.
- Lubricate the pins with silicone grease. Insert into the holes.
- Fill the top plate of the template (at least 2 cm).
- After the gypsum has thickened , remove the pins, release the matrix from the bag, separate the two halves, and remove the wooden cone and wire.
- We clean the cicada's body from plasticine. We drill two holes in the body of the spoon from different ends of the spoon to close the molten lead on both sides of the cicada.
- We insert the flat body of the cicada template, treated with phosphoric acid at the point of shipment, back into the matrix.
- into the sprue hole.
- After the melt has cooled, remove the pins and separate the two halves of the matrix. We take out the cicada blank.
- We bite off the excess lead and process the areas with a file and sandpaper.
- We drill holes for attaching fishing line and hooks.
- We attach the hooks.
From drawing to manufacturing instructions: do-it-yourself cicada spinner
Cicada (bladebait) is a small flat spoon, launched at the head, with a fishing line attached at the top of the back. Creates active high-frequency low-amplitude oscillations when moving. Differs in a wide variety of shapes, sizes, weights.
The spinner has not yet become widespread in Russia, although those who have experienced the cicada in action become its faithful fan.
Thanks to several options for attaching the spinner to the fishing line, the cicada changes the nature of its movement and the frequency of vibration. We can say that these are several spinners in one. It doesn’t look like either a wobbler or a regular spoon or spinner, but sometimes it’s a better catcher than all of them combined.
A bladebait is similar to a ratlin by attaching a fishing line to the back of the spoon. However, the ratlin has a voluminous body with a rattle inside. The cicada's play is more aggressive and noisy than that of the ratlin.
Cicada is intended mainly for predatory fish: perch, pike, pike perch, asp. Large peaceful fish: carp, bream, crucian carp can also covet a small cicada.
Perch especially loves the cicada for its high-frequency, low-amplitude play.
The bladebait works great when casting with a spinning rod, when trolling up to 10 km/h, and when fishing vertically.
Bladbait is an all-season lure. It works great in winter when fishing vertically.
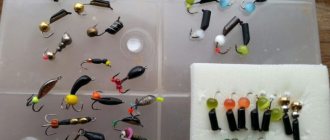
For winter fishing, a cicada with a small load is used.
Stepped vertical wiring is recommended. The spoon sinks to the bottom, then there is a sharp rise to the top, a pause and a free fall, and then a jerk again. Gradually, the area is tested throughout its entire depth. The number of steps and the duration of pauses are selected experimentally.
On the back of the bait there are from one to five holes for attaching fishing line. The closer the hole is to the head of the spoon, the faster the retrieve can be.
The closer the hole is to the tail, the stronger the resistance of the spinner when retrieving. The reel experiences heavy loads, so in this case large-sized bladebaits are carried out not by rotating the reel, but by pulling it up. The natural result is a stepped retrieve, which is more interesting for a large predator than a uniform one.
Bladebaits with a concave blade-body have their own attractive play when free falling to the bottom. In this case, stepped wiring can also be effective for small spinners.
Cicadas are equipped with either doubles or trebles.
Doubles are hung with a curved tip to the tail of the spoon. Since the stings of the hooks are directed upward when the cicada moves, there are fewer snags on obstacles, but there are more fish escapes.
In clean water, it is recommended to use tees.
When hooked, the hooks themselves create attractive vibrations and often serve as a point of attack for fish, so there is no need to decorate them with cambrics, beads, feathers and other trinkets.
It is not recommended to attach the fishing line directly to the hole. The spoon is narrow and can quickly loosen or fray the joint. To directly connect the fishing line to the lure, you can use a small winding ring inserted into the hole, or a small carabiner.
It is best to use a leash with a carabiner. The carabiner will not limit the vibrations of the cicada and will allow you to quickly change one hole to another.
It is recommended to use a rigid leash to prevent the line from tangling over the hooks.
In pike areas where there is a high probability of attack by a large toothed predator, you can use a string 20-25 cm long.
A fluorocarbon leader of 0.5-0.6 mm is recommended. It is tough enough to prevent line overlaps and can sometimes even save you from the sharp teeth of a pike.
The cicada shows all its advantages in the summer with the onset of the swimming season. The water warms up, blooms, visibility decreases, and then the noisy, high-frequency play of the cicada becomes especially attractive to fish.
Fishing stores don't have a large selection of palebaits. This is explained by the fact that these spinners are not yet very popular.
It may happen that you liked a purchased cicada, which worked great in the summer, and you want to try it in the winter, but the shipping weight is not suitable for winter fishing. You can make a copy of the spinner with a different shipment.
Making your own cicada is not that difficult.
You can make copies of purchased cicadas, experiment with the shape of the body, the weight of the shipment, the number and location of holes for attaching the leash and hooks, change the degree of concavity of the petal-body, and much more.
Self-production provides a wide field for experimentation.
Making a cicada from the petal of an old flat or concave spinner and an olive-shaped sinker
First, look at the drawing:
DIY Tools:
- Hacksaw for metal.
- Round nose pliers.
- Drill or screwdriver.
- Metal drill (2-4mm).
- Wire cutters.
- The file is round.
- Marker.
- Long shaped petal from an old rotator.
- Two doubles or tees of suitable size.
- Lead olive sinker (or two smaller lead olives of the same weight in total).
- “Moment” water-repellent glue for metal.
- Soda.
- Inorganic solvent.
Cutting cicada body from metal sheet, fusing shipping
- Metal scissors.
- File.
- The skin is fine.
- Soldering iron 80-100W.
- Electric drill or screwdriver.
- Metal drill (2-4mm).
- Pliers.
- Marker.
- Sheet metal 0.6-0.8 mm: iron, stainless steel (metal from a flexible spatula is best), or brass, or copper, or bronze.
- Battery lead (this kind of lead is best alloyed with other metals).
- Orthophosphoric acid.
- Inorganic solvent.
- Doubles or tees 2 pcs.
Making your own bladebait using a matrix
Tools:
- Metal scissors.
- Wire cutters.
- File.
- Fine sandpaper.
- Electric drill or screwdriver.
- Metal drills (2-4mm).
- Battery lead.
- Sheet metal 0.6-0.8mm.
- Battery lead.
- Gypsum.
- Orthophosphoric acid.
- Cut rectangular milk or juice cartons.
- Nail pins.
- Silicone Grease.
- Plasticine.
To give a concave shape to the body of the bladebait, a recess is hollowed out in a wooden block along the contour of the cicada's body of the required depth. Using a hammer, gently tapping the body of the spinner without pushing, gradually imparts the desired convexity. The body of the spinner is given a final, complete shape with a round punch.
The video clearly shows how to make a cicada with your own hands:
The three methods of making cicada described above are not dogma. Inventing a new way of making this catchy spoon or a new bladebait design is your honorable right.
For this, many anglers will thank you very much.
What you need to know about bladebait? Advantages and disadvantages
- Nature of the game.
During spinning, the entire body of the bait produces very amplitude vibrations, which causes a large number of waves in the water, this greatly attracts predators. - The bladebait has a very high range.
Thanks to the monolithic structure and the absence of sailing parts, as well as focusing more gravity at one point (the front of the bait), the bladebait allows them to make very long spinning casts. - Cicada is the second name for bladebait.
The play and vibration of the bait in the water resembles the movement of a very active insect such as a Cicada. - Attach the bait to the fishing line using different holes in the upper part of the bait
and you will achieve the most correct game in specific fishing conditions. - You can make a bladebait with your own hands
at home. You can use a metal spoon or plate as a plate, and lead as a sinker. Learn more about how to make a bladebait with your own hands in the video. - This is a jig bait
that pops up quite actively when reeled in. - The cicada begins to play even when the retrieve is not very fast
, holding the spinning rod in your hand - you will feel vibrations; it is not at all necessary to move the bait faster. - Thanks to its flat shape, in strong currents it is possible to achieve the floating of the bait over a long distance
and, as a result, to fish a very large area of water. - You can catch perch, pike, pike perch, catfish,
and any other predator with a bladebait, but less often. Also, a lot depends on the size of the bait. One thing is clear, the most caring predator is the pike. She really loves the amplitude vibrations that the cicada has.
- a small piece of equipment that allows you to attach any bait without using a single knot or damaging the fishing line. The baits are firmly attached.