How to properly tie a hook to a fishing line, eye hooks
Experienced fishermen have many variations in their knowledge of tying fishing line to hooks, but they always use 1-2 types. The list of hook parts includes:
- The head is the part for which, in fact, fixation occurs;
- Forend - a component part that extends from the head to the hook;
- Prying - a semicircular area;
- The sting is the sharp end of the hook, which catches the fish.
Let's celebrate! The main material used in the manufacture of hooks is metal mixed with steel. There are several methods of binding, which will be discussed in more detail below.
Grinner
The strength level is more than 80%; a fishing line is used that consists of only one thread.
It should be tied like this:
- The line is pulled through the eyelet twice, leaving 10 centimeters at the end;
- Wrap the fishing line 6 times around the base, pull the fishing line through the loop;
- Tighten firmly.
Uni
To implement this node, you must follow the above recommendation, which is a step-by-step guide.
Strength is almost 90%. Mainly suitable for fishing line that has a small diameter.
Shark knot
Relevant only for professional fishermen who already know how to tie a hook using basic methods. The strength remains unchanged even over time; they fit the fishing line in one thread.
It should be tied like this:
- Thread the fishing line into the eye of the hook and make a loop;
- Wrap the warp several times and thread the end through the loop formed.
Spindle
A strong knot that is suitable for different types of fishing line. Strength approaches 90%. The cord is inserted into the eye and goes around the fishing line 5 times. At the final stage, pass it through the loop and tie the cord. Suitable for single or flucarbon lines of small diameters.
Blind node
There is a loop at the end of the leash, so the most reliable way to secure the hook is a blind knot. The method is suitable not only for thin lines, but also for strong ones. You can make such a knot only when the loop has a soft base. A blind knot can be used to tie sinkers.
Tying pattern:
- We pull the fishing line through the ring and wrap it around 6-7 times;
- After the above, we send the fishing line into the loop and check for strength; if the knot is tight, then we did everything correctly.
Locked up bloody
To tie a knot, you need to choose fishing lines of different diameters. The positive side of such a knot is strength and compactness, but the disadvantage is the complex implementation. Naturally, the deficiency can be combated through long training.
Gripping unit
The appearance resembles the movement of a snake; to tie it you need to take two cables. The knot has no complications, as it is familiar to almost all fishermen. It can be used on any fishing line.
California Knot
It was invented by California fishermen almost 40 years ago. The connection is simple and maximally reliable 97%.
How to tie:
- Fold the two ends of the fishing line in half and insert it into the eye;
- Wrap the fishing line and stick it into the eye;
- Bring the hook back and tighten the knot.
Canadian eight
- Fold the fishing line in half and form a loop from it;
- Wrap the resulting line around another line and make a loop again;
- Check for strength.
Bloody Knot Clinch
This strange name contains a tying pattern that is often used by experienced fishermen. The name comes from the Middle Ages; belts were tied with such knots, which were used in case of disobedience of fishermen.
Not only hooks and bait are attached, the strength is 70%, which is very low in relation to the above.
Scheme:
- One end of the fishing line is inserted into the eye;
- We twist it around its axis 4-8 times;
- The end is again threaded into the loop formed at the beginning and tightened.
Clinch improved
More durable than the above. It is strictly forbidden to use it to secure weights and wheels. And so the knot is universal and can be used both on a spinning rod and on a regular fishing rod.
Bloody
The bloody knot is universal and durable.
Subsequence:
- Intertwine two laces together;
- Twist one line onto another, and then vice versa, the number of turns should be the same;
- Wet the knot and tighten
Salmon knot
Has a tear resistance of 97%. Suitable for any fishing line.
Fisherman's Eight
Fastening is allowed not only for hooks with an eye, but also without an eye. Popular with beginners.
Tuna knot
A rare knot because it is very difficult to tie, but the options for breaking are kept to a minimum. To implement such a tie you need a small wire size. There is no need to bandage it as it is more likely to wear out faster than it needs bandaging.
Bayonet knot
More relevant for interlaced fishing line; using a different fishing line can lead to slipping.
Turtle knot
- The fishing line is threaded through the hook and wrapped around its axis;
- Re-thread through the eye and tighten the knot.
latest comments
Latest publications
- Re: Visiting Strangers V. (PhilippS) 12 minutes 56 seconds ago
- Re: Visiting Strangers V. (Van Levon) 6 hours 7 minutes ago
- Re: Visiting Strangers V. (SubMarinka) 16 hours 41 minutes ago
- Re: Visiting Strangers V. (SubMarinka) 16 hours 53 minutes ago
- Re: Visiting Strangers V. (Van Levon) 16 hours 53 minutes ago
- Re: Visiting Strangers V. (SubMarinka) 16 hours 58 minutes ago
- Re: Visiting Strangers V. (Van Levon) 17 hours 13 minutes ago
- Re: Spammer will be killed! (SubMarinka) 17 hours 28 minutes ago
- Re: Visiting Strangers V. (ANSI) 17 hours 59 minutes ago
- Re: Spammer will be killed! (ANSI) 18 hours 11 minutes ago
— The most reliable fishing knots (IS. Okhotnik. Rybolov (Dairs)) 988 Kb, 13 p. (read) (read page by page) - A. A. Okunevsky
Text settings:
CONTENT
STOPERS (STOPKING UNITS)
1.1. “QUICK COOKING” STOPPER. CLINCH TYPE UNIT
1.2. STOPPER USING DANKEN TYPE UNIT
KNOTS FOR TYING LINES
2.1. TRIPLE FISHERMAN'S KNOT
2.2. LOOP TO LOOP CONNECTION
2.3. KNOT “BLOOD TIES”
2.4. DOUBLE SLIDING UNIT TYPE “GRINNER”
2.5. PETER MINENKO'S KNOT
2.6. KNOT FOR CONNECTING MONOFILINE AND “BRAID”
2.7. ALBRIGHT TYPE UNIT
KNOTS FOR TYING A HOOK WITH A SPATULA
3.1. LOOP KNOT WITH EXTERNAL PASS OF THE END OF THE LINE
3.2. TROMBONE LOOP TYPE UNIT
3.3. UNIT WITH EXTERNAL LOOP WINDING
KNOTS FOR TYING A HOOK WITH A RING AND SWIVELS
4.1. "PALOMAR" TYPE UNIT
4.2. CLINCH TYPE UNIT, IMPROVED
4.3 HOMER TYPE UNIT
4.4 GRINNER TYPE UNIT
4.5 CLINCH TYPE UNIT, REINFORCED
wobbler units
5.1. KNOT “THE TIGHT LOOP”
5.2. KNOT WITH A BIND LOOP
5.3. RAPALA TYPE UNIT
AUXILIARY UNITS
6.1. KNOT FORMING A TEMPORARY LOOP FOR A SIDE LEACH ON THE MAIN LINE
6.2. KNOT. FORMING A STATIONARY LOOP ON THE MAIN LINE FOR A SIDE LEASH
STOPERS (STOPKING UNITS)
Stopper knots, formed from monofilament line or thread (wool is best) and tied over the main line, are most often used in float fishing rigs that use a sliding float with one or two attachment points. In most cases, this stopper is the top one. Its main purpose is to install the float release, so it is necessary to be able to move the stopper (with some effort) along the main line.
In addition, it should not get stuck in the guides of the rod when casting the equipment.
And, of course, after tightening, the knot should not deform the main line
(back)
1.1. “QUICK COOKING” STOPPER. CLINCH STOPPER KNOT
1.1.1. Take a piece of monofilament fishing line 25-30 cm long and with a diameter the same or slightly larger than that of the main line.
Fold the piece in half, place it under the main line and press with your fingers.
1.1.2. Throw the working end of the segment over the main line and the auxiliary end. Thus, the main scaffolding ends up inside the formed loop.
1.1.3. Make 4-5 turns of the working end around the main line and the service end, holding the loop on the main line with your fingers.
1.1.4. Pass the working end through the loop. Gently tighten the ends, after moistening the knot with saliva.
1.1.5. Trim the excess stop line, leaving 1.5-2 cm at the ends. These protruding ends will not interfere with the passage of the knot through the guide rings of the rod, but they can be used to tighten the stop knot if it becomes loose when moving it along the main line.
Typically, the diameter of the line suitable for tying a stopper knot should be the same as that of the main line, or slightly larger. Fluorescent fishing line for a stopper is good - it is easier to see.
(back)
1.2. STOPPER USING DUNCAN STOPPER KNOT, SPRINGER KNOT
1.2.1. Take a piece of monofilament fishing line with the parameters as in paragraph 1.1.1. Place the auxiliary end 5 cm long under the main line, place the working end behind it and press the loop thus formed to the main line with your fingers, leaving the working end 10 cm long.
1.2.2. Place the working end under the main line and begin wrapping it and the loop.
1.2.3. After making no more than 4 turns of the working end around the main line and the loop, thread it through the latter.
1.2.4. After wetting the knot with saliva, smoothly tighten it by the working end, holding the auxiliary end and the main line with your hand.
1.2.5. If you do everything carefully, there will be only even turns of winding outside the stop assembly. Such a knot will be easier to pass through the guide rings of the rod than the previously discussed one. But forming such a node is more difficult.
1.2.6. By the way, if you take a piece of plastic straw (a “straw” for a cocktail or something similar) 7-10 cm long, tie several locking knots of the type considered on it at home (preferably made of woolen threads), then you will no longer spend time to knit stoppers.
(back) (back)
KNOTS FOR TYING LINES
In most cases, such units are necessary in float, bottom and fly fishing.
Usually the main line (or undergrowth - in fly fishing) and the leash are tied together. These fishing lines, as a rule, are of different diameters, and even from different materials (braided and monofilament, for example). Or the main line is tied in two pieces if it breaks or you just need to add more line to the line. Or a so-called “shock leader” is tied to the main line (a thicker piece of line a little larger than twice the length of the rod, which at the moment of casting the rig bears the main line load).
In the first case, the main requirement for the knot is that the strength of the line in the knot is not affected. In the second and third, it is also added that the connecting unit must pass freely through the guide rings of the rod without getting stuck in them.
(back)
2.1. TRIPLE FISHING KNOT (THREE - WATER KNOT)
The fishing lines retain about 90% of their carrying capacity in the knot. You can tie monofilament lines with a difference in diameter of no more than 0.05 mm.
2.1.1. Fold the two lines to be tied together, aligning the ends. Pinch the fishing lines with your fingers at a distance of 15-20 cm from the ends.
2.1.2. Make a simple knot using two lines. Make sure that the ends of the lines remain level.
2.1.3. Pass the ends of the lines twice into the simple knot obtained earlier.
2.1.4. Moisten the area where the knot is tightened with saliva and gently pull the ends of the folded lines on both sides at once. Make sure that both lines are tightened at the same time, without sliding against each other (the thinner one usually tightens faster). If you did everything correctly, before the final formation of the knot, the tightened fishing lines will form a figure of eight.
2.1.5. Now gently pull the different lines to form the final knot. There should be no visible voids in the resulting assembly. Trim the excess, leaving 1-1.5 mm at the ends.
(back)
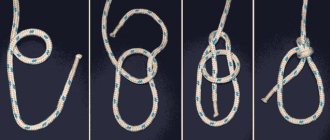
2.2. DOUBLE LOOP JUNCTION
Much stronger than any knotted line connection. A better alternative to using a swivel, especially if the latter is made of thinner wire than any of the fishing lines.
2.2.1. Take the main line, step back 30-35 cm from the edge and fold this piece in half. Form a simple knot from the double line.
2.2.2. Pass the double line through the knot two more times. You now have a blank for forming a “Surgeons Loop” type knot.
2.2.3. After moistening the knot with saliva, gently pull it off. If you did everything correctly, before the final formation of the loop, the double scaffold will fold into a figure eight.
2.2.4. Make a “surgical” loop on the leash, place it over the loop on the main line and pass (as shown in the diagram) the other end of the leash through the loop on the main line.
2.2.5. Pull the main line and the leash in opposite directions. The connection is ready.
2.2.6. Trim the ends, leaving 1-1.5 mm. The beauty of this connection is that it can be very easily dismantled and quickly replace one leash with another.
(back)
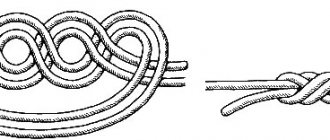
2.3. KNOT “BLOOD TIES” (BLOOD KNOT, ATTACH KNOT, FISHERMAN'S BEND KNOT)
A strong knot for fishing lines, the difference in diameters of which is no more than 1/3. Retains more than 90% of the carrying capacity of lines.
2.3.1. Fold two fishing lines overlapping, pinch with your fingers, leaving each working end 15-20 cm.
2.3.2. Wrap the working end of one line around the other 5-7 times.
2.3.3. Return the working end back to the beginning of the winding and pass it between the two fishing lines. Press this area with your fingers.
2.3.4. Make a similar winding with the working end of the other fishing line, return it back and insert it into the gap formed between the two fishing lines towards the other fishing line. Gently pull first one knot, then the second, after moistening them with saliva.
2.3.5. Gently pull the formed knot by the fishing lines in opposite directions.
2.3.6. If everything is done correctly, the ends of the lines after tying the knot should point in opposite directions. Leaving 1-1.5 mm at the ends, trim off the excess lines.
(back)
2.4. DOUBLE GRINNER KNOT, DOUBLE UNI-KNOT
A reliable knot that maintains the carrying capacity of fishing lines more than the “Blood knot”. However, the difference in the diameters of the tied lines should be no more than 1/5.
Suitable for connecting monofilament lines and braided lines. Can also be used to attach a fluorocarbon leash to the main line.
2.4.1. Fold the two fishing lines overlapping in the same way as in paragraph 2.3.1.
2.4.2. Return the working end of one fishing line back to the place where the fishing lines are clamped and begin to wrap this end around the resulting loop and the other fishing line.
2.4.3. After making at least 5 turns, bring the working end through the loop and, after wetting the knot with saliva, carefully pull it off.
2.4.4. Perform the same operation with the working end of the other fishing line.
2.4.5. After forming two knots, pull the lines in opposite directions. The nodes will “come together” and the connection is ready.
2.4.6. After tying the knot, trim the ends of the lines, leaving 1.5-2 mm.
(back)
2.5. PETER MINENKO'S KNOT
The knot, used by the famous fisherman Peter Minenko, is designed to connect the main line and the “shock leader” in float rigs. The connection of the fishing lines is reliable, the knot is compact and passes freely through the guide rings of the rod.
2.5.1. Fold the two lines together, aligning the ends, and make a simple knot out of them. This knot is auxiliary; we leave 2.5-3 cm at the ends.
2.5.2. Using thicker fishing line, make a 10 cm long loop and pinch the base of the loop and the auxiliary knot with your fingers.
2.5.3. Form a loop from a thinner fishing line, pass it into the previously formed one and begin winding the latter.
2.5.4. Make four or five turns with the top of the loop of thin line around the thick line.
2.5.5. Pass the auxiliary knot into the resulting gap between the top of the thin line loop and the thick one and pull the connection slightly.
2.5.6. Moisten the site where the knot is formed with saliva and gently pull each end of the lines alternately until a knot is formed. Trim the ends, leaving about 1 mm.
(back)
2.6. KNOT FOR CONNECTING MONOFILINE AND “BRAID” (SHOK LEADER KNOT)
The knot “came” from fly fishing. Has a high load capacity. Quite compact and fits freely through the rod guides. It is a combination of a simple knot (monofilament line) and a Clinch type knot (braid).
2.6.1. Tie a simple edge knot using monofilament fishing line.
2.6.2. Pass the “braid” through it, tighten the knot of monofilament fishing line to the end, leaving the working end of the “braid” about 15 cm long.
2.6.3. Make 6-8 turns of the braid around the monofilament line and return the working end back, passing it through the resulting gap near the end knot.
2.6.4. Pass the braid through the resulting loop, moisten the knot with saliva and carefully pull the knot by the working end of the braid. The result is a “Clinch” type knot.
2.6.5. Grasp the monofilament and braided lines and gently pull in opposite directions. The knots will come together. Trim off the excess ends, leaving 1.5-2 mm.
(back)
2.7. ALBRIGHT KNOT
Designed for connecting fishing lines with a diameter difference of more than 1/3, as well as for tying undergrowth to a fly line. The unit is quite complex in execution, but very reliable. The unit is very compact and easily passes through the guide rings of the rod.
2.7.1. Form a loop about 10 cm long from thick fishing line and pinch it at the base with your fingers. Thread a thin line through the loop.
2.7.2. Wrap the thin line around a loop of the thick line and form a loop out of the thin line. Leave the working end of a thin fishing line 12-15 cm long.
2.7.3. Use your fingers to pinch the top of the thin line loop and the bottom of the thick line loop. Using the working end of a thin fishing line, wrap a loop of thick fishing line and the upper branch of a loop of thin fishing line.
2.7.4. Make 10-12 turns and pass the working end into a loop of thick fishing line. Make the last one smaller by pulling the free end. Moisten the knot with saliva and gently pull it by the working end of the thin fishing line.
2.7.5. Grasp the thin and thick fishing line and gently pull them in opposite directions, forming a knot gradually and adjusting the turns.
2.7.6. Trim the excess ends, leaving 1.5-2 mm.
(back) (back)
KNOTS FOR TYING A HOOK WITH A SPATULA
In most cases, hooks with a spatula are used in small numbers, so a knot on them is not so easy to make. When tying knots, the turns of the fishing line on the shank of the hook should lie in even and dense rows, without one turn jumping onto another. It is important to remember that after tightening the knot, the fishing line should be on the inside of the hook, so the shank of the hook will be like a continuation of the fishing line. It is recommended that after successfully tying a knot, apply a little waterproof glue (such as “Moment”) to the last knot.
(back)
3.1. EYELET KNOT
3.1.1. Step back 12-15 cm from the edge of the fishing line, pinch the fishing line and the hook head in this place with your fingers. Form a loop at the beginning of the hook shank.
3.1.2. Wrap the working end of the hook shank and the fishing line 8-10 times, not pulling the latter too much, but trying to prevent the turns from jumping over one another.
3.1.3. Pass the working end through the loop at the beginning of the forend and pull the line slightly.
3.1.4. Moisten the knot with saliva and, holding the working end with one hand, pull the line over the other end.
3.1.5. Gently adjust the knot by turning the line so that it comes out of the knot above the spatula. Pull again and trim off the excess line, leaving 1.5-2 mm at the end.
(back)
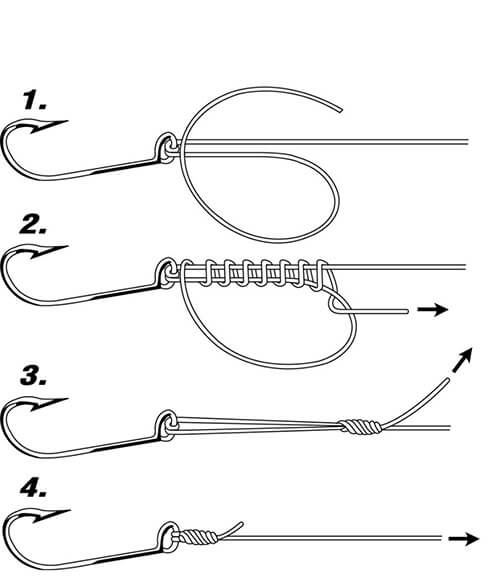
3.2. TROMBONE LOOP, SPADE END KNOT, SLIDING BAIT LOOP
Suitable for both monofilament and braided lines.
3.2.1. Fold the fishing line into a loop, leaving the working end 10-12 cm long. Place the hook at the top of the loop so that the shank is parallel to the main line. Pinch with your fingers.
3.2.2. Wrap the working end of the fishing line very tightly around the end of the forend and the main line a couple of times.
3.2.3. Gently grab the winding at the head of the hook with your fingers and continue wrapping the working end around the shank and line.
3.2.4. After making 8-10 turns, thread the working end into the loop. Pull the working end slightly.
3.2.5. After wetting the knot with saliva, carefully pull the ends of the fishing line in opposite directions.
3.2.6. The line should pass over the spatula as in paragraph 3.1.5. Cut off the excess fishing line, leaving 1-1.5 mm.
(back)
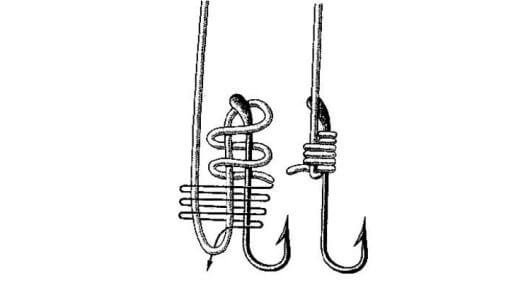
3.3. UNIT WITH EXTERNAL LOOP WINDING (TROMBONE LOOP)
The great advantage of this knot (as well as the previous one) is that there are no overlapping fibers and the more the line is pulled, the tighter the knot is tightened.
3.3.1. Make a loop from the fishing line (as shown in the diagram) 8-10 cm long, leaving a free tip of 1-1.5 cm.
3.3.2. Holding the base of the loop and the head of the hook with your fingers, with one side of the loop, begin wrapping the forearm, the main line and the other side of the loop, passing the free tip through the loop with each turn.
3.3.3. Try not to let the coils overlap each other.
3.3.4. Make 8-10 turns and, pulling the main line, make a smaller loop.
3.3.5. After wetting the knot with saliva, pull the ends of the line in opposite directions.
3.3.6. Having unfolded the fishing line correctly (see paragraph 3.1.5), cut off the excess fishing line, leaving 1-1.5 mm.
(back) (back)
KNOTS FOR TYING A HOOK WITH A RING AND SWIVELS
The only limitation for this category of knots is that it is not recommended to tie the fishing line to hooks, rings and swivels made of wire thinner than the fishing line, because a sharp bend in the fishing line in the knot significantly reduces its strength
(back)
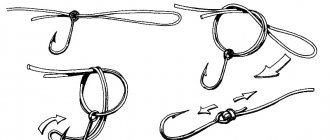
4.1. PALOMAR TYPE KNOT (PALOMAR KNOT, SWIVEL KNOT)
In my opinion, this is the easiest knot to tie. It clamps the line to a minimal extent. It is used when the main line needs to be tied to a swivel or jig head, as well as a leash with a hook with a ring. The only drawback is that the knot is not for small rings. It is also recommended for “braid”.
4.1.1. Fold the line in half, forming a loop 10-12 cm long. Pull the double line through the ring of the swivel.
4.1.2. Tie the double line in a simple knot, with the swivel inside the knot.
4.1.3. Pass the swivel through the top of the original loop.
4.1.4. Moisten the knot with saliva and tighten it smoothly. If any part of the loop comes out of the knot, tighten it.
4.1.5. Having finally tightened the knot, trim off the excess fishing line, leaving 2-2.5 mm.
(back)
4.2. IMPROVED CLINCH KNOT
One of the most commonly used knots for monofilament lines. The maximum recommended line diameter for this unit is 0.4 mm. Lines retain up to 98% of their carrying capacity in the knot. Not recommended for braids and fluorocarbon lines.
4.2.1. Thread the line through the ring of the hook. Leave the working end 8-9 cm long.
4.2.2. Wrap the working end of the tensioned main line at least 5 times.
4.2.3. Bring the working end back and thread it through the loop formed at the ring.
4.2.4. Now insert the working end into the formed top loop and pull it slightly until a knot is formed, holding the main line.
4.2.5. Moisten the knot with saliva and carefully pull up the main line, moving the knot towards the ring of the hook. Cut off the excess, leaving 1-1.5 mm of fishing line.
(back)
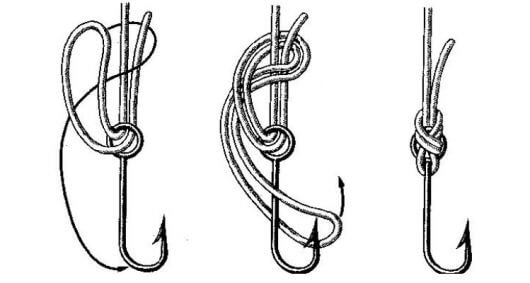
4.3 HOMER KNOT
The knot is recommended not only for monofilament, but also for fluorocarbon and braided fishing lines. Super strong knot. The smaller the diameter of the fishing line (this, by the way, is also true for other nodes), the greater the number of turns should be.
(back)
4.3.1. Thread the fishing line into the ring of the hook, leaving the working end 12-15 cm long. Form a simple loop by wrapping the working end around the main fishing line.
4.3.2. Make a simple knot using the working end. Pull the knot slightly, but do not close it.
4.3.3. Wrap the working end around the main line at least 5 times.
4.3.4. Bring the working end back and thread it through a simple knot. Moisten the knot with saliva and gently pull it by the working end and the main line.
4.3.5. Carefully pull the formed knot by the main line to the ring of the hook. Trim off excess fishing line, leaving 1-1.5 mm.
(back)
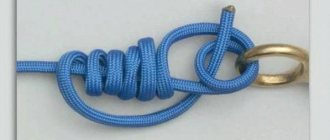
4.4 GRINNER KNOT (UINI-KNOT)
This unit has a very high load capacity. With this knot, the fishing line is tied not only to the hook, but also to the “carp” sinker (weight up to 200 g). Recommended for monofilament, fluorocarbon and braided lines.
4.4.1. Pass the fishing line through the ring of the hook, leaving the working end 15-17 cm long.
4.4.2. Fold the working end in half and pinch the top of the formed loop and the main line with your fingers.
4.4.3. Using the working end, begin winding a loop from both lower lines.
4.4.4. Make no more than 5 turns and pull the knot by the working end.
4.4.5. After wetting the knot with saliva, finally tighten it by the working end.
4.4.6. Carefully pull the knot to the hook ring and cut off the excess fishing line, leaving 1-1.5 mm.
(back)
4.5 ATTACHED CLINCH KNOT
Especially recommended for fluorocarbon and braided lines.
4.5.1. Fold the end of the fishing line in half so that you get a loop 12-14 cm long. Thread the double fishing line into the ring of the hook.
4.5.2. After pulling, you should be left with a working end 8-9 cm long.
4.5.3. Using the working end, begin wrapping the loop and main line.
4.5.4. After making at least 5 turns, pass the working end through the loop formed by the double line and pull it slightly.
4.5.5. Moisten the knot with saliva and carefully tighten the knot behind the main line.
4.5.6. Trim the excess fishing line, leaving 1.5-2 mm at the end.
(back) (back)
wobbler units
In order for the wobbler to “play” as intended by the manufacturers, it is necessary to minimally limit its freedom of movement in the water column, i.e. abandon rigid steel and Kevlar leashes, as well as winding rings, clasps and swivels made of thick wire. Wobbler units are also used in fly fishing.
(back)
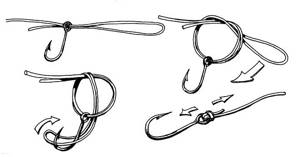
5.1. HOMER-RHODE LOOP KNOT
It is used for tying not only wobblers, but also fly fishing flies, streamers, etc.
5.1.1. At a distance of 12-13 cm from the end of the fishing line, form a simple knot without tightening it. Thread the free end of the fishing line into the ring of the wobbler.
5.1.2. Leave the working end 8-9 cm long. Pass it through the middle of a simple knot on the main line.
5.1.3. Pull the knot firmly into the main line. Gently pull the knot by the working end to form a loop 1-1.5 cm long.
5.1.4. After wrapping the working end around the main line, use it to make another simple knot.
5.1.5. Tighten the second knot with the main line, gently pulling it towards the first knot. Trim the excess line, leaving 2-2.5 mm at the end.
(back)
5.2. COMPOUND KNOT
5.2.1. At a distance of 13-15 cm from the end of the fishing line, form a simple knot without tightening it. Thread the free end of the fishing line into the ring of the wobbler.
5.2.2. Leave the working end 10-12 cm long. Pass it through the middle of a simple knot and bring it above the main line.
5.2.3. Pass the working end through the knot as shown in the diagram. Pull the working end slightly, without tightening the knot, but selecting the loop near the wobbler ring. Leave the last one 1-1.5 cm long.
5.2.4. Place the working end into the bottom gap between the branches of the line and slightly pull the knot behind the main line and the working end.
5.2.5. Moisten the knot with saliva and carefully tighten it behind the main line. Cut off the excess line, leaving 1-1.5 mm at the end.
When using this knot, you should remember that it is not suitable for very thin lines. The compressive and shearing forces inside the knot are high, so the knot is best used for “braid”, thin Kevlar and fluorocarbon leashes.
(back)
5.3. RAPALA TYPE UNIT
The advantage of this proprietary knot is that the wobbler is always in the correct position and its play is not constrained by the elasticity of the fishing line.
5.3.1. Form a simple knot 15-17 cm from the end of the fishing line. Pass its free end through the wobbler ring.
5.3.2. Leave the working end 13-15 cm, pass it through the middle of the straight knot.
5.3.3. Wrap the working end of the main line at least 4-5 times. Using the working end, pull the loop near the wobbler ring, leaving it 1-1.5 cm long.
5.3.4. Bring the working end back and pass it through the middle of the simple knot again.
5.3.5. Moisten the knot with saliva and carefully tighten it alternately by the main line and the working end.
5.3.6. Trim the excess line, leaving 2-2.5 mm at the end.
(back) (back)
AUXILIARY UNITS
6.1. KNOT FORMING A TEMPORARY LOOP FOR A SIDE LEACH ON THE MAIN LINE
6.1.1. Wrap the main line around your left index finger twice, without pulling too hard.
6.1.2. Carefully remove the coils of the line from your finger and pinch them at the base with your fingers. Form a simple loop 4-6 cm long from the main line above the resulting turns.
6.1.3. Pass the formed loop through the turns.
6.1.4. Holding the main line above and below the knot, pull it past the top of the loop.
6.1.5. Thread a leash with a stopper (say, a figure-of-eight knot) into the resulting loop and tighten it behind the main line. If the leash needs to be removed, carefully cut off the stopper on it, remove the leash and pull the main line in opposite directions - the knot will come undone.
(back)
Hook without eye
Even experienced fishermen in some cases do not have the knowledge of how to tie a fishing line to a hook if it does not have an eye:
- Place the fishing line next to the hook and wrap one side around 5 times;
- Next, we thread the same end into a loop and dip it in water, only then tighten it.
Spiral knot (Dumhof)
Designed for double braided lines.
Step knot
Designed for fixing fishing line to those hooks that have a spatula instead of an eye^
- Fold the fishing line in half and secure with a hook;
- Wrap the hook 3 times and tighten the line.
Universal nodes
In order to tie it, you need to be careful and follow the recommendations:
- Place the fishing line next to the graft and make a small loop;
- Wrap the end around the hook 6 times, wet the knot and secure it.
CanoeMan
Used on one line only and the strength is over 95%. The main thing in tying is to pull the knot correctly.
Duncan loop
- We put the tail in the ear and wrap it 4 times together with the folded ends;
- Tighten the knot.
Eugene
Equally durable on all types of materials.
Orvisknot
One of the most popular methods, which provide not only a high level of strength, but also the versatility of tying the material.
There is no professional who does not know this node:
- Pull the fishing line through the eye and insert the end through the formed loop;
- Next, we pass the formed tail through the loop three times;
- We tighten the knot, first wetting it.
Palomar
Advantages of using such a node:
- Easy to tie;
- Versatility;
- Strength.
The only disadvantages are the inability to use hooks with a spatula-shaped hole.
In addition, there are varieties of palomar:
- Triple
- Double
- Single
Rapalaknot
Rapala is one of the ways to fix baits. Can be used for spinners. When purchasing a spinner from the manufacturer of the same name, instructions for tying are included, which is a big plus. Strength is more than 90%.
Snell
A universal method with high strength.
cat's paw
From the name alone it is clear that the fixation method externally resembles a cat’s paw. The possibility of untying is only 15%.
Rib
- Fold the thread in half and thread it through the shank;
- Wrap 5 times and thread the tail through the loop;
- Wet the knot and tighten.
Knot "Palomar"
One of the simplest weaves is “Palomar”, which, despite its strength, clamps the fishing line with minimal force. This type of weaving will be useful for swivels or jig baits, and is also very convenient if the hook is made with a special ring. One drawback that emerged during the use of this weave is the fact that it is not suitable for hooks with a small eye.
To perform the Palomar, you will need a fishing line, folded in half, from which you need to form a loop at least 12 cm long and pull the base of the swivel through it.
Next, you can tie the cable with an ordinary knot, so that the center of the swivel is located inside it, and pass the swivel through the top of the previously made loop.
At the end of the weaving pattern, it is necessary to wet the fishing line so that it can be adjusted later and leave a small end of the working cable, but if any part becomes slightly loose, you will need to tighten it. The final version is ready!
Multiple hook fastening
In order to attach several hooks, you can use the options provided for eye hooks. However, there is also a special node, which will be described in more detail below.
Knot-less
It is used only in conjunction with fishing line in several layers, the strength is about 95%.
- The fishing line is threaded through the eye;
- Wrap around the axis 7 times and thread it through the eyelet again;
- Wet with water and tighten.
Appetite comes with eating, and so does the fisherman. With experience, the fisherman will have many knots that he will possess, but the leaders will be 2-3.
All nodes are subject to the following rules:
- The knot should be well remembered;
- Must be strong and not unravel;
- The tied knot needs to be wetted, then it will be much stronger;
- The knot itself does not need to be tightened too much; the external impression should remain free.
Let's celebrate! Experts recommend that all knots be wetted before tightening and that no long ends are left. By following these tips, fishermen can extend the life of their knot.