Types of knots for fluorocarbon line
Due to friction, fluorocarbon line assemblies often overheat and become damaged. To avoid this phenomenon, it is best to wet the surface of the fishing line with water. Fluorocarbonate requires a large number of weaves in the loops, with their help the knots are strong and durable.
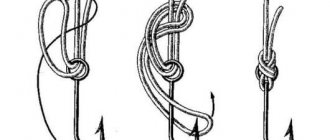
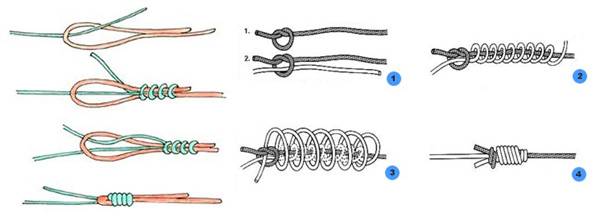
Carrot (Mahin Knot)
Most often used to attach a leash to braid. It is done in several stages:
- Make a regular knot at the end of the leash, do not tighten it all the way.
- A braid is pulled into the same knot for a length of about 15 mm. Next you need to make 10 revolutions forward and six back along the fishing line. It is best if the turns can be arranged in a checkerboard pattern.
- The resulting fastener is generously wetted with water; for additional reliability, the knot must be tightened tightly. The remaining fluorocarbonate is cut 5-10 mm above the node.
The result should be a very strong knot that is almost impossible to notice in the water.
Albright
Indispensable if there is a significant difference in the diameters of the fishing lines. It makes it easy to connect braided and fluorocarbon line. This is done in a few simple steps:
- Fold the material with a larger diameter (fluorocarbonate) in half, leaving a small loop.
- A second line is pulled into the hole formed. After a short distance, a winding is made around the loop.
- To be reliable, you need to make at least seven revolutions. The end of the thin line is pulled back through the first loop.
- The resulting fastener is tightened tightly, the excess ends are trimmed.
This combination of two materials allows you to make a fairly long leash that will be invisible to fish in the water. The diameter of the fluorocarbon line can be up to three times thicker than the second material.
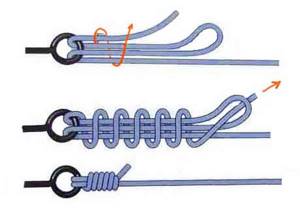
Grinner
It is considered a universal fastening method. Also used for tying a swivel to monofilament and fluorocarbon fishing line. To tie this node, you need to perform four steps:
- The end of the line passes into the ring of the swivel. For additional reliability, you need to thread at least 15 cm.
- The released tip is applied back to the fishing line. This creates a small loop. Now you need to press the loop with your finger and turn the end of the line back to the swivel.
- By passing the tip under both sides of the fishing line, make the winding further from the loop. You need at least five turns for reliability
- Tighten the fishing line, trim off any unnecessary residue with a knife or scissors.
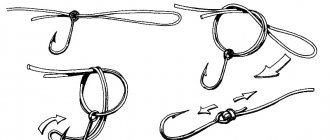
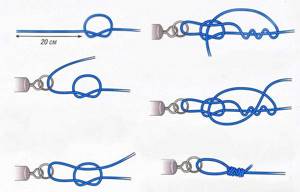
Rapala
Knots for fluorocarbon line and hook require more strength, rapala is one of these:
- A loop is tied at a distance of approximately 10 cm from the end of the fishing line. It doesn't need to be tightened.
- The tip of the fluorocarbon is threaded through the ring on the swivel and returned to the loop. The fishing line is pulled through it so that a large and small loop is formed.
- The end of the fishing line is threaded through a large loop, the fastening is tightened and cut.
For any type of knot, you need to select swivels with smooth rings without burrs or roughness. An uneven surface of the ring can damage the fishing line and significantly reduce its service life. Before tightening the knot, be sure to wet the surface of the material with water. This will reduce the negative impact of friction on the fluorocarbon.
If you do not have extensive experience tying fishing knots, it is better to practice on a regular rope. This way you won’t ruin your expensive fishing line due to inexperience.
With your own hands
It’s easy to make a fluorocarbon leash for pike fishing with your own hands. The cost of a homemade leash is five times less than the price of a store-bought one. To fluorocarbon with a diameter of up to 0.5 mm, you can attach the necessary elements, namely a fastener and a swivel, using the widely used “palomar” or “clinch” fishing knots. But remembering that knots are the weak point of fluorocarbon, it is better to make a reliable and aesthetically pleasing leash using crimp tubes, especially since tying knots with thick fluorocarbon is extremely inconvenient. For this you will need:
Tools:
- scissors;
- crimper is a special tool for crimping tubes. If you don't have one, you can use regular pliers.
Materials:
- fluorocarbon for leaders;
- crimp tubes;
- fasteners;
- swivels.
Make a leash as follows:
- Cut a piece of leader material to the required length. It should be remembered that part of the fishing line will be used in the loops, so cut off a piece with a margin of 10 centimeters. Typically, the length of leashes for pike fishing is 15-20 cm; only under special circumstances are leashes made shorter or longer.
- Thread the end of the fishing line into the crimp tube and put a fastener on it.
- The fishing line is threaded through the tube again.
- Thread the line in the opposite direction. Thus, inside the crimp tube there are three pieces of fluorocarbon. Therefore, the diameter of the tube is chosen with a margin.
- Crimp the tube carefully on all sides.
- Do the same operation with the swivel.
Knots for hooks, swivels, baits
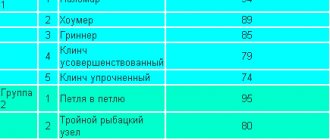
For superiority in reliability for braided fishing lines, two knots are fighting among themselves - these are Uni and Palomar. Tests carried out on different cords showed that the Palomar knot can withstand a slightly greater load compared to Uni. Next in terms of reliability is a modified version of the Clinch knot - “Improved Clinch”.
Of course, these knots are suitable for tying anything on both regular nylon and fluorocarbon fishing line.
Palomar
The Palomar knot is one of the most reliable and simple fishing knots for braided fishing line and monofilament (Palomar knot, hinged knot). Often used for tying various hooks, baits, snap hooks and swivels.
How to tie a Palomar knot:
Uel Palomar
1. We pass a loop of fishing line through the eye; 2. Using this loop we make a simple knot, but do not tighten it; 3. We pull a swivel or something that is tied through the end of the free loop; 4. The line is wetted and the knot is tightened.
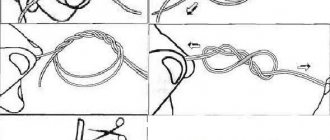
Uni, Grinner
The Uni knot (Uni), also known as Grinner, is very popular for tying various baits or hooks to braided fishing line and regular monofilament (Uni knot, Grinner knot).
How to tie a Uni knot (Grinner):
Uni Knot (Grinner)
1. The fishing line is threaded through the eyelet once or twice; 2. A loop is formed along the fishing line; 3. The free end of the fishing line is wrapped around the main line several times, passing through the loop ring; 4. The knot is moistened, carefully and evenly tightened.
Improved Clinch
The Improved Clinch knot, an improved version, is also quite common and is often used by fishermen for braided cords and regular fishing line, for tying hooks or accessories. It knits quite simply.
How to knit an improved Clinch:
Improved Clinch knot
- The fishing line is threaded into a ring;
- The free end is wound around the main line several times;
- Thread through the loop formed near the eye and back through the large loop;
- The line is wetted and the knot is carefully tightened.
How to knit a fishing knot "carrot"
Main line connection and leader shock:
It is not for nothing that the carrot is considered the most durable option for connecting the shock leader to the main fishing line. Thanks to this method, you can tie any two pieces of fishing line without any difficulties.
Since the size of such a connection is small, the knot fits perfectly through feeder and carp fishing rods, making the line several times thicker at the junction. In this regard, “carrot” is so popular.
The strength characteristics of the unit are at the highest level. There is not even the slightest chance that the line will break
The only important thing here is to make the connection correctly
There are a huge number of variations of performing the “carrot”, but it is worth paying attention to the strongest among them
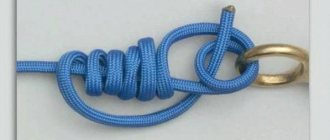
Step-by-step instructions for creating a Carrot knot
To do this, it is necessary to prepare those sections of fishing line that will be connected using this method. For example, this will be the main monofilament line and braid. So:
- At a distance of five centimeters from the end of the braid, create a standard knot without tightening it.
- Insert the main monofilament thread into the previously created loop so that it protrudes at least 15 cm.
- Carefully, fixing the loop with your fingers, wrap the main line around the braid at least ten times. In this case, the winding should be done evenly, moving along the entire braid, forming a pigtail.
- Then you need to hold the end of the braid and make reverse turns, but in the opposite direction.
- After completing ten turns, secure the loop. In this case, it is necessary to wet the connection to increase the strength characteristics of the unit.
- This connection is particularly sensitive to line burnout. Indeed, at the moment of tightening, a powerful load may occur on the monofilament thread, especially if the connection was tightened incorrectly.
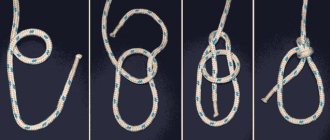
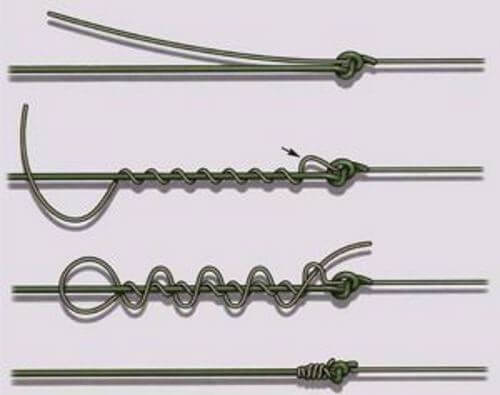
Below is a diagram of the step-by-step connection of the fishing lines.
Proper tightening of the “carrot”
It is recommended to grab both ends and pull evenly. At the same time, the turns of the monofilament are carefully advanced in the direction of the knot. Move the coils with your thumb and forefinger to tighten the connection with ease and accuracy. It is definitely necessary to wet the knot.
After completing these manipulations, we will have two extra ends. Moreover, the end of the monofilament thread is cut to the very base. Whereas the braid can remain visible no more than 3 mm. The reason for this is considered to be its tendency to fluff up.
In the event that in the future there are plans to glue the knot joint to achieve ideal smoothness, you can cut the braid to fit the base
But this operation should be performed with extreme caution and accuracy. Since scissors can damage the villi of the shock leader, worsening the strength characteristics of the “carrot” knot
What are the main mistakes fishermen make?
- do not wet the knot, which leads to burnout of the monofilament;
- tighten the connection without advancing the turns;
- make few turns;
- the turns are performed not in the form of a pigtail, but as it turns out;
- They fix the knot even before making turns and inserting a monofilament thread into the loop, and much more.
How to increase your fish catch? ">
Over 7 years of active fishing, I have found dozens of ways to improve the bite. Here are the most effective ones:
- Bite activator. This pheromone additive attracts fish most strongly in cold and warm water. Discussion of the bite activator “Hungry Fish”.
- Increased gear sensitivity. Read the appropriate manuals for your specific type of gear.
- Pheromone-based lures.
Basic mistakes when tying a knot
We have already discussed how to tie a carrot knot above and I hope that everyone understands, but now I think it’s time to talk a little about the mistakes that fishermen make very often. To avoid any surprises while fishing, you need to know about them.
- Fishermen do not wet the knot before tightening
, and this leads to burnt line and increased wear of the material. - The coils are not moved by the hooks during tightening
, and this leads to uneven tightening. - Few turns are placed
(about 20 of them are needed), which leads to spontaneous unraveling of the knot. - The turns are not wrapped evenly
, and as a result, the knot turns out crumpled and loses its strength. - Very often, anglers forget to wind the turns in the opposite direction
. - Thread the fishing line into the loop from the reverse side
, but you need to use the one from which the fishing line came out in the second knitting step.
fishermanblog.ru
Description and purpose of the “Carrot” node
Many fishermen have come to the logical conclusion that “Carrot” is the best choice when you need to firmly connect a braided line to a monofilament line. In addition, it is small in size, so during fishing it will not touch the rod rings.
If you have never used this unit before, information about its features, advantages and disadvantages will be extremely useful to you.
Features of application
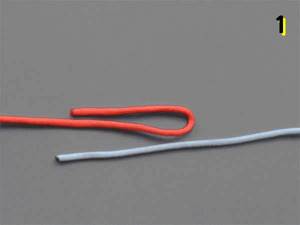
This type of connection is most often used to connect the shock leader to the main line. Every experienced fisherman knows that the type of connection is selected depending on the types of fishing lines that should be connected (Figure 1).
To firmly connect the braided cord and fluorocarbon or monofilament, you should use only “Carrot”. This is explained by the fact that the cord and fishing line have different surface hardness and slipperiness, so any other connection method will not be effective and sooner or later it will come undone.
The “Carrot” fishing knot is often used to tie the leader’s shock when fishing for carp. This is explained by the fact that it is small in size, easily passes through the rings of carp rods and thickens the line at the tying site by approximately two times.
Figure 1. This type of connection is used primarily by fishermen
Despite the fact that there are other similar methods for connecting fishing lines of different diameters (for example, Albright or Bloody knots), it is the “Carrot” that is considered the simplest and most universal means of firmly connecting gear.
Pros and cons of the node
Like any other fishing knot, the “Carrot” has certain advantages and disadvantages that must be taken into account (Figure 2). Let's look at the pros first:
Let's look at the pros first:
- Strength:
this concept means that the threads at the point where they are connected to each other will not break. However, a rupture can occur on any other part of the tackle, and the fishing line or thread with a lower breaking load will break first. - Lack of spontaneous unraveling:
if the knitting was done correctly, the “Carrot” will never unravel on its own. The only thing that can happen is a weakening of the connection, but in this case it will be enough just to tighten the threads and the strength of the structure will be restored. - No slipping:
the knitting pattern itself is such that the line will almost never slip out of the knot. - Small size:
when ready, the knot is extremely compact, so it can easily pass through the rings of a spinning rod, feeder or carp rod. - Simplicity:
despite the fact that outwardly it seems quite complex, it is simple to knit, since the pattern does not contain any complex weaves. However, it should be borne in mind that in the process it is necessary to strictly observe the accuracy and precision of movements so that the finished structure has the correct shape and has sufficient strength.
Figure 2. The main advantages of “Carrot” are strength and durability
However, this extremely durable and versatile unit does have some drawbacks, but fortunately they are few. First, the connection wears out over time. If you do not correct it in time and tighten the ends, the entire structure will have to be redone.
Secondly, the knitting itself requires certain skills and care. Only in this case will the design be strong enough and compact, but you will always have the opportunity to practice knitting.
Knitting pattern
Despite the fact that outwardly connecting two different lines using “Carrot” looks quite complicated, its knitting does not present much difficulty. The only thing that needs to be taken into account is attentiveness and precision of movements. If you rush too much, the structure will not be strong enough or too large, so it is better to be patient in advance.
The pattern for knitting “Carrots” is quite simple, but if you do not have skills in this lesson, we will provide detailed instructions for performing such a connection step by step.
Advantages and disadvantages
All connections have advantages and disadvantages, pros and cons, and this node is no exception. Let's take a closer look at all the advantages and disadvantages of a fishing knot, and then look at the most common mistakes that fishermen make when tying a knot, because not everyone knows how to tie it correctly.
Advantages
The node has several advantages over others.
- it has high strength;
- practically free of slippage;
- the probability of spontaneous unraveling is minimal.
Flaws
But the knot is not ideal; it also has disadvantages, albeit minor ones.
- the knot wears out and needs to be re-tied frequently;
- knitting it is quite long and difficult.
Proper knot tightening
The carrot knot is very strong and versatile, but only if it is tied and tightened correctly. We have already talked about how to tie it correctly, now let’s look at how to tighten the knot correctly:
- The first thing to remember is that the knot is tightened only after all the turns of the fishing line have been wound in the opposite direction from the loop;
- When tightening the knot, it is necessary to pull both working ends simultaneously, applying the same force;
- Move the knot very carefully so that it is tightened gradually and evenly;
- Both ends of the assembly, as well as the connection itself, must be moistened before tightening.
Once the fisherman's carrot knot has been tightened, you can trim off the excess line completely, although some recommend leaving about 2 millimeters of line on the shock leader side. However, if you glue the knot with waterproof glue, then it is best to cut off the excess braid or fishing line completely.
In addition, after tightening you will still have a couple of extra ends. It is best to cut this pair of ends right at the base so that they do not interfere with casting, otherwise constant tangling of the braid and line is guaranteed.
The main thing is to very carefully cut off the excess so as not to damage the base of the braid with scissors and not to violate its integrity, otherwise your shock leader, or any other connection, will lose most of its strength. And this is not the most pleasant thing.
How to knit correctly
Tying a fishing carrot knot correctly is quite simple. All you need is two pieces of fishing line, braid or cord and a basic knowledge of the tying sequence. This is what we will talk about below.
- do not need to tighten it
yet . - Now you need to thread the working end of the other fishing line through the resulting loop and pull it about 20-25 centimeters.
- Now you need to make about 10 turns around the loop, as shown in the diagram below. Fold the coils evenly and tightly, making sure they do not intersect
. - After you have made 10 turns, you need to turn the line over and start laying turns in the opposite direction, the number should be the same as in the previous paragraph.
- Now you need to pull the working end through the loop and tighten it.
- The carrot knot is ready, all that remains is to trim off the excess fishing line.
Don't forget about the basic rules for tying fisherman's knots. Be sure to wet the knot before tightening
. Now I suggest watching the video and moving on to the instructions on how to properly tighten the knot, because its strength directly depends on this.