What is a clinch and what is it used for?
The clinch fishing knot is the most popular among fishermen around the world. It is used for tying:
- hooks;
- spinners;
- jig heads;
- wobblers;
- swivels;
- carbines;
- flies, etc.
But why is the clinch knot so good? The fact is that, in addition to versatility, it has very high strength (about 95%), which most other units are unlikely to boast of. The clinch knot can withstand up to 10 kilograms of rupture, naturally, if the fishing line or cord allows it.
Of course, it also has disadvantages - not all of its varieties are suitable for braided fishing line, as well as fishing line with a cross-section of more than 0.4 mm.
Advantages and disadvantages
The described node, like any other, has a number of advantages and disadvantages. Now we will look at them in more detail. I think it's better to start with the good
. Let's move on to consider the obvious advantages that are visible at first glance:
- It is very easy to knit;
- Indispensable for mounting hooks and lures with a large eye diameter;
- Ideal for thin and medium line.
But it was not without its drawbacks. The clinch knot has quite a few of them, but many fishermen consider them trivial (me included). And so, the disadvantages
node described above:
- Not suitable for thick lines (diameter greater than 0.4 mm);
- On a smooth braid, the likelihood of unraveling is very high;
- If you need to attach a sinker or any other accessory with a longitudinal hole, then the knot will not work. You simply won't be able to tighten it.
Despite all the shortcomings, the knot is used by many fishermen, most likely this is due to its simplicity and high strength (compared to other simple knots). And the unit has a lot of improvements, so you can close your eyes to the shortcomings.
If you are tired of reading, then you can watch a video about how people learn to knit a double clinch knot. The British call it Double Loop Clinch Knot; by the way, this name is used quite often among our fishermen.
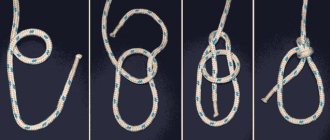
How to tie a clinch knot
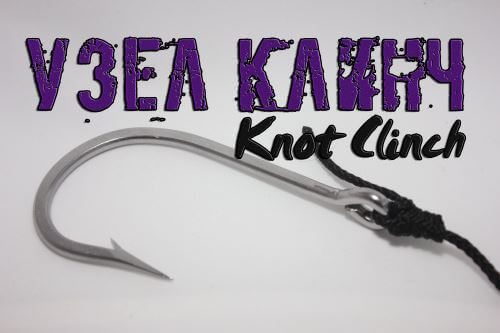
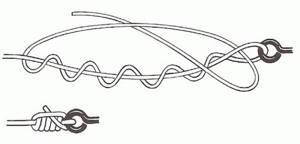
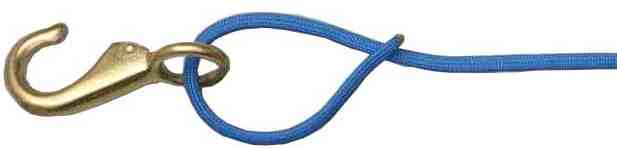
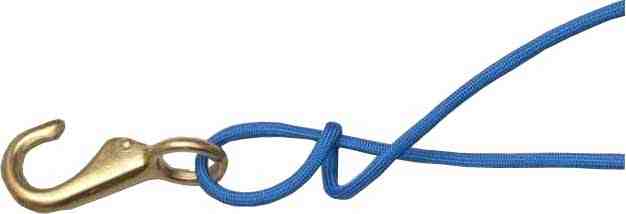
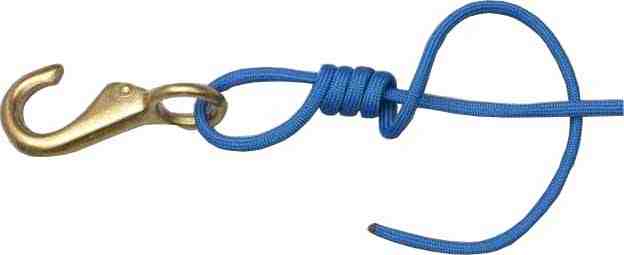
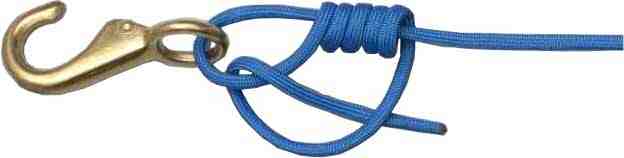
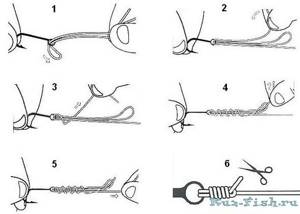
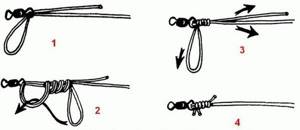
First, let's look at how to knit a simple knot for attaching a hook with an eye. We take a piece of fishing line, pass one end of it into the eye of the hook and return it back, folding the fishing line in half. Holding the hook with one hand, we wrap the fishing line with the same end, making 4-5 turns around it. Next, we pull the working end into the loop formed near the very ring of the hook. After this, it is necessary to moisten our structure with water and tighten the clinch knot, stretching the ends of the fishing line to the sides. We cut off the working end, leaving 1-1.5 mm.
This is interesting: Wolfberry: a poisonous plant
Stop Clinch
Stopper nodes are used to limit the amplitude of movement of the sliding float along the fishing line. They are usually knitted not from monofilament fishing line, but from thin braid or ordinary woolen thread.
The locking clinch knot is knitted in the same way as usual for tying a hook. We fold a piece of braid or thread in half and place it on the main fishing line so that it is in the middle. Holding the top of the thread and the fishing line with your hand, we wrap one end around them 4-5 times, after which we return it to the beginning and thread it into the loop formed by the top of the thread folded in half. We wet the knot with saliva or water, and then carefully tighten it. Be sure to trim the ends, leaving 1.5-2 mm.
Varieties
How to knit a loop on a fishing line for a leash
Fishermen have developed several versions of the most popular of the knots, depending on the required fastening:
- simple knot,
- locking,
- improved clinch,
- double clinch,
- hardened
Below we will look at how to knit each of these fisherman's knots.
Simple clinch
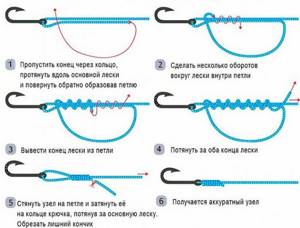
Simple is just that: simple. To do this you should proceed as follows:
- We thread the tip into the ring of the hook, bait or swivel.
- We hold the line at the ring and make 5-6 turns around the base.
- We return the end and thread it through the loop near the ring.
- Now we pass into the newly formed loop.
- Wet and tighten.
A detailed diagram of how to knit a clinch will help you master the knot. Attention! By wetting the knot, we cool the future connection and prevent the line from losing its structure.
Stopper
Stopper knots limit the movement of sliding long-range floats by mounting running equipment. Now Chinese plastic beans are used for this, but suddenly such an element is not at hand, then the clinch will help out.
When knitting a stopper, we use the technology of knitting a simple clinch.
- You should start tying it by folding a piece of fishing line 10-15 centimeters in half, in a kind of loop.
- Then we attach it to the main fishing line.
- With the long end of the loop we make several turns around the formed structure.
- At the last stage, we thread the tip into the original loop.
- Wet and tighten. Trim, leaving tails of 1-2 centimeters.
Leaving the tails on will allow the stop clinch to easily slide through the guides of the rod when casting. If you leave the tips of the usual length, one and a half to two millimeters, they will knock on the rings and make casting difficult.
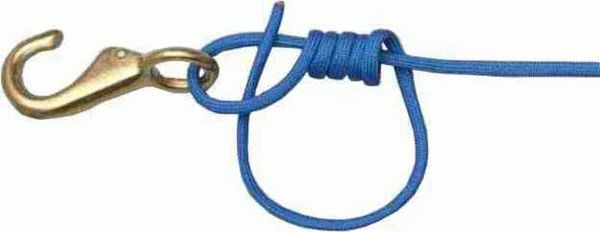
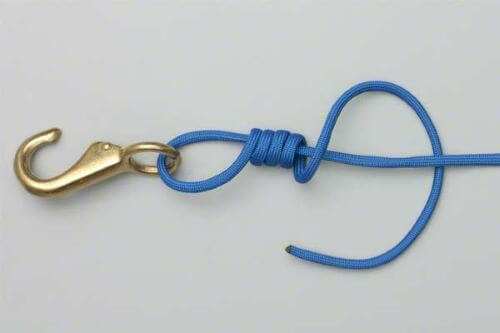
Improved
The improved clinch is used even when attaching anchors, it is so strong, the figure reaches 97 percent! The only drawback is that it cannot be used on a braided cord.
It is knitted like a simple one, only repeated twice. To do this, the initial end of the fishing line is made two to three times longer. After finishing tying a simple knot, as in the example above, the end is again threaded into the loop of the bait or hook, and all manipulations are repeated.
Advice! When cutting the tip of the fishing line, leave approximately 1.5-2.5 millimeters. This will prevent the knot from coming undone during operation.
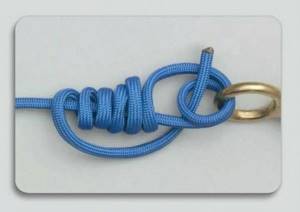
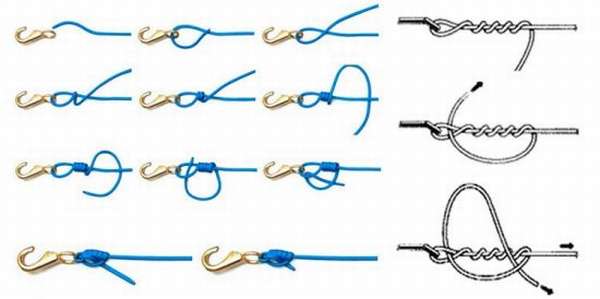
Double clinch
The double clinch knot differs from the simple one in that at the beginning of tying the end of the fishing line is folded in half and passed through the ring. The remaining manipulations with the connection are similar. Details can be seen in the diagram below.
The double clinch is thicker, but also more durable.
Hardened
This type of clinch is recommended for use with fluorocarbon and braided lines. The reinforced version is a little more difficult to knit, but it is worth it with the specified fishing threads.
- Fold the end of the fishing line in half and thread it through the ring of the hook about five centimeters.
- We orient the resulting loop along the base.
- We make several, preferably at least six, turns around the resulting triple fold with the working end.
- We insert the tip of the fishing line into the original loop and tighten it after wetting.
Advice! It is better to study fishing knots not on a fishing line, but on a thick cord. This will allow you to feel the connection, and it will be much more convenient to work with such material.
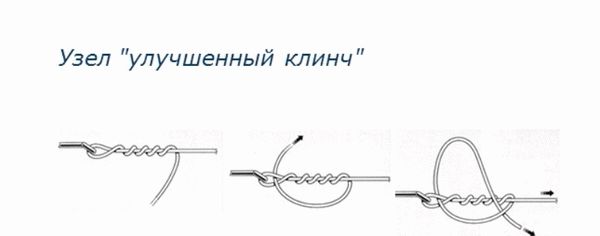
Improved clinch knot
This knot is an improved version of the simple one. It is quite popular due to its high reliability. Its strength is about 97%. Boat anchors are often tied with such knots.
The process of tying such a knot is simple - it is a double repetition of a simple clinch. Now more details. We pass the working end of a piece of fishing line through the ring of the hook, return it back and wrap the other end with 4-5 turns. Next, we thread the end into the loop near the eye of the hook, but do not tighten it, but repeat the process, wrapping the line again. Having made 5-6 turns, we return the edge of the fishing line to the loop located near the eye of the hook and, after wetting the knot, carefully tighten it. We cut off the remaining fishing line, not forgetting to leave 1-1.5 mm.
This knot has only one drawback - it is not recommended for use with braided fishing line.
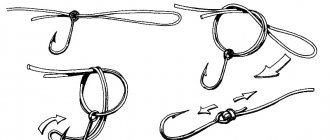
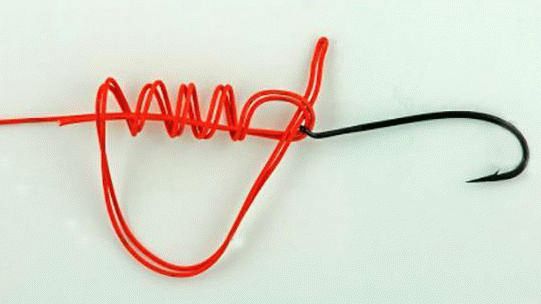
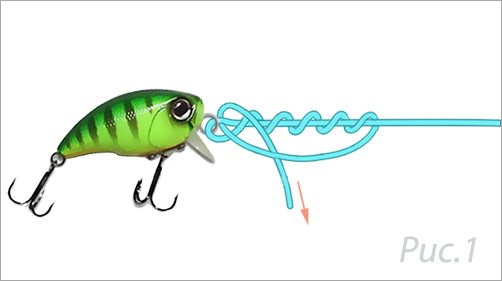
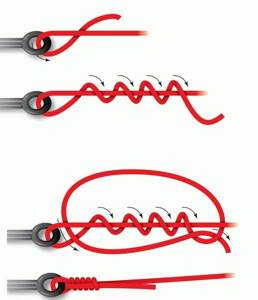
The principle of knitting the “Reinforced Clinch” knot
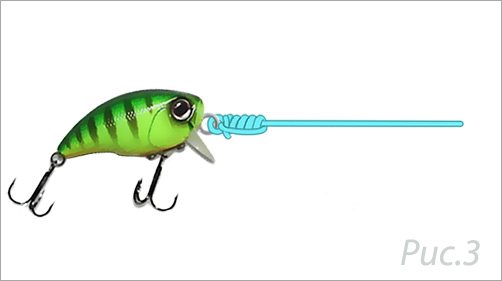
Let's look at the example of attaching a wobbler to the main core of a spinning tackle.
The knot is knitted in the same way as a regular “Clinch”, only it has a continuation. After pulling the end of the fishing line into the loop, it is not tightened, but passed into the loop formed by it with the spiral (Fig. 1.).
After which, just as in the previous diagram, we tighten the working end, wet the connection and, holding the bait with one hand, tighten the knot by the main core with the other.
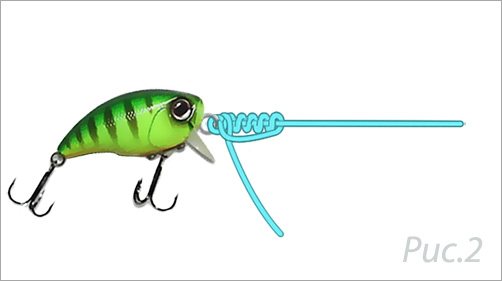
We cut off unnecessary fishing line. That's it, the node is ready.
All the best, see you again.
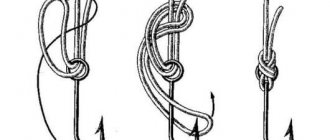
Hardened Clinch
A reinforced clinch is used to secure hooks when there is a possibility of high stress on the connection. Recommended for fluorocarbon and braided lines. Has a strength of about 95%.
We bend a piece of fishing line in half and pass the top into the eye of the hook. After pulling the line, we fold it back so that the loop we have formed lies on the main thread. We wrap the working end around this “tail” 5-7 times and pull it through the loop. We wet the knot formed with water and slowly tighten it, pulling the hook and the end of the fishing line in different directions. Trim the end, leaving 1-1.5 mm.
Uni node
The uni knot is used in situations where the fishing line does not fit into the eye. This may be due to the fact that the eye is very small or the line is too thick. The uni knot is not easy to perform, so you need to train your hand.
To complete it you will need:
- the fishing line is pulled through the eye of the hook and a loop is formed:
- the tip of the fishing line is wrapped around the main fishing line several times;
- form another loop:
- the tip of the fishing line is pushed through the first loop;
- make 5-7 turns around the fishing line;
- wet the line and tighten;
- cut off excess.
{banner_vnutri-kontenta-3}
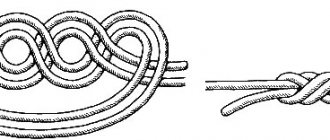
Double clinch
The double clinch knot is also designed for tying hooks, carabiners and various baits that can be subject to heavy loads. It is a little more complex, but stronger. In addition, a double clinch knot can be knitted either from monofilament thread or from braided fishing line. It does not stretch at all and does not lose its density.
This is interesting: Pilaf over a fire in a pork cauldron
We pull the working edge of the fishing line through the eye of the hook and thread it again so that we get a double loop. We wrap the working edge around the fishing line 5-6 times, after which we pass it through our double loop. We wet our knot with water and tighten it, stretching it by the ends. We cut off the remaining fishing line, leaving 1-1.5 mm.
You may not be able to tie a fishing knot the first time, especially if you practice on a fishing line. Therefore, it is recommended to carry out the first training sessions on a regular lace. It is much more elastic than fishing line, and it is easy to untie.
Types of node
Single improved clinch
| Thread the running end of the fishing line into the loop of the hook or swivel. |
|
| Wrap the running end of the line around the main end. |
|
| Make no more than 4-5 turns of the running end around the root end of the fishing line. |
|
| Thread the running end through the loop through which the eye of the hook or swivel goes. At this step the single clinch is tied. |
|
| An improved clinch is completed by threading the running end into the final loop formed. |
|
| Wet the knot and pull the ends of the line. The reinforced clinch knot is ready! |
|


The reliability of the improved node is much greater than the reliability of a simple node, which reaches 97%. Thanks to this feature, boat anchors are tied with such knots.
This type of knot has an important drawback; it is not recommended for use with braided fishing line.
Double clinch
This connection is used for attaching various types of baits, as well as carbines, which experience heavy loads during fishing. The knitting itself is complex, however, the knot is stronger than a simple single clinch. The knot can be knitted from either braided or monofilament fishing line.
| The method of tying a double knot is the same as that of a single knot, except that the fishing line is initially folded in half and all steps are done on a double fishing line. |
What is attractive about this kind of knots? First of all, they have a fairly significant density and do not stretch.
Stop Clinch
Knots of this kind are used to mark the area of movement on the float line. For stop knots, thin braid is usually used rather than monofilament line.
For stopper knots, regular wool or cotton thread is often used. This is a simple type of knot, it resembles the same knot that is used to tie a hook:
| We fold a piece of braid onto the main line in half so that it remains in the middle. |
| The fishing line and the top are held and wrapped several times, then we thread it into the loop. |
| Before tightening the knot, moisten it with water. |
Improved Clinch
- The fishing line is folded in half and passed through the eye of the hook or leash;
- Take the running end;
- Wrap around the root part of the fishing line 5-7 times;
- Push the running end into the starting loop;
- Wet the knot and tighten it;
- Cut off the excess running end.
How to tie a clinch fishing knot
The clinch fishing knot is used by fishing enthusiasts for spinning. It has two methods of execution: normal and enhanced. These knots make it possible to quite firmly and quickly attach any special fishing accessory to the fishing line, which has an eyelet made of wire or a metal profile.
The clinch fishing knot is used by fishing enthusiasts for spinning rods.
Facts about the node
- The strength of a single clinch fishing knot is quite impressive and is as much as 95% of the strength of fishing line or braid. It can withstand a maximum load of 10 kilograms.
- It is very often used for mounting sinkers and feeders.
- To avoid deforming the line, be sure to wet the knot with water before tightening.
Fishermen, who have more than one year of fishing experience behind them, try to choose a certain type of knot for individual needs and for each type of fishing line. Sometimes it comes to the point that the knot behaves completely differently on the same fishing line, differing only in diameter.
Therefore, you need to remember one thing: there is no universal node
, for each type of fishing line and specific installation case it is different. It all depends on your practice, love of experimentation, and of course experience. Even if you are tightly hooked, with the right approach you can protect the bait and fishing line.
When should you not use the clinch knot?
If the eye of the bait or any other part (for example, a sinker or tee) has a fairly large diameter, or there is no eye at all. In this case, the knot will untie quite quickly, and spontaneously. So it is not recommended to use it when it is necessary to install such parts.
It is necessary to use a clinch knot only for fastening parts with an eyelet made of thin wire. You should not tie baits with a double winding ring with such a knot, as it is quite thick and it can unravel.
How is the clinch used?
This type of fishing knot is widely used in spinning fishing, where it is used as a device for tying bait, which must be changed frequently during fishing.
Many novice fishermen use a carbine for this. However, as practice shows, it reduces fishing rates. It is very difficult to catch such wary fish as grayling or trout using a carabiner. A regular clinch is used to secure a sinker to a fishing line when assembling deep-water and spinning tackle. It has a strength of 80-90%. The strength of the reinforced one is 95-98%, it makes it possible to save gear when it gets caught on various objects. This often happens when the river current is strong. In this case, an ordinary knot can come undone.
If high structural strength is required, for example, with a strong current in a river, then an improved clinch is used, since it does not come loose and does not cause losses. However, if the breaking load is higher than the standard, the line may break both at the knitting point and elsewhere.
Therefore, fishermen who do not have sufficient experience are advised to use a conventional knot.
Using known methods, you can easily learn how to knit a double clinch knot and a regular one, which will help many amateur fishermen do what they love
Both types of these knots are firmly attached to any type of fishing line:
The designs are simple to implement. It is not at all difficult for a novice fisherman to remember the technique for performing them. They are used with:
- sinkers;
- artificial baits;
- hooks;
- jig heads;
- feeders;
- swivels that have an eye made of profile or wire.
This is interesting: Do-it-yourself ice pick for winter fishing: drawings
In this case, the diameter of the ear should be no more than 1.2 mm due to the fact that the knot will hold weakly on a larger ear.
This design is not used for tying sinkers with a through hole of a transverse or longitudinal configuration, for rings, tubes and other similar devices.
How to knit a regular clinch?
How to knit a regular clinch? For example, a fisherman needs to tie a sinker to the fishing line:
- You need to thread the thread through the eye, while stretching 15 cm through it. Then they wind this section onto the main fishing line in a spiral, making 5 turns around the fishing line.
- Thread the thread into the loop that is created in the area where the main line bends. Use the fingers of one hand to tighten the loop, and with the other hand hold the thread so that its turns do not overlap one another and their sequence is not disturbed.
- This knot should be slightly wetted with water to make it easier to work with.
- Hold the sinker and pull it onto the main line.
This completes the knitting of a regular knot.