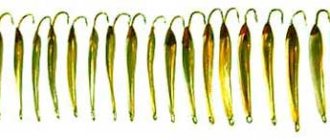
The winter spinner Maropedka is a vertical type bait for catching perch and other predatory fish from the ice in a vertical position. Since 2014, after information about the catchability of the spinner was leaked, the popularity of the spoon has only grown every year.
The Maroped has everything it needs to gain popularity among fishermen who are interested in winter fishing:
- a strange but memorable name - “maropedka”;
- simple design that allows you to make a spinner at home;
- catchability for perch, both pike and pike perch are caught;
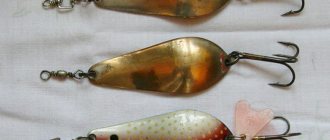
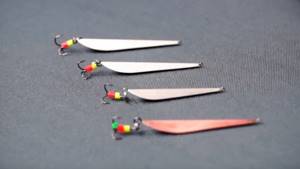
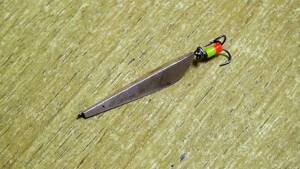
Maropedka - a simple but catchy spoon
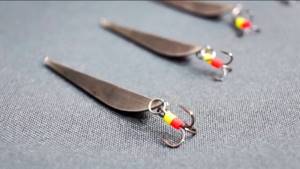
As we have already said, the Maroped is an incredibly simple, but very catchy spinner that collects fish like a “vacuum cleaner.”
The author of the spinner and the very name “maropedka” is a fisherman-sportsman, the Champion of Russia in winter spinners - Alexander Vorobyov, aka “Technologist” on the Internet. Taking as a basis the spinner of Vladimir Matveychikov, the elements of the spinner “rhombus” and “torpedo”, and combining the names of these spinners, we got “MaRoPedka”.
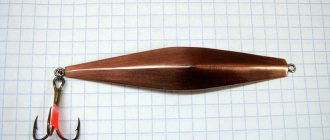
Winter maropeds are made in sizes from 30 mm in length, with wings turned at angles from 90 to 120 degrees. For catching perch at shallow depths, the most catchy ones are 35 - 40 mm long with wings bent at an angle of 90 degrees. For fishing at greater depths, more weight of the spoon is required, and for this, the length of the spinner and some proportions must be changed.
Making our own spinner “Maropedka”
Each angler can make a spinner in different ways, making some of his own changes during production; there are several schemes for making such a spinner, here is one of the options:
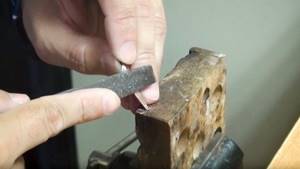
- — we take sheet metal, cut out a rectangular blank from it, choosing the desired width and length, it will be the crown of our spinner;
- - markings should be applied on a metal plate, we make a center for bending, the widest part of the spoon, lines are drawn for cutting, in this case you can easily cut off the tail part of this workpiece, and the workpiece will become trapezoidal in shape;
- - next, you should place the workpiece in a vice exactly in its center, using light blows with a hammer on the base, you should slowly bend the plate until it stops, in our vice to a right angle of 90 degrees, then the plate is turned over and the operation is repeated on the other side;
- - then, using scissors for cutting metal, the excess is removed according to the markings, while it is necessary to leave some margin for rounding on the head part, using a file to smooth out all the irregularities;
- — you should heat the plate with a soldering iron and apply a thin layer of solder to the inside, while simultaneously applying acid;
- — you should solder the ears, fill the crown itself with tin;
- — then again take a file, a needle file, level everything, and grind it using sandpaper;
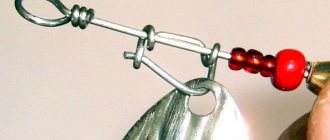
- — using a winding ring, a tee is mounted.
Tips for making the Maropedka spinner
- If you need to make more than one such lure, it is better to make a template out of paper, which is applied to the plate and traced with a pencil.
- In the case when the metal plate is made of flexible metal or simply thin, then it can simply be bent in half and cut along its contour, and then bent using a vice to an angle of 90 degrees, thus achieving complete symmetry.
- The fact is that the narrower the wings of a given spinner, the more stable its play will be, but at the same time it will dive strongly to the side.
- Since copper or brass can oxidize quite quickly, they can be coated with a thin layer of waterproof varnish.
Do-it-yourself Maropedka
Maropedic is easy to make with your own hands. Thanks to its simple shape, this lure is quite easy to manufacture; no special metalworking skills are required. Below we will show a drawing of a maroped, sketches of this spinner and what the result is. In addition, all the dimensions and manufacturing process of the spinner can be seen in the video.
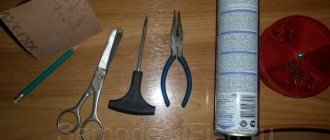
To make a spinner we will need some tools and materials.
Tools:
- Soldering iron;
- Bench vice;
- Metal scissors;
- Pliers;
- Metal file, needle files;
- Sandpaper;
- Ruler and caliper.
Manufacturing materials:
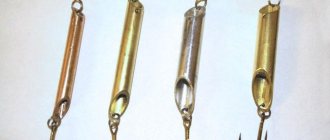
- Sheet metal with a thickness of 0.1 – 0.5 mm (copper, bronze, brass, stainless steel);
- Lead-tin solder grade POS-60 or other;
- Phosphoric acid or other flux for etching during soldering;
- A pair of hooks for the eyes of the spinner. Instead of hooks, you can use nichrome wire or stainless steel. Wire ears are formed using pliers.
The process of making a maropedka
The progress of the work may be different at some points; different people make the maropedka in different ways. Here is one of the manufacturing schemes:
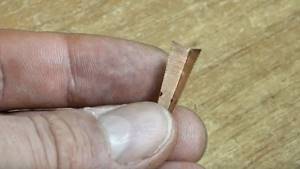
- Crown preparation. From sheet metal we cut out a rectangular blank of the required length and width, which will be the crown of the spinner.
- Marking. We apply markings on the metal plate - the center for bending and the widest part of the spoon, and draw cut lines. You can immediately cut off the tail part of the workpiece, the plate will become trapezoidal in shape.
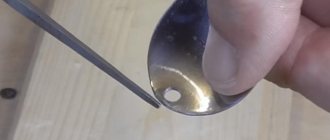
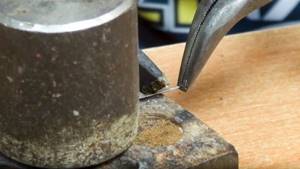
- The bend of the spinner. We clamp the plate in a vice exactly in the center. Lightly hit the base with a hammer and bend the plate until it stops in a vice - 90 degrees. Turning the plate over to the other side, we repeat the operation. If the metal is thick, to avoid unnecessary deformation of the plate from hammer blows, you can use something wooden as an intermediary. A thin plate can be bent using the force of your fingers and finished with hammer blows. The thinner the metal, the more distinct the edge of the crown will be.
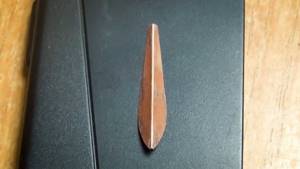
- Trimming and straightening. Using metal scissors or strong regular scissors, cut the plate according to the markings, leaving a margin for rounding in the head part. We remove the unevenness with a file and bring it almost to an exact match to the template. The final part of the adjustment will be after soldering.
- Tinning the crown. We heat the crown with a soldering iron and apply a thin layer of solder on the inside using acid or other flux.
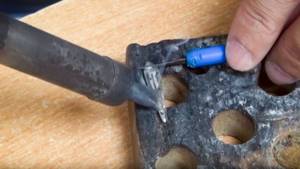
- Soldering maropedka. We solder the ears and fill the crown with tin. Before soldering, the crown must be conveniently positioned. This can be done in a wooden block with a cut for the sharp edge of the spoon. We press the workpiece against the block with something heavy and begin soldering the ears from the tail and head of the spinner. After fixing the ears, completely fill the crown of the spinner with solder.
- Final processing. Using a file or needle file, remove excess solder, align all edges of the spinner, and sand with sandpaper.
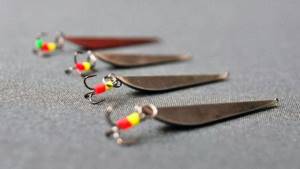
- Installation of a tee. Through the winding ring we install a tee with a droplet or decorated with pieces of colored cambric.
It is better to watch the process of making spinners of the “maroped” type in the video. The first video from this list shows how the author of the spinner, “Technologist,” makes this spinner.
Subtleties and useful tips in manufacturing
- For precision in manufacturing, especially if you need to make many identical lures, you can use a paper template. It is glued onto the plate and, guided by it, they are trimmed and finished with a file. It is more convenient to use paper with adhesive backing.
- If the metal plate from which the maroped is made is thin and the metal is plastic, you can bend it in half and then cut it along the contour. File the edges. Bend the plate to 90 degrees using a vice. This results in complete symmetry.
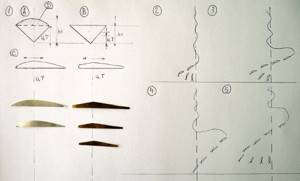
- The short and long parts of the spoon from the widest part can be calculated as the golden ratio of the total length. The approximate ratio is 0.62 on the larger side and 0.38 on the smaller side - from the head of the spoon. Accurate calculation of the golden ratio - calculator.
- The narrower the wings of a spinner spoon, the lighter it is, the smoother and more stable the game, and the greater the diving to the side.
- The smaller the spinner, the heavier the solder should be; large spinners use pure tin.
- Copper and brass quickly oxidize, and the spoon loses its metallic luster; to prevent this from happening, it can be coated with a thin film of waterproof, colorless varnish.
Spinner setup and refinement
After the spinner is made, you need to check its operation in the water and, if necessary, adjust its play. The game of the spinner can be fast or smooth, it depends on the weight of the spoon. The maropedic woman can glide, but must not fall flat. If the spinner does not work properly, it needs to be modified.
The instability of the maropadic game may be due to its sphericity on the solder side (D). In this form, the spinner works normally only with a certain wiring - at the lowest point it will move a short distance from the center (2). If you remove excess tin (D) and make this edge flatter, the play of the spinner will become more stable.
Achieving complete repeatability of the desired game from a homemade spinner is easier than from some other spinners, but this is achieved with experience. Simplification of the already simple shape of the bait allows you to achieve the desired result in almost every lure.
If you need more variety in the game with different drives, you will need to experiment with shifting the center of gravity in the longitudinal and cross sections. Read more about such settings here.
Maropedka 40 mm or more
Initially, the maroped spoon was designed for catching medium-sized perch in winter lure competitions and had dimensions ranging from 30 to 40 mm. Then, attempts were made to adapt the spoon to catch larger perch at greater depths.
Experiments with larger lures have shown that the spoon becomes too heavy. As the length of the spoon increases, the spinner gains weight disproportionately faster, and the nature of its play and catchability changes. Therefore, with an increase in the size of the spinner, when making a spinner, lighter solders are used that do not extend beyond the cut of the crown, and the longitudinal center of gravity shifts closer to the middle.
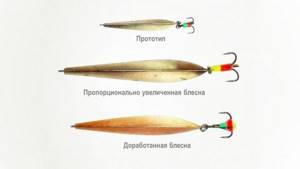
In general, changing any parameter of a spoon always entails a change in its behavior in the water. The game changes, and the fish’s reaction to the bait—the catchability of the spoon—changes. The ability to give a spinner the desired action is the pinnacle of mastery in spinner making.
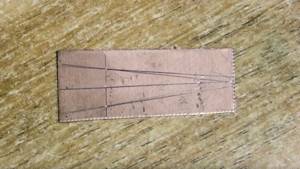
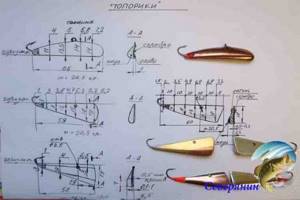
Drawings and sketches of the Maropedka spinner
Finding a ready-made detailed drawing of a maropede is not so easy. They simply don't exist. Those who are engaged in the construction of spinners make drawings and sketches of spinners only for themselves, realizing that ideal proportions do not exist. But the approximate parameters of the Maroped are known, and they are shown in the video above.
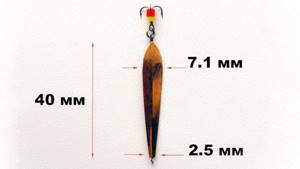
Maropedka 40 mm
Spoon templates 35 and 40 mm
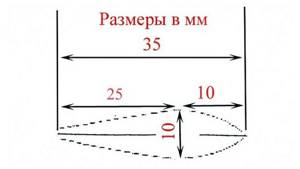
You can download templates of spinners for printing on A4 sheet and use them when making spinners by gluing them onto a plate. Templates are taken here.
Printable template. Spinner 35 mm Printable template. Spinner 40 mm
DIY spinner hatchet for perch
In the store, the “Hatchet” predator lure is available in different versions, but many fishermen prefer to make it themselves at home. To do this, you should first prepare a sketch and use it to make a spinner.
You should also prepare two or three plates in advance, from different metals, and their total thickness should not exceed eight millimeters in total. The width of each such plate should be 28 millimeters, and the length should be around -72-75 millimeters. You can use brass and copper. Silver plates.
The records will need to be thoroughly cleaned and tinted. When the tin between the plates begins to melt, then at that moment we solder them to each other. After this, you must wait until it cools completely. As a result, we get a plate with a layered character.
One such blank allows you to build a pair of Hatchet spinners, and the blank should be cut into two parts diagonally. Next, we adjust the dimensions to the dimensions in the drawing using a sharpener; of course, you can also use a file, but this process will be long and tedious.
The spinner blank prepared on a sharpener should be processed with files and needle files. In this case, sampling on planes is carried out using semicircular files, on one side the depth is 0.7 millimeters, on the other in the region of 0.3-0.5 millimeters. The accuracy of this stage determines the effectiveness of the game of this spinner.