Knots for knitting loops and connecting ropes
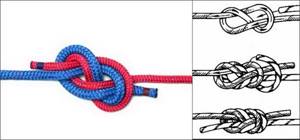
The bowline or, as it is also called, the “gazebo” is one of the most important knots, regardless of where a person is - in the air, on land or on water. His job is to get the loop at the end of the rope. The bowline knot allows you to attach weights using a carabiner or other rope. The gazebo knot is preferable to many others in terms of safety, as well as ease of tying and untying, which allows it to be used in extreme conditions and situations.
Knitting pattern
How to make a figure eight knot, the knitting pattern clearly demonstrates all the stages.
The basics of knitting are as follows:
- you need to take braided line or fishing line measuring 0.6-1.0 mm with a length of no more than 0.5 meters,
- take the running end,
- bend a piece no more than 0.3 meters long in the form of an arc, placing it along the remaining part,
- guide the running gear below the piece of fishing line that was not used, and pass it so that a loop is formed, while leaving the end of the running gear below,
- the next movement is to direct this part with a turn around the fishing line, getting into the loop,
- tighten the knot with force.
Having performed these actions, you can see that the shape of the knitting is similar to the sign of “infinity” or “figure eight”. Start learning slowly using step-by-step instructions. Having mastered the method and become a fishing professional, the execution time will be a few seconds.
Advantages of the node:
- Simplicity.
- Variety of intended purposes (connecting parts of a fishing line, installing leashes, attaching a hook).
- Used as a stopper due to its ability to remain motionless after execution.
- Possibility of untying after considerable effort.
- The ability to retain the properties of a single piece of fishing line after tying.
Please note:
- Do not use a knot on a thin line (labor-intensive).
- Reliability decreases when used on fishing lines with significant rigidity.
We tie a loop with a bowline knot
Before you start tying more complex knots, it is recommended to study the bow knot, as it serves as a basis for understanding other options. In addition, such a knot is universal and can be used to tie two ropes or secure it to a support. In order to quickly tie it in hiking conditions, you need to be well versed in the rope, not only sitting comfortably in a chair at home, but also on damp, damp ground in the rain. While hiking on Elbrus, there is no time to remember how to tie a bowline. At low temperatures, even if you know the process, it will be much more difficult to do with frozen fingers.
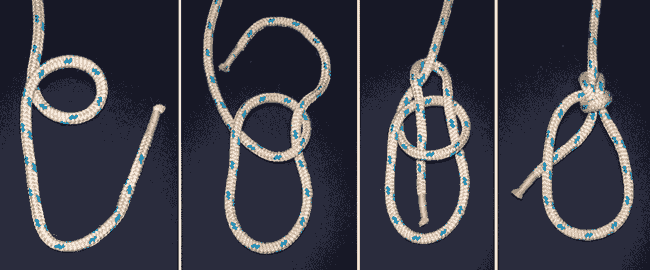
In order to understand how to knit a bowline, it is best to associate it with a loop on a rope. There are many styles of tying a knot, depending on speed and convenience. To find a way out of any situation, you need to learn to imagine the end result. Understanding the structure will allow you to tie both a single and double bowline knot without instructions, developing your own style.
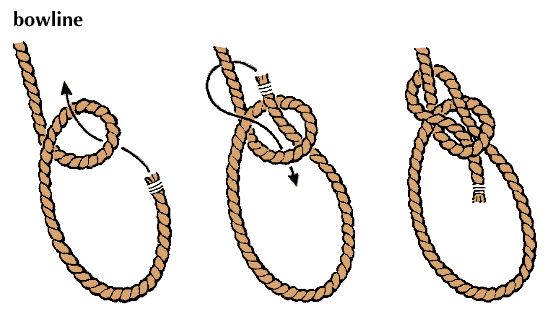
In order to understand how to knit a bowline knot, you need to follow the following sequence:
- place the rope on a table or other surface (during training), so that one end is under your right hand and the other under your left hand;
- form a loop closer to your left hand, with the right end at the top, and pass it through the back;
- loop the free end around the back of the rope and thread it through the top of the loop;
- tighten the knot.
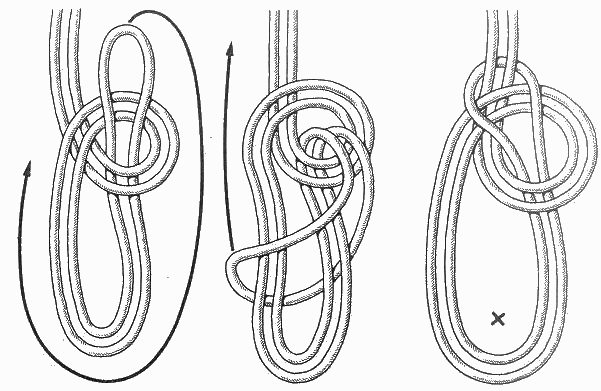
To tie a double bowline knot, also follow the step-by-step instructions:
- lay the rope on the surface so that the double end is under your right hand;
- fold the rope in half;
- form the same loop as for a single knot;
- pass the double end through the back of the loop;
- pass the newly formed loop on the right hand between the ropes of the double end.
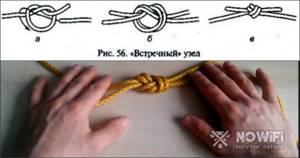
We knit a counter knot step by step
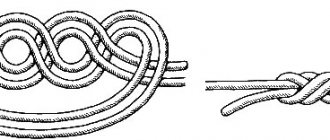
There are several varieties of the figure eight, but there is a universal knitted fishing knot pattern that is used most often.
Step by step, the classic knitting of a counter knot looks like this:
- We knit a regular figure eight on one rope. To do this, bend one end of the cable and make a loop. Next you need to pass it under the main rope and make a second loop.
- The free end of the rope must be threaded through the first loop of the formed figure eight. With the second end of the cable, you need to carry out similar actions, but in a mirror image.
- If the knitting was done correctly, you will get an intertwined figure eight. All that remains is to tighten it to get a strong connection.
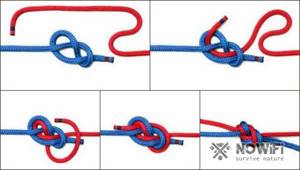
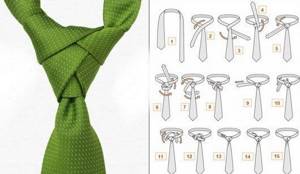
Step-by-step knitting pattern From these step-by-step instructions you can see that the knot is knitted very easily, but is strong enough for use in tourism, mountaineering and maritime affairs. The only nuance that should be taken into account is that for knitting it is better to use ropes of the same diameter.
Double
The main one for tying a double counter knot is the usual one. Its difference from the classic one is that it knits and looks a little different, which is why it gets the name “bunny ears”.
Scheme of a double counter knot In practice, a double counter knot is often used in fishing for attaching feeder gear, as well as in mountaineering and rock climbing to provide a safety margin and equalize the load on two safety points.
As in the classic design, the connection consists of two loops, each of which carries approximately half the load. The size of the loops can be freely adjusted.
So, tying a double counter knot is not difficult. First you need to tie a regular figure eight on a rope. Using a long open loop, you need to make two double loops. This will help you tie a quality eight. Next, the end of the open loop should be passed under, over and around the entire joint. Now all that remains is to tighten the cable tightly to securely fasten both loops.
The result is a very strong connection that can be used not only as a safety net, but also as a seat.
Classical
We provided a detailed step-by-step diagram for tying a classic counter knot in the previous sections. However, I would like to recall the description of this type of connection.
The counter knot got its name absolutely deservedly, because the end of one rope seems to go towards the other, and at the same time is brought down under the already formed loop.
This is what a classic rope connection looks like. In the classic version, this type of connection was used to connect two separate ropes. Its main advantage is that even after the cable gets wet, the knot will not unravel, and in order to untie it, you must pull strongly on one of the ends. Combined with the ease of tying, this makes the counter knot one of the most reliable connections.
Tie a loop with a figure eight knot
The figure eight knot is used to knit a loop and subsequently engage loads. In general, this is one of the most used knots in mountaineering, for example, when climbing in Nepal. This loop does not move or tighten, providing a secure base. A figure eight knot is tied both for attaching fishing hooks to fishing lines and for carabiners used by climbers. There are two knot options: single and double. Before you learn how to tie a loop, you need to learn a simpler version of the figure eight knot:
- pass the right end of the rope first over and then under it, forming a loop;
- insert the same end through the top of the resulting loose loop;
- tighten the knot.
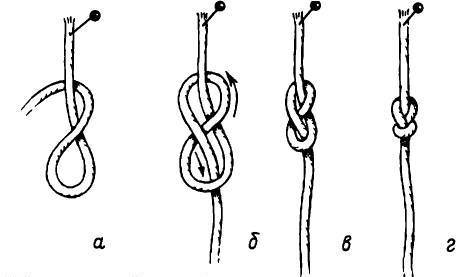
The double figure eight acts as a knot that allows you to create a non-tightening loop:
- fold the rope in half;
- using the double end, form a loop by passing it first over and then under the rope;
- pull the double end of the rope through the back of the loop;
- tighten the knot.
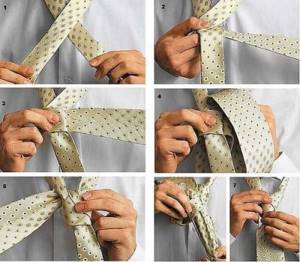
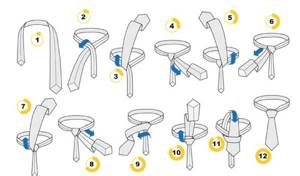
Tie complex knots correctly
The choice of knot for tying a tie depends on many factors. First of all, this is the material of the thing. Dense material will not allow you to decorate the item with a wide and even knot: it will seem bulky. We will pay special attention to the collar of the clothes.
Let's find out whether there is enough space for a volumetric weave.
If not, then we use a thin cut product. We begin to practice tying knots with a classic or double plexus. We tie the product immediately on the clothes. Information. After decorating the item with an unusual knot, we will bring the ends of the tie into a harmonious state. According to standards, the wide area cannot be short or long. Let's lower it two centimeters below the waist.
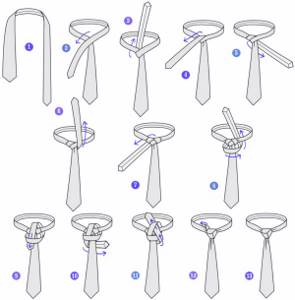
Oblique: step-by-step instructions
This is a commonly used and recognizable type of plexus. Follow these instructions to complete it correctly:
- Place the larger edge on one side, the small one on the other. The larger part should be at the level of the belt buckle;
- We place the volumetric half in the bend and lower it down;
- Pull the wide segment under the narrow one to the left;
- Repeatedly stretch the volumetric half through the bend from top to bottom;
- Pull the wide edge to the right over the narrow one;
- Once again we thread the voluminous edge into the formed eye and pull it forward;
- We correct the position of the plexus towards the center.
Attention! If you don't succeed in tying the knot the first time, don't be discouraged. Try again. Follow practical recommendations exactly.
Having an idea of how to design this plexus, you will quickly prepare for any special event.
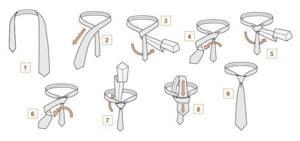
Leningradsky: scheme
The Leningrad junction is otherwise called “Half-Windsor”. It is very easy to tie. Looks perfect with any collar. Suitable for decorating a thick tie.
Follow these instructions to create a node:
- Throw the accessory over your shirt. The seams should not be visible. Place the bulky half on the right, the narrow half on the left;
- Lower the smaller edge to a level above your belly button. The parameter is individual and depends on the person’s height and the length of the product. Lay out the bulk half of the product;
- Place the wide edge over the narrow edge, crossing them;
- Fold the wide half around the narrow part from the left side to the right;
- Pull the voluminous edge up and pass it over the bend of the product;
Information. The wide half must be moved to the left. Pull it slowly. - Decorate the facial area of the plexus, laying out the wide half from left to right in a horizontal position;
- Pull the voluminous edge up and pass the item under the bend;
- Pull through the eyelet on the outside of the plexus;
- Pull the wide part down. Shape the plexus so that it is located in the center.

Trinity
The Trinity plexus is non-standard. The knot is usually tied with the narrow half. The product turns out to be asymmetrical. A tie designed in this way will make the wearer stand out from the crowd of people.
Follow these steps to tie a tie:
- Drape the accessory over your shoulders with the front part. The larger end should be on the left side, the smaller end on the right. Pull the wide half to the level of the belt buckle. Lay out the narrow half;
- Pull the narrow edge over the wide one, crossing them;
- Pull the smaller half of the tie towards your neck and pass it under the loop;
- Go around the eye of the tie and pull this half to the left;
- Go around the wide edge of the product from left to right;
- Bring the narrow edge up and under the loop;
- Go around the collar once, pull the end to the left;
- Form the facial area of the plexus, turn the volumetric half from left to right and stretch it under the bend;
- Pull the narrow edge down through the loop;
- Go around the wide part of the product from left to right;
- Pull through the loop and tighten the knot;
- Place the smaller half under the collar of the garment;
- Align the plexus so that it is located in the center.
Eldridge
The Eldridge plexus is classified as non-standard. You can knit it in 11 steps. The use of plexus began in 2007.
Attention! When designing this plexus, they work only with a narrow piece of tie. The knot turns out to be large, similar to a triple knot. It is extremely cumbersome to wear: you will have to adjust it often.
Follow these steps to tie a knot:
- Drape the accessory over your shoulders with the front part. The larger end should be on the left side, the smaller end on the right. Pull the wide half to the level of the belt buckle;
- Lay out only the narrow half;
- Place the narrow part over the wide one, crossing them;
- Go around the wide section of the product from left to right;
- Pull the smaller half of the product towards the neck and pass it under the loop;
- Go around the collar of the product and pull the end to the left;
- Form the front part of the plexus, turn the volumetric half from left to right and stretch it under the collar;
- Pull the narrow half down and to the left, pass under the wide half;
- Pull through the bend on the outside of the plexus;
- Pull the narrow half to the left;
- Place the remaining piece of the accessory in the collar of the shirt;
- Align the plexus so that it is directly in the center.
Tolstoy
Not all knot tying techniques work with thick ties. In special cases, non-standard techniques are used:
- universal plexus . Take a thick tie and wrap it around your neck so that the wide part is on the left side. After this, cross the wide half with the narrow half. Pull the volumetric part under the base. To the right of the knot, lower the larger edge. Pull it to the left under the product. There should be an ear in the front. Thread the larger end through it. Tighten the product with a large knot;
- double knot . It is not difficult to learn how to design this knot.
Important! The tie should be long. The material of the product is dense.
Drape the accessory over your shoulders. Cross the ends and bring the wide edge up. Create a loop and release the edges down. Pull the wide half of the product under the narrow one and carefully make a small loop. After this, pull the thick end under the plexus. The knot should not be tightened. Hold the loop. Thread the bulky end into the loop and tie the resulting knot.
Balthus
Belongs to the category of wide knots. It was invented by the artist Balthasar Klossowski in the last century. He made the wide half short and the narrow half long. Suitable for short people - evens out the proportions of clothing.
The tie is tied like this:
- Drape the accessory over your shoulders with the front part. The larger end should be on the left side, the smaller end on the right. Pull the end of the narrow part to the level of the belt buckle;
- The parameter varies depending on the height of the person and the length of the accessory. Lay out the wide half of the product;
- Place the narrow part over the wide one, creating a crosshair;
- Pull the smaller section of the tie towards the neck and pass it over the loop;
- Insert the wide part behind the collar of the product and pull it to the right side;
- Pull the smaller section of the tie toward your neck and pass it over the loop;
- Insert the wide part behind the collar of the product and pull it to the left;
- Fold the narrow edge from right to left, creating the front side of the plexus;
- Pull the wide half of the product down. Align the plexus so that it is in the center.
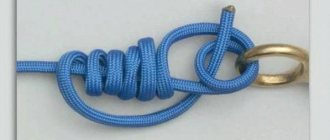
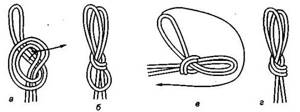
We tie the ropes with a clew knot
The clew knot is used to fasten the two ends. Before tying a clew knot, it is worth remembering that its use on synthetic ropes is unsafe. Since synthetic fibers are slippery, the knot can come undone easily. The clew is used only for natural ropes that are under load.
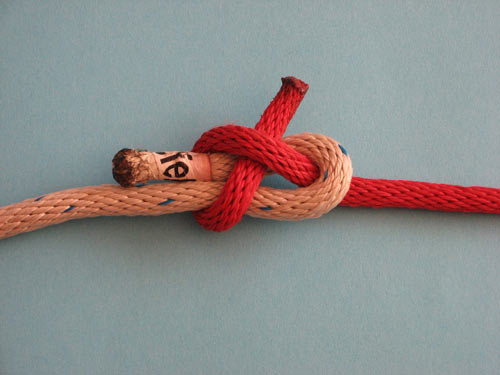
In order to tie this knot, you need:
- fold the end of one of the ropes (on the left in the image) into a loop;
- pass the end of the second rope through the back side of the rope (in the image on the right);
- circle the left rope folded into a loop with the right rope;
- pass the end of the right rope into the loop formed by it.
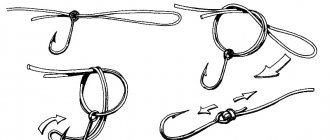
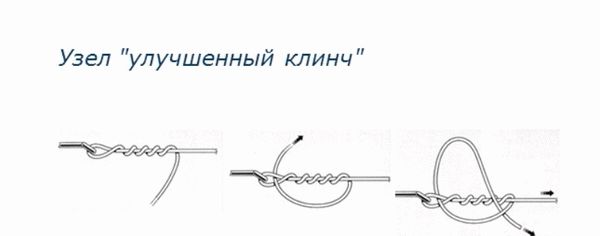
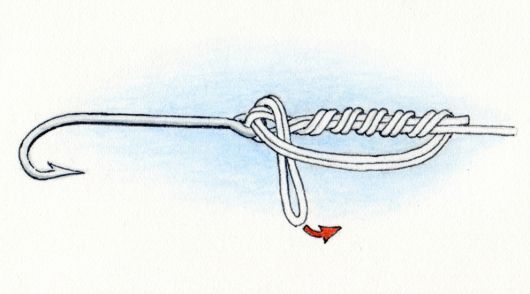
How is the clinch used?
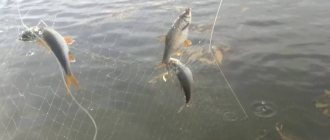
This type of fishing knot is widely used in spinning fishing, where it is used as a device for tying bait, which must be changed frequently during fishing.
Many novice fishermen use a carbine for this. However, as practice shows, it reduces fishing rates.
Expert opinion
Tarasov Dmitry Timofeevich
Master of Sports in mountaineering. Author of scientific articles on the topic of survival in the wild
It is very difficult to catch such wary fish as grayling or trout using a carabiner. A regular clinch is used to secure a sinker to a fishing line when assembling deep-water and spinning tackle.
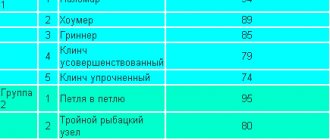
It has a strength of 80-90%. The strength of the reinforced one is 95-98%, it makes it possible to save gear when it gets caught on various objects.
This is interesting: Personal experience of making a fire in wet weather!
This often happens when the river current is strong. In this case, an ordinary knot can come undone.
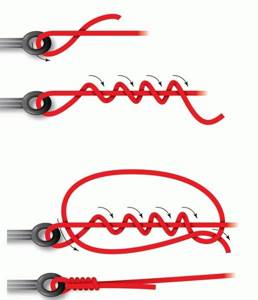
If high structural strength is required, for example, with a strong current in a river, then an improved clinch is used, since it does not come loose and does not cause losses. However, if the breaking load is higher than the standard, the line may break both at the knitting point and elsewhere.
Therefore, fishermen who do not have sufficient experience are advised to use a conventional knot.
Using known methods, you can easily learn how to knit a double clinch knot and a regular one, which will help many amateur fishermen do what they love
Both types of these knots are firmly attached to any type of fishing line:
The designs are simple to implement. It is not at all difficult for a novice fisherman to remember the technique for performing them. They are used with:
- sinkers;
- artificial baits;
- hooks;
- jig heads;
- feeders;
- swivels that have an eye made of profile or wire.
In this case, the diameter of the ear should be no more than 1.2 mm due to the fact that the knot will hold weakly on a larger ear.
This design is not used for tying sinkers with a through hole of a transverse or longitudinal configuration, for rings, tubes and other similar devices.
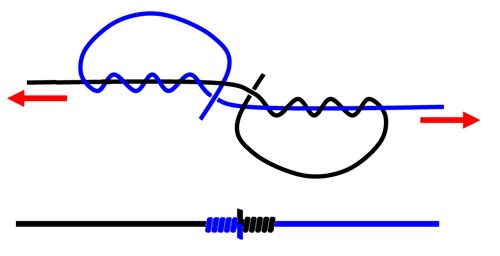
We tie the ropes with a weaver's knot
You can also use a weaving knot to tie two ropes together. It is also called textile, as it was originally used for fastening threads.

In order to tie such a knot as a weaving one, you will need:
- tie a simple knot at the end of one of the ropes, passing the end of the second through the loop formed from below, leaving a reserve length for safety knots;
- repeat the action with the second rope, but forming a loop on top;
- tighten the knot;
- form safety knots from the remaining ends in the same order.
Alpine (middle) guide
The stronger alpine guide is a good replacement for a simple guide that forms a locking loop in the center of the rope or sling.
It can be found under different names, such as "bloodworm" or "bee".
It is a high-quality and reliable climbing mount. If you tie it in the middle of a rope or cable, it will take the load absolutely evenly, and this will not cause the knot to shift.
This node is used for:
- tying lifelines in the middle of the rope;
- safety systems;
- fastening to hooks;
- production of portable rope structures;
- tying up two broken cables.
Tying the ropes with a snake knot
The snake knot is another option used to connect two ends. It is used for nylon threads and has high reliability. The second name is bloody. It is justified by the fact that in the past the knot was used to tie a noose on the gallows.
To tie a knot you need:
- arrange the ropes parallel;
- loop the end of one rope around the other through the top three times;
- do the same for the other rope, except that here you need to circle through the bottom;
- thread the ends into the ring formed between the ropes;
- Pull the base of the ropes, after which the knot will be easily tightened.
When should you not use the clinch knot?
If the eye of the bait or any other part (for example, a sinker or tee) has a fairly large diameter, or there is no eye at all. In this case, the knot will untie quite quickly, and spontaneously. So it is not recommended to use it when it is necessary to install such parts.
This is interesting: Tin and glass tin cans: how to open with and without an opener
It is necessary to use a clinch knot only for fastening parts with an eyelet made of thin wire. You should not tie baits with a double winding ring with such a knot, as it is quite thick and it can unravel.
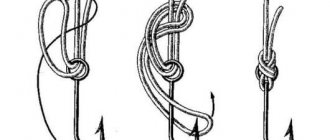
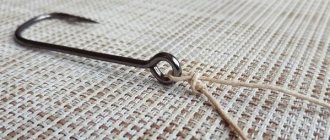
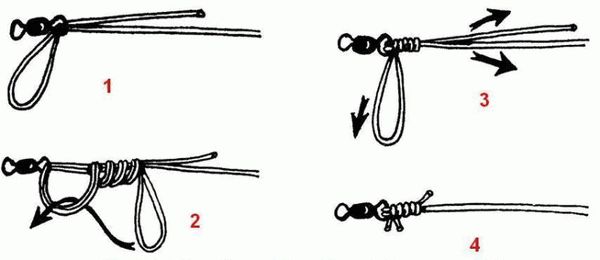
Hello friends! The first truly reliable knot I learned to tie was a simple gripping knot called a clinch. One very famous and authoritative fisherman showed it to me.
Then I mastered the Palomar and a dozen other special fishing knots, some of which I occasionally use in one case or another. But just like many, many years ago, if I need to tie something down, I still use a simple clinch.
I’ll briefly explain why it’s the clinch and not the palomar or something else.
Recommendations and possible difficulties
Tying knots is a tricky business and it’s no wonder that you may make one or two mistakes. Knitted clinch-type braids will be difficult to untie, unless cut off. Keep this in mind if you don’t want to shorten your lines, especially when every centimeter is important.
Unfortunately, it is not possible to make a clinch knot from fluorocarbon cord, because it has amazing smoothness. The only ligament that can last on fluor is the improved one. However, for fluor there are other, more suitable methods of fixation. Wetting when tying is not necessary, but will help strengthen it even more.
Expert opinion
Tarasov Dmitry Timofeevich
Master of Sports in mountaineering. Author of scientific articles on the topic of survival in the wild
In the article we described how to correctly knit a classic, double, reinforced clinch knot and other options; we hope this knowledge will help you in practice. When choosing the necessary weaving, keep in mind that each of them has its own disadvantages.
People involved in fishing at a professional level use various knots.
Where is the clinch primarily used?
For feeders and sinkers, as well as for mounting baits. Before tightening the knot, be sure to moisten it with saliva or water, otherwise they may deform the fishing line.
If a fisherman has a lot of experience, then he uses a variation of this knot for various fishing lines and purposes. What is the first thing you need to know? There is no universal knot; each type is used, for example, for a particular fishing line.
A clinch cannot be used if the diameter of the eyelet is large enough, and a clinch should not be used if the eyelet does not exist at all. If the eyelet is made of thin wire, you can safely use a clinch knot.