How to choose an installation location?
The demand for echo sounders is growing, and so is the number of sales. And an increasing percentage of buyers remain dissatisfied. The echo sounder does not work as it should and does not show the required parameters. And often the problem is not in the device itself (most often everything is fine with it), but in its installation. A few wrong decisions and the device becomes useless.
How to properly attach an echo sounder to a PVC boat? Three basic conditions must be met:
- Strictly horizontal location of the water surface sensor.
- No bubbles under water near the sensor.
- The transducer does not experience even the slightest vibration.
Important nuances in choosing a mounting location
Special attention should be paid to cavitation or the amazing process of formation of cavitation bubbles, which are harmless only at first glance. They appear due to a local decrease in pressure in the water, for example, when speed increases or when an intense acoustic wave passes through. Under these conditions, the cavitation bubble collapses: this is how a shock wave is emitted. It is cavitation that has a destructive effect on the surface of propellers; it is precisely this that is the enemy of the echo sounder!
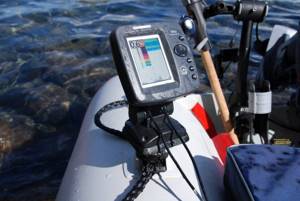
The fish finder transducer is often mounted on the boat transom. This is not to say that this is wrong, but there is one point: the air bubbles that move along the bottom surface significantly scatter and absorb ultrasonic waves, which is why your valuable device “goes blind”. This is easy to check: run your palm along the bottom of the sensor. If everything works, the successful operation of the echo sounder is counteracted by those very small, but very strong air bubbles.
It is important to consider that cavitation varies among different housings. Few people can determine exactly where to place the sensor. There are few specialists who will provide real assistance in this matter; you can try contacting workshops/repairs. There is another way out: mount it so as to move the sensor in height. Or first make a temporary fastening, and after determining the best place, fasten it “tightly”.
With regard to the horizontal position of the sensor, it is also important to remember that the boat position is not always the same when moving at different speeds. We advise you to determine the position of the vessel when planing and running quietly, and mount the device so that it is as horizontal as possible in such positions.
Now let's look at how to attach an echo sounder to a PVC boat using different methods. By the way, in a separate article we presented a rating of cool echo sounder models.
Echo sounder for PVC boat
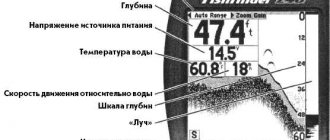
All available information on the echo sounder will be presented to you in two versions. The first is the so-called graphics. Here you will see lines and various diagrams. And in the digital version, digital indicators will be presented in the corner of your screen.
When you buy a fish finder for your boat, it is very important to remember that the fish finder has a view of your entire watercraft and application. If you choose this boat accessory incorrectly, your spatial orientation may suffer:
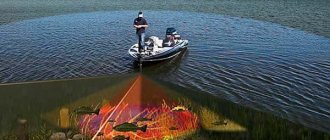
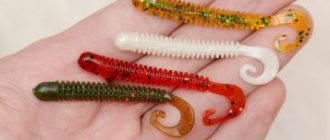
- if for you the best companion in your fishing is your PVC boat, then the echo sounder can become a reliable friend and a real lifesaver in your sailing. The main function of this unit is to search for fish in the water. They also show various changes in the bottom topography and in the water itself. Experienced boaters with experience usually know well in what relief strata and places fish accumulate;
- very often, for some boaters, it is not so important to determine the location of the fish using an echo sounder, but they need to find out the depth of the entire reservoir for their purposes, as well as determine the bottom topography. In addition, good quality echo sounders can even help determine water temperature;
We recommend reading: Do you need a license when using a PVC inflatable boat with a motor?
Echo sounder for PVC boat
- This unit must have a good quality transmitter and a quality converter, as well as a super sensitive receiver and a good screen. It is interesting that the display of such a unit as an echo sounder is very similar to the screen of a phone. In essence, this is the same matrix that contains a certain number of pixel bits. And the more pixels there are in a technical device, the better the picture will be;
- echo sounders come in different sizes. It is generally accepted that the larger the echo sounder, the better you can see something on it. Also, echo sounders come in both color and black and white. Black and white echo sounders are basically a grayscale screen that represents the water column.
Factory method, official
This method is quite expensive, and now you will understand why. At the same time, it is reliable, and the process of installing and dismantling the sensor on a boat will not take too long, and for fishermen, every minute counts!
What you will need:
- A stainless steel clamp with a rubber layer for good fastening to a hard boat surface.
- A bracket or tube, thanks to which you can change the depth, and in advanced models, the rotating angle.
- Mounting unit to press the sensor to the bracket.
What to do with all this:
- Press the clamp well against the transom. If the boat has a motor, remember that maneuvering should not create any problems. To do this, the mounting location is moved closer to the side.
- Securely attach the sensor to the bracket and lower it to the selected depth.
- Attach the bracket to the clamp with a bolt.
- Adjust depth and angle.
- Secure the entire structure.
- Place the device screen on the bottom or bench and go test your work!
Remember that this design is quite rigid. If you hit an obstacle, the transom will be damaged. Therefore, drive carefully.
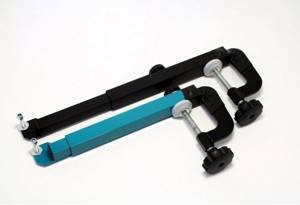
Mounting bracket
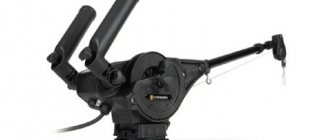
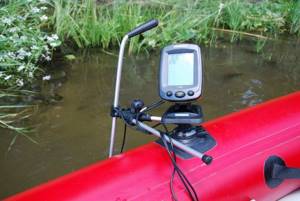
Mounting the sensor using a bracket with a clamp is the optimal and widespread option for installing the sensor on the transom. The design is a rod with a clamp installed at one end, and at the other end there is a place for attaching a transducer.
Using a clamp, the bracket is attached to the top of the transom away from the outboard motor or inboard propulsion unit. The bracket rod is adjustable in length, which allows you to lower the sensor to the required depth to avoid radar interference from air bubbles formed from turbulence under the bottom of the boat.
The bracket has advantages:
- Mobility. The bracket is easy to remove and install. The fish finder can be used on different boats.
- Reliable rigid mounting of the sensor relative to the vessel.
- Simple mounting.
- The presence of many adjustments (height, tilt angle, tilting capability).
- Durability (in the case of a metal rod).
- Possibility of installing the sensor on a transom of any thickness.
Disadvantages of the bracket.
- The need for constant removal and installation.
- Occupies a certain volume during transportation.
- High cost (from 1200 to 3000 rubles depending on the design).
The simplest option for making a bracket yourself is to use a regular clamp and a wooden strip as a rod. The sensor is attached to a rail of the required length. The rail is attached to the transom by clamping it with a clamp.
DIY methods
It's cheaper to do everything yourself. Usually the sensor is mounted on the transom or bottom. There is also a more exotic remote method in the “range”.
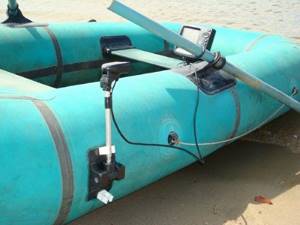
To the transom
What you need to have:
- Metal-plastic pipe, 1 m long.
- Stainless steel tube.
- Clamp (sold in construction stores). If you don't have a clamp, use bolts and a drill. The bracket is secured through the transom holes. Of course, this option is not as convenient as removable holders, but the signal quality should not suffer.
- Bolts with washers, rubber gaskets, clamps, cotter pin.
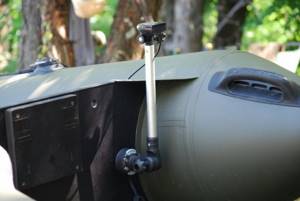
Step-by-step instruction:
- Using clamps and gaskets, we secure the metal pipe (about 0.4 m) to the clamp.
- We put metal-plastic inside and “flatten” the bottom.
- We make a couple of “holes”.
- We fasten the sensor using bolts, washers, and nuts.
- We attach the sensor and run the wire into the pipe.
- We put the clamp on the transom.
- We set the length of the metal-plastic part with a cotter pin and holes that were drilled.
- We attach the screen to the upper end.
Fasteners must be installed securely!
Useful video:
To the body
The method is completely different, as it is based on gluing:
- Near the keel, remove the layers on the bottom (right up to the outer one).
- Use epoxy glue to glue the sensor to the surface.
- Also seal the remaining cutout area.
The method may seem strange, but some fishermen, especially those using one boat, will appreciate it.
Remote method

And here everything is quite simple:
- Attach the transducer to the middle of the bottle (half-liter or liter plastic). It is better to secure it with electrical tape or tape.
- Also secure the sensor wire to the neck of the bottle.
- Place the screen on the bench, connect the wire.
- Pour water into the bottle until you reach the desired sensor immersion depth.
This is an option for fishing where there are no creeks or currents.
Fishermen are people with imagination, so the listed methods for attaching an echo sounder to a PVC boat are not the only ones. You can travel on forums and borrow experience from others. Do you have your own way? Share in the comments. And come to our friendly store where they sell excellent inflatable boats!
Question answer
Question: What is the best way to secure the echo sounder on a PVC boat so that it doesn’t fly off?
Name: Roman
Answer: This can be done using a factory or homemade method. The first method is highly reliable and expensive, but the design is rigid, which is dangerous if the boat hits an obstacle. Doing the fastening yourself is cheaper.
Question: How to properly install an echo sounder on an inflatable boat with your own hands?
Name: Ivan
Answer: It all depends on the mounting method: on the transom or the hull of the vessel. There is also a remote method. If the echo sounder is mounted on the body, epoxy glue is used to glue the sensor to the prepared surface.
Question: How exactly can you attach an echo sounder sensor to a PVC boat?
Name: Ivan
Answer: There are three rules to follow. The first is only a horizontal arrangement of the water surface device. Secondly, there should be no bubbles under water near the sensor. Third, the device should not experience vibrations.
Question: How to securely install the echo sounder transducer on the transom of an inflatable boat?
Name: Timofey
Answer: You need to attach a metal pipe to a clamp, put metal-plastic inside, attach the sensor and run the wire into the pipe. Then place the clamp on the transom, set the length and secure the screen. These are the basic steps.
Share link:
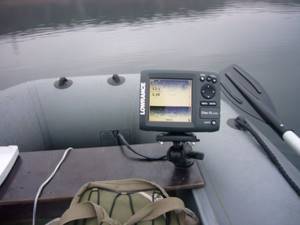
Mounting the echo sounder sensor to the transom
A large number of echo sounder models include a mount that allows you to fix the device. Most often, such fasteners provide for stationary installation of the device. However, this method can be a problem for people who have several boats or use temporary inflatable boats.
Most often, the fasteners are installed on the transom wheel stand, but there are also special devices for boats that do not have transom devices.
When purchasing a product, you must clarify this point. Fasteners are most often made of stainless steel, which allows the device to serve for a long time, regardless of operating conditions.
Let's celebrate! The mount is installed using a clamp, where a special mechanism is placed, with the help of which the depth of the sensor is adjusted. The mounts are suitable for all types of devices.