Foam fish
Of all the jigging baits, the foam fish is the cheapest and at the same time one of the most catchy. The secret to the success of the foam fish is that at the bottom it takes a vertical position, imitating a feeding fish and is clearly visible to the predator. It is generally accepted that foam rubber is a bait that has no game. Yes, undoubtedly, a foam fish does not have active elements like a twister or a vibrotail. But nevertheless, she wiggles her body very beautifully if she is led in a wave-like manner. Perch and pike love this kind of wiring very much. In the video below, I tell you in detail how to make a foam fish. In the video I made a small bait for catching perch, but using the same technology you can make both very large foam rubber for pike perch and micro products for fishing with ultralight tackle. Fishing with foam rubber fish is somewhat different from fishing with vibrotails and twisters. The pause is of great importance, as is playing along with it. When you first start fishing with foam rubber, you will catch a little less than with active jigging lures, but over time, when you master the technique of jigging passive lures a little, the number of your catches will be greater than ever before.
Features of application
Without exception, all types of tying have pros and cons. In this sense, “carrot” is no different from others. However, its advantages are worth mastering it perfectly, and the disadvantages are partially leveled out with the acquisition of experience.
Advantages
This type of knitting bypasses all existing types of joints due to the following advantages:
- ease of tying: the knot does not require specialized skills, even an inexperienced fisherman can make it,
- no slippage,
- high strength: a correctly tied knot retains almost 100% strength,
- compactness,
- the least likelihood of spontaneous unraveling,
- free passage through the rings.
The advantages that a knot has are expressed when it is tied correctly. Another important feature of this type of knitting should be mentioned. Fluorocarbon is a very unruly material, and if tied to a loop by other means, it tends to often come undone. With the correct carrot connection, this does not happen.
Of course, this is a huge advantage, since the fisherman does not have to spend a lot of time attaching a new fluorocarbon leader each time.
Disadvantages for a beginner
Of course, the “carrot” knot is not ideal, and in its presence, just like other types of connections, it has its own disadvantages , although they are secondary:
- wear, resulting in the need for bandaging,
- without certain experience, a sufficient amount of time is spent on its creation,
- Sometimes when wrapping the fishing line, problems with its precise placement may arise.
Carrot
A foam fish is simply an excellent bait for catching fish! But it has one significant drawback: the inconvenience of mounting on a hook. Craftsmen found a way out, and a bait called “Larva” or “Carrot” (or call it whatever you want) was born. The design of the larva is extremely simple: the body is from an old twister, and the tail is made of foam rubber. What does this design provide? Well, first of all, the bait can be easily put on/removed from the jig head. The silicone makes the hook sit securely and never easily fly off the fore-end. Well, the foam tail is the element that provides the bait with buoyancy. This “larva” simply works great in conditions where you need to hold the bait for as long as possible in the expected bite zone. The catchability of the larva will increase significantly if the tail is impregnated with some attractant for predatory fish.
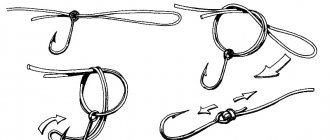
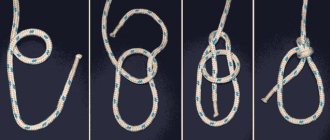
How to tie a Carrot knot correctly
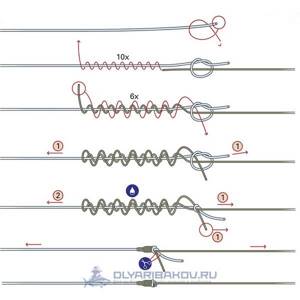
We will need two pieces of fishing line that we want to tie. For example, a braided shock leader and a main monofilament line.
- First of all, you need to tie the simplest knot 5 cm from the tip of the braid, but do not tighten it.
- Then you need to thread the main fishing line (monofilament) into the loop of the braid, pull out at least 15 cm, since you will need to make many turns with the monofilament.
- Next, holding the loop that we made in the first step, you need to wrap the monofilament around the braid 10 times, no less. You need to wrap it gradually, moving along the braid, so that you get a kind of braid.
- Then you need to hold with your hand the place where the last turn ended and start winding another 10 turns of the monofilament around the braid towards the loop of the first point.
- After making 10 turns, thread the monofilament line into the braided loop and tighten the braided knot.
- Now it is quite difficult to spoil the knot, all that remains is to tighten it, there are also some tricks here.
- Be sure to wet the knot; its strength depends on this step. This knot is especially sensitive to line burnout, since during tightening sometimes there is a strong load on the monofilament, especially if pulled incorrectly.
Nanojig larva
This bait is phenomenally catchy and damn cheap! Take a look at the manufacturing process - everything is simple and fast. It would seem: what can catch a piece of edible food on a miniature hook? Absolutely any fish! If you learn to play with such a bait during a pause at the bottom, then it will be attacked by perch, roach, goby, rudd, crucian carp and all other fish. This kind of fishing is very interesting and exciting. If you get hooked on the nanojig, you won’t get off soon
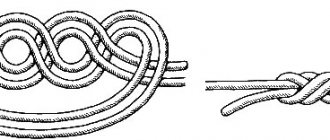
Knitting pattern
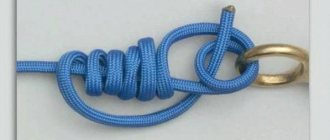
To knit Carrot, you need to:
- fold two fishing lines, pointing their ends in opposite directions (toward each other);
- make a loop on the first line (located closer to the end of the rig - for example, on a piece of braid that will play the role of a shock leader) so that it is located around the second, it is better to tie it at a distance of at least 10, and preferably 15-20 cm from the end of the scaffolding;
- wrap the second line around the first several times, it is better to make the length of its free end also 10-20 cm, so that it is convenient for them to wield;
- make several turns in the opposite direction (there should be fewer turns than the number of turns in the main direction);
- thread the second line into the loop on the first;
- tighten the loop - not all the way, but tightly enough so that it holds the end of the second line, but does not burn it when tightening the knot;
- wet and tighten the joint by pulling all ends.
Important! Proper tightening of the Carrot is very important.
The connection must be tightened smoothly and carefully, without unnecessary haste. In this case, you need to make sure that the turns lie exactly one to the other. All turns must be tightened at the same time. To achieve simultaneous tightening of all turns, it is necessary to apply the same tension to all three ends of the fishing line , which goes in the direction of the reel. It is necessary to monitor this moment, if necessary, giving more force to one or another “lagging” line.
It often happens that the turns located at the front of the knot are tightened first, while the others lag behind. If this happens, you need to straighten the line with your fingers when tightening.
You also need to make sure that the opposite does not happen, that is, that the turns located at the rear of the connection do not tighten first. If this happens, the second line (the one located closer to the coil) will be burned due to strong friction and curl into a spiral. This often happens to beginners who do not pay attention to this point. But the forest, burned and twisted into a spiral, loses its strength.
How to tie a Carrot Knot is clearly shown in this video:
Twisted leash
And finally, I want to say a few words about leashes for pike fishing. Nowadays there are a lot of leash materials on sale, ready-made leashes made of tungsten and titanium. Many have switched to fluorocarbon. But, according to many experienced spinning anglers, the best leash is an ordinary steel rod! And I agree with this 100%! Its first and most important advantage is its absolute resistance to pike teeth. The second advantage is that the rigid steel minimizes the overlap of wobblers over the tees, and this significantly affects the fisherman’s nervous system. The video you see below tells in detail about making a twist leash from thin steel.
How to knit a fishing knot “carrot”
Main line connection and leader shock:
It is not for nothing that the carrot is considered the most durable option for connecting the shock leader to the main fishing line. Thanks to this method, you can tie any two pieces of fishing line without any difficulties.
Since the size of such a connection is small, the knot fits perfectly through feeder and carp fishing rods, making the line several times thicker at the junction. In this regard, “carrot” is so popular.
The strength characteristics of the unit are at the highest level. There is not even the slightest chance that the line will break. The only important thing here is to make the connection correctly. There are a huge number of variations of performing the “carrot”, but it is worth paying attention to the strongest among them.
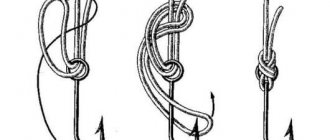
Step-by-step instructions for creating a “Carrot” knot
To do this, it is necessary to prepare those sections of fishing line that will be connected using this method. For example, this will be the main monofilament line and braid. So:
- At a distance of five centimeters from the end of the braid, create a standard knot without tightening it.
- Insert the main monofilament thread into the previously created loop so that it protrudes at least 15 cm.
- Carefully, fixing the loop with your fingers, wrap the main line around the braid at least ten times. In this case, the winding should be done evenly, moving along the entire braid, forming a pigtail.
- Then you need to hold the end of the braid and make reverse turns, but in the opposite direction.
- After completing ten turns, secure the loop. In this case, it is necessary to wet the connection to increase the strength characteristics of the unit.
- This connection is particularly sensitive to line burnout. Indeed, at the moment of tightening, a powerful load may occur on the monofilament thread, especially if the connection was tightened incorrectly.
Below is a diagram of the step-by-step connection of the fishing lines.
Proper tightening of the “carrot”
It is recommended to grab both ends and pull evenly. At the same time, the turns of the monofilament are carefully advanced in the direction of the knot. Move the coils with your thumb and forefinger to tighten the connection with ease and accuracy. It is definitely necessary to wet the knot.
After completing these manipulations, we will have two extra ends. Moreover, the end of the monofilament thread is cut to the very base. Whereas the braid can remain visible no more than 3 mm. The reason for this is considered to be its tendency to fluff up.
In the case where in the future there are plans to glue the knot joint to achieve ideal smoothness, you can cut the braid to fit the base. But this operation should be performed with extreme caution and accuracy. Because scissors can damage the villi of the shock leader, worsening the strength characteristics of the “carrot” knot.
What are the main mistakes fishermen make?
- do not wet the knot, which leads to burnout of the monofilament;
- tighten the connection without advancing the turns;
- make few turns;
- the turns are performed not in the form of a pigtail, but as it turns out;
- They fix the knot even before making turns and inserting a monofilament thread into the loop, and much more.