What should a targa be like?
It must meet certain requirements. The main ones:
- assembled strength;
- possibility of disassembly;
- ease;
- simplicity of design;
- low cost.
The spinning rod should enter the glass easily, but not dangle in it. 10-seat products made of stainless steel go on sale. A special metal coating creates an aesthetic appearance and at the same time serves as its protection. It can be disassembled in 5-10 minutes and placed in a special case during transportation.
How to make a targa with your own hands
Buying a ready-made one is, of course, easier. Unfortunately, not everyone’s financial well-being allows them to do this. But there is another way out of this situation. If you have a little plumbing experience, you can make a targa for trolling on a PVC boat with your own hands. Alternatively, you can do it yourself and without the use of electric welding. In this case, instead of metal ones, ordinary metal-plastic water pipes used in plumbing are used. They are easily bent at the desired angle, cut and, on top of that, have sufficient strength. Glass holders for fishing rods are also made from the same pipes, only with a larger diameter. Their connection with the upper and lower crossbars is clearly visible in the photo. In the assembled structure they additionally serve as stiffening ribs.
Before installation, it is advisable to foam the prepared crossbar pipes with construction foam. This will give them even more rigidity.
The dimensions are chosen independently, based on the dimensions of the boat and the number of fishing gear. For ease of use, the length is usually taken from 130 to 160 cm. In addition to holding cups, the targa can additionally be equipped with a flashing light, a searchlight and running lights.
All the necessary parts for making tackle are easy to find in construction and specialized stores. A sample of a homemade targa for 6 fishing rods is shown in the photo.
When equipped with such a design with a glider, the catchability of the gear will noticeably increase. Ready-made gliders are sold in all fishing stores. If you wish, you can make it yourself.
A targa (arc) for trolling is becoming an integral attribute of many fishermen. Not everyone is able to buy it, but anyone can make it with their own hands. With such a device, a successful outcome of any fishing is guaranteed.
comments powered by HyperComments
plotka.ru
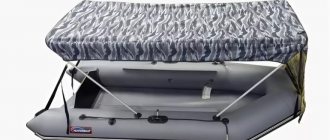
Still, I think about her, dream about her. Here I drew a couple of sketches. Which one is better in your opinion and why? I want to make a targa for the standard fastenings of the transom wheels or for fastening the eyelets, to insure the motor. Those. so that it is quick-detachable. So that if you are going for a ride or something else, we leave the targa, but if it is purely for fishing, then you can remove it and not put it on, so that it does not interfere with landing fish or swinging with a spinning rod. + while I’m still thinking about it, try attaching a canopy to it to protect it from the sun and rain.
I haven’t figured out how to implement this beautifully yet, but all sorts of different thoughts are floating around. Since it rained in Rybinka that year, we couldn’t go out on a boat or anything else. I'm thinking... I'm guessing... Will an awning help you catch in the rain or not?
IMG_20150207_154912.jpgIMG_20150207_154916.jpg
You can start criticizing, throwing slippers, eggs, and even calling him bad names!
Added after 1 minute 52 seconds:
| : | I can’t decide on the height of the targa. What should it be like? I’m 1.9 meters tall, probably with a ponytail….. so that if you sit under it comfortably and stand somehow so that it doesn’t interfere…. |
Added after 1 minute 42 seconds: Round - these are speakers, for relaxation - riding a wake, I’m thinking of adapting them. To make it more fun to ride and relax in general. But only in places where people have fun and relax. Instead of catching fish, he listens to nature, in silence. IMHO
fishboatlive.ru
A few years ago, only more or less wealthy people could engage in trolling, because... This type of fishing requires the presence of 10 fully equipped fishing rods, a medium boat and, accordingly, an expensive motor. Everything else, when you have a pair of spinning rods with casting reels, a “cauldron” or “progress” with rod holders, is “track fishing”. This type of equipment can be used for pike and pike perch, and even for salmon. Full-fledged trolling in its true sense requires somewhat greater financial costs, but this was the case until recently.
What is the problem with equipping an inexpensive PVC inflatable boat with trolling equipment? The problem is the lack of rigid sections of the hull where equipment can be installed on this type of boat. We only have a couple of “cans”, a transom and a plywood or aluminum floor and that’s it. Nowadays, UniMount systems have begun to appear for mounting a rigid platform at any place on the inflatable board.
Also, not so long ago, Targa went on sale, which can be easily mounted on a PVC inflatable boat or a small frame boat (boat). Fastening the targa to the inflatable cylinders is carried out using rubber coins, which are glued to the PVC material.
These nickels have fasteners for bolts.
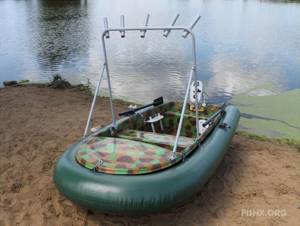
The width of the boat on which installation is possible should be from 1.3 meters to 1.6 meters (between the centers of the cylinders). A very large number of boats fall into this range. The targa itself has a sliding design, 10 glasses for fishing rods , there are two carbines and two blocks for the glider and glider reel.
The entire structure can be assembled and disassembled (into three parts) in a few minutes and packed in a special case. The design of the trolling targa is made of stainless steel with a polymer coating. It is quite light and very durable. The polymer coating protects the surface from damage and corrosion and gives a pleasant appearance. The color of the coating can be any. The rigidity of the structure is ensured by adjustable stops, which are installed towards the bow of the boat. The front attachment points are located almost at the bow of the boat, and the targa itself with glasses is above or slightly behind the head of the fisherman sitting on the front can. In fact, the entire structure is located in the first third of the boat. Thanks to the mobility of the stops, the targa can take a flat shape, which is convenient for transportation.
The production and sale of this type of targ is carried out by targ, which is based in St. Petersburg. The price varies from 11,500 to 14,500 rubles. depending on the configuration.
spyship.ru
Trolling targa
A targa is an arc that carries glasses in which spinning rods are placed for trolling. It is attached to the sides of the boat.
"Profi-Troll" is one of the manufacturers of trolling equipment. The universal targa produced by this company can be installed both on a boat and on a boat made of polyvinyl chloride. 10 cups are welded to a polymer-coated steel targa. The device is bolted to rubber dimes glued to the boat. For transportation, it is disassembled and folded into a case.
Option 1. Targa can be made from aluminum or stainless steel. Spacers should be placed between the boat hull and the targa mount to prevent electrolysis. The diameter of the pipes is 40 millimeters. The wall thickness of stainless steel pipes is 1 millimeter. The glasses are welded to the targa. Their number depends on the size of the boat.
Option 2. Collapsible targa without welding made of caprolon and PVC pipe. The glasses act as stiffening ribs, assembling the upper part of the structure into one whole. This part is attached to the tubes through inserts firmly fixed in them, and where the joint is, it is fixed with a fastener. Targa fasteners, the base of the block and the block itself are made from caprolon.
The bait can be lowered to depth by weighing down the leash or fishing line with a sinker. There are special wobblers for guiding under a large layer of water.
But on large bodies of water, deep wiring is a problem. Therefore, bait deepeners (divers) are used. These are special devices for deepening the nozzle and making changes to its game. Luhr Jensen is one of the manufacturers of deepening devices (diving gliders). Let's look at 2 fundamentally different types of divers produced by Luhr Jensen. They appeared recently. The material for their manufacture is plastic.
- Dipsy Diver (translated from English as “drunk diver”). The device looks like a saucer. A leash is attached to the “saucer”, and bait is attached to the leash. The deepener is tied to the main line. In the zero position it goes straight down. When changing the angle of the sinker (it is located at the bottom of the diver) - to the side. In the second case, the maximum depth is impossible, but the fishing zone expands. The diving depth of the deepener depends on its size and design. The small one goes to a distance of 6 meters from the surface, the large ones at 11 - 21 meters. The deepener has a stepper mechanism, thanks to which it sinks quickly, but when a fish bites or is hooked, the resistance of the Dipsy disappears - this is important when landing fish. And the resistance of the device at depth is high, so for trolling you need a heavy spinning rod and reliable fishing line (test of at least 9 kilograms). The Dipsy diver cannot be used with a large deep wobbler.
- Get. During towing, it descends to depth and floats up when it is completed. That is, when the engine is in neutral or the gas is minimal, the diver rises. The maneuver especially attracts the attention of pike perch. By the way, when planning to catch pike perch by trolling, do not forget about a good bait - a wobbler. If you alternate speed with neutral, baits can be passed in steps. The depth of the diver also depends on its size (there are 5 models of different sizes in the line). They differ from dipsy deepening agents in that they lack the ability to move to the side.
There are other devices and elements for deepening baits:
- Downrigger. The design is based on a winch. The outrigger boom is attached to the transom of the boat.
- Sinker. Increases the wiring depth by 1 - 2 meters.
- Sinker. A lead weight with a lip plate. It goes deep when there is resistance to incoming water.
- Bouncer. A weight in the form of a tube with one end heavier than the other ensures that the bait is held at a short distance from the bottom.
One of the downrigger options can be made:
- made of wood,
- lead,
- old dumbbells
Using a jigsaw, a small circle is cut out of birch (pine). A stopper is attached to it to control the depth. The weight is cast from lead. Old dumbbells serve as a base for larger loads. The plywood base is glued with epoxy.
An echo sounder makes it possible to explore the underwater space for trolling. Using this device, you can monitor the bait, determine the distance from the surface of the water to the bottom, and detect large schools of fish.
We suggest you familiarize yourself with: DIY life jacket - viberilodku
Among the leading manufacturers of echo sounders:
- Lawrence,
- Raymarine,
- Humminbird,
- Garmin
- Interphase,
- "Practik-NC".
Let's look at the price range of each model.
Lowrance Elite 3x with color display and one beam - 9,280 rubles. It scans to a depth of 244 meters. Lowrance Elite-9 with GPS (chartplotter) costs 109,500 rubles. It has 2 beams, 4 frequencies, scanning depth - 305 m. Lowrance HDS-12 Gen3 with GPS costs 252,700 rubles. 5 frequencies, scanning depth - up to 1 km.
The price range of Raymarine echo sounders is from 15,480 thousand to 59,200 rubles. Humminbird - from 6,250 rubles to 236,300 rubles.
Garmin—from 10,950 rubles to 32,400 rubles.
“Praktik ER-6PRO” - 5,300 rubles (Russian manufacturer “Praktik-NTs”).
Interphase - from 68,495 rubles to 126,227 rubles.
How to use?
Typically, the echo sounder is attached to the transom of the boat. The sensor is in a position horizontal to the water surface. The deeper the emitter is immersed, the more accurate the device readings. On PVC vessels it is possible to install the emitter inside the boat.
If the device begins to work incorrectly, it is recommended to stop the boat, turn off the echo sounder, wipe it from below with your hand, turn it on again and move on (cavitation is often the cause of the “breakdown” of the echo sounder: small air bubbles that form on the surface of the device while the boat is moving).
GPS navigator. You should choose a waterproof navigator model. The device must be highly sensitive and be able to connect additional information media.
Chartplotter. A chartplotter is an echo sounder with a map, i.e. an echo sounder with a navigator in one device. Its display can be color or black and white. The power of the chartplotter must correspond to the depth of the reservoir: the deeper, the more powerful the device is needed. You cannot use a powerful echo sounder on shallow rivers: double reflection of the signal (from the bottom and from the boat) creates interference. Models include Dragonfly 6 and Dragonfly 7.
Autopilot. If the boat is less than 9 meters in length, you can install a Raymarine SPX-5 Sport Drive Pilot for trolling. Its software precisely controls the vessel, adapting to changing conditions. The approximate cost of the device is 74,200 rubles.
Autopilot is popular now. It is expensive, but together with a chartplotter it can not only keep a given course in a straight line, but also independently control the boat at low speed. The troller plots a course on an electronic map, placing dots on it. Guided by the navigator's data, the autopilot guides the boat from point to point.
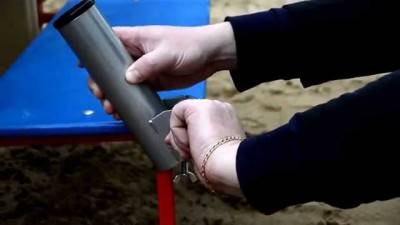
Video of installing a targa on a PVC boat
The process of installing a device for attaching spinning rods on a PVC boat is shown.
Targa is a trolling arc that carries glasses for spinning rods. The targa is attached to the sides of the boat (or pvc boat) approximately 1/3 of the length of the boat, counting from the bow immediately in front of the front “can” (seat) in such a way as to be above the head and slightly behind the troller sitting on the front “can”, watching against the direction of the boat. The targa is bolted to rubber pads, which in turn are permanently glued to the middle of the side of the boat.
The targa stops are extended towards the bow of the boat and attached to the same nickels. This creates a rigid structure that will not be shaken by gliders or fish.
Sliding, folding universal targa for 10 glasses in a case.
Targa sales are carried out at our office address: St. Petersburg, st. Olga Berggolts, 42, office 505/1.
Steel targa. treated with polymer coating - 12 500
rubles
Targa polished stainless steel - 16 500
rubles
PVC boat targa
fishx 08/13/2018, 21:00 2 thousand
What is a targa? Targa fastening for spinning rods on a PVC boat. Transportation.
In trolling, catching a predator often occurs using several spinning rods, for which trollers are sometimes equated to poachers. But most often, such an organization of fishing is inherent in sea fishing or fishing on very large lakes, where large areas are not easy to fish with one spinning rod and one bait. Therefore, trolling with several spinning rods somewhere on Lakes Ladoga, Onega, and Chudskoye, where the shores are not visible and swimming such areas with one rod is not effective, .
Content:
Promotion
:If you purchase a pair of coils for the central line or a pair of gliders for the target, GET A DISCOUNT of RUR 1,500.
Come to Profi-Troll and buy a targa with a total discount of 1,500 rubles!
| Old price, rub. | Price when purchasing targas, gliders and reels, rub. | |
| Steel targa, treated with polymer coating in a case with a set of fasteners for a PVC boat | 12500 | 11000 |
| Stainless steel targa in a case with a set of fasteners for a PVC boat | 16500 | 15000 |
profi-troll.ru
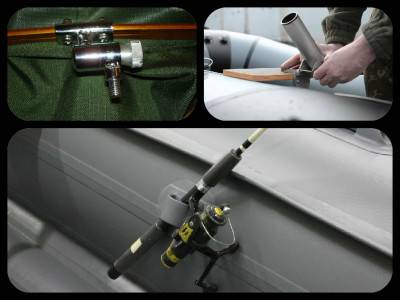
Mounting methods
There are several ways to attach a spinning rod holder to a boat. For example:
- With bolts.
- Using screws.
- Using a clamp.
- Using glue.
Fastening the holder with bolts is only possible if the material of the boat allows holes to be made in it. These can be boats made of wood, plastic or aluminum. As for inflatable products, this method of fastening is naturally not suitable.
As for wooden or plastic boats, such mounts for holders are the most durable and durable.
Fastening with screws also has its advantages and disadvantages. The fastening turns out to be quite rigid, although the holder can only be attached to wooden bases: the sides of wooden boats, to benches or transoms. The disadvantage of such fastening is the fact that over time the fastening point may weaken due to load and vibration. There may be cases where spinning rods are lost if not noticed in time.
Fastening with clamps has its own characteristics. In some ways, such fastening is more reliable than fastening with screws. On the other hand, sometimes it is not very practical, especially in cases where the device has to be mounted on a bench or transom of a boat. In the latter case, such a mount will interfere with engine control.
Fastenings with glue are used only on inflatable rubber and PVC watercraft. Occasionally, such a mount can be found on plastic boats.
Adhesive joints, if made using technology, are quite strong. But they have one significant drawback - preparing the watercraft for transport.
Making it yourself - step by step instructions

Option 1. Spinning rod holder for a duralumin boat. You need to make a base from sheets of duralumin (it will be fixed to the coaming) and a tube from galvanized iron. several millimeters larger than the butt of the spinning rod .
Horizontally, the tube should rotate around the screw not freely, but with force. Therefore, the screw must be tightened to the limit and secured with a locking screw.
It is better to use a wing nut - this will simplify vertical adjustment. This ensures the ability to move the rod both horizontally and vertically. There should be no sharp edges in the design ; they need to be dulled.
Option 2 . A bracket is made from 3.5 mm wire in diameter, to which a tie is soldered or welded to enhance rigidity. This structure attaches with an aluminum mounting strip to an aluminum turntable (4 rivets required).
In the polymer base, a bolt with a ground head is secured with BF-2 glue so that it does not turn , and four 3-mm holes are drilled. Holes are needed for steel wire half-arcs. A bracket with a platform is placed on the bolt. The structure is secured with a wing nut and installed on board a not very inflated boat where it is more convenient to use it.
To change the position of the spinning rod during trolling, the nut is unscrewed one turn or one and a half turns, the holder is rotated and again secured with the nut.
You can use the video tips below, in some cases it is better and more visual. We especially recommend the second video for PVC boats: simple, but quite effective . Tested on myself, so to speak
Classification of fasteners
Depending on the method of installing the spinning rod holder, they are divided into two categories:
- Combined.
- Separate.
Combined models are distinguished by the fact that the stand for the spinning rod (fishing rod) and the attachment to the boat have a common, combined design. This approach to mounting makes the device more mobile, but such a device has large dimensions, which makes transportation problematic.
Separate models require more time to deploy, but they are smaller in size, which eliminates some problems during transportation.
Depending on the design features, the models are as follows:
- In the form of glasses arranged vertically.
- In the form of horns with rings located horizontally.
The first models are designed for installing rods with the handle down, at an angle of 50 degrees to the surface of the water. Perfect for trolling fish.
The second models are more suitable for installing rods on the shore, with tilt angles of up to 40 degrees. There is a branch at the front of the product and a ring at the back. Such designs are ideal for installing feeders or regular float rods.
According to the number of fishing rods installed simultaneously, the holders are divided:
- For singles.
- For doubles.
- To Targhee.
Single and double holders speak for themselves. As for targas, these are multi-form holders. Most often they are used in trolling and are curved structures with glasses attached to them.
If there are not many glasses, then such a structure is attached to one and the other side of the boat at one point. If there are a lot of glasses, then fastening at one point is not enough. Therefore, on each side of the boat or boat, the targa is attached to at least two points.
Famous models (brands)
On the fishing market you can find several models presented by well-known companies today. For example:
- "Scotty"
- "Amphibalt".
- "Patriot".
- "Hummingbird"
On the shelves of domestic stores you can actually find the products of these well-known companies. As a rule, many anglers make their own models using some of them as a basis.
There are five well-known models that we can talk about in more detail. Here they are:
Scotty
Scotty is a manufacturer of targas, so there are several different models on the market, depending on the options for the arrangement of the glasses.
Hummingbird
“Hummingbird” is a regular bar with cutouts, like a stand for feeder rods. The device is attached to the opposite sides (cylinders) of a PVC boat or to the sides of a plastic boat.
Amphibalt
"Amphibalt" is practically compatible with the Canadian model range.
DS-155
The DS-155 is a single rod cup holder that can be mounted on a bench, on the side or on the transom of a boat.
Patriot Combo
“Patriot Combo” - this rod holder is attached to both the targa bow and the transom.
TARGA FOR TROLLING WITH YOUR HANDS
How to make a targa for trolling is a question that causes a tremendous surge of imagination among our home-made craftsmen, the result of whose creativity is a wide variety of hand-made targa designs. These can even be structures made of durable wood impregnated with water-repellent agents, and also coated with varnish. Despite the strangeness of such a targa, which looks like a piece of furniture, some such homemade products fit quite naturally into the interior of a boat, since wood is also present in the design elements of expensive yachts and boats.
Homemade targa designs are aimed primarily at compactness and quick disassembly of the frame into several components for transportation in the trunk of a car. A targa for trolling with your own hands, instead of using welding, as in mass-produced samples, is often assembled on fastenings using bolts and wings, which makes homemade products simpler and capable of changes to suit the needs of the shipowner and troller.
And in such options, in addition to wood, polymer materials are widely used, and even PVC plumbing pipes, in particular, in the manufacture of glasses for installing spinning rods, which are usually made of metal. And here the advantage of home-made structures is obvious, since the targa turns out to be lighter, without losing much in strength.
Some people decide for themselves how to make a targa for trolling in a completely unusual way. Here you can give an example of making a targa and fishing with it at the initial stage without the use of spinning rods, but with the goal of working out the principles of fishing using a glider connected to a targa. Moreover, the connection is assumed to be dynamic, capable of moving from one side to the other when the fastening on the targa arc is loosened. The principle of using such gear was taken from the experience of fishermen in Karelia, who have long caught predators with several baits, without trolling, which was then unknown to them. The tackle consisted of two boats, between which a cable or strong cord with several leashes and baits was attached. The boat fastenings were mounted to the boat's mast. This is where the mount connects to the targa.
In this case, a do-it-yourself targa for trolling was made with a minimum of capabilities, which included tools such as a grinder, a grinding wheel, a drill, and a bench vise. By the way, it doesn’t hurt to have in stock such a simple tool as a hacksaw, which will come in handy more than once in some operations when cutting durable materials.
DIY spinning rod holder for a boat
The designs are not complicated, so they can be done in a home workshop or in your garage where a car is being repaired, especially since you have the tools. Alternatively, you can consider a couple of designs to repeat. For example:
- Targu with several glasses.
- Clamp holder.
Such models are not complicated, and therefore are easy to manufacture. In addition, they have a number of positive characteristics.
DIY targa
At first glance, this is a difficult device to manufacture. In fact, even an inexperienced welder can handle this task. The structure is made from a thin-walled metal pipe. To work you will need a welding machine, electrodes, sandpaper and paint.
Manufacturing stages:
- Take a pipe whose internal diameter is slightly larger than the diameter of the rod handle and bend an arc along the width of the craft.
- The pipe is flattened at one end and the other, after which holes for the bolts are drilled here.
- Part of the pipe is cut into glasses, on one side of which plugs are welded.
- Glasses are welded in certain places on the arc.
- All that remains is to sand the structure and cover it with paint, preferably waterproof.
What you need to know about the spinning rod holder
The designs are not complicated, so they can be done in a home workshop or in your garage where a car is being repaired, especially since you have the tools. Alternatively, you can consider a couple of designs to repeat. For example:
- Targu with several glasses.
- Clamp holder.
Such models are not complicated, and therefore are easy to manufacture. In addition, they have a number of positive characteristics.
DIY targa
At first glance, this is a difficult device to manufacture. In fact, even an inexperienced welder can handle this task. The structure is made from a thin-walled metal pipe. To work you will need a welding machine, electrodes, sandpaper and paint.
Manufacturing stages:
- Take a pipe whose internal diameter is slightly larger than the diameter of the rod handle and bend an arc along the width of the craft.
- The pipe is flattened at one end and the other, after which holes for the bolts are drilled here.
- Part of the pipe is cut into glasses, on one side of which plugs are welded.
- Glasses are welded in certain places on the arc.
- All that remains is to sand the structure and cover it with paint, preferably waterproof.
On a clamp
What’s most interesting is that such a homemade product can be made from the most affordable parts that are easy to find on the balcony or in the garage. Real owners are in no hurry to throw away products that have expired, which sometimes helps to assemble a functional device without spending practically any money.
To make such a holder you will need the following parts:
- A meat grinder that has served its purpose, but with the part with which it is attached to the table working.
- Tube or metal plate for stand.
- Plumbing clamp.
- Plastic pipe with a diameter of 50 mm (also sewer).
- Plug for this pipe.
- Bolts, washers, nuts, screws.
Technological stages of production:
- A clamp is made from a meat grinder, although you can buy a ready-made clamp in a store. The upper part is cut off from the meat grinder, where the meat is ground.
- The second stage is drilling holes in the body of the meat grinder, which will serve as a place for attaching the holder stand.
- Three holes are made in the tube or metal plate. Two of them should coincide with the holes made in the body of the meat grinder. The third hole should be at the top of the plate. If a tube is used, it is best to flatten it before drilling holes in it.
- The post and clamp are connected together using bolts, washers, screws and nuts.
- At the top of the rack, where the hole is drilled, a plumbing clamp is attached.
- Using a clamp, a piece of plastic pipe with a plug (a kind of glass) is attached to this place.
A holder of this design can be easily mounted on a bench or on the transom of any boat, regardless of the material of the boat itself.
Naturally, such a device is simply necessary for anglers who fish both from the shore and from a boat. Who wants to constantly hold a rod in their hand, and this is not necessary, especially when fish are caught on bottom gear, using feeder or spinning rods.
Of course, you can pay attention to the proposed options, but in any case, the design must be reliable, especially when catching a predator by trolling.
fishingday.org
Set for lake trolling for trout or any other salmon fish.
In addition to my post About Fishing for Trout in Karelia, I am posting some technical side of the process.
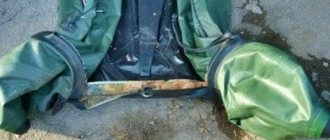
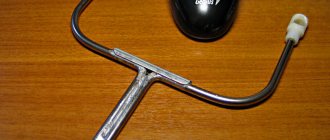
Targa (or, in simple terms, installation on a boat for holding spinning rods and releasing boats).
Two boats.
Clothespins for fishing lines.
Let's start with the most difficult thing - the targa.
It is attached to a PVC boat using standard eyelets (rubber pads through which a rope is passed). They can also be bought (for example, on Ptichka) and glued to the required places. But in my case, they made do with regular ones.
The targa is secured with four M8 bolts and nuts. The design is quite strong and stable.
For production we need
Stainless steel pipe, diameter 20mm, thickness 1.5mm - 6 meters - for the targa itself.
Stainless steel pipe, diameter 38mm, thickness 1.5mm – 2 meters – for glasses for spinning rods.
Stainless steel pipe, diameter 16mm, thickness 1.5mm – 1.5 meters – for making fishing rods for boats
A piece of stainless steel 3mm thick and about 200 x 200mm - for making heels and eyes for fastening.
2 M6 screws with a nut – for connecting the spacers.
4 M8 screws with a nut – for fastening the targa to the boat.
Two inertial reels, Nevsky type, for winding boat cords.
We invite you to familiarize yourself with: Rating of the best ultralight spinning rods: prices, reviews, selection by test || Ultralight spinning rod for twitching
Four metal clamps with a diameter of 20-24 mm - for attaching inertial coils.
Two carabiners No. 1 or 2 - for attaching the boat cord to the fishing rods.
Nylon cord, diameter 2mm, preferably bright, acidic colors - 80 meters - for boats.
Next, either 3 packs of electrodes for welding stainless steel, or we will leave this item to the welder’s conscience. We cooked it ourselves.
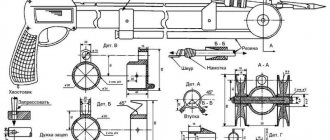
Further. Cut the pipe to size as in Figure 1.
We make a frame from two pieces of 1200 mm and one piece of 1400 mm. Butt at right angles. We weld glasses for spinning onto a 1400mm segment at equal intervals. We weld the glasses to the pipe at an angle of 15 degrees.
At a distance of 200mm from the top edge, we weld two eyes for attaching additional spacers.
We weld U-shaped heels to the ends of the 1200mm and 1000mm sections for attaching to the eyelets. It is advisable to pre-drill holes for screws in the heels.
On 1000mm sections, at the end opposite the heel, make a 2mm wide, 50mm long slot and drill a hole for the screws
When assembled, the spacer mounting unit looks like this.
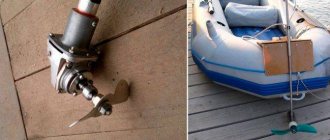
We cut the piece for the boat fishing rods in half. At the end of each of the segments we make a drilling for a carabiner. Insert the carabiner into the hole.
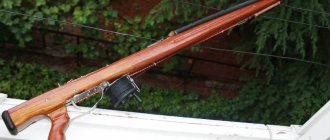
We weld two pieces of pipe with a diameter of 20 mm and a length of 100 mm at the ends of the frame - for inserting fishing rods for boats. When raised, the fishing rod is secured with a wire latch.
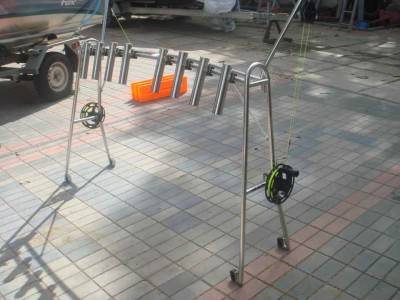
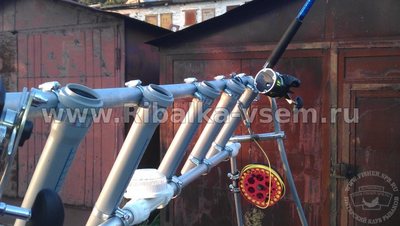
In an arbitrary place, most convenient for you, on the racks using clamps, we fix two inertial coils. We wind 40 meters of cord onto reels.
When installed on a boat, the design looks like this
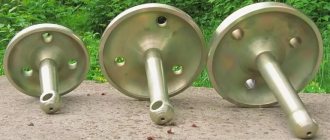
Next - we make boats
We will need any high-quality board. The piece is 20mm thick, 150mm wide and 1400mm long. Plus a block of 25-30 mm cross section and 2 meters long.
We cut the board into two pieces 400mm long and two pieces 300mm long. We cut the block into 4 pieces of 500mm each. In principle, it can be shorter, but the wider the boat’s blades are spaced, the more stable it behaves at speed and on waves.
We process the edges of the boards as in the picture.
We get this set of cut wood.
We coat the wood with yacht varnish.
At the fishing site, a structure consisting of an internal blade, small 300 mm, connected to an external blade, large 400 mm, using two crossbars made of a block, is assembled with self-tapping screws.
In the bow of the inner blade we make a fastening for the cord. We just screwed in another screw.
In general, there are plenty of boat designs on the Internet. You can also buy ready-made ones, but they are inhumanely expensive.
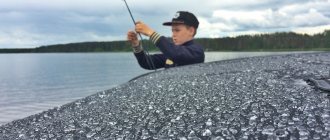
The principle of boat fishing is this.
The clothespin for holding the fishing line is made from ordinary household clothespins. To which is attached a carabiner for hanging a clothespin to a cord.
After a bite, the clothespin (or more correctly, the clip) releases the fishing line and rolls towards the boat. You can, of course, attach a cord to it for return, but the boat is already full of all sorts of cords. It’s easier to make more clothespins (in our case, 30 pieces) and, after each bite, put a new one on the cord. And at the end of the fishing, pull up the boat and remove all the used clothespins.
At the beginning of fishing, you release the boats. 30-35 meters. one on each side. Raise the fishing rod for the boat above the targa to the highest possible position - this makes it easier for the clothespin to roll towards the boat.
Next, we throw the bait overboard, let it go 15-20 meters and snap the line into the clip, hang the clip on the cord with a carabiner and release the bait along the cord to the boat. The higher the fishing rod is raised, and the faster the boat goes, the faster the clip will slide towards the boat. We fix the reel a meter from the boat and put the spinning rod in a glass. And we repeat the process according to the number of spinning rods.
We use spinning rods with a length of 2.10 meters, a test weight of up to 150 grams and multiplier reels with a line counter. The cord is a braided cord PP 0.22. But according to updated data, it is better to use a monofilament somewhere around 0.3 in diameter. It absorbs the jerks of the fish. We will switch to it. All bites occurred at a depth of about a meter, plus or minus a meter.
All the information we had about catching this amazing fish was purely theoretical.
The most frequent salmon bites are from 9 to 11 pm and from 6 to 8 pm. Moreover, in the morning, first he begins to fish with wobblers (they have a depth of a meter greater than that of a spinner), and then with spinners. In general, it takes better on spinners.
Our spinners had a similar shape to the Professor, but we fished with Bluefox. Coloring matters. Because the water is extremely clear. But wobblers also work. Moreover, colors that work well for wobblers work much worse for spinners and vice versa.
We fished with Bluefox spinners
Lucius
The color R has proven itself to be the most mega-killer.
Wobblers worked best Rapala X-RAP
Here the RT colorway showed the best results, but the SB color was not much inferior to it. A pike weighing 9 kilograms, by the way, was caught just on SB.
All spoons require replacement of hooks with thinner and extremely sharp ones. It is necessary to install an additional double-tee on top. It is possible to install a wabik a meter in front of the spoon to enhance the bite, but it is extremely doubtful that you will be able to remove an individual that has landed on the wabik. We only hatched perches.
Salmon is a completely crazy fish; jumping out of the water alternates with locomotive jerks of 20-30 meters of friction. The mouth is very hard - it’s very difficult to break through with a hook. We tried a lot of possible tactics. And with tightened clutches and with practically loose ones, and with fast fighting and slow fighting and with all sorts of combinations.
In our case, we at least somehow managed to pull out the fish with the clutch tightened as much as possible and the fish caught as quickly as possible. Without stopping the engine (only at minimum thrust, so as not to confuse the boats). During this time, the fish managed to make “only” 4-5 candles. The candles are fierce and the spinner almost always lands on them.