Relevance of application
The beneficial properties of twisting are used in many types of fishing.
- When fishing on a feeder for a diverting leash.
In this case, hard Skr. removes the leash with a hook from the feeder, which prevents the monofilaments from tangling and tangling with each other.You can also use Skr for the feeder.
- For float fishing, to equip the fishing line with several hooks.
If there is a need to install additional hooks on a fishing rod with float equipment, a small hard helps to remove the hook or leash with a hook from the main monofilament line. This equipment option is possible if the float rod is equipped using modern methods: a sliding float and a sliding sinker, limited in movement by cambrics.By moving the sinker and float to the free space of the monofilament, you can install additional hooks under or above the sinker.
- For equipping the half-bottom with bends for hooks or leashes.
A half-bottom is a fishing rod with a reel on which a fishing line with hooks is wound, at the end of which a sinker of the desired weight (usually 30-40 grams) is tied. This design allows for long casting. The bite is detected due to the activation of a signaling device from the vibration of the fishing line or due to the jerky chaotic movements of a large float freely moving along the fishing line (most often a foam ball painted in a bright color is used). In this case, the float-ball does not record the diving depth of the bait, but only signals a bite. - For equipping donks with bends with hooks or leashes.
For donkeys, you can also use Skr., SkrO and SkrOP as outlets for attaching hooks (or leashes).
Expert opinion
Knipovich Nikolai Mikhailovich
Zoologist, hydrobiologist. I am interested in fishing at a professional level.
Important! The hook and eye can be placed directly on the Skr after the formation of the Skr. Having narrowed the loop as much as possible, we thread it through the eye of the hook, thread the hook into the twist loop, and tighten the fishing line on the hook.
All types of feeder installations:
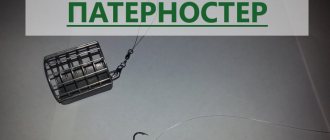
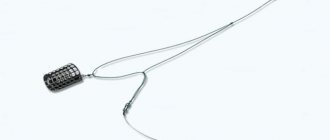
Paternoster (Gardner loop)
The Paternoster or Gardner Loop rig can serve as an excellent tool when fishing in any type of body of water (both on a river and in still water).
The Gardner loop is a main fishing line with bait, from which a leash with a weight feeder extends. As a rule, the main line should be of a larger diameter (0.2 - 0.3 mm), and the secondary line should not be more than 0.2 mm.
The main line is folded flush with the thin line and a knot is tied at a distance of 40 cm from the end. The stronger the knot, the better; thin fishing line should not slide along the main fishing line. The Figure Eight knot is ideal.
We cut off one end of the secondary fishing line and shorten the second to 20 cm - we get a leash onto which we knit a swivel with a clasp at a distance of 10 cm. The feeder is attached to the clasp. At the end of the main fishing line we tie a leash using the “loop to loop” method. See how to knit this knot.
In the video you can watch the entire process of manufacturing feeder equipment from Alexey Fadeev .
Symmetrical loop
An installation called “Symmetrical loop” is usually made from fluorocarbon fishing line (diameter from 0.28 - 0.31 mm).
The peculiarity of this installation is that it has a self-cutting function, which is not available in a number of alternative feeder equipment.
The manufacturing process is reflected in the video and diagram.
An important aspect is the nuance that the length of the twisted fishing line together with the loop should be longer than the total height of the hanging feeder on the anti-twist.
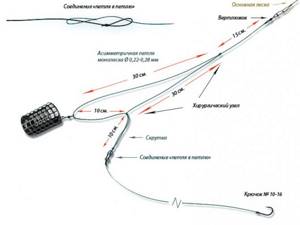
diagram “Symmetrical loop”

Asymmetrical loop
The fishing line in this type of installation is recommended with increased sensitivity, so professionals give their preference to fluorocarbon fishing line.
First of all, it is practically invisible, and is also a very durable and poorly deformable material, which affects the sensitivity of the bite.
Installation “Asymmetrical loop” is a modification of equipment with a symmetrical loop with the only difference being that the section of the fishing line on which the swivel with the feeder is located is 2-3 cm longer.
Installation with anti-twist tube (Combine)
diagram with anti-twist tube
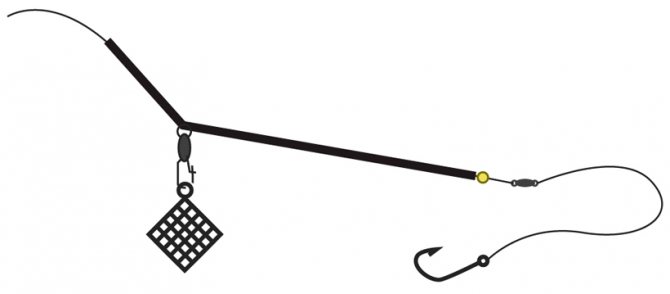
Of course, the main feature of this equipment is its ability to prevent tangling and twisting of the fishing line.
Although this type of feeder installation does not have a self-hooking effect, an experienced angler can always achieve greater results with just such a result, because it scares the fish less - it practically does not feel resistance when biting.
Quite simple installation - check out the manufacture of this type of equipment, which can be knitted using either monofilament or braided line.
Inline
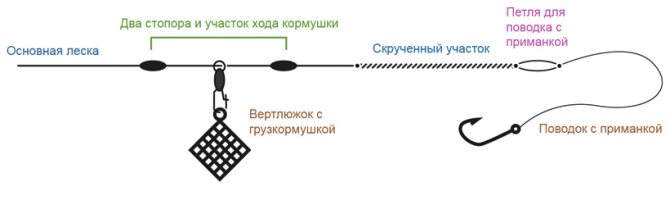
The “Inline” installation is very similar to the asymmetrical loop equipment with only one feature: in the inline you can adjust the free stroke length of the feeder
In this case, there is also a section of twisted fishing line near the terminal loop for the leash with bait. It creates a rigid shape that prevents the leash from getting tangled with the fishing line of the rig. The length of this twisted section is approximately 15 cm, which is fixed with a regular figure eight knot.
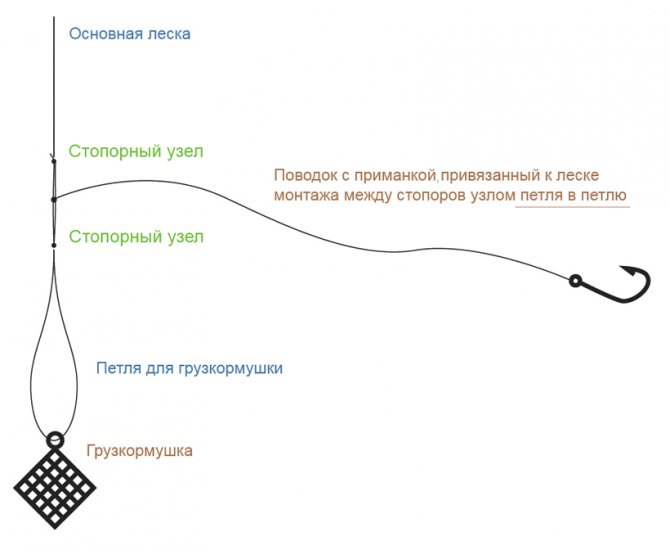
Helicopter and two knots
Using this installation you can fish both from the bottom and in slightly higher layers of water. Fans of feeder fishing often choose this equipment for catching roach, bream and silver bream.
This feeder equipment is interesting because it is very, very sensitive to fish bite. Works well in fishing conditions with an active bite.
The manufacturing scheme is quite simple.
Tooling Method (Flat Method)
Flat is, first of all, a form of innovative feeder, which has a fairly simple method of attaching the mounting line, as well as such a feature as the ability to distribute the feed itself using tiny air bubbles, which are stored in the feeder while it is charging.
You can see how the Flat Method behaves in water.
How to do
- On a piece of monofilament.
When using feeder equipment “asymmetrical loop” Skrt. you need to knit on a free piece of monofilament. A piece of monofilament with equipment is subsequently tied to the main fishing line, and while the monofilament is free, you can easily make Skrop on it.
In this case, the simplest and fastest method is:
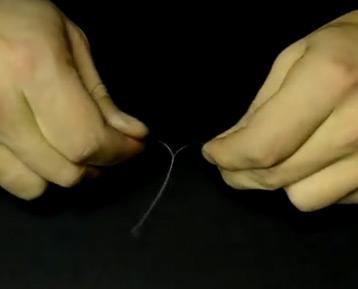
- Take a piece of monofilament of the required length, fix it with the thumb and index fingers of your right and left hands at a short distance from the future location of the loop being formed on the twist.
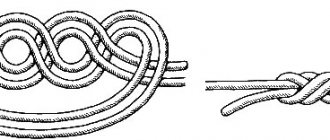
- Having formed a twist of the required length, it can be secured with a knot (figure eight or surgical).
We rotate the monofilament with the fingers of both hands at the same time, but in opposite directions. A small loop will automatically form and the monofilament will begin to curl. If necessary, you can place the fingers of both hands at a very small width and gradually move them in different directions as the length of the Skr increases. The closer your hands are to each other, the smaller the loop is formed.
Expert opinion
Knipovich Nikolai Mikhailovich
Zoologist, hydrobiologist. I am interested in fishing at a professional level.
Important! For feeder fishing, the more common method is to fix the base of the twist and the loop for the leash with knots (i.e. Skrop). The loop for the leash can be secured with a knot at the very beginning before the formation of the Sk.
- We move the float and sinker to the sides so that they do not interfere with the formation of Skr.
We tie an additional hook to the monofilament line.
Expert opinion
Knipovich Nikolai Mikhailovich
Zoologist, hydrobiologist. I am interested in fishing at a professional level.
Important! A leash with a hook can be tied to a loop after the formation of Sk.
We form the required number of Skr, SkrO or SkrOP in the same way as for a piece of monofilament.
We tie two hooks to the fishing line
Both the upper and lower hook are tied to the same fishing line. This is, as a rule, the main line of a float summer or winter fishing rod.
The “Podolsk fork” tie is made on the basis of a regular loop made with a simple triple knot, to which two hooks are tied.
How to tie 2 hooks - sequence of actions:
- We make a loop on the fishing line using a simple triple knot, leaving a reserve at the free end - this will be the side leash;
- We cut off one of the ends of the loop near the knot - this will be the leash for the lower hook;
- We tie the upper and lower hooks sequentially. How to tie a hook.
! Remember to wet the knots as you tighten the line.
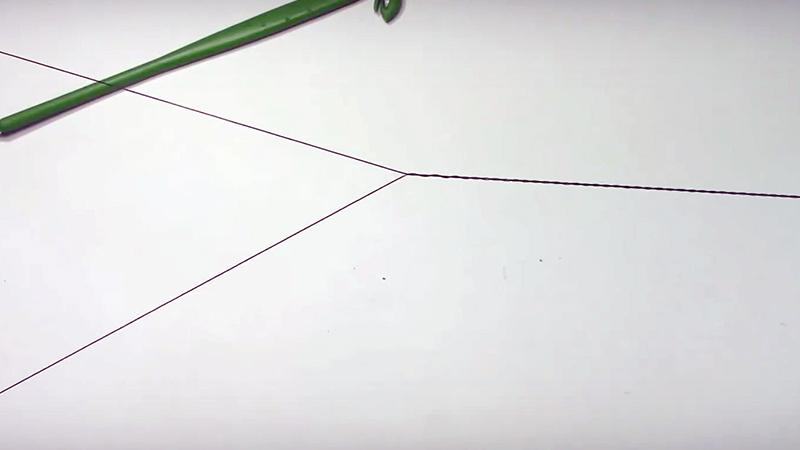
How to tie 2 hooks so they don’t get tangled - video
To demonstrate the sequence of actions in the video, so that it is better visible, we take large hooks and instead of fishing line, a rather thick thread of a bright color.
Using a sushi stick with cambric
- We thread a loop of monofilament into the cambric. The length of the cambric will determine the size of the loop.
- We put the cambric together with a loop of monofilament onto the sushi stick. The cambric should fit tightly onto the stick.
- Holding the fishing line with one hand, rotate the stick with the other. Skr is formed, the density of which can be adjusted by twisting the stick.
- Having formed a twist of the required length, take out the stick and remove the cambric.
In this way you can form Skr. any length with a loop of the desired size anywhere, even on a fully rigged mono line.
Mounting on donks
When equipping the old spinning rod that has been tested for decades, fishermen mainly used, and still use, tying the feeder directly to the end of the working line. Moreover, in this installation it can be attached either directly with a knot, or on a loop, or using a carabiner.
Two or three short leashes with hooks are attached above the feeder, creating a kind of garland. It is important to position them so as to prevent overlap with each other.
Some fishermen use a method of attaching leashes with hooks on opposite sides of the feeder, and equipping the garland with a carabiner. This allows you to quickly change equipment.
Other Applications
Since twisting imparts additional rigidity to a certain part of the monofilament , the use of Skr, Skro and SkrOP is relevant for separating various parts of the equipment to prevent overlaps.
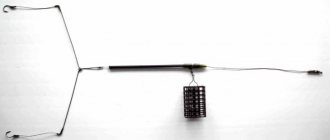
- Creating a rocker using two twists.
- Fold the fishing line in half, forming a large loop.
- We bend the free end of the monofilament line at the required distance equal to the length of the right arm of the rocker arm. Rotate the monofilament with your fingers until Skr is formed. required length.
- We wrap the remaining free end of the fishing line behind the main monofilament line, wrap it around the bottom of the fishing line in the middle of the rocker arm, bring it out in front of the main fishing line, thread it into a loop, and secure the structure with a triple surgical knot.
By rotating the monofilaments with the fingers of both hands in opposite directions, we create the first Skr - the left shoulder of the rocker.
Since it is possible to create a Skr of any length, you can also use twisting to form the branch end of a meter-long fishing line on which the bait is attached to a leash. Usually they use a shorter length (30-50 cm) and tie a 50-70 cm leash to it.
You can use 40 - cm Skr for the sinker.
Two twists will separate both parts of the equipment in different directions and reduce the risk of twisting or overlapping of the monofilaments.
“Helicopter and two knots” – equipment for current
This type of equipment (we have a detailed article about it) is suitable for fishing in bodies of water where current prevails. To make it we will need:
- fluorocarbon fishing line with a diameter of 0.25 - 0.35 mm. (if fluorocarbon is not available, you can take monofilament);
- feeder weighing from 40 to 130 grams, the heavier the feeder, the thicker the fishing line;
- hook and swivel;
After all the components of the future gear have been found, we begin manufacturing:
- We take the fishing line, measure out a piece fifty centimeters long, and cut it off.
- Fold the line in half in the middle. We get a double piece of twenty-five centimeters.
- At the folded end we make a loop connection with a swivel.
- We measure fifteen centimeters from the folded edge and knit the first knot using the figure eight method.
- Next, from our first knot towards the tips we measure another centimeter. Using the same figure eight we make the second knot. We should now have a double line with a swivel on one side and two knots on the other.
- We attach the feeder to the swivel using a clasp.
- Now the most important part in the manufacturing process is the leash. It is important to remember here: our leash, in order to adapt to the existing flow, must rotate freely around its axis. Therefore, we tie a small loop at the end of the leash. Now between the two “eights” we make a slip loop and tighten it.
- We attach the hook to the leash, and the equipment itself to the main fishing line.
How to tie two hooks to a float fishing rod?
There are several ways to attach an additional hook to the fishing line:
- two hooks of the same length at the end of the main line,
- hooks of different lengths,
- a hook located above the sinker.
The first method is used to more effectively hook the fish into the mouth cavity, since there is a possibility that the catch may be lost during a sharp hook.
The second method can be used when you are not exactly sure which bait the fish will bite on, so two different baits are used.
And the third method can be used in fishing at different depths. To do this, you need to place one or two weights between the hooks.
Attachment nodes
First way
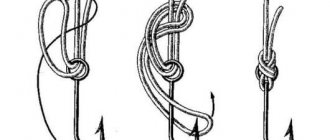
If we talk directly about the nodes, the easiest way to attach is presented in the figure below.
Execution order
To attach an additional leader, you will need a piece of fishing line of the required length (the same diameter as the main fishing line). A hook should already be attached to this leash, and a knot should be tied at the other end. The knot can be ordinary, in the form of a figure eight. An overlapping loop is made on the main line in the right place and a leash with a hook is threaded into it, as shown in the figure above.
After this, both parts of the fishing line are tightened firmly enough, but not too much, so as not to damage the structure and not provoke its rupture in the future. If everything is done correctly, the leash will be positioned strictly perpendicular to the main line. This arrangement will prevent both leashes from becoming tangled.
Advantages
The advantage of this method of attaching a leash is not only its simplicity, but also the speed of execution. In addition, this knot uses a minimum number of overlaps, which guarantees a lower probability of line breakage.
Second way
The main difference between this method of attaching an additional leash to the fishing line and the one described above is the absence of any additional leash. Therefore, this method is also quite simple to implement.
Execution order
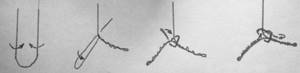
With this method, the first thing to do is tie the hook that will be higher than the second. Therefore, you first need to decide on the distance that will be between them. As a rule, two hooks are tied using this method for catching predatory or peaceful fish with live bait. Accordingly, it is necessary to select the distance between the hooks based on the length of the bait bait being attached.
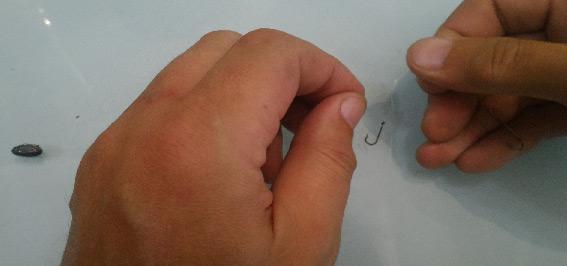
Attaching the first hook
After measuring the required distance, the end of the fishing line is threaded into the eye of the hook and pulled to the required level. Then the free end is wrapped around the shank of the hook several times and pulled into the eye again. The first node is ready.
Installing the second (bottom) hook
The second hook is attached in an identical way. The free end remaining from the knot made on the first hook is wrapped around the shank and inserted into the eye, and the excess part of the fishing line is removed.
Complex ways
Now we come to a more complex type of fastening the second hook to the fishing line, although essentially the methods described above are sufficient. Fishermen most often use simple methods.
Third way
With this method, a double or triple loop is made on the main line, where it is necessary to make a second leash. After this, both ends are simultaneously tightened until a figure eight is formed. A pre-prepared leash with a hook is threaded into one of the holes in the resulting figure eight, at one end of which there should be a knot. Then, with a smooth movement, the figure eight is tightened. This must be done carefully, alternately tightening both the leash and the fishing line.
Fourth method
Two loops are made, one of which will be threaded into the adjacent one. A leash is prepared in advance with a regular knot at the end that prevents slipping, which is inserted into the threaded loop and tightened.
other methods
In addition to the above methods of tying knots for two hooks, there are also more rare ones , but worth attention. Let's consider one of them.
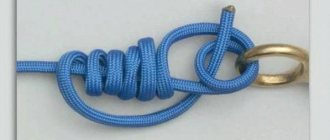
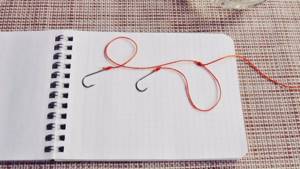
A fishing line about 30 centimeters long is folded in half and, using twisting movements, a so-called pigtail three to four centimeters long with a loop at the top is made. The ends of the fishing line at the end of the braid are tied, leaving only a small hole into which the braid will be threaded.
This pigtail is threaded through the hole (this is done in the same way as the diverter leash). Now the main line is threaded into the loop of the pigtail, onto the ends of which two leashes are attached in any way.
Two leashes on a float rod: advantages and disadvantages
Not all anglers accept such equipment. A float rig with two hooks seems like a fad. The second hook on a float rod has its pros and cons .
Advantages of a second hook
Each fisherman chooses for himself how many hooks to use. You won't increase your catch just by equipping your fishing rod with several hooks. It all depends on the experience and skill of the fisherman himself, not to mention other fishing factors that are also of significant importance. Therefore, despite the obvious advantages of this type of equipment, there is no need to quickly remake the equipment; it requires a competent approach and practice.
So, highlighting the advantages of equipping a fishing rod with several hooks , we can highlight the following:
- the ability to attach two different baits,
- stability of hooks in water due to increased weight in conjunction with sinkers,
- increasing the chances of successfully hooking fish,
- lower hook depth,
- the ability to fish at different depths.
Detailed description of all the advantages
When attaching two different baits, it is possible to determine which fish is most responsive to one or another. Sometimes when fishing, the float, along with the equipment and baits, is strongly carried away by the current, and therefore you have to constantly throw the fishing rod to the right place.
When there are several hooks on the fishing line, the total weight of the equipment increases. Thus, in addition to the fact that it is not carried away by the current, it is buried even lower.
If we talk about the third point , which characterizes this method of equipment on the positive side, then it is worth mentioning the increase in the likelihood of hooking fish. This is due to the fact that you can miss the fish when hooking (especially with a sudden movement of the hand) if it has not completely swallowed the bait. If there are two hooks on the line, the chances of catching fish increase.
If you make leashes of different lengths, you can fish at different depths. To do this, use one or more sinkers, which will be located between two leashes. This also increases the likelihood of a catch.
Disadvantages of the second hook
The advantages of the two-hook fishing method do not exclude the presence of disadvantages. Some of these disadvantages can be called situational, that is, they depend on how correctly the leashes were positioned and tied. These include:
- line hook,
- leash breakage,
- entanglement,
- reducing the possibility of “playing” with bait.
Detailed description of all the disadvantages
Now let's look at each of these disadvantages separately. It has already been said that with a double leash there is such a positive aspect in fishing: if one hook gets caught on something, be it some kind of snag or mud, then the other hook will remain with the fisherman safe and sound. But this applies to the case when The leashes on the fishing line are located at a considerable distance from each other. If they are located close enough, then the likelihood that the line will catch on something on the bottom or in the coastal area doubles. Here we can mention another disadvantage, which largely depends on how correctly the leashes are installed.
Close location
If they are placed too close, they can become tangled very easily. Then, instead of enjoying fishing, you will have to untangle the fishing line, and this, as you know, is a rather tedious and lengthy process. Sometimes when the hooks get tangled, you have to cut off part of the fishing line, which leads to the loss of the length of the entire rig. Read below to learn how to position leashes so they don't get tangled.
Nodes
The fact that a node is a weak point has already been mentioned above. Therefore, when there are two or more of them, and this is inevitable in this rigging method, then line breakage can occur more often, especially if the knots are tightly tightened.
And the last minus is the deterioration in the quality of the fisherman’s game with bait. This is due to the increase in weight because there are two leashes attached. Together with the sinkers, this will make playing with the bait somewhat difficult.
How to tie two hooks so they don't get tangled together
To do this, a meter-long fishing line is cut.
Note: This length is arbitrary, it is taken as an example. It is better to choose the length yourself based on the expected fishing conditions.
Then the fishing line is folded in half and a figure-eight knot is tied at one end, thereby forming a small loop. At a distance of about 20 cm from the loop, another figure-eight knot is made (for greater reliability, the end can be passed around the edge several times), wetted and tightened.
You should get one loop with a double fishing line, at a distance of 20 cm from which there will be a knot, and behind the knot there will be two leashes. Now one line is cut between the loop and the knot almost to the very root of the knot, leaving literally 1–2 mm. After this, the hooks are tied, and the loop itself is attached to the main fishing line. The hooks are tied in the usual way: the fishing line is wrapped around the shank several times, the free end is inserted into the eye, and the remainder is cut off.
Due to the fact that the hooks are located at a distance from each other, the likelihood of them getting tangled during the fishing process will be significantly reduced. This equipment is suitable for both float and bottom fishing.