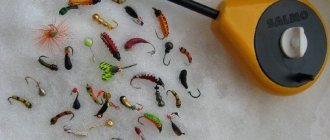
Experienced winter fishermen say that there are no catchy or “empty” jigs: it all depends on the ability to wield one or another bait. These skills include not only the correct selection of bait in accordance with fishing conditions and the ability to give it the most seductive game. It is important to be able to correctly tie a jig to a fishing line, because this moment also significantly affects the effectiveness of fishing.
In today’s publication we will look at the simplest and at the same time reliable knots that allow you to attach different types of jigs to a fishing line. This applied art seems difficult only at first: later you will be able to carry out the corresponding manipulations almost by touch, and in conditions that are far from comfortable. So let's get started!
Requirements for correct binding
Many novice fishermen do not particularly bother with fixing the bait, considering this point not too important. This is a fundamentally erroneous opinion, which is refuted at the very first trips to the reservoir. The slightest mistake in tying - and the jig will not adequately respond to the angler’s manipulations or will go into the reservoir along with the fish that are attracted to it. Moreover, the more delicate the equipment, the more attention should be paid to this point.
This bait provides a rich catch even with a bad bite!
Read more So, the basic requirements for correct fixation are as follows:
- Correct orientation in the water. The bait must maintain the correct position in the water: this affects the effectiveness of hooking.
- Reliability of fastening. The importance of this factor is clear: an insecurely attached bait will go away with the fish when fishing, especially if the trophy is large enough.
- Saving the configuration. This is especially important when fishing for passive fish, when the most delicate equipment is required, and a rough knot can alert potential prey.
- Minimize friction. Any friction against hard metal negatively affects the strength of the fishing line. This point is especially critical when using tungsten frames.
- Correct game. Any knot, one way or another, makes adjustments to the game of the bait. We must try to keep them to a minimum.
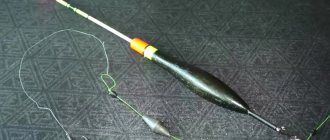
Loop
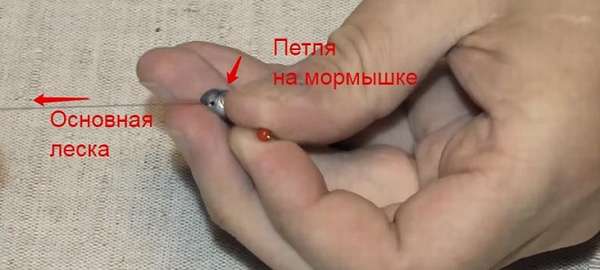
Attaching a reelless jig in a loop somewhat changes the game of the bait. How this will affect the fish can only be found out in a reservoir under specific fishing conditions.
Due to the fact that the reeler runs freely in the loop, and its front part at the attachment point moves due to the hinge joint, the reel will make a more “cheeky” play when reeling. This method is also suitable for devils with rings and jigs, which are located in the water at an angle to the vertical (hook to the side) even in a free suspension - baits like nail balls, nail cubes and others (due to the shifted center of gravity).
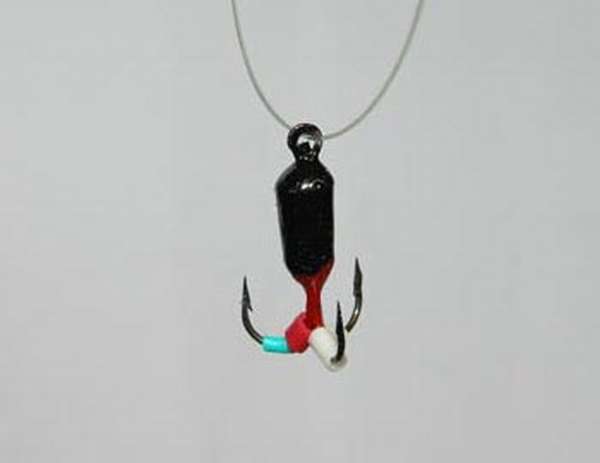
Figure eight knot. Please note that the bait is threaded into the loop immediately when tying it (to run freely along the line).
The spinning method, when the loop itself is threaded through the bait and then the object of the tie is inserted into it, will not work. Otherwise, the meaning of the loop node – free movement – will be lost.
The loop is made small - no more than 1 cm long.
This is interesting: How to tie leashes to the main line on spinning, bottom, and float tackle
Rapala knot. This knot is recommended for tying wobblers and rattles because of its reliability and loop strength. Also suitable for jigs with a ring for direct suspension.
The simplest old-fashioned methods
First, let's look at the options with which baits were attached in the past. They were used even before the invention of modern monofilaments and lures with mounting eyes. Now it is better to refrain from these methods: more modern units have appeared that maximally satisfy the requirements listed above.
Use with caution:
- Simple knot. This option is not reliable (the equipment is weakened by almost half), and when tying the jig with a fishing line over the body, it also gives it the wrong position. A simple knot on the forend is more acceptable, but it does not provide sufficient strength.
- Stopper knot. This is how the first “uralochki” were tied, but sometimes the locking knot is still used today. The option is outrageously simple: the fishing line is threaded through the body of the bait, and a rough limiter knot is formed at the end. As a result, the jig moves freely up and down, which is not very favorable for the game, and the reliability leaves much to be desired. This method is applicable only when catching overactive fish with coarse equipment, but sometimes it is also used for reelless fish with bait.
- Hook method. The classic version, which appeared by analogy with tying a hook without an eye: the fishing line is located on the fore-end, tied around it and itself. This method is still very popular and, in principle, not bad, with the exception of one point - the constant friction that arises.
Tandems and pendants
In reelless fishing, various pendants, tandems of two jigs, and garlands are often used. To do this, one of the jigs (fly) is attached to the main line above the first bait.
Expert opinion
Makarov Igor Tarasovich
Hunter and fisherman with 20 years of experience. Wildlife lover
To tie a jig to the line of a winter fishing rod in tandem, the same palomar knot is used, only the end is not cut off - the lower jig is attached to it. As a result, after tightening, the tip of the hook should point upward.
Tying two jigs is not limited to this method only - others can be used. The main thing is that the monofilament is not injured at the point of tightening.
A light phosphor eye or hook with beads, a fly, can also be tied in a sliding version. This suspension is more effective - when playing, the snag jumps up and down.
During the descent, the light suspension sinks more slowly than the main load below, which further attracts fish. As stoppers, ordinary beads are used at the top and bottom, through which a fishing line is threaded in a loop.
Working stroke length (distance between stoppers – from 2 to 10 cm.
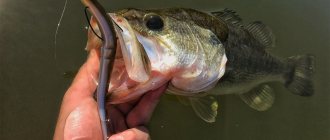
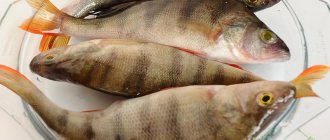
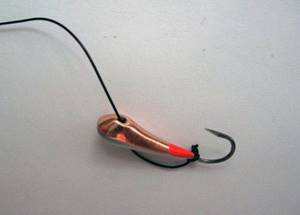
Fishing with a jig is very popular among fishermen who engage in winter ice fishing. The jig can be used for fishing in the summer season. The maximum effectiveness of this bait is possible only in clean, transparent water of small, slow-flowing rivers.
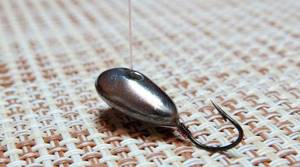
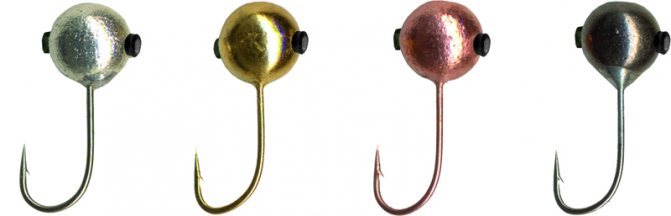
A jig consists of a hook that is soldered into a lead or tin pellet, thus simultaneously loading the tackle and “making” it attract fish with a polished metallic sheen. Fish are caught with a jig without using bait; the predator is attracted by the shiny hook and rarely swims past without tasting it.
You can catch decent sized fish with this rig, so it shouldn't have any weak spots. To cope with catching large fish, you should use only high quality parts and accessories. First of all, you should tie this bait to the fishing line correctly.
This is interesting: What does a hunting license provide and what is it for?
Tying jigs with an eye
Jigs with an eye appeared much later than baits with a hole and gradually took their rightful place in the arsenal of any self-respecting ice fisherman. Now this is a very large family, including most of the reelless and super-heavy predator jigs, which, strictly speaking, form a separate class of baits, approaching winter vertical spinners.
It is objectively easier to attach such baits, and a free position on the line can provide the most realistic game. In this case, the correct position is determined not so much by the quality of the binding as by the location of the eyelet.
All methods of tying baits with an eye can be divided into three broad groups, each of which we will now consider individually.
Tightening knots
This group includes knots that tightly encircle the ring and are tightened on it. They are compact, simple, suitable for any equipment, but are especially good on thin fishing lines. There are many of them, so we will consider only the two most common and easy to implement.
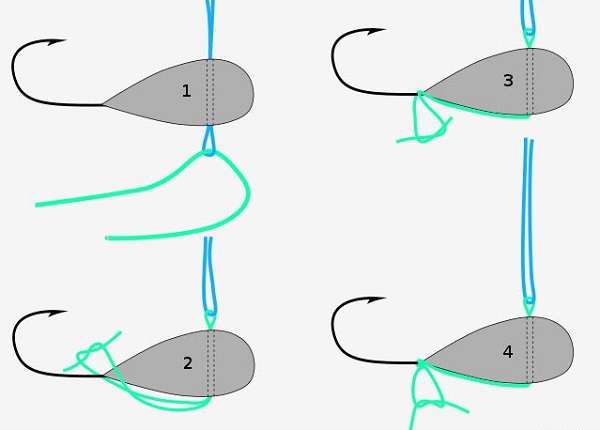
Perhaps the simplest and most reliable “Palomar” is knitted as follows:
- Fold the fishing line in half.
- We pull the loop through the eye.
- Tie the loop into a single simple knot.
- We pass the bait through the loop formed at the end, starting from the hook.
- Tighten the knot on the ring well.
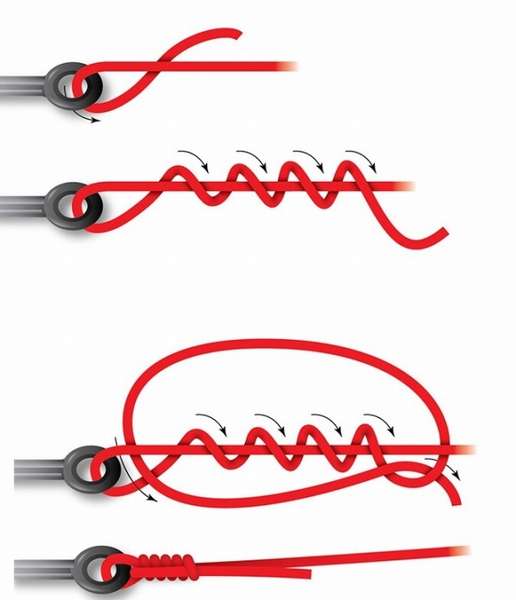
“Improved Clinch” is a little less reliable, but almost simpler than the above-mentioned brother. We tie the jig like this:
- We pull the line through the eye.
- We make 5-6 turns of the fishing line around itself.
- We go back and pull the end into the space near the ear.
- We pass the fishing line into the resulting loop between the entwined part and the “return”.
- Carefully pull the turns together and tighten the knot.
Both of these units are quite rigid, which allows you to slightly vary the overhang angle. They are ideal for tying reelless baits such as “devils”, where playing strictly vertically is required and any deviations to the side are not welcome. On the other hand, for most other jigs, a rigid binding is rather a disadvantage, limiting freedom of movement.
Fixed hinges
In this case, we are talking about loops that are tied on the fishing line and tighten on themselves, and not on the eye of the bait. As a result, the jig moves more freely, that is, the game is as realistic as possible, which is optimal for most reelless jigs that do not require strictly vertical wiring. This binding is also relevant for wobblers and spinners.
On the other hand, in this case it is impossible to vary the overhang angle - it obeys only the laws of physics, and the compactness of the equipment suffers somewhat, which should be especially taken into account during the period of deep winter passivity. In addition, the risk of chafing of the fishing line increases: the metal eye constantly fidgets around the bend.
As an example, we give the simplest non-tightening loop, its execution reminiscent of the already described improved clinch:
- We make a simple knot on the fishing line, but do not tighten it.
- We pass the end into the eye, and then into the resulting loop of a simple knot.
- We make five or six turns of the fishing line around itself.
- We return and again pull the tip into a simple knot.
- Carefully tighten the simple knot.
- We pull the coils to the knot and tighten them completely.
Hook methods
Hook tying methods are relevant for jigs both with and without an eye. As mentioned above, they appeared a long time ago, even before the birth of hooks with rings, and even more so, jigs. Despite some disadvantages, they are still successfully used by experienced non-reelers and almost all fans of fishing with a jig without an eye. Their essence is that the knot is completely located on the fore-end, and the eye (if present) serves only to pull the fishing line.
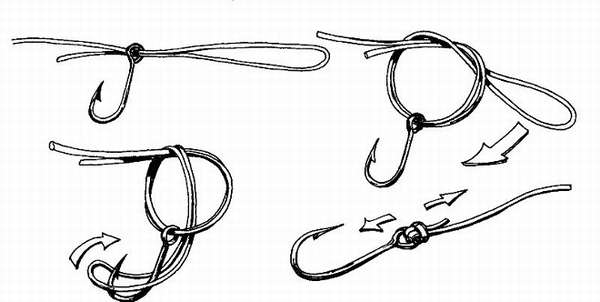
As an example, we can cite a simple leash knot (“fishing noose”) - a kind of classic of the fishing genre:
- We pull the line through the eye and stretch it along the hook until it bends.
- We form a loop and wrap the fore-end along with the fishing line towards the body of the bait.
- After several turns, we go back and pull the line into a loop near the bend.
- Tighten the line and cut the end.
This is just one example of the hook method: the “spindle” mentioned below is knitted and used during fishing using the same principle.
How to properly tie a jig to a winter fishing rod
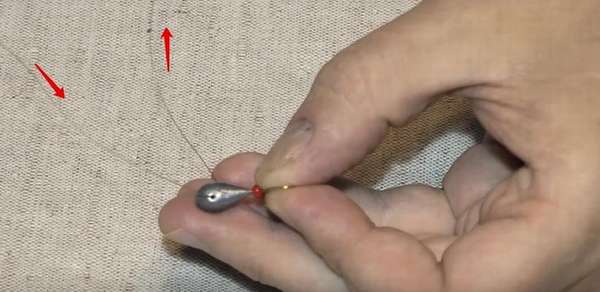
Let's look at a few really reliable jig knots with explanations of when and what to use them for. In winter fishing gear, regular monofilament is used, not braid. You need to knit winter jigs depending on whether there is an eye. The knot is formed on the shank of the hook, tightly on the main one or through a blind loop.
How to tie a jig without an eye with a hole in the body
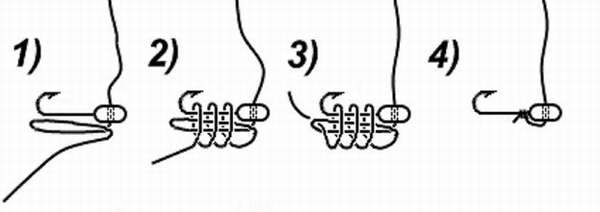
To hang an ant jig, a small jig, a shot (and any other with a pass through the body), the vast majority of anglers use a regular self-tightening loop. Depending on the angle of the hole, the position in the water is formed (horizontal or inclined, with the hook point up). This method is universal and is used in many other equipment elements. Many winter roads do not use other knots for jigs, always using a loop. The scheme is simple:
- The end of the monofilament is threaded into the hole (always from the side of the hook tip),
- A loop is formed, applied to the shank of the hook,
- While holding the loop on the hook, make several turns around the shank (from three to seven),
- The free end is threaded through the remaining loop,
- Next, the knot is carefully pulled up, moistened and tightened.
This is a reliable fastening method that practically does not weaken the monofilament. However, there is also a minus. The fishing line is strongly bent twice at the entrances to the holes. Under heavy or prolonged load, it becomes damaged in these places and breaks. This method is suitable for hooks, lead or tin jigs. But when using the thinnest monofilaments (0.08-0.1 mm) with tungsten, frequent breaks occur precisely due to the formation of such damage on solid metal. And this problem is being solved with special measures.
Reliable binding
The most reliable way to attach a jig to a fishing line is the self-tightening loop method discussed above with some improvements. This type of tying is used by athletes and experienced jig makers. It can be used with any type of winter monofilament - fluorocarbon, fluorocarbon, ordinary nylon. This method is perfect for tying a tungsten jig onto the thinnest tackle. The attachment of the jig to the fishing line is based on a loop, but you can also use a figure eight or some other one on the shank of the hook. Improvement issues concern equipping the hole with a cambric or fluoroplastic insert, tightening through the stock made and forming an additional loop.
- Tightening is carried out using a temporary loop specially created for this purpose. This helps protect the thread from damage.
- An additional loop is placed through the body. The area of contact with the metal increases, which reduces the load on the assembly itself.
- A cambric or fluoroplastic insert protects the monofilament from the sharp corners of the hole.
Many tungsten jigs are made with cambrics or inserts. But if there are none, then you can insert them yourself. This is possible if the tungsten body has a hole large enough for the tube to enter (it can also be drilled out). If the cambric is slightly larger in diameter, then it can be preheated in boiling water and stretched. The tube is inserted, the excess ends are cut off, and the edges are countersunk using a lighter. Tubes do not need to be installed on lead and tin blende.
Binding scheme
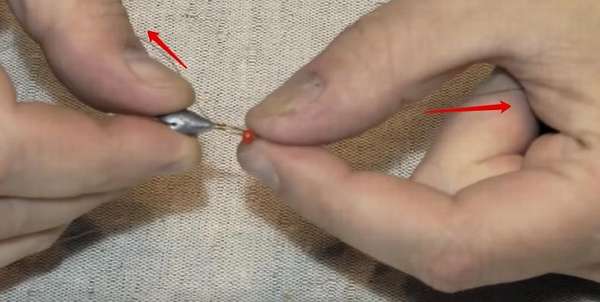
So, we tie the jig correctly.
- We pass from the hook point side.
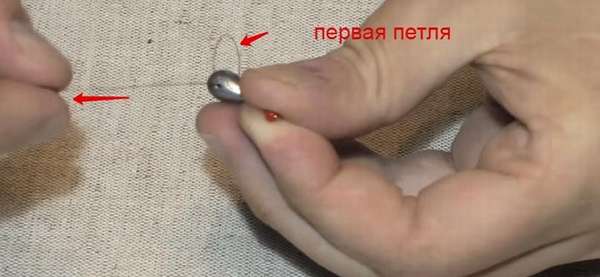
- We form the first loop, threading the end again from the side of the sting.
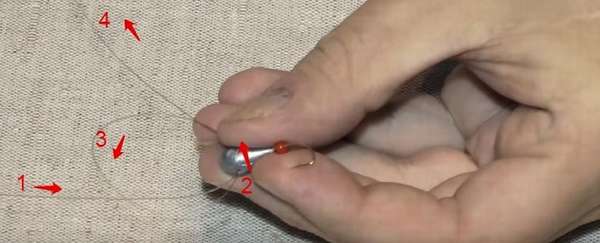
- We form a second loop, but no longer thread it through the jig. Place the loop on the outside, holding it with your fingers. This is a reserve of fishing line for tightening so that you can do it directly and not through metal. Thus, when tightening, no kinks are formed on the ends, the scaffold is not injured or stretched.

- We tie a standard self-tightening (fishing) loop on the forend. We tighten it (after wetting it), but not through the hole, but using our special second loop.
- Select a technological loop for tightening.
- Select and tighten the first loop. On a pellet it can be placed on top, and on any elongated bait (ovsinka, uralka) - on the side.
- Ready. The hanging position is correct. The fastening is reliable, the fishing line is not damaged.
Be sure to wet any fishing knots with water or saliva while tightening. This reduces friction and, as a result, there is no damaging microheating. The monofilament tightens stronger and more securely.
Many anglers believe that this is the best knot for a jig with a hole. This is confirmed by practice on reservoirs. To tie a jig with a ring on a fishing line, other solutions will be required.
Another reliable method is using a braided loop. A braid is threaded into the bait (from the back side), a loop is formed in front and the cord is passed back (from the face). A match or nail is inserted into the loop (so that it does not get pulled into the hole when tightening. Both ends of the cord must be tied together to the forend (loop, figure eight). Then the monofilament is tied to the braided loop.
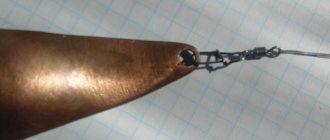
With a ring
Let's look at how to tie a jig with an eye to a fishing line. This is simpler - for a jig with an eye, knots familiar to most anglers are used. But there are some nuances here too. You can pass the monofilament through the ring and tie it at the top - then the bait will take on its natural hang. If, after passing through the eye, you tie the end to the fore-end (with a loop or a figure eight), then this can give the position of the bait some angle to the vertical. This is more relevant for baitless fishers, since, naturally, the game of the bait will change. Only the fish in the pond can tell you which option is better.
To tie a jig with a ring using the standard method, three common and reliable knots are most often used.
- Self-tightening loop (again). But this time it is formed on a fishing line.
- Clinch (regular and enhanced).
- Palomar.
The most reliable is considered to be tying with a palomar knot or a reinforced clinch. You can knit a jig with an eye for a winter fishing rod using any of them. To tie a palomar, you need the monofilament thread to be able to be threaded through the ring twice. Don't forget to wet the knots. Schemes are below.
Blind loop
Used for baits of an elongated shape or with a heavy upper part (devils, goats, posts, cones, bananas with an eye). Experienced reelers claim that this method improves the performance of these deceptions. The limitation is the presence of a ring. The loop knot is formed using a figure eight. But it is better to tie it with a loop using a rapala knot - it is more difficult, but stronger.
Schemes of knots for tying with loops:

Knots for jigs without an eye
“First-born” jigs were just lead pellets with slits in the body and were simply tied with thin twine. The first lures with a hole in the body were a qualitative step forward and required a slightly different approach to tying. They were made mainly from lead and tin, that is, soft metals, so the problem of chafing the fishing line was not so acute.
And everything seemed to be going well, but here’s the problem: the soft jigs quickly deformed, which could not but have a negative impact on both their configuration and the quality of the game. Naturally, the industry quickly responded to the problems of anglers and gave them tungsten jigs, which have both greater specific gravity and unsurpassed strength. Everything would be fine, but when tying tungsten jigs using traditional methods, even first-class Japanese monofilament frays in record time. In short, the problem had to be solved - to come up with more functional units and introduce small fishing tricks.
Spindle
Here we have the best method at the moment for tying baits with a hole in the body (including tungsten). Essentially, the "spindle" is an evolution of the above-mentioned simple leader knot with some variations.
This method is truly champion in strength: line breaks are extremely rare, since friction is minimized. "Spindle" is compact, and at the same time provides the most realistic animation. True, knitting it in the cold is somewhat problematic, especially without the appropriate experience.
Absolutely all jigs can be tied in this way, but you need to take into account that the knot takes up some space on the fore-end. In most cases, this is not important, but reelless baits with beads somewhat lose their characteristics. The bead rests against the knot and does not hit the body of the bait, making sounds that attract fish, or gets stuck altogether, which makes normal animation impossible.
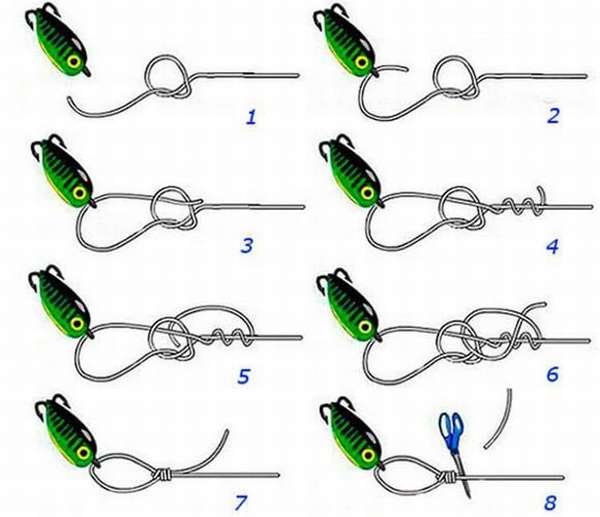
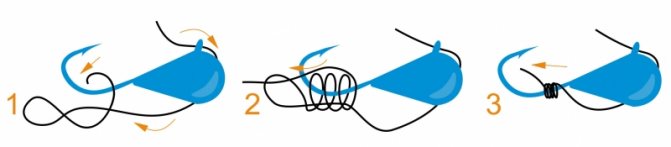
So, "spindle":
- We thread the fishing line through the hole.
- We draw it along the hook.
- By going back we form a loop.
- We wrap the hook and fishing line in two folds with the free end towards the body.
- After 5-6 turns, we return, thread the tip into the original loop and tighten to tighten the turns.
- Tighten the knot by grasping the line at both ends.
By analogy with the ear
In this case, we are talking about using a hole by analogy with an eyelet, that is, tightening a knot on it. In this capacity, the above-mentioned “palomar” and “clinch” can be used in an improved version. They do not roughen the equipment, especially if the diameter of the hole allows you to hide the knot in it.
This method of tying is relevant for jigs, where most of the hook is occupied by feathering and other “decorations” (it does not load the already busy forend, does not interfere with the beads, and even allows you to adjust the angle of inclination to some extent). However, it must be taken into account that the quality of animation in this case will suffer significantly, since the mobility of the bait will be severely limited.
Improved hook option
The knot may not be located completely on the hook, but only partially, that is, simply secured to it with one turn. Of course, this somewhat reduces its reliability (the most problematic is the place of contact of the fishing line with the hook), but it frees up the forend and practically does not affect the freedom of movement of the beads, which is especially important for reelless baitfish.
Such a knot is knitted by analogy with a simple leader or “spindle”. However, after pulling into the hole or eye (this is true for all jigs), the line is only thrown over the fore-end, and then wrapped and tightened around itself, without catching the hook.
In this way, it is much easier to tie a jig in fishing conditions, since you do not need to press the fishing line to the hook and get caught in miniature loops, so it has the right to life, although it is significantly inferior in reliability to purely hook-based options.
Blitz tips
- How to increase the catchability of jigs: Some fishermen string bait on the hook to additionally attract fish. If a bare hook and a lead ball are used, then the fish begins to bite after visual detection of the bait. To attract fish with the smell of bait, the hook is equipped with bloodworms or maggots. You can use a “sandwich” of various baits attached to one hook.
- Canned corn can also be used as bait. Its smell attracts many peaceful fish.
- If the tackle is used with a bare hook , then here you can “work” on the attractiveness of the lead pellet. You can polish lead with automotive polishing pastes.
- You can paint the pellet black. During winter fishing, you can successfully catch pike perch and pike perch with this bait.
- The red cambric placed on the shank of the hook attracts predatory fish well, both in winter and during fishing in the summer months. Fish are caught especially well if the jig is constantly in motion. This twitching of the bait provokes a large number of bites.
- Good results when fishing with this tackle can be obtained if you use beads. Small beads are strung on a hook and secured to the shank. The shine, which is visible to fish in clear water for tens of meters, will help increase the catch using such bait.
- Golden jigs , which can be prepared at home, have very high catchability.
You can gild tin or lead bait; the process is carried out in 2 stages:
The product must be coated with a layer of copper
For this, the electrolytic method of applying a thin layer of metal is used. To perform this operation you will need the following materials and tools:
- Copper sulfate.
- Water.
- Sulfuric acid.
To prepare a solution for electrolytic coating, 40 g of copper sulfate is dissolved in 100 ml of distilled water. The mixture is thoroughly mixed and 2–3 ml of sulfuric acid is added. The acid must be concentrated, so it should be added to the mixture very slowly, taking precautions. Be sure to use rubber gloves and safety glasses.
The mixture is poured into a glass container and copper plates connected to the positive pole of a direct current source are lowered into it. Then a jig attached to a steel conductor is lowered into the mixture, to which the negative pole of the battery is connected. A 12 V battery can be used as a power source. After several hours, the part will be covered with a sufficient amount of copper film.
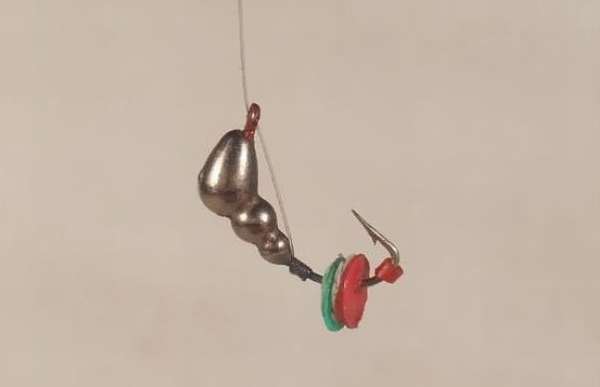
Tying several jigs
Sometimes it becomes necessary to use several baits (one usually acts as the main one, the rest play the role of provocateurs). The role of a provocateur is usually either a light jig with a ring, or an ordinary hook with all kinds of “jewelry” that attracts fish. Usually the additional bait is mounted 10-20 cm above the main one, but there are exceptions, even down to the lower location.
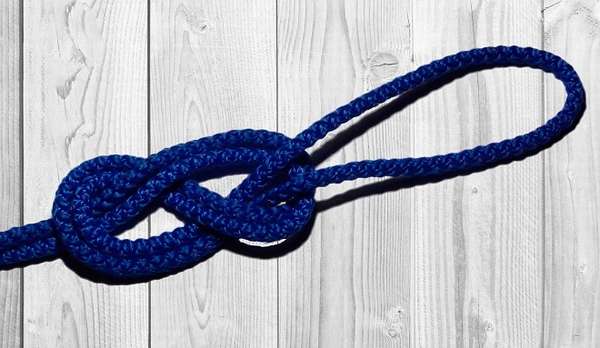
The top bait is always applied first. It can be made sliding by limiting the mobility with stoppers or rigidly fixed to the fishing line using the above-mentioned self-tightening rigid knots. Sometimes one or more decoys are attached to the main fishing line on leashes in “counter-eights” (fold two fishing lines, form a loop, twist it, pull the ends through, use the upper end as a leash) or through swivels. The use of swivels is especially important when fishing in strong currents, but the equipment in this case will be far from sophisticated.
Direct suspension
For direct suspension with a ring, diagrams and instructions can be found on any website or in a fishing publication. This is a standard suspension for hooks, lures, swivels, etc.
In reelless fishing it is used for ringed devils and baits that require a strictly vertical position in the water. Naturally, you cannot use a simple knot - the fishing line will lose up to 60% of its strength at the point where it is tightened.
You can use the usual methods - a palomar fishing knot, a clinch or a suspension in a loop. Let's take a closer look at how to tie a jig with a ring.
Palomar knot. The scheme is simple and reliable. However, it may not be feasible in cases where the reelless ring is so small that the fishing line does not pass through it twice.
Clinch. Another common and reliable node. You can use both a regular and a reinforced clinch, when the end of the monofilament is once again additionally threaded into the loop.
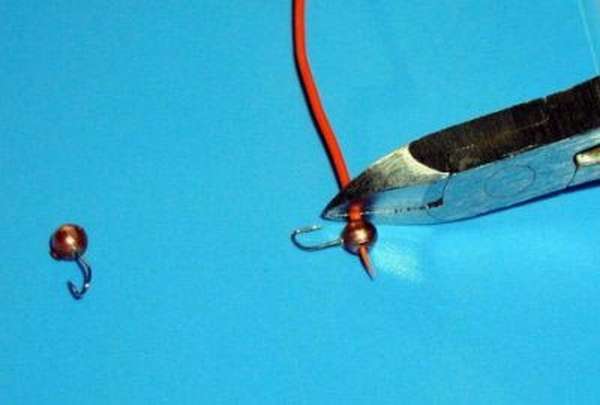
The nuances of tying tungsten frames
As mentioned above, tungsten jigs are a qualitative step forward compared to classic lead and tin lures. Now they predominate in the arsenal of almost all experienced subglaciers, although they are much more expensive than their classic counterparts.
Tungsten is heavy and hard, which minimizes windage and eliminates the risk of deformation, but there is also a downside to the coin: this metal is almost diamond hard, therefore, the slightest notch on the jig acts on the fishing line as a powerful abrasive, which requires a special approach to tying.
Naturally, it is not possible to “clean” such a surface at home; this is not soft lead, but there are still ways to combat this negative phenomenon. The first and most common of them is to use cambric or fluoroplastic: we stretch the tube into the hole and cut it so that the edges are smooth and slightly protrude from the hole. If necessary, if the protector does not fit tightly in the hole, it can be secured with glue.
The second option is to create a temporary loop from a more abrasion-resistant cord, acting as a ring. It looks something like this:
- Fold the working monofilament in half and pull it through the hole.
- We thread the cord into the monofilament loop and pull it through the hole with the monofilament, forming a small loop.
- We tie the cord on the forend with an ordinary single knot, then on the opposite side with a double knot.
- We secure the knot, controlling the loop.
- We tie the working line in any way to the improvised eye.
How to tie two or more jigs?
To increase the chances of a bite, the fisherman increases the number of baits in his gear. And this is justified:
- Makes it possible to use several different baits at once.
- Different techniques for tying additional hooks give different bait play from each other.
- Increasing the attention of fish to several baits at once.
Requirements for tying several jigs:
- The lower rewinder should be heavier than the upper ones.
- The distance between baits is at least 25 cm.
- The first thing you need to do is knit the top jig.
You can knit with a train in various ways:
- With a leash. It is usually attached using a counter figure eight (Flemish) knot.
This design is usually used on bodies of water with current.
- Sliding. Fixed with stoppers. Typically, light pendants are used (phosphorus eye, fly, hook with beads).
Used as a provocative bait.
- With suspension. Knitting technique - palomar knot.
Supporting tools
In principle, you can tie a jig without auxiliary tools, but why not make this process more comfortable? This is especially important in winter fishing conditions or if your fingers are not too accustomed to such delicate manipulations.
So, it doesn't hurt to have on hand:
- Tailor's pin . This is a needle with a loop or ball at the end. The presence of such a “handle” simplifies delicate manipulations such as clearing a clogged hole in the bait.
- Small scissors (you can even use nail scissors). They are very convenient for cutting fishing line, and they don’t take up much space.
- A syringe and a needle from it . You can clean the hole with a needle, grind the edges of the lead jig, or use a syringe to blow out a hard-to-reach area.
- Knife . A must-have accessory: you can cut the fishing line, chop the cambric, and clean the hook from unwanted traces of paint.
- Lighter . It is indispensable for melting the ends of the fishing line.
If possible, get the smallest fly fishing holder: with its help, tying knots on the hook will become much easier.
Types of fastening
Jigs with an eye
The main line is located on top, and on the left is the tip, which will need to be cut off after tying the knot.
Jigs without an eye
Recently, jigs without an eye have often been found, in which there is a through hole through the entire body. It doesn’t matter - there are mounting methods for such jigs too.
Of course, if you want to improve your catching results, it is better to use a leash and not tie the jig directly to the main line.
Tying two jigs
The scheme for tying two jigs can also be organized on a leash with a jig attached to the main line, however, you can fix the second jig and higher directly on the main line.
Successful fishing with a winter rod and during summer vertical fishing !
Source: https://hariuz.ru/sposob-lovli/rybackie-xitrosti/kak-privyazat-mormyshku.html
Angling tips
We will assume that you have already mastered almost all the basic wisdom; it remains to familiarize yourself with some nuances:
- Don't forget to wet the line. When tying a jig, constantly wet the line with saliva or water. The fact is that monofilament stretches when it gets into water, which weakens the knots. Similar conditions should be created for him “on the shore”.
- You can secure the knot with superglue. In principle, this is just a recommendation, but worthy of attention: a drop of superglue will strengthen any knot. True, this must be a truly microscopic dose, especially when it comes to delicate equipment. Gluing should be done only after the fishing line has completely dried.
- Treat the ends. The ends should be left extremely short, and in the end, do not forget to melt them until soft. The resulting miniature ball will not only further secure the knot, but will also prevent unwanted pricking of the fish when biting.
- Do not double pull unless necessary. Some fishermen, who are especially concerned about the strength and quality of the binding, practice double or even triple pulling the thread through the hole of the jig, forming several loops on its body. This is motivated mainly by the fact that then the fishing line sits tightly in the hole, which allows it to be fixed in the most attractive position. This is partly true, but a similar effect can be achieved by using a cambric that fits as closely as possible and a well-tightened “spindle”. The loops of the fishing line roughen the equipment, which is not welcome under normal conditions, but in the dead of winter it is completely catastrophic.
- Take equipped gear with you. Tying knots in the cold is still a pleasure, but you can lose the bait, and the fishing conditions can change dramatically. And in general, without experiments, sometimes you won’t catch anything. Therefore, it is wise to take with you several fishing rods, equipped for all occasions - they weigh little, and the equipment is inexpensive.
Let your gear always be in order, the weather cool, and your fishing productive!
Fishermen wonder why I’m biting and they’re not?
I’m revealing a secret just for you: it’s all about the miracle bait! More details