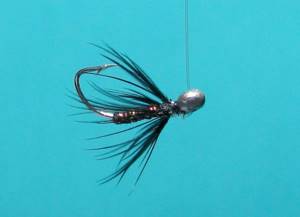
Once you see fly fishing, it’s impossible not to fall in love. But mastering this science is not so easy. And if the classification of fly fishing reels, rods, cords and undergrowth is clearly fixed and understandable, then with the main bait - the fly - everything is much more complicated. How not to get confused in the huge variety of fly fishing flies? How to learn to select what you need? Where, when and on what flies do fish bite – we will devote a series of articles to the answers to these questions. They are the very first, but also the most fundamental, who open the blog of our online store.
The ABC of tyers can be called the book “Fly Fishing Fly” by Mikhail Shishkin - this is the first Russian-language manual book that contains the history of creating flies, a description of materials, and step-by-step instructions for tying flies. Unfortunately, the book in paper version is quite difficult to find today - it was published in the early 2000s in a small edition. Today, the heirs of Mikhail Shishkin do not give any comments about the re-release of the book.
Of course, there are works of many foreign ones: Oliver Edwards, Milan Kurnotsik and other equally honored masters. There are Russian-language videos with detailed, high-quality analysis of fly tying, for example, by Igor Tyapkin and others.
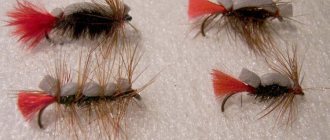
In all these educational and explanatory materials, the following classification of fly fishing flies is adopted:
Dry flies
· Wet flies
Nymphs
· Edgers
· Streamers.
Let's look at them in a little more detail.
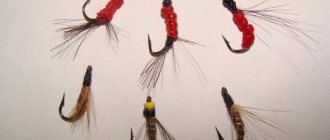
choosing a wet fly
The next problem is choosing the right fly. If the fish is not particularly picky about a dry fly, then it can see a wet fly well enough to catch the catch. Therefore, the approach to choosing a wet fly is very relevant. Let me make a reservation right away that no realistic flies pass here. And if you have not yet gained enough experience, then you should start with the familiar Red Tag(s), Black Zulu, March Brown and other popular flies. The main thing is not to make a mistake in size.
Front sights: what are they?
Flies are imitations of insects that have fallen into a pond or their larvae, made with maximum similarity from:
- thread;
- animal hair;
- bird feathers.
There are several types of flies:
- First, there were sinking versions of baits, which are also called wet. Usually such flies:
- have a streamlined shape;
equipped with wings;
- may have a brush.
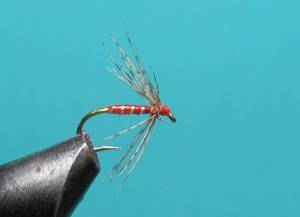
- Flies that imitate insects by floating on the surface of the water are called dry flies. Very often this species is characterized by the presence of imitation wings in the upper part of the bait and legs that lie on the sides of the water. Sometimes such flies are lubricated with fat to maintain buoyancy.
- From the many drowning flies, the nymph is isolated separately. This fly sinks very quickly and imitates insect larvae that live on the bottom.
- Streamers are flies that imitate fry. All streamers have one distinctive feature - the presence of a feather that masks the hook. Streamers can be equipped with a winding that resembles scales.
- Emergers are flies that are an intermediate type of bait between nymphs and wet flies. They are characterized by high catchability and great popularity.
They are usually made on large hooks numbered up to 12 from materials that absorb water well.
The appearance of a wet fly should imitate as much as possible a larva or insect, because in the water the fish can see the bait.
Timeless classic. Nymph flies and “rising” fishing
Fly fishing using a dry fly is characterized by good control of the fly and the visibility of the bite. However, wet fly fishing also has its adherents, including those who do not forget and develop the classics of the genre - fishing with “soft feather” flies.
In general, wet fly fishing, while perhaps not as spectacular, produces larger fish than dry fly fishing. The main reason is that fish, especially large and experienced ones, prefer to feed away from the surface. Firstly, she is safer there, and secondly, there is more food there. Indeed, the stages of insect metamorphosis that float to the surface to hatch and fly away, that is, the most mature nymphs and pupae, constitute a significant proportion of the diet of trout, grayling, dace, chub and many other fish species (for example, in medium rivers, insects at this stage of development can make up more than 90% of trout food). Thirdly, the visibility of food on the surface is limited by the visual window, and visibility in the water column is limited only by its transparency, therefore in clear waters the fish sees a wet fly at a greater distance than a dry one.
History and terminology
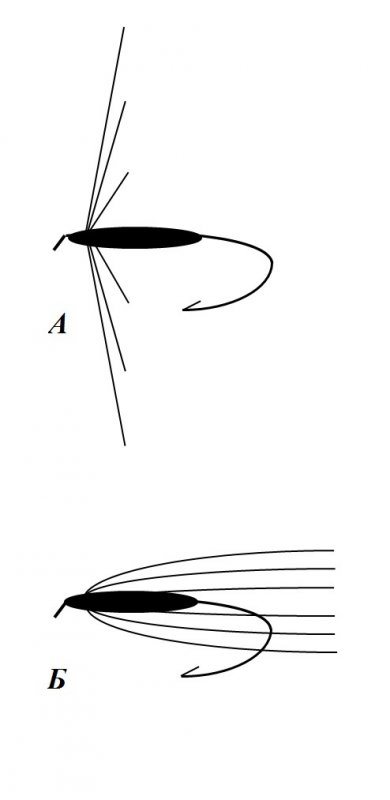
One of the first soft feather flies was the North Country Spider, which appeared in the north of England and the south of Scotland. The oldest fly, known, according to some fly fishing historians, since the 15th century, is the Orange and Partridge fly (then called the “donne fly”, and described under the name “Orange and Partridge” in 1807). Since, unlike dry flies, the collar of spiders is knitted from soft feathers, and they do not have elements depicting wings, they are all combined into a large class of flies such as “soft feather” (Soft Hackle) or “wingless wet flies” (Wingless Wets). . A distinctive feature of classic flies of this type is also the very design of their soft feather collar. Firstly, it is rare, and secondly, the length of the feather barbs can be much longer than the “standard” one (Fig. 1A), which creates significant resistance to the flow of water when the fly moves, so the feather barbs are pressed closer to the hook and, vibrating, propagate vibrations (Fig. 1B).
Fig.1
In the middle of the last century, J. Leisenring introduced dubbing made of natural fur into the design of flies, which made the flies more similar to the nymphs of aquatic insects. His student and co-author V. Heidi, in order to emphasize that these flies are precisely the transitional stage from a nymph to an adult insect, gave them the name “flymph” (fly + nymph = flymph). This can also be translated as “nymph” (the transitional stage from nymph to fly).
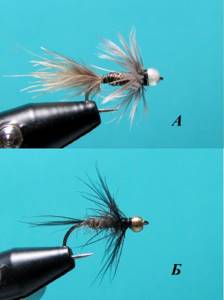
Another branch of the soft feather fly tree are flies tied in the Soft Hackled Nymph style. These flies represent immature nymphs living on the bottom. The wiring of such a fly is carried out by drifting at the bottom, therefore, unlike nymphs, a load is introduced into their design: winding a hook with lead wire, or metal heads: brass, steel or tungsten, and unlike spiders, the feather collar is made more abundant and shorter. They differ from traditional nymphs by the presence of a collar, which “animates” the fly with its vibrations.
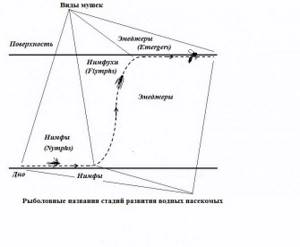
Progress in the study of selective feeding options for trout has led to the appearance of flies depicting the stage of already emerging nymphs and pupae, when the process of the emergence of an adult individual in the surface film of water occurs. They represent a separate class of flies - emergers, which are in no way connected with nymphs either structurally or by the method of wiring. They are, however, related in that they depict different stages of the same process of transformation: a) the emergence of the nymph, which is demonstrated by nymphs, and b) the emergence of an adult insect from the nymph, which is imitated by emagers (Fig. 2). Confusion sometimes arises from the fact that insects in these two stages of one process are called by fishermen in the original language by one word - emerger (formerly emergent nymph), since this word reflects both emergence and emergence; but in Russian there is no such word.
Rice. 2
Materials and methods
Traditionally, wingless wet flies were (and still are) tied using natural silk. Currently, nylon silk, or nylon thread, is a good substitute. That is, the thin body of the spider can also be knitted from a mounting thread (photo 1A). Silk, like some other materials, is quickly “combed out” by the rough lips of a cut fish. To strengthen the structure, knitters use wax or add soft wire to the body. The latter creates additional elements of attraction - body segmentation and glare of reflected light.
I often use another method: after the fly is ready, I varnish it well. Firstly, this solves the problem of insufficient strength, and secondly, I can immediately see what final shade of color the fly acquires, since the color of silk in water (wet, as well as varnished) is different from dry. Thirdly, the varnish protects the winding made of reflective elements, for example, from a strip of broken foil (photo 2). Last but not least, you can use not only transparent, but also colored varnish (and colored varnish diluted with transparent) to tint the body of the fly with varying intensity.
Photo 2
The body of the spiders can be made from other materials: woven lurex (photo 1B), latex thread (photo 1B), and even beads, cambric and much more. There are no specific requirements for hooks, except, perhaps, that these flies are often crocheted small - on hooks No. 12 - 16.
The collar of the fly is traditionally knitted from soft feathers of chicken, partridge, woodcock, snipe, starling, etc. In imitation models, feather collars are selected according to the color of the emerging wings, antennae and legs of emerging nymphs of specific insects. The density of the plumage, from one (classic) to 2 – 3 or more turns, is still a subject of debate. Opponents of the classics say that after the first fish, the fly can lose all its plumage and remain “bald”. In practice, I have not encountered such a dramatic event, and the loss of even half of the feather barbs does not in any way affect the working qualities of the fly.
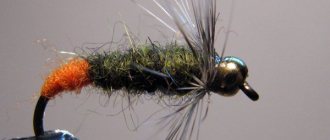
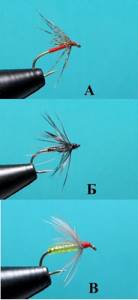
The more voluminous body of modern nymphs is knitted from natural materials: feathers or fur (hare masks, muskrat fur, mole fur, squirrel fur and other fur containing guard hair). These materials get wet quickly and often trap small air bubbles as they penetrate the water. They look like gas bubbles of larvae floating to the surface or air bubbles of caddis flies using them for breathing when they climb into the water to lay eggs. Some new synthetic materials, for example, Z-Lon (kling-on yarn), also have this important property. Photo 3 shows a nymph with a plastic bead representing a gas bubble. Heavier metal beads are inserted into the body of nymphs, designed for fishing in sections of the river with a relatively fast current combined with great depth. “Soft-feathered” nymphs tied in the Beadhead and Goldhead style can also be used as nymphs (photo 4, A and B).
Photo 3
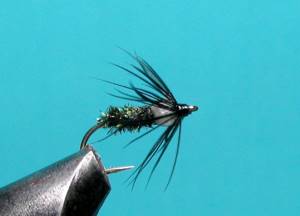
Photo 4
Fishing method
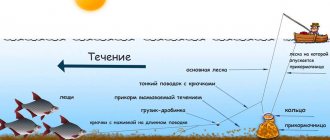
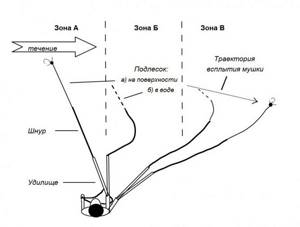
Many authors point out that fishing with these flies is done by casting downstream. From my own experience I can say that you should not limit yourself to just this. After all, the task of “rising fishing” is to move the fly in such a way as to emphasize the process of its movement from the bottom to the surface. And the simplest and most natural way is to cast slightly against the current and simply follow the drift of the line with the rod. The casting angle depends on its distance, current strength, depth and should be such that the fly and the end of the line drift in a parallel course for a time sufficient for the fly to sink to the bottom. Then the line and leader are straightened by the current and pull the fly to the surface (Fig. 3).
Rice. 3
When we cast across and downstream, the line and undergrowth are immediately pulled by the current of water and do not allow the fly to sink deeply. This means that you need to make sure that the fly does not “feel” the influence of the cord being carried away by the current during the time required for its immersion. You can, for example, after casting, unclench the fingers of the hand holding the line (release the overhang of the line between the reel and the first ring) and sharply lift the rod up. The result is an overhang of cord already in front of the rod, which must be “given” to the current, smoothly lowering the rod towards the water. At shallow depths and with moderate currents, the procedure can be repeated during one trip.
These two methods of casting and presenting a fly are the simplest, but are acceptable only in sections of the river with a relatively uniform flow. More often, especially during long casts, the current speed in the line drift zone differs from the speed in the fly drift zone. To compensate for the difference in speeds (including during the immersion of the fly), many types of mending have been developed, creating the required line configuration on the water for specific conditions. Much depends on the strength of the current, its uniformity, depth, turns and many other fishing conditions. Mending is a separate topic.
In all cases, delivering the fly to the bottom is an indispensable condition for successful fishing “on the rise”. When fishing takes place in your native reservoir, there are no problems. But in a new place with unknown depths, it’s better to “overdo it” and even get a couple of hooks before getting comfortable. For such cases, I use a fly tied on a light jig with a relatively large hook (photo 5). Such a “scout” sinks faster and, even if it drags along the bottom for some time, has a lesser tendency to get caught due to the position of the hook with the tip up.
Photo 5
Bite
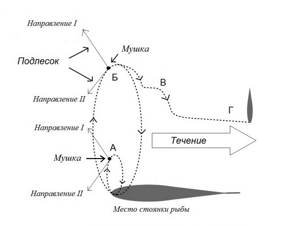
A bite on a wet fly, of course, is not as visible a phenomenon as on a dry one, but it is clearly noticeable by the change in the movement of the cord and sometimes even felt by the hand (tactilely). It can occur at any stage of the retrieve and, depending on the relative position of the fish and the fly, it manifests itself in different ways. If the leader is oriented towards the angler in direction I (Fig. 4), and the fly appears in the fish's field of view in the immediate vicinity of it (Fig. 4A), the fish only needs to make a small movement, no matter sideways or upward, to grab the fly, remaining practically in place. Such an event is perceived as stopping the movement of the cord (as a hook). If the fly passes at such a distance from the fish that it has to move from its place (Fig. 4B), take the fly and return to the parking lot, then the bite looks and feels like a pull (quick straightening of the sagging line). If in this case a small fish “runs” after the fly, then instead of a confident pull, two short jerks are tactilely felt (Fig. 4B). This happens so quickly that the thought arises: “that’s it, I missed it!” The fact is that the small fish does not have enough strength to return to its place, pulling out the line in one movement, it immediately makes a second jerk and “freezes” - for some time it does not take any action, holding the fly in its mouth (Fig. 4D). Therefore, hooking, which in this case seems belated, most often brings fish.
If the undergrowth is oriented towards the angler in the opposite direction, then all bites look like a stop in the movement of the line, and we may not even perceive some of them. When the cord is positioned straight downstream, when it is no longer moving, the bite looks like a sharp straightening of the sag of the cord and is felt like a jerk.
Fig.4
Conclusion
The emergence of an insect larva at the emerging stage under the influence of a gas bubble or by active swimming due to the work of the abdominal muscles, caudal fins, or a pair of special rowing legs is a natural and quite frequent event. This determines the fish’s readiness to grab an object floating to the surface, which sparkles with gas bubbles (or reflective elements) and spreads vibrations of working muscles (or vibrating feather barbs).
The use of simulation models of nymphs and emedgers is important during the period of mass emergence of insects of this species. However, as practice shows, for nymphs this is not absolutely important, since during the current the fish does not always have time to discern the details of a floating object and attacks it, be it an imitation or an attractor of the appropriate size. The most striking confirmation of this is the effectiveness of the Orange and Partridge fly in such fishing, which has been successfully used by anglers for centuries, although it is not an imitation of a specific type of aquatic insect.
Fly tying technique
- At the ring of the hook, fasten the mounting thread and fix the eyes of the fly;
- Wind a lead wire weight;
- Attach the film for the upper body in the same place;
- Immediately fasten a piece of fishing line to wrap the body;
- Apply green dabbing to the mounting thread;
- Wrap the body out of this dubbing;
- Wrap the body of the fly with film;
- Wrap the body of the fly with fishing line;
- Bend the film back and apply black dubbing to the mounting thread;
- Reel a thorax out of this dubbing;
- Secure the hazel grouse feather;
- Make one full turn with this feather and secure it with a mounting thread;
- Trim the excess feather and fluff the thorax and feather;
- Bend the film forward over the thorax and feather and secure with mounting thread;
- Make a final knot and trim off excess film and thread;
- Cover the eyes and thorax with a black marker;
- Cover the body and thorax with clear varnish. The fly is ready!
These articles may interest you
- Fishing for burbot on Lake Onega in winter
- Fishing on Rakity in Rubtsovsky district
- How to choose a spinning rod based on material
- How to make a simple fish smoker
- How to feed fish with worms
- Fishing on the rivers in the Topchikhinsky district of the Altai Territory
- Fishing in the region:
- Fishing during the seasons:
- Fishing:
- Homemade bait and tackle