To begin with, it will be useful to know the definition of the concept in question. A knot is a variation of connecting ribbons, various kinds of threads, ropes, fishing lines and other things, tying them to a variety of objects; way to create loops. The process of tying knots itself is not a difficult task, but doing it quickly and correctly, selecting suitable knots depending on the situation - this already requires certain skills and dexterity. So, for example, one node needs to be tightened under load, but the other does not. There are also those that “creep” when untied slowly, or they are tightened very tightly so that they cannot be untied.
In the framework of water, mountain, hiking, and also in mountaineering, sea knots are naturally used. The specificity of these spheres has turned them not only into an integral component of the technique of overcoming obstacles encountered along the way, but also into a way of forming temporary structures in a wide variety of conditions.
Functional classification of existing nodes
The connections under consideration began to be made on fundamentally new materials (from the point of view of their properties), and therefore previously unknown modifications of the units arose. This led to the identification of their functional variety:
- Splicing of 2 or more flexible materials in different variations.
- Fastening the knot carrier (a rope connects 2 or more objects to each other, 1 of which can act as a rope support).
- Stopper of the assembly carrier in various kinds of holes, including those that relate to the designs of the connections in question.
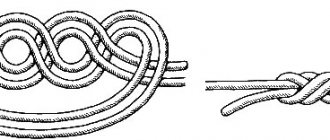
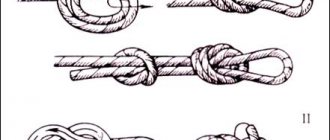
Eight
This classic knot forms the basis of a dozen other, more complex knots for various purposes. It can be used as a stopper at the end of a cable (unlike a simple knot, it does not damage the cable even with strong traction and can always be easily untied) or, for example, for the rope handles of a wooden bucket or tub. You can even use a figure eight to fasten strings to the pegs of violins, guitars and other musical instruments.
Specifics of terminology regarding the concept under consideration
It is connected directly to the knots, as well as various kinds of flexible materials that are used for the process of knitting them. For convenience, the terms and their designations are presented in table form.
| Term | Definition |
| Cable | Specially made rope (base – synthetic, plant materials) |
| Running end | The end of the cable that begins to move during tying a knot (in other words, free) |
| Kalyshka | A loop of cable (closed) that is made in such a way that it crosses itself |
| Obnos | Grasping a cable around an object (another cable) |
| root end | The end of the cable that is not secured (not used for tying) |
| Loop (open) | Curved end of the cable (no crossing over itself) |
| Half knot | Overlap (single) of 2 ends of 1 cable (different cables) |
| Schlag | The rope completely wraps the object (another rope) |
Requirements for tying knots
To carry out this procedure correctly, of course, some practice will be required. It is she who dictates a number of requirements for tying knots, namely:
- Easy to remember tying.
- Spontaneous release is inadmissible, either under or without load.
- No spreading under the influence of variable loads.
- No need to knit tightly.
- Fitness for purpose.
Another unspoken rule is that if there is any doubt about the correctness of knitting, it is better to abandon it.
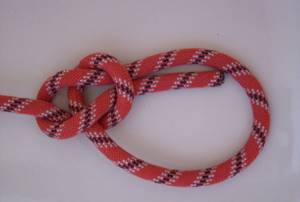
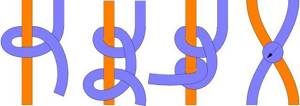
Tourist nodes: guide, guide-eight
How to tie a guide and figure eight knot correctly? The differences when tying them are insignificant. They are designed to create a strong loop, used in a climbing harness. The conductor and figure eight are very reliable units, which is why they are widely used in tourism. In this case, the figure eight is considered more reliable, and therefore does not require control nodes, unlike a conductor.
Conductor node diagram:
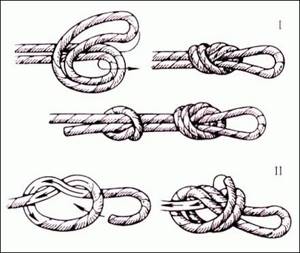
It is knitted with one rope, which is folded in half and a simple knot is tied at the end to form a loop. You can also tie it in the middle of the rope.
This knot is very simple to perform - practically it is the simplest non-tightening loop. Can be knitted at one end. Under load it pulls tightly and crawls on a rigid rope. Used to attach a rope loop to something. To make untying easier after use, you can first insert an object into the weave of the knot. If there is a high probability of variable loads, it is recommended to knit a control knot.
Such a knot leads to a decrease in the strength of the rope by 30-40%.
This node can be considered as a preparatory node before studying the next node - conductor figure eight.
How to take a figure-eight conductor knot? Scheme:
Knitted with one rope. It is a modification of a simple conductor. You should make the loop half a turn more and insert it into the knot on the other side. This knot can also be tied at one end. A control node is not required here. The scope of application of the figure eight conductor knot is similar to a simple conductor.
This is interesting: Legal basics of first aid and some tips
The decrease in rope strength in a knot is 25-35%.
We can add that there is also a conductor nine - an additional half-turn of the loop, but it is used quite rarely.
Rope strength: conditions and knots that weaken it
It is important to note the fact that the connections in question can significantly affect the condition of the rope. For example, a knot such as a figure eight reduces its strength by a quarter, a bowline by almost a third, and a weaving knot by more than a third. The remaining knots weaken the strength of the rope to almost identical limits. In addition, it is worth mentioning that the sea rope becomes less strong in these situations by 10%. And if the operation is carried out in 30-degree frost, then by 30%.
Dirty, sun-dried, old ropes or nylon ropes with damaged outer braiding reduce their strength by half. In this regard, their use for insurance purposes is simply unacceptable.
Particular attention in this article will be paid to the direct knitting method.
Types of knots and how to knit them. Types of rope knots and methods of tying them
There are many different knots with similar and different uses (K. Ashley described about 700 types of them). Such a huge variety is due to the fact that rope has been used by man since he left the caves (although even earlier), and rope without knots is almost a useless thing. So knots were invented, at first simple and unreliable, but over time more sophisticated, convenient and reliable. And over time, there have become so many of them that it is simply impossible to know them all. But you can learn the basic ones that will satisfy any needs.
So, to begin with, you must remember that each knot weakens the rope by 30-60%, and this is not a little. The more the rope is bent and compressed, the greater the weakening. This is due to the fact that at the point of bending the load on the fibers is distributed unevenly; the greatest stresses are experienced by those fibers that are located on the outer radius of the bend. Therefore, try not to tie unnecessary knots, and also measure the load on the rope with a specific knot.
So, if the load that the rope will experience is not great, then simpler and easier-to-knit knots can be used, in which it will bend significantly. But when it comes to serious weight, or when a person’s life and health depends on the strength of the rope, then it is necessary to use more reliable knots, which I will talk about. In addition, do not forget that some knots can become so tight that they cannot be easily untied. And it’s especially difficult when the rope is under load.
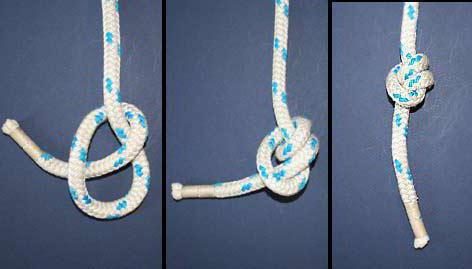
Counter conductor
One of the oldest knots. It can be used for tying ropes of both the same and different diameters; it holds well, is easy to knit and does not “creep”. Also, this is practically the only knot that is suitable for tying ribbons.
Disadvantages: significant weakening of the rope, as well as very strong tightening to the point of impossibility to untie.
I recommend using it for tying ribbons and ribbon-rope combinations, as well as for permanent quickdraws.
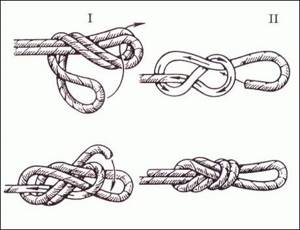
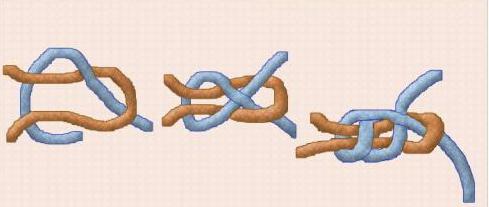
Straight
The Ashley Book of Knots (New York, 1977) says the following about the straight knot: “Previously, this knot had a specific purpose in the navy - it was used to tie the reef seasons of the sails when reefs were taken. Previously, sailors had never used it to tie together two ropes if the latter were of different thickness or make. It cannot be used to connect two cables that will be subject to strong traction. This knot crawls and is dangerous when it gets wet. After tying the knot, each of its running ends must be secured with a line to the root end.”
This knot is used to connect two ropes of the same diameter. It is easy to knit and can be relatively easily untied; to do this, you need to strongly and sharply pull the running or root end of one of the ropes. Use without control nodes is not permitted.
Disadvantages: it tightens too much, unties spontaneously (especially on slippery, wet and icy ropes), requires control knots.
I recommend using a direct knot to make unimportant connections of ropes of the same diameter, while not forgetting about the “controls”.
Stirrup (bleached)
Since ancient times, this knot has been used in maritime affairs for attaching castings to the shrouds - transverse sections of resin cable that served as steps for climbing the mast, hence its name. And in the loose version it looks like a stirrup.
It is used as a support for the legs, including in the middle of the rope. They are very convenient for attaching rope to smooth surfaces, such as a mast, log, branch, etc. The stirrup will never be tightened tightly and you don’t even need to untie it; just remove the rope and the knot will fall apart on its own. If one end of the rope is used as the main (loaded) end, then a “control” tied with the running (free) end is needed.
Direct knot: diagram, definition, conditions of use
It is used for tying exclusively single-thickness ropes. The straight knot is auxiliary. They are used to connect cables of identical thickness with little traction. It is considered correct when the ends of each rope go together and parallel, while the roots are directed against each other.
There is a tendency to self-untie when the rope is loaded. The direct knot scheme is impractical for use in the situation of tying two ropes of different diameters, due to the fact that the thinner one breaks the thicker one under load. Also, in this technique, control nodes must be present at the ends.
The straight knot is symmetrical. It is widely in demand within the macrame weaving technique. With this knitting, the strength of nylon rope is reduced by approximately 63%, and terylene rope by almost 55%. In addition, a straight knot is difficult to untie when wet. Often, beginners, in order to make it easier to untie, place a carbine (stick) in it in advance. The direct node diagram is presented below.
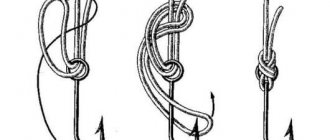
How to tie a clew knot?
What if we need one long rope, but we only have pieces of rope of different thicknesses? For this we need a clew knot. It is suitable for permanent loads, i.e. may come undone when released.
A reinforced version of the clew is the clew knot (a thin rope is wound).

Knitting technique for the considered connection option
After a short excursion into theory, you can move on to practice, namely how to tie a straight knot.
Firstly, with the help of the 1st rope you need to make a loop, and the 2nd - the required turns. As mentioned earlier, control knots must be present at the running ends, which is why you will need to leave 15-20 cm. In a situation where one end is on top and the other is on the bottom, or vice versa, the straight knot is tied incorrectly. It is fundamentally important that the running ends come out either exclusively from above or only from below. Visually, the knot resembles 2 loops that hold each other.
It has already become clear how to knit a straight knot at the first stage, so it’s worth moving on to the second stage. So, 2 ropes need to be placed on top of each other. Next you will need to tie 2 simple knots in opposite directions. When they are tied in one direction, you get a connection called a “woman’s knot”. At the final stage, already known control knots are tied.
Untied knot
Sometimes it is necessary to tie a loop that will not come undone under any circumstances. As a rule, these are tightening knots. Weaving is considered one of these. So, how to tie a strong knot on a rope that will definitely not come undone at the most inopportune moment? First of all, you need to understand that it is a combination of two knots, which are tied with running ends around the base:
- lay two ropes with ends facing each other;
- make a simple knot at one end;
- pass the end of the other through the loop made on the first, make a turn around its base;
- tie the same simple knot with the second rope;
- move both loops towards each other until they come together;
- Tighten the knot properly.
This is a very strong knot; for all its apparent simplicity, when pulled, it becomes so strong that it seems unlikely to untie it.
Direct sea knot: advantages, disadvantages, nuances
The main advantage is the simple knitting process. There are two negative points here:
- creep under variable loads;
- strong fixation under significant loads.
Be sure to consider the following nuances:
- A direct marine knot is used to tie together ropes that have the same diameter.
- A prerequisite is the presence of control nodes.
- This technique can be used for knitting fishing lines.
We knit a “straight” knot
Tying a straight knot is very simple, but it is intended for those cases when someone's life does not depend on it. That is, it is not suitable for belaying, because it can come undone and slide off. When tying a straight knot, so-called control fixing knots are required. What's good about this node? It is easy to untie, just pull the two ends of the rope on one side of the knot. And besides, it knits quickly and easily. That is, if you need to quickly tie two ropes of the same diameter for light loads, a straight knot is perfect.
This is interesting: DIY water-repellent impregnation for shoes
One of the control node options:
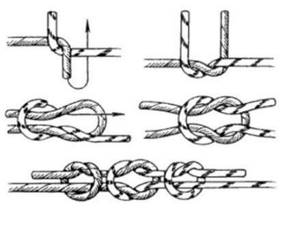
This knot unties itself, so it should only be used with control knots. To tie them, the running ends must be more than 15 cm long. The knot is tied correctly if the running ends come out either only from the bottom or only from the top.
History of the technology in question
According to archaeological finds, this method was used by the Egyptians as early as 5 thousand years BC. e. The ancient Romans and Greeks called it the Hercules (Hercules) knot. This was justified by the fact that the mythical hero named Hercules tied the skin of the lion he had defeated on his chest with a straight knot. The Romans used it to stitch wounds and treat fractures.
We have already described how to tie a straight knot. It can be compared to two half-knots that are sequentially tied one above the other in opposite directions. This is considered the easiest way to make a straight knot.
Sailors who use this knot to tie mainly cables used a different tying technique. The weavers, in turn, tied it in a special way that was exclusively convenient for them.
To modern sailors, the idea of taking a reef with a straight knot will seem quite absurd. However, in the era of the sailing fleet, it was they who always took reefs on ships with direct rigging: by means of 2 reef-sezens they tied the sheet of straight pars (its upper part) to the reef line.
The ancient Romans called it a “women’s knot” due to the fact that it was with a straight knot that young Roman women tied the sashes of their tunics during their wedding night. The young husband, according to legend, was supposed to quickly untie him. The faster he does this, the greater the chance that the bride will avoid infertility. Now it becomes clear why it was previously considered important to have knowledge not only of how to tie a straight knot, but also how to quickly untie it.
Which ones exist?
Knots can be sea, tourist, mountaineering, hunting or fishing - this is a difference in the scope of their application. For example, there are about seven hundred sea knots alone!
Certain requirements apply to each type. For example, tourist ones, in addition to the fact that they must be strong and simple: they must be easy to remember, easy to tie, not crawl under load, not tighten tightly if this is not necessary.
Of course, it is hardly possible to know how to tie knots on all types of rope, and it is not necessary. This is not available to any person on the planet. It is enough to simply understand how to tie knots on a rope tightly and so that they look presentable.
Of course, you won’t get a good, strong connection or the right loop right away. You need to learn how to tie a strong knot in a rope through practice, not just theory. Although it is also necessary to know the theoretical basis. For example, how to tie a knot at the end of a rope: fold the free edges into a loop, leaving a tail of the length that the knot is needed, thread it through it, and tighten it. The knot at the end of the rope is ready!
Reef double knot
As mentioned earlier, in ancient times the use of the straight knot by sailors was limited to taking reefs. It is for this reason that its second name is reef knot. As for the double straight knot, it is also called a tether knot. The sailors practically did not use it: to temporarily connect the rods and other ends, they used a reef knot.
According to Dahl, a straight double knot is also called a “loop knot”, “burdock (bow)”. You can often hear it referred to as a byte node. The technique of knitting it is the same as a straight knot, with the exception of the first moment, when in the 2nd half-knot the running ends are first folded in half and only then tied. It is indispensable for lacing shoes, tying bows in the neck area, bows on hair, boxes, and packages.
Thus, before mastering the technique of tying a double reef knot, it is worth practicing how to make a straight knot.
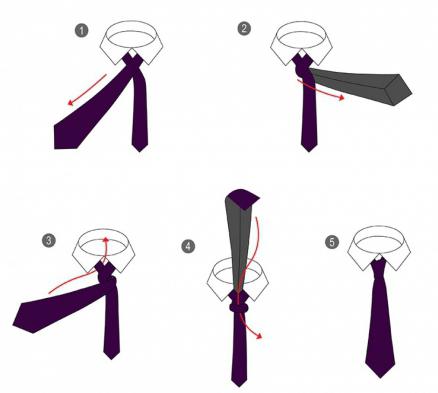
How to tie a tie with a straight knot?
It will fit standard collars. This method, within the scope of this study, was invented at the end of the 19th century in England.
Step-by-step instructions on how to tie a straight knot in a tie are as follows:
- First, you need to take the wide end of any tie and place it under the narrow one, making sure that the latter is much shorter.
- Next, you need to pass the wide end under the narrow one in the direction to the right.
- Then the front side of the wide end should be drawn to the left.
- Then you need to pass this end between the tie and the shirt collar, slowly pulling it up.
- Next, while holding the knot, you will need to pass the wide end through the front knot.
- All that remains is to pull out the knot, smoothly moving it to the collar and at the same time pulling down the narrow end of the tie.
Through the instructions above, you can learn how to tie a straight knot in a tie. This knowledge will definitely be useful in everyday life for both men and women.
forward knot
This is the English name for the technique of tying a straight knot in the process of weaving baubles. It is formed by the combination of two left loop knots. It is worth first mentioning the basic concepts in weaving baubles, namely:
- working thread - this is what all the knots are knitted with;
- nodular - knots are tied on it.
During the weaving process, they can change (the working thread is transformed into a knot thread and vice versa). It is customary to distinguish 2 types of loop (simple) knots, namely:
- left loop (the working thread fixes the knots on the left side of the knot);
- right loop (the working thread is located on the right).
In the diagram, the knot in question is indicated by an arrow (which points diagonally to the left and down) in the direction of the smooth transition of the working thread. The color of the knot must match the color of the guide (working) thread.