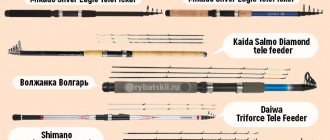
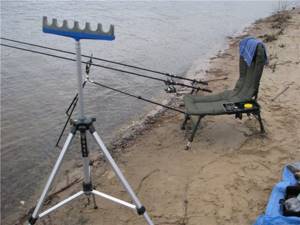
Stationary rod stands
This may not be needed often, unless you live on the ocean...
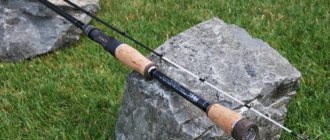
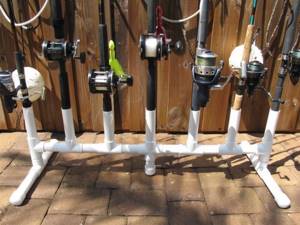
A completely workable option for storing assembled spinning rods, again, if you live within walking distance of the water. Or for storing one-piece items at home. Looks quite neat.
This option, by the way, has become widespread:
Another quite nice option.
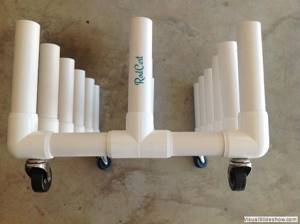
If you tinker a little, you can make a mobile stand.
Ceiling mount. You can easily place your “forest” in a garage or workshop.
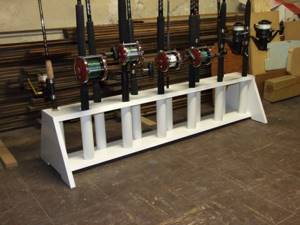
Finally, an almost boring option
Do it yourself
Most fishermen refuse to purchase store-bought stands, believing that it is better to make the product themselves, which will guarantee good quality and guarantee long-term use. In addition, such installations will not bring significant financial costs, which is a very tangible advantage.
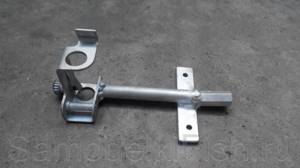
Stand based on a metal rod
When making such a device, you cannot do without the following materials:
- directly without a metal rod with a diameter of no more than 9-10 mm;
- rubber;
- welding
Step-by-step work process:
- Using a welding machine , we make a semicircle from a rod, reminiscent of a stag.
- the resulting material with a soft rubber base.
- The next step is to weld the stand , which looks like a tube with a flat stand, to a metal rod.
- A stand for one spinning rod made according to these instructions can be used on any type of surface, which makes it especially attractive.
A stand for one spinning rod made according to these instructions can be used on any type of surface, which makes it especially attractive
Homemade genus under
If you wish, you can easily make a rod with your own hands, which is in great demand among fishermen. The manufacturing process requires:
- camera tripod;
- factory-produced stag;
- soft rubber or fabric.
Step by step guide:
- Having unscrewed the spear on the tripod, install the nut in its place.
- We fix the stag.
- A rubber or fabric base is glued on top of the stag, intended to function as a protective lining for the rod.
Stand made on the basis of a hanger
The job requires:
- plastic hanger intended for clothes;
- knife;
- glue "Moment";
- thread;
- two tubes.
Step by step guide:
- The first step is to remove the hook from the hanger , which allows you to hook onto the crossbar in the closet.
- Eliminate the presence of small parts located on the hanger.
- Using a thread, wind the entire surface of the device , which will make it possible to install at the desired angles and replace the tension.
- The bottom of the hanger is cut.
- The tube, on which 2 rubber rings are put on, acts as a lock.
- The homemade stand is ready for use.
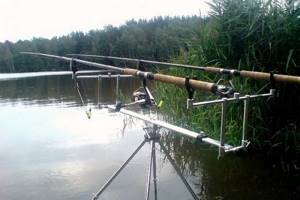
Boat stands
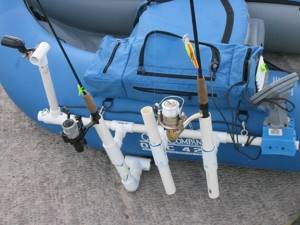
A hanging option for an inflatable.
Transom mounting option. Sloppy, but the general principle is clear. It would be possible to use wall mounts for pipes and do without a clamp.
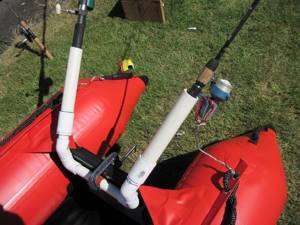
These guys are absolutely crazy. The density of madness per square meter is off the charts
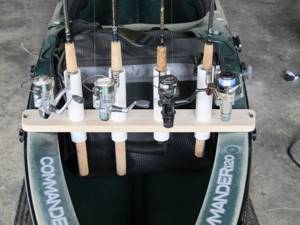
A very simple option, suitable for both a hinged boat and an inflatable boat.
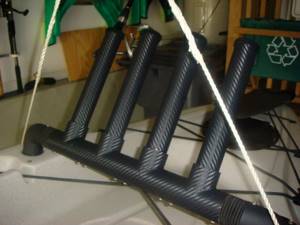
The advantages of welded polypropylene are the solidity of the structure. You can even cover it with carbon fiber film.
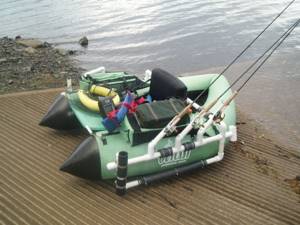
But these are all minor things. More serious options are below.
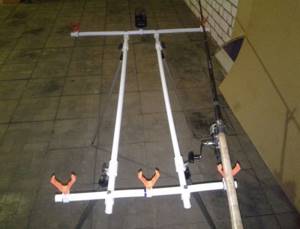
To make a homemade rod pod at home, we needed:
- three tubes 12 mm x 90 cm
- tube 115 cm
- two tubes 10 cm each
- two nuts 10, thread – pitch 1.25
- three square tubes of 13 cm, 1 cm length and width
- two plates of 5 and 10 cm
- washer with a diameter of 13 cm
- rivets
- Bulgarian
- welding machine
- 3-4 hours of free time
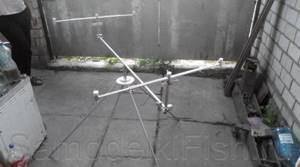
Now in more detail on each detail and processes. All spare parts were found in the bins of the garage and attic. The legs are made from old cornices (stainless steel), but it is quite possible to make them from parts of a cot, cauldron tripod or tripod.
The length at first glance seems inconvenient, but in practice such dimensions have justified themselves - the mouth-pod can be both high and squat due to the extendable legs. A piece of the same pipe (also stainless steel) 1 cm long for rivets is welded to each of the legs. We rivet them to square tubes, of which we cut off one side in advance so that the tripod can be well adjusted.

Next, this entire structure is welded to the washer, which was removed from the energy accumulator. The diameter of the washer is 13 cm. So, our tripod is ready. This part, as you can see, is solid and not collapsible, so if you do not have the opportunity to transport it in this condition, then the legs still need to be made shorter.
Now let's start making the upper part of the stand for carp rods. To do this, we weld a metal plate to the washer, and the same one, but smaller and with a bolt, weld it to a 115 cm pipe and fasten it all with a lamb. We put a rubber layer between the plates so that in the future our mouth will maintain its position and not “walk around”.
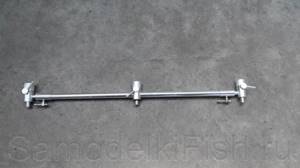
We came across stands for buzbars that were almost ready-made. We removed them from a device that vaguely resembled a level and added them a little - we welded 10 cm tubes and 10 nuts with a thread pitch of 1.25 to them. Initially they planned to modify them using aluminum corners, but then abandoned this idea, making them simpler.
Buzbars were bought ready-made, because manufacturers resort to tricks - the thread of the alarm mounts, the range of which in our city is not so large, is tricky and we could not find a turner who would take it on.
Therefore, it was decided to buy ready-made buzbars - this turned out to be the only expense during the manufacture of the mouth-pod and did not impact the budget in any way. Also, the product was painted with silver, but in the future we plan to apply more serious paint.
Types and production of stands for fishing rods
Stands differ in design solutions, purpose and material of manufacture.
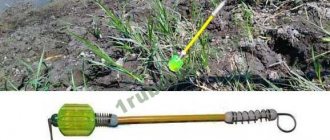
Metal flyer
The simplest of homemade products is a flyer made from a reinforcing bar. It can simply be bent or welded into a Y shape. An important addition to such a stand will be to ensure the safety of the rod. As shock-softening materials, the metal base is hidden in a silicone or rubber tube, or simply wrapped with several layers of insulating tape.
- Salmo;
- Cormoran;
- Daiwa;
- Golden Catch;
- Flagman.
BUZZ BAR'S
Some time later, after the growing popularity of branded racks for carp rods, the British released another “know-how” called buzz-bars. In appearance, they represent a transverse crossbar, on which (using the appropriate thread) it became possible to install even 2 or 3 bite alarms (or butt clamps). Accordingly, for working with 2 or 3 carp rods at once.
In terms of functionality, buzz bars are, sort of, an intermediate option between the conventional stands described above and the “pinnacle of evolution” - kind of pods, which we will talk about later. For a beginner who has normally mastered one working rod and smoothly transitions to working with 2, and then 3 “sticks”, buying an inexpensive buzz bar will be an excellent solution. Just until the moment when you can safely switch to a cool (but expensive) rod-pod.
Branded fishing stores usually sell two buzz bars in a set. One of which is designed for installation at the front (with threads for bite indicators), the other for installation at the rear (with threads for rod butt holders). You just have to buy racks/stands with special “sockets” separately (better - telescopic models).
The greatest demand is for buzz bars with a width adjustment option, which allows you to arrange carp rods in the shape of a wide “fan”.
In terms of functionality, buzz bars are, sort of, an intermediate option between the conventional stands described above and the “pinnacle of evolution” - kind of pods, which we will talk about later. For a beginner who has normally mastered one working rod and smoothly transitions to working with 2, and then 3 “sticks”, buying an inexpensive buzz bar will be an excellent solution. Just until the moment when you can safely switch to a cool (but expensive) rod-pod.
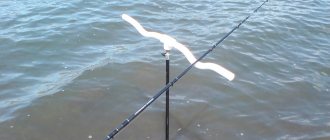
Butt stands
The butt stand under the feeder is designed to secure the tackle by the handle. Structurally, the product looks like an open shortened tube or bracket with a fixing bracket, which has a peak or pin at its base for mounting the holder into the ground. Butt versions of the auxiliary product are made from PVC pipes and duralumin light alloys. This type of stand is compact and easy to install, as well as low in price, but it also has a number of significant disadvantages.
Important! A serious disadvantage is the contraindications for using the product during windy weather.
A rod raised high loses sensitivity, making it impossible for the angler to notice bite signals in a timely manner. To install the device, you need dense soil that can hold the gear. In practice, it turns out that the product cannot be inserted into asphalt, concrete and rocky soil, and the rod will not hold up in sand and loose soil.
Important! A serious disadvantage is the contraindications for using the product during windy weather.
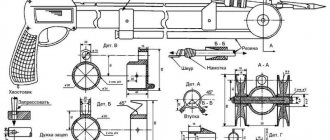
Step-by-step instructions for making a stand
The first photo shows a complex structure with many joints. To make an even simpler holder, you should follow the following procedure:
- We draw up detailed drawings of the future homemade product. They do not have to have an engineering look - a sketch is enough. But the dimensions and all connections are indicated in as much detail as possible.
- Components are purchased. The pipe should be rigid so that the stand does not look flimsy.
- Fastenings for the front single holders are made taking into account the fact that electronic signaling devices can be installed in their place.
- Assembly begins. First, all pipes are cut to size and laid out on the site, then all connections are welded.
- If large height adjustments are not required, then you can mount one central tripod, and extend or lower the plastic brackets, which are fixed in height with pipe latches.
Homemade stand in a folded state
But sometimes during fishing in the current it is necessary for the feeder to raise the tip high. Then the central tripod can be replaced with four telescopic rod stands. In such circumstances, the design is modified by introducing a fastening element for such racks.
The tee will then have to be drilled and threaded to secure the top of these elements. Thumbscrews are used to keep them from falling out of the tee.
Instead of a tripod, this design uses single telescopic stands. The cross brackets simply slide onto the base and then lock into place.
The advantage of this kind of pod is its low weight and low cost.
The types of stands presented in this brief review are not dogma. Very high-quality products can be obtained if the stand is made from an aluminum square pipe with a cross-section of 20 mm.
A homemade rod-pod is, of course, not done as quickly as a single stand. But the design of such a stand is not as complicated as it might seem at first glance. If you have the tools and minimal skills, its production takes a minimum of money and time.
What materials and tools are used
The easiest way is to make a stand for the feeder yourself from polypropylene pipes for cold water. You can also take it for hot, but this will only increase the price of the product without adding quality.
To make a stand you will need:
- A water pipe with a diameter of 20 mm is approximately 2.5-3 meters.
- Tees, couplings for connecting pipes, plugs - depending on the chosen scheme.
- Pipe latches, two for each rod and, if necessary, one for fixing the lifting height.
- Plastic holders according to the number of rods. They can be replaced with similar holders used in water supply installations, but then a cutout for the fishing line should be made in the front ones.
- Four single telescopic rod stands.
- Soldering iron for connecting elements (can be rented at a pavilion selling building materials).
- Scissors for cutting pipes (also given for temporary use).
If the angler intends to make a homemade rod-pod from other materials, the set may be different. But in order to clearly understand how the process will take place, you need to draw up a work plan.
What a factory type is is described in this article.
Types of stands
Feeder stands are distinguished by their diversity. Each type has its pros and cons; there are products that are simple in design and those that are intricate in shape; they can also differ in functional features.
There are the following types of fishing rod stands for feeder fishing:
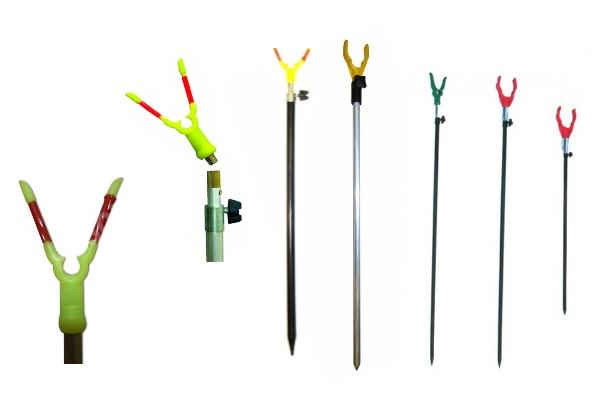
- wooden pegs;
- single stand stands;
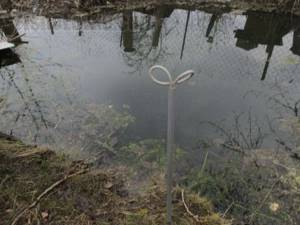
Photo 1. Soft stands made of tubes with wire do not injure rod blanks.
- butt holders;
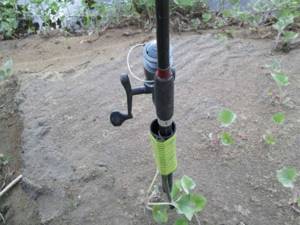
Photo 2. Butt holder.
- genus under
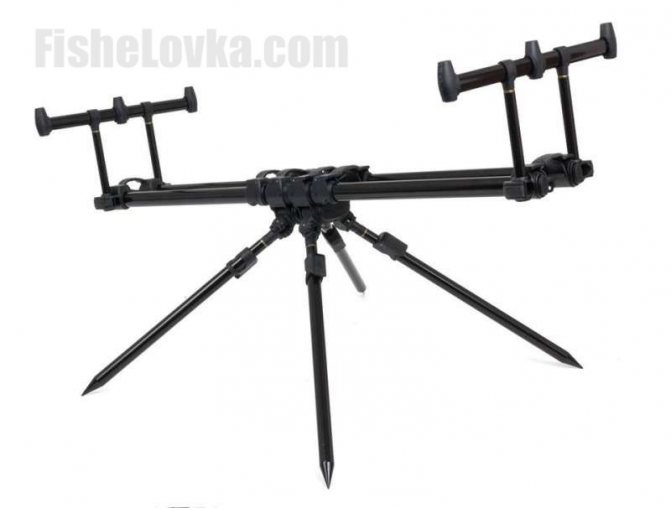
Photo 3. Rod for carp fishing.
Wooden pegs are an unusually simple and ancient invention of fishermen. Such stands can easily be cut on the shore of any body of water. You don’t need to spend money on them and you don’t have to take them with you from the reservoir. However, modern fishermen are increasingly refusing to use slingshot rods because they do not want to harm the environment and are afraid of damaging expensive fishing rods.
Important! If you use a vine as a material and leave the stick sticking out in the water, then the very next year it will take root and begin to grow. This is fraught with the fact that the convenient descent to the water will subsequently become unsuitable for casting and landing fish.
Single racks are made mainly from metal alloys. The cheapest models can be made of plastic. There are different designs of such stands. There are one-piece ones, there are telescopic ones or composite ones of two sections. The lower part is pointed for easy installation in the ground. A mount for placing a fishing rod is fixed on top of it.
In fishing circles, single racks are commonly called simply “pokes.” Their advantages are:
- simplicity of design;
- compactness;
- ease of use;
- low cost.
They have one drawback - the impossibility of placing them on a solid base, for example, on stones, concrete slabs, or a wooden platform.
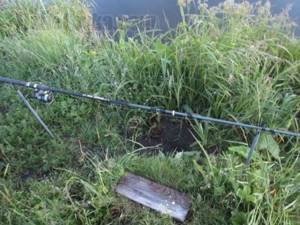
Photo 4. The feeder lies on a pair of soft stands.
Butt holders are driven into the ground. They are not suitable for placing on a solid base. Such stands are suitable when using short fishing rods, since long ones will sway and maximum sensitivity of the gear cannot be ensured.
Rod pod is a well-thought-out multifunctional stand that allows you to place from one to several feeders at the same time. It is installed on vertical stands; a special tripod for the feeder is also used. This design allows you to change the angle of inclination of the fishing rods, selecting the optimal one for the given fishing conditions. You can “hang” additional various holders and bite alarms on it.
The main disadvantage of such multifunctional stands is their bulkiness. It takes a lot of time to assemble and install. These products are expensive and not always available to the average fisherman. But there is a way out. You can make a rod yourself.
Homemade fishing rod stands
On the Internet you can find many photos of fishing rod stands. Fishermen share their experience and post drawings and diagrams of various supplies.
Read here Foam fish - the secrets of catching pike and other predators with foam fish (125 photos and videos)
There are very simple ones - from lids, jars and all sorts of useless things that came to hand. However, there are also worthy models. They are multi-level, foldable, with holders.
This model needs a little work. But the result will not keep you waiting. You will receive comfortable conditions for fishing.
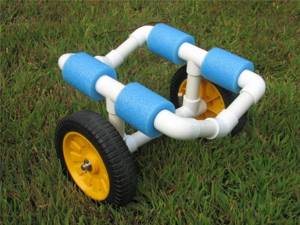
Trolleys
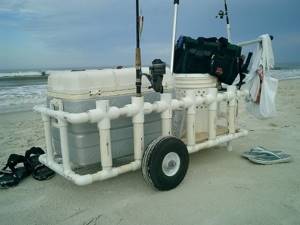
How do you like it? It’s quite possible to weld such a thing from ordinary polypropylene in a day or two.
Beach carts are generally very common among our ocean-spoiled colleagues, for example, here’s a smaller option:
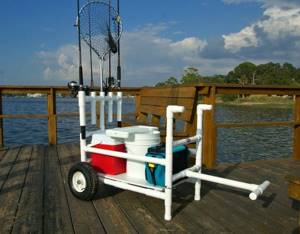
Another small fishing beach cart
Working example of axle assembly
Or this. As you can see, the person is engaged in this masturbation clearly not from a lack of funds.
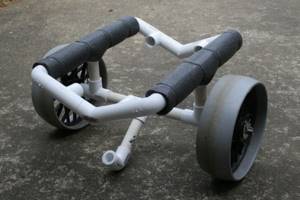
An option for a small cart is a canoe stand.
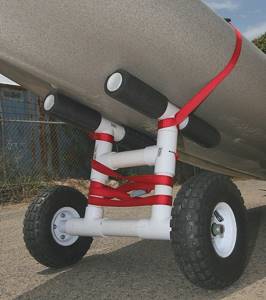
Another boat option.
Very miniature and durable design.
This topic has become so widespread among kayakers that on the English-language Internet you can find detailed instructions with a list of parts for purchase and self-assembly.
Making your own coasters
It's actually not difficult to make your own stand. The simplest option is to make a single stand from a hollow tube and rigid wire.
The manufacturing process consists of 4 stages:
- We simply bend the wire, giving it the shape of a horn.
- We insert the free ends into the tubes.
- We fix the ends of the wire in the tube. This is not difficult to do with a hammer - just flatten the top of the tube.
- Well, finally you need to flatten the lower end.
And that’s it – the fishing rod stand is ready.
Homemade holder for several fishing rods or spinning rods
In this case, 2 options are more common:
- Make a coil. This is quite simple, it also requires wire and, for example, old ski poles. That's all. This type of hold is quick to assemble and easy to install. However, there is one drawback - low rigidity.
- The second option is more interesting. To do this, you will need 2 plywood strips no thicker than 6 mm, wooden stakes 3 cm thick.
The manufacturing process consists of several stages:
- Using a jigsaw, we cut out the required number of slots for fishing rods. It is better to make them deeper so that they do not pop out during bad weather; the width is at your discretion (but they should not touch each other too closely).
- You can make slots in the bottom bar, or you can not make them - according to your desire.
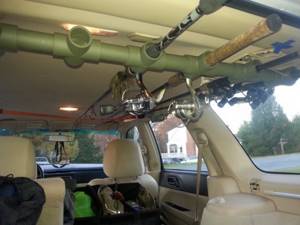
Car/bike mounts
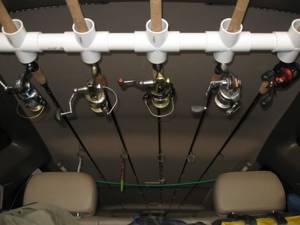
If the car allows it, then you can always be fully armed.
You can even paint your product. I like this option better than all the others.

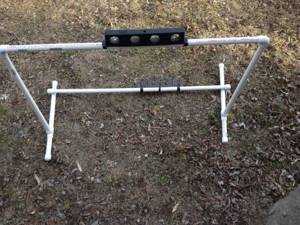
Front part of the car holder.
Option with a stand for the car.
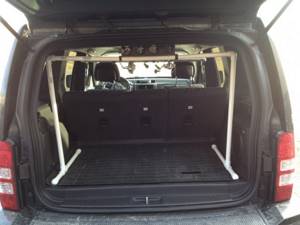
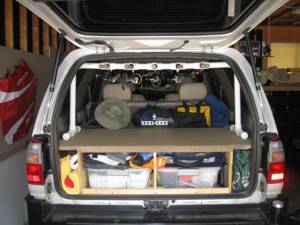
Or a full size version. The trunk is free, the rods are safe.
You can take it out at any time. Two parts: a stand in the trunk and a hanging front rail. It is cooked from polypropylene in a couple of minutes...
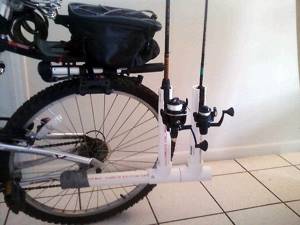
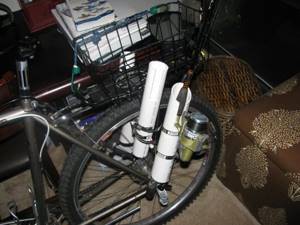
Bicycle option. It feels like it was made in about 5 minutes, but there is room to use your imagination.
Type of pod for carp fishing
And finally, the “pinnacle of creation” on the evolutionary path of creating stands strictly for carp fishing is the genus pod. In fact, it includes modernized versions of the ones described above - single racks and buzz bars. Competently “grouped” into a single and well-thought-out “carp system”. Rod-pods have a lot of advantages and advantages! From maximum stability on the surface to the ability to rotate 360 degrees (in fact, on any plane). The only caveat is the high price. Moreover, the more functions such a “rod stand” has, the higher the cost will be.
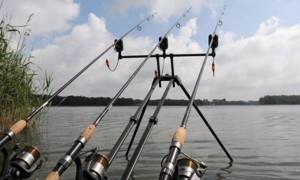
The design of rod pods allows you to successfully work with three, four or even five (depending on the model) working rods at once. The last option (i.e. for 5 fishing rods) is convenient because in addition to 3 working sticks, a “marker” and a “spod” will always be “at hand” (in full “combat readiness”). Depending on the method of installation on the shore, these stands are divided into 2 main types: “tripod” and “four-leg” models. As can be seen from the name itself, the first products have three legs, “spread out” in a triangle. The second ones have four “legs”, folded out in pairs (2 in front and 2 in back), being connected by a statin (or longitudinal “crossbar”).
A characteristic feature of modern “rod pod” stands is the ability to quickly change the length of the frame (rod/crossbar), height of the legs and width of the bars. Which in total allows you to “transform” the rod type for carp rods to suit any situation on a lake, pond or river (which we will talk about in future materials).
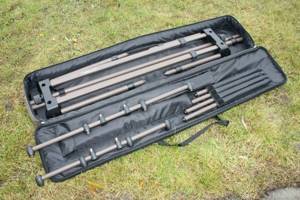
The following advantages of carp rod-pods are strictly “camouflage” colors, quick assembly/disassembly and optimal transportability. Special cases (with separate compartments for all parts of the stand) reliably protect against all kinds of damage. Some manufacturers place “pockets” on them, for example, for convenient storage of bite alarms or other elements necessary for fishing. Thanks to the use of special metal alloys (in the manufacturing process of rod stands), branded rods are not only highly durable, but also do not weigh too much.
The use of rod stands is intended to promote successful fishing. During the bite process, the line experiences tension, thereby transmitting information to the signaling device or the tip of the tackle, which allows the fisherman to quickly find his bearings and perform the hook. Being in a stationary position, the rod does not experience vibrations from the movement of the fisherman or gusts of wind.
Types of stands

To be fair, it is worth noting that today there are absolutely no shortcomings in designs, shapes and functional features when choosing a rack for a feeder. Commercial fishing nets offer a wide range of devices for every color, taste and budget. On sale you can find budget single supports for the feeder, as well as high-tech products called rod-pods, with which you can fish simultaneously with two or three rods, equipped with an electronic bite signal system on a compact section of the coast.
The holders are made of light metal alloys, polymer and wooden materials, with the possibility of their quick assembly and easy operation over a long period of time. Each individual type of stand has a number of individual features that are suitable for certain feeder fishing tactics, which the angler should be aware of when choosing his equipment option. We will consider the main types of holders in the continuation of the article, from the most basic products to a modern multifunctional product.
Wooden pegs
One of the primitive and, of course, the very first devices for a holder is a wooden peg ending in a flyer. The main advantage of this option is its low cost and ease of manufacture. You can’t buy a peg in a store, but when you arrive at a pond, you can find a suitable rod in the coastal vine bushes and prepare the holder yourself.

For these purposes, choose a branch 1–2 cm in diameter ending in a double branch, a slingshot. The rod is cut to the length required for fishing conditions, taking into account the gap for fastening into the ground, and the ragulka is also cut to the size of the splitter of 3–5 cm. The straight section of the branch is sharpened for ease of insertion into the ground, obtaining an effective and free device. The disadvantages of this option are that you won’t always find suitable material at hand, because the shore of the reservoir may be deserted, and searching for and preparing a holder will take up some of your invaluable fishing time, and besides, careless fishermen cause some harm to nature with thoughtless cuttings.
Butt stands
The butt stand under the feeder is designed to secure the tackle by the handle. Structurally, the product looks like an open shortened tube or bracket with a fixing bracket, which has a peak or pin at its base for mounting the holder into the ground. Butt versions of the auxiliary product are made from PVC pipes and duralumin light alloys. This type of stand is compact and easy to install, as well as low in price, but it also has a number of significant disadvantages.
Important! A serious disadvantage is the contraindications for using the product during windy weather.
A rod raised high loses sensitivity, making it impossible for the angler to notice bite signals in a timely manner. To install the device, you need dense soil that can hold the gear. In practice, it turns out that the product cannot be inserted into asphalt, concrete and rocky soil, and the rod will not hold up in sand and loose soil.
Single racks made of metal
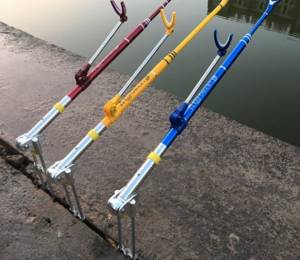
This type of stake is an improved form of the wooden peg. In its modern form, a single stand is made of a stainless or duralumin rod with a head made of a plastic flyer. The stands are designed as prefabricated or telescopic, which allows the fisherman to adjust the device in height, as well as place the holder in pairs, while setting the desired angle of inclination of the rod relative to the water.
The products are compact for transportation, reliable and durable in operation, and do not require maintenance. As in the previous case with the butt option, they have one significant drawback in installation, depending on the composition of the coastline. Concrete slabs, wooden walkways, stone beaches and sand are not suitable for this type of rack. The best type of bank will be dense and turfy soil.
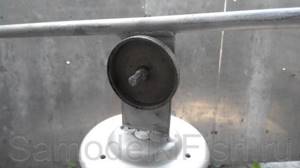
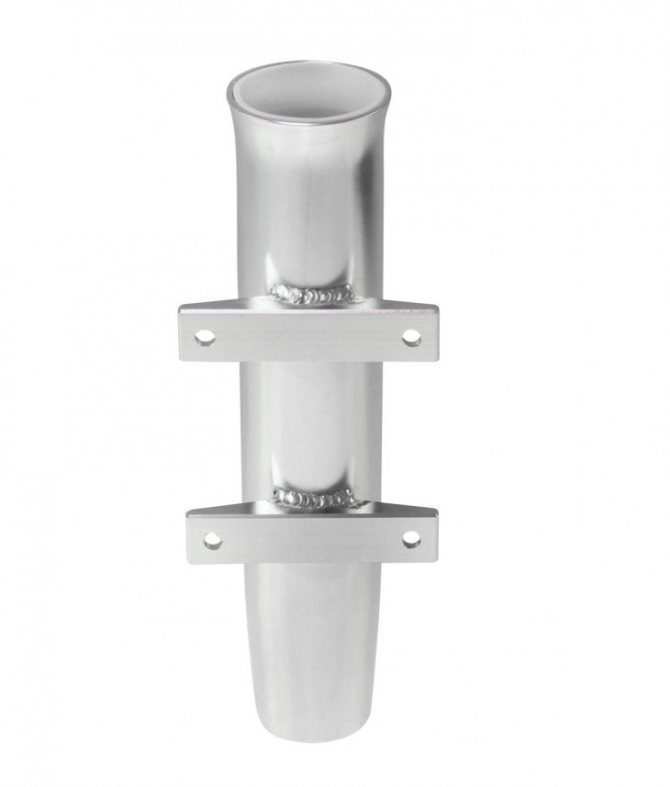
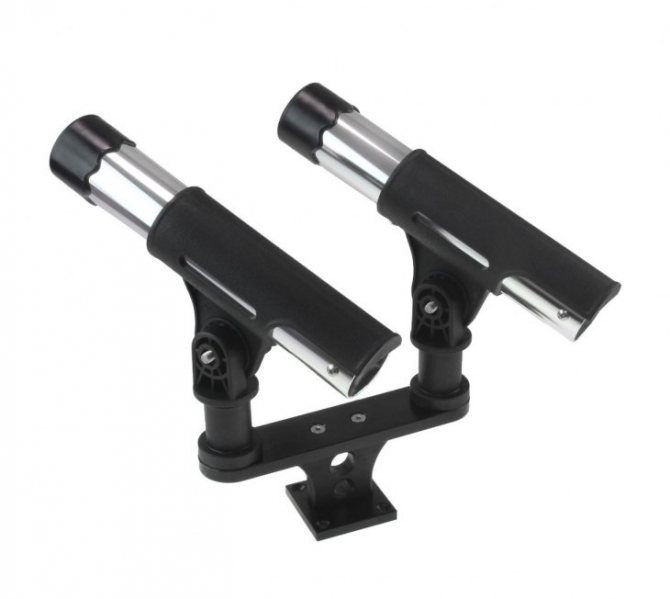
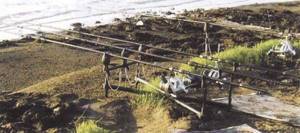
Side stands
When fishing from a boat, anglers use various designs of side supports that minimize the influence of waves on the quality of bite detection. The holder for the feeder can be glued into the side of the boat, being a stationary form, or it can be installed on the floor of the boat and be a mobile device. Glued-on options are mostly collapsible structures. A bracket is permanently mounted into the side, into which a flyer or rod stock is screwed directly while fishing, adjusting its height. The mobile stand is placed on the floor of the boat, fixing the fishing tackle in it at the desired angle.
Choosing the right gender
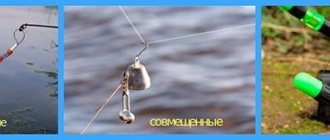
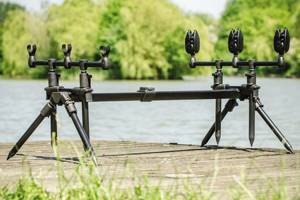
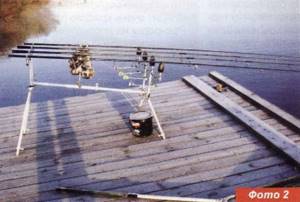
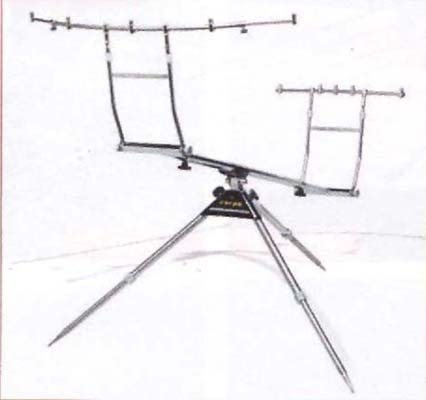
A rod-pod is a stand for several fishing rods, to which electronic and mechanical bite alarms are also attached (and sometimes such attributes of superstitious carp anglers as personal and team talismans) (photo 1).The main advantage of rod pods in relation to individual racks is the ability to install them on almost any surface, including stone and concrete slabs and wooden pavements (photo 2). Currently, there are a huge number of rods on the market, differing in design, materials used, workmanship, and performance characteristics. The price of these products varies within a very wide range, which makes it even more difficult for novice fishermen to choose a rod that can satisfy their needs to the maximum extent and, at the same time, costs slightly less than a used car.
Let's try to understand the variety of genus models and their features, which should be paid special attention to. Structurally, rods can be divided into two large groups according to the number of supports (legs) used in them: three-legged and four-legged. Each group has its own advantages and disadvantages. Four-legged rods, as a rule, have much greater stability than three-legged ones.
They can have different designs. The simplest and, in my opinion, most unsuccessful design, due to insufficient rigidity, is a sliding central rod, to which supports and racks for attaching the crossbars are attached through special units (photo 3). Due to the attachment of the crossbars to the rest of the structure at only one point, rods of this type have low rigidity. In inexpensive products, the crossbars often rotate arbitrarily in the horizontal plane at the slightest touch to the rods.
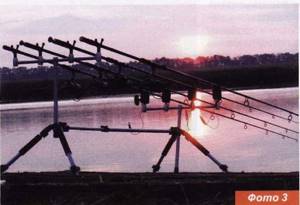
In addition, when you try to remove one of the rods, and sometimes in the process of setting up one of the electronic alarms, all the other alarms attached to the rod-rod crossbar are triggered.
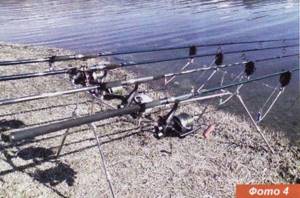
Rods with crossbars attached at two points, as a rule, have significantly greater rigidity (photo 4.5).
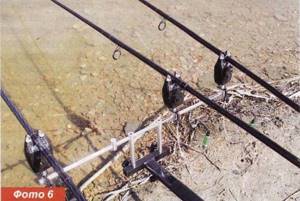
Their design features include a fixed (photo 6) or adjustable distance between the crossbar attachment points. Rods in which this distance is adjustable (for example, Fox models such as Quattro Pod, Trek Pod, X Pod) (photos) provide their owners with greater flexibility in choosing and replacing crossbars.
Additional convenience may lie in the possibility of using rod-rod supports as separate racks for attaching fishing rods and vice versa.

Three-leg rods allow you to adjust the tilt of the rods (both towards the water and towards the shore) within a very wide range.
Moreover, this can be done much faster than when using four-legged rods.
This feature of three-legged rods can be very popular when playing. Sometimes the fish cannot be brought to the desired point and it crosses the lines of the other rods.
In this case, by quickly raising or, conversely, lowering the remaining rods installed on the rod, you can avoid problems with tangling lines, thereby saving the fish and avoiding wasting time on unraveling the lines.
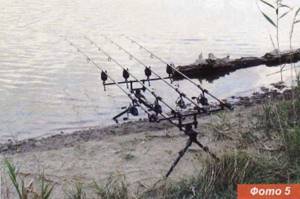
At the same time, with the exception of the most expensive models produced, for example, by companies such as Fishcon and Amiaud (photos 10, 11), three-legged rods are much less stable than four-legged ones, which can lead to them tipping over under the influence of gusts of wind.
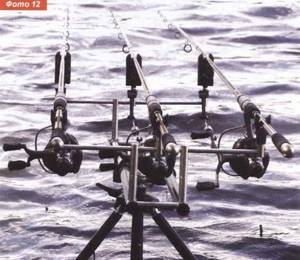
To combat this, many three-legged rods are equipped with a hook (photo 12). It is designed for hanging some kind of load, for example, a bucket of water, to increase the weight and, as a result, the stability of the rod. The main unit of three-legged rod pods is a ball or cylindrical joint, which is used to adjust the angle of inclination of the rods. The reliability and operational convenience of the rod largely depend on the quality of this unit. In cheap products, the ball joint, as a rule, is made of low-quality materials and with insufficient precision, which leads to the rapid appearance of significant play in it, greatly reducing the rigidity of the structure.
Therefore, if you do not have the opportunity to spend a significant amount on purchasing a rod-rod, I strongly recommend that you opt for a four-legged design, which is much easier (and cheaper) to manufacture with acceptable quality.
In addition to the number of supports, rods can be classified according to the materials from which they are made. Since rod stands are used in harsh conditions (high humidity, large temperature changes), corrosion-resistant materials are used for their manufacture, mainly duralumin and stainless steel. Although, I have also seen “masterpieces” of hospital construction, made of painted “black” metal. I would advise you to refrain from purchasing such products - no paint can protect this type of product from rust for a long time.
In my opinion, both stainless steel and duralumin are equally suitable for making rod pods. Stainless steel is heavier, which theoretically gives models made from it additional stability. Although, even very light duralumin rod-pods, being well designed, are not much inferior in terms of stability to their heavier stainless steel counterparts. As an example, we can cite such a rod-rod, which is undoubtedly wonderful and has enjoyed deserved popularity among carp anglers for many years, as the Fox Quattropod. With a very modest weight and extremely small dimensions when folded, this model has excellent stability. In addition, thanks to its user-friendly design, the Quttropod can be assembled and disassembled in less than a minute. Not to mention, it looks very nice in Advantage Timber.
Rods made from corrosion-resistant materials do not particularly require additional coatings. However, not everyone is a fan of shiny products. It is for such carp anglers that many models of rod-pods made of stainless steel and duralumin are coated with an additional decorative coating. No matter how wonderful the design of the rod-rod is and no matter what wonderful materials it is made from, if it is not possible to make the necessary adjustments, it will be inconvenient to use.
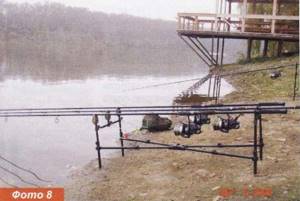
First of all, you should evaluate the margin of adjustment of the distance between the front and rear crossbars of the rod-pod - it should provide the possibility of installing the rods in such a way that their input rings are 10-20 centimeters closer to the water than the alarms (photo 18).

Then you need to evaluate within what limits the angle of inclination of the rods can be adjusted. Quite often you have to fish from a steep bank or wooden bridges (sizhi), significantly rising above the surface of the water. In these cases, to ensure that the rods are installed “in one line” with the tensioned fishing lines, it may be necessary to tilt the rods quite significantly towards the water. The ability to adjust the tilt of the rods over a wide range becomes even more important when fishing in the current.
In this case, to ensure minimal resistance of the fishing line to the flow of water (and to avoid collecting all the debris floating past), they try to leave as little fishing line as possible in the water. To do this, the rods are installed almost vertically, tilting them strongly towards the shore. Not every pod provides this opportunity.
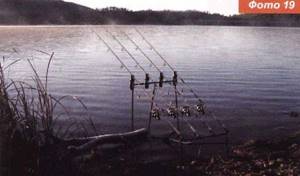
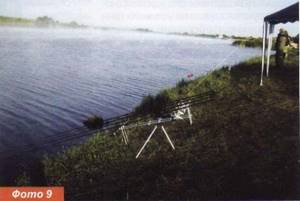
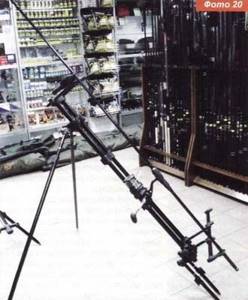
If standard stands can be used as rod-pod supports, the problem can be solved quite simply (it is enough to buy a couple of additional stands about a meter long) (photo 19). For some rod pod models, you can additionally purchase support extensions specially designed for these purposes. For some models, such extensions (or additional extended supports) are included in the standard delivery kit. For example, the latest Fox Ranger Pod, which went on sale in 2009, is not only sold with front leg extensions, but also, thanks to its design features, can be used when fishing in currents with no less convenience than three-legged rod pods (photo 20).
Since the topic of installing rods when fishing in currents has been touched upon, it is impossible not to mention a few more special requirements put forward for the design of rod-pod elements for fishing in such conditions. Since the rods have to be tilted upward, the line may not reach the roller of the electronic bite alarm when it is normally installed vertically. For these purposes, some models of rod pods provide the ability to change the angle of inclination of electronic signaling devices.
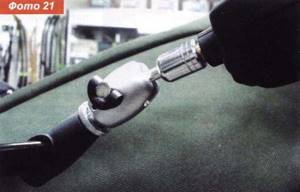
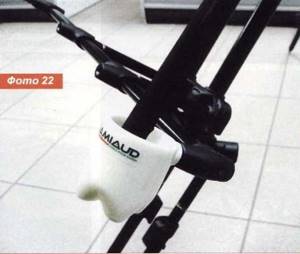
If this is not possible, it can be achieved by purchasing special rotary units (photo 21). The large angle of inclination of rods when fishing on rivers gives rise to another problem - under the influence of gravity, the rod and reel try to slide down, and the frictional force generated in a conventional rear holder is not enough to prevent this. Therefore, for fishing in the current, you will have to additionally purchase special rear holders in the form of glasses, which completely eliminate the possibility of the rods slipping off the rod pod (photo 22).
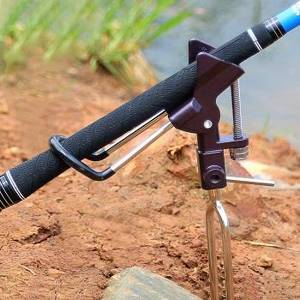
Since rear rod holders are usually not included in the delivery package of rod rods, I will dwell a little on the criteria for their selection for fishing under normal conditions (in still water). As mentioned above, even when fishing in still water, the rods often have to be tilted strongly. Unlike fishing in the current, this is usually done towards the water (although in some cases, for example when fishing for shells, you have to raise the rod tips up). Therefore, the rear rod holders must ensure that they are securely held on the rod pod. This is especially true for rods with ultra-thin handles (to my great regret, the fashion for precisely such handles has become widespread among most manufacturers of modern carp rods). When purchasing rear holders, you should check how well they can hold your particular rods, preferably without leaving unsightly marks on their handles.
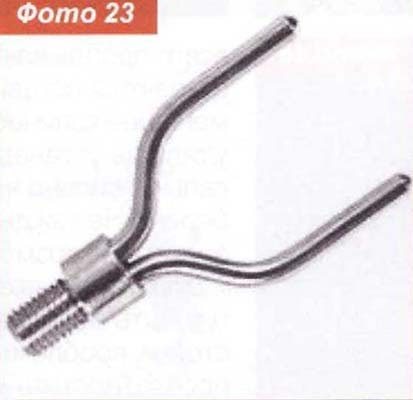
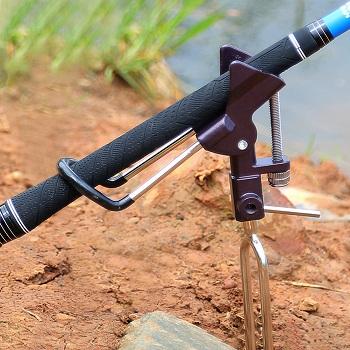
Modern holders are made of various materials: rubber, plastic, metal. Metal products are practically “eternal” and have wonderful aesthetic qualities, but their price is appropriate (photo 23). There are even adjustable metal holders (for example, from the English company Solar), which allow you to fine-tune the holder in accordance with the diameter of the rod handle (photo 24).
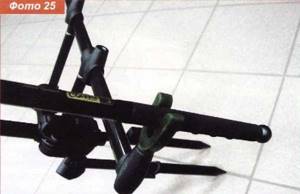
Plastic holders also last a very long time and, when properly selected for the diameter of the handle, are capable of holding rods very securely, but can leave marks on their handles and blanks (photo 25).
Rubber holders, due to their high elasticity, are able to reliably hold fishing rods with handles of various diameters, so it is easier to choose them; they are guaranteed not to leave marks or abrasions on either the handles or the blanks of the fishing rods. Many rubber holders have two seats: one is intended for full-size handles, the other for thin ones, or directly for the rod blank in its butt part.
Perhaps the only drawback of rubber holders is their slightly shorter service life compared to metal and plastic ones. Holders made of light-accumulating materials look very interesting in the dark (in addition, such holders help to accurately determine the location of the butt of the rod even without using a flashlight).
Very important elements of the rod are the front and rear crossbars (carp anglers use their English name “buzz bar”), on which electronic and mechanical bite alarms are attached, and rear rod holders, respectively. As a rule, crossbars are included in the delivery kit, but sometimes the manufacturer leaves the buyer the opportunity to independently select these elements in accordance with their preferences.
The most important characteristic of the crossbars is the number of seats intended for the installation of signaling devices or holders, which determines how many rods can be installed on the rod. If (now or in the future) it is planned to use an external transmitter (we talked about them in detail in one of the previous articles of this series), the number of seats on the front crossbar should be one more than the number of rods used.
When choosing crossbars, you must make sure that the distances between their seats are large enough to, a. to prevent the elements of your coils from touching each other. Otherwise, there is a high risk of knocking over the neighboring rod when hooking. Be sure to check this before purchasing. If, however, your reels touch each other, do not be discouraged - to combat this, simply install the rods, moving them slightly forward or backward in a checkerboard pattern.
Some crossbar models allow you to change their overall width, making them more compact for transport and providing more flexible customization options. It is very convenient if the seats can be shifted within the entire length of the crossbars. It is very aesthetically pleasing (and sometimes practically convenient) when the rods are installed not parallel to each other, but in a “fan”. To ensure this possibility, the rear crossbar must be slightly narrower than the front.
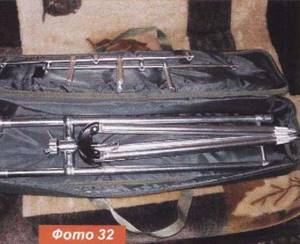
This effect can also be achieved by slightly moving the seats of the rear crossbar (if its design provides such a possibility). In my opinion, arc-shaped crossbars look the most aesthetically pleasing and provide maximum ease of use. Just like rod-pods, crossbars are made of stainless steel and duralumin (both painted and unpainted). The design of the fixing elements of its adjustment units (units for adjusting the length of the supports, the height of the posts for fastening the crossbars, the length of the central rod, the width of the crossbars) has a significant impact on the ease of use of the rod-pod. As a rule, these elements are made in the form of wing screws, knurled screws or eccentric rotary mechanisms. In my opinion, the last option is the most convenient because it allows you to make adjustments as quickly as possible. Typically eccentric units are made of plastic. Some anglers are wary of any plastic rod pod components, believing that they are not reliable enough. Experience shows that with regard to high-quality products (for example, the already mentioned Oiaigoros!), these fears are unfounded. In conclusion, I would like to draw attention to such an important element of the rod-pod as the transport case (photo 32). It should be made of sufficiently high-quality material that is easy to clean and have reliable fasteners.
It is very good if the design of the cover allows it to transport front crossbars with electronic bite alarms installed on them. This will save you from the long and tedious procedure of installing and removing electronic and mechanical alarms on every fishing trip.
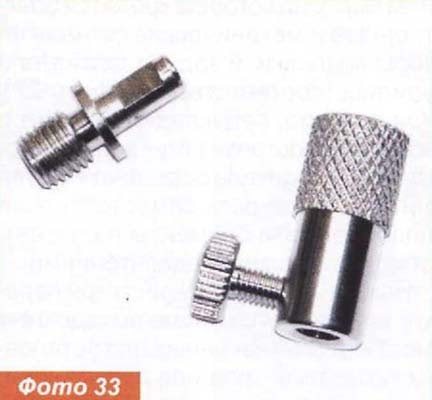
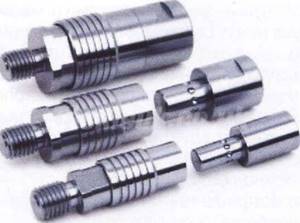
If the rod-pod cover is not spacious enough, you can cope with the above problem by purchasing a separate cover for the front crossbar and signaling devices, or by using special quick-release connections (photo 33, 34).
In conclusion, I want to say that although the rod is a very important element of a carp angler’s equipment, and its choice should be approached responsibly, it does not catch fish by itself. No matter how high-quality, expensive and “sophisticated” the rod-pod may be, its influence on the final result of fishing is much less than the carp angler’s ability to analyze the situation, think and improve.
Good luck on the thorny path of carp fishing and ringing lines!
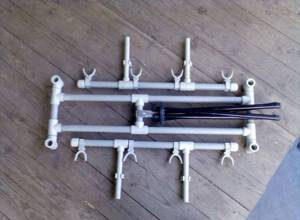
Do-it-yourself rod pod for fishing rods made of plastic pipes
If you are used to fishing with 2-3 rods, then you will need a large stand. If you look at the cost of modern rod-pods, not everyone is happy with it. There is a cheaper option for getting such a stand. It can be made from plastic water pipes and crosses with connectors.
To make a rod stand with your own hands, we will need the following materials:
- Plastic pipes - 7.5 meters (diameter 3 cm)
- Crosspieces – 2 pcs.
- Plugs – 4 pcs.
- Corners - 8 pcs.
- Tees - 12 pcs.
- Plastic flyers for fishing rods – 6 pcs.
We make such a list and go to a plumbing store. To make the stand we need the following pipe sections:
- 1.5 m – 1 pc.
- 0.75 m – 4 pcs.
- 0.5 m - 6 pcs.
Pipes 0.5 and 1.5 meters long must have threads suitable for tees and crosses. After that, we will need these plastic flyers for fishing rods:
We will screw them into plastic tees. After purchasing all the necessary elements, we arrange them in a way convenient for us: We thread tees and angles onto two pipes 0.75 m long to get the following elements:
We see that the pipe has two corners, two plugs as a stand and four tees. We form the second element in the same way. After this, we connect the elements with a pipe 1.5 meters long and we get this design: The connection is made through tees. Then we screw two tubes to the tees located in the middle of the opposite pipes.
After this, we screw two more elements to the racks.
These elements have two tees and one cross in the middle.
Please note that there is a thread on the crosspiece. Exactly the same thread should be on the corners. We will attach alarms to them. If alarms are not needed, then we use threadless elements on which we attach flyers. Having screwed two pipes from above, we connect them from below with small tubes:
This should work both ways for us.
The next and final stage is putting the flyers on the corners and on the cross. They fit tightly, hold well and do not require additional fastening:
We insert flyers into the corners and into the crosspiece.
On the opposite side we attach the signaling device to the corner.
We screw the same signaling devices to the crosspiece and corner. If there is no need for them, then we screw on the flyers.
This stand can be assembled within 5 minutes. When you arrive for fishing, you assemble it, and after it’s finished, you disassemble it. It is better to put all the elements in a separate case so as not to lose them.
The advantages of this DIY rod stand are obvious. It allows you to install from one to three fishing rods. If necessary, you can easily make a stand for more fishing rods. This homemade rod weighs very little. Its cost is several times less than store-bought options. And another important advantage of the plastic stand is that it has a long service life. It does not rot or rust and is not afraid of water and moisture.
How to choose a genus?
When looking through the genus of pods in fishing stores before purchasing, you need to pay attention to the following main features:
- The most stable stand is a feeder tripod. Her center of mass is in the middle. The uprights are not as stable. It is necessary to use other additional weights, pads and stabilizers.
- A high-quality and well-thought-out design of the hearth should be able to adjust the inclination of the crossbar and the distance between them, as well as change the height of the racks.
- Simplicity and speed of disassembly and assembly of the stand. The faster the better.
- The presence of a bag or case made of dense material for transporting the pod for fishing.
It is necessary to pay attention to the quality of the materials used, their processing, how well the paint is applied, and whether there are any visible defects. Every little thing plays a role and can ruin your fishing later.
Rod Poda
The rod-pod, a special stand for fishing rods, has long been considered a symbol of carp fishing. It is universal and convenient; it can be installed on any, even the most hilly and difficult surface: on concrete slabs, wooden scaffolds or rocky slopes. And this is without additional fastenings and screwing into the ground! The design of the rod-pod is quite simple: it is a body with supports in the form of legs. The rod-pod is needed precisely so that rear holders, alarms and fishing rods can be conveniently installed on it.
Many models of rod-pods are very convenient to use; their legs can be adjusted, and the parts of the structure themselves can be lengthened, expanded and rotated. They are also made of aluminum or metal. Rod pods are lightweight, easy to fold, and often come with a convenient carrying case. Thanks to them, you will not tangle the fishing line and will be able to fish comfortably.
Typically, rod pod models can be designed for three rods, or four.
Buzbars can be sold as a set or separately for a rod-pod. You can also fish for carp on a rod stand on the shore. Rod stabilizers can also help in carp fishing if, for example, a strong wind tilts the rod to the side or the carp moves too far to the side.
Before you buy a rod-pod, consult our manager, and he will tell you all the pros and cons of different models.
- Fast delivery
- convenient payment methods
- 100% product quality guarantee
Carp stand Rod Pod for 3 rods Carp Pro
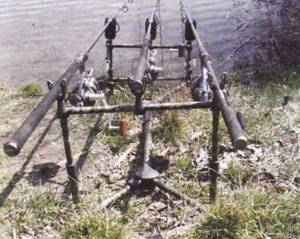
Photo of the finished rod stand - type of stand
This is what a finished homemade pod looks like. Our homemade product has been tested by fishing and has proven itself to be the best. We wish you good luck in making this device, which will greatly help in fishing! No tail, no scales!
Olga Mashtaler - Specially for the Samodelki FISH website, Ukraine, Zhitomir
- Do-it-yourself, collapsible stand for donks and fishing rods made from plastic tubes
- Fireflies and the use of LEDs in night feeder fishing