We knit a counter knot step by step
There are several varieties of the figure eight, but there is a universal knitted fishing knot pattern that is used most often.
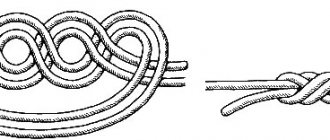
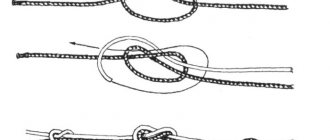
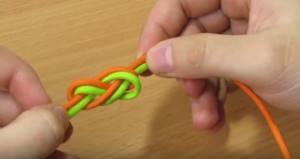
Step by step, the classic knitting of a counter knot looks like this:
- We knit a regular figure eight on one rope. To do this, bend one end of the cable and make a loop. Next you need to pass it under the main rope and make a second loop.
- The free end of the rope must be threaded through the first loop of the formed figure eight. With the second end of the cable, you need to carry out similar actions, but in a mirror image.
- If the knitting was done correctly, you will get an intertwined figure eight. All that remains is to tighten it to get a strong connection.
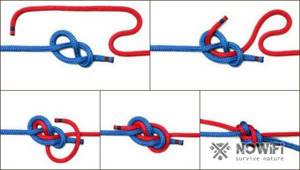
Step-by-step knitting pattern From these step-by-step instructions you can see that the knot is knitted very easily, but is strong enough for use in tourism, mountaineering and maritime affairs. The only nuance that should be taken into account is that for knitting it is better to use ropes of the same diameter.
Double
The main one for tying a double counter knot is the usual one. Its difference from the classic one is that it knits and looks a little different, which is why it gets the name “bunny ears”.

Scheme of a double counter knot In practice, a double counter knot is often used in fishing for attaching feeder gear, as well as in mountaineering and rock climbing to provide a safety margin and equalize the load on two safety points.
As in the classic design, the connection consists of two loops, each of which carries approximately half the load. The size of the loops can be freely adjusted.
So, tying a double counter knot is not difficult. First you need to tie a regular figure eight on a rope. Using a long open loop, you need to make two double loops. This will help you tie a quality eight. Next, the end of the open loop should be passed under, over and around the entire joint. Now all that remains is to tighten the cable tightly to securely fasten both loops.
The result is a very strong connection that can be used not only as a safety net, but also as a seat.
Classical
We provided a detailed step-by-step diagram for tying a classic counter knot in the previous sections. However, I would like to recall the description of this type of connection.
The counter knot got its name absolutely deservedly, because the end of one rope seems to go towards the other, and at the same time is brought down under the already formed loop.
This is what a classic rope connection looks like. In the classic version, this type of connection was used to connect two separate ropes. Its main advantage is that even after the cable gets wet, the knot will not unravel, and in order to untie it, you must pull strongly on one of the ends. Combined with the ease of tying, this makes the counter knot one of the most reliable connections.
Knots for tying two cables
Oak knot
Sailors use it only in exceptional cases, when there is a need to very quickly tie two cables together. Although connecting plant cables with an oak knot is quite reliable, it has a serious drawback: a tightly tightened knot is very difficult to untie later, especially if it gets wet. In addition, a cable tied in such a knot has less strength and during operation creates a danger of catching on something during its movement.
Its only positive qualities are the speed with which it can be tied and its reliability. To connect two cables, their ends need to be folded lengthwise together and, stepping back 15-20 centimeters from the edges, tie both ends as one whole with a simple knot. Do not try to tie synthetic cables and fishing line with this knot: it crawls on them.
Flemish knot
This is one of the oldest maritime knots, which was used on ships to connect two cables, both thin and thick. In fact, this is the same figure eight, tied at both ends. There are two ways to tie this knot. First, make a figure eight at the end of one of the cables tied together. Towards the exit of the running end, insert the running end of the second cable and repeat figure 8, tied on the first cable.
After this, grab each two ends, left and right, and begin to tighten the knot evenly, trying to maintain its shape. To final tighten the knot, pull the root ends of the cables. To connect two cables with a Flemish knot using the second method, place the running ends of the cables being connected parallel to each other so that they touch each other approximately along the length of one meter.
At this point, tie a figure eight with two cables folded together. In this case, you will have to carry it around and thread it into the loop along with the short running end of one of the cables and the long main one. This is precisely the inconvenience of the second method of tying the Flemish knot. The connection of two cables with a Flemish knot is considered very strong. This knot, even if tightly tightened, does not damage the cable, and it is relatively easy to untie. In addition, it has excellent quality - it does not slip and holds securely on synthetic fishing line.
Water node
The connection of two cables with a water knot is considered no less strong. To tie it, place the ropes to be tied with their ends facing each other so that their ends run parallel and touch each other. Holding the running and root ends of two different cables in one hand, begin to knit an oak knot with them, but instead of one run-out of the root end, make two.
Before finally tightening the knot, make sure that one pair of ends comes out of the loop from the top, and the second from the bottom, as shown in the diagram. The water unit is simple and reliable. It has not found wide use in the navy, because with strong draft it becomes so tight that it is very difficult to untie it.
Mother-in-law's knot
Mother-in-law's knot
Some people, when tying two ropes together, somehow manage to tie a so-called “mother-in-law” knot, which is somewhat reminiscent of a woman’s knot. If in the latter the running ends come out of the knot on one side, then in the mother-in-law knot they come out from different sides diagonally.
The “mother-in-law’s” knot is just as insidious as the woman’s (if not more). It should not be used under any circumstances.
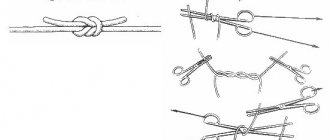
Straight knot
Straight knot
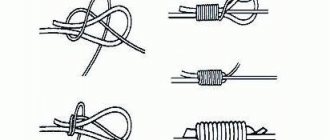
Archaeological finds indicate that the Egyptians used it approximately three thousand years BC. The ancient Greeks and Romans called it Nodus Hercules - the Hercules or Hercules knot, because the mythical hero Hercules tied the skin of the lion he killed on his chest with it. The Romans used the straight knot to stitch wounds and heal broken bones. It consists of two half-knots, sequentially tied one on top of the other in different directions. This is the usual easiest way to knit it.
Sailors, who have been using this knot since ancient times to tie cables, use a different tying method (Fig.b). Weavers who use a straight knot to tie up broken threads of yarn tie it in their own, special way, convenient for them (Fig. c). When there are large loads on the connected cables, as well as when the cables get wet, the straight knot is greatly tightened. How do you unravel a straight (reef) knot that is so tight that it cannot be untied and will have to be cut?”
A straight knot, even if wet and tightly tightened, can be untied very simply, in 1 - 2 seconds. Tie a straight knot as shown in diagram (d). Take ends A and B in your left hand, and ends C and D in your right hand. Pull them strongly in different directions and tighten the knot as tightly as possible. After this, take the root end of A in your left hand (to prevent it from slipping out of your hand, make a couple of slings around your palm).
Take running end B in your right hand (it can also be wound around your palm.). Pull the ends sharply and firmly in different directions. Without releasing end A from your left hand, clench the remaining part of the knot into your fist with your right hand, holding it with your thumb and forefinger. Pull the root end A to the left - the knot is untied. The whole secret is that when ends A and B are pulled in different directions, the straight knot turns into two half-bayonets and completely loses all its properties. It also comes undone easily if you take the root end G in your right hand and pull the running end B strongly to the left. Only in this case, the end of G must then be pulled to the right, and the remaining part of the knot (half bayonets) - to the left. When untying a straight knot in this way, remember that if you pulled the running end to the right, pull the main end to the left and vice versa. When untying a straight knot, one should not forget that with the same force it was tightened, one of its running ends must be pulled with the same force.
Thief's Knot
Thief's Knot
At first glance, it is almost no different from a straight knot and it seems that it is akin to it. But if you look closely, it becomes clear that the running ends of the thief's knot come out of it diagonally. The thief's knot, like the woman's and mother-in-law's knots, are shown for clarity in order to emphasize their similarities and differences with the straight knot.
It is not recommended to use these four knots, as they are unreliable for connecting two cables.
The origin of the name “thief's knot” is curious.
It appeared on English warships at the beginning of the 17th century.
The theft of royal property and the theft of personal belongings of sailors on British ships were considered commonplace. In those years, sailors on warships stored their simple belongings and food, mainly in the form of biscuits, in small canvas bags. Naturally, the bag cannot be locked, it can only be tied.
As a rule, sailors tied their personal bags with a straight knot. The thieves, mostly recruits who were not yet accustomed to the starvation ship rations, having stolen other people's biscuits, could not correctly tie the knot with which the bag was tied. They knitted something similar - a knot that the sailors began to call a thief's knot.
There is a second version about the origin of this name:
to prove the act of stealing from a bag, the owner deliberately tied a knot very similar to a straight one, and the thief, not paying attention to the trick, tied the robbed bag with a straight knot. But be that as it may, the origin of the node itself, like its name, is connected with the Fleet.
Surgical knot
Surgical knot
They are still used by surgeons to tie ligature threads to stop bleeding and to stitch tissue and skin. Nowadays, medicine has not yet abandoned the use of nodes, and doctors skillfully use them. During abdominal operations, surgeons have to apply sutures made of catgut (a special material obtained from the mucous layer of the intestines of a ram or sheep), which resolves after 3-4 weeks.
When tying, the catgut slips, and when making knots on it, surgeons use special clamps. During microsurgical operations, doctors use extremely thin suture material - a synthetic thread 10-200 times thinner than a human hair. Such a thread can only be tied using special clamps under an operating microscope. These threads are used when stitching the walls of blood vessels, for example, when replanting fingers, or when stitching individual nerve fibers. They mainly use woman's, straight, bleached, surgical knots and the so-called “constrictor” knot.
When tying a surgical knot, first make two half-knots one after the other with two ends, which are then pulled in different directions. Then another half-knot is tied on top, but in the other direction. The result is a knot very similar to a straight one. The principle of the knot is that the first two half-knots prevent the two ends from moving apart while another half-knot is knitted on top. This knot is convenient to use when there is a need to tighten and tie some elastic bale or burden with a rope and the tightened first half of the knot on the rope, without letting go of its ends, has to be pressed with your knee.
Academic node
Academic node
It is very similar to a surgical knot, differing only in that instead of one second half-knot, it has two of them. It differs from its, so to speak, progenitor - the direct knot - in that the running end of the cable is wrapped around the running end of another cable twice, after which the running ends are led towards each other and wrapped around them twice again. In other words, there are two half-knots below and two half-knots on top, but tied in the opposite direction.
This gives it the advantage that when there is a heavy load on the cable, it is not as tight as a straight knot and is easier to untie in the usual way.
Flat knot
Flat knot
It has long been considered one of the most reliable knots for tying cables of different thicknesses. They even tied anchor hemp ropes and mooring lines. Having eight weaves, the flat knot never gets too tight, does not creep or spoil the cable, since it does not have sharp bends, and the load on the cables is distributed evenly over the knot. After removing the load on the cable, this knot is easy to untie.
The principle of a flat knot lies in its shape: it is really flat, and this makes it possible to select the cables connected with it on the drums of capstans and windlass, on the welps of which its shape does not interfere with the even placement of subsequent hoses. In maritime practice, there are two options for tying this knot: a loose knot with its free running ends tacked to the main or half-bayonets at their ends (a) and without such a tack when the knot is tightened (b).
A flat knot tied in the first way (in this form it is called a Josephine knot) on two cables of different thicknesses almost does not change its shape even with very high traction and is easily untied when the load is removed. The second tying method is used for tying thinner cables than anchor and mooring ropes, and of the same or almost the same thickness. In this case, it is recommended to first tighten the tied flat knot by hand so that it does not twist during a sharp pull. After this, when a load is applied to the connected cable, the knot creeps and twists for some time, but when it stops, it holds firmly. It unties without much effort by shifting the loops covering the root ends.
As already mentioned, a flat knot has eight intersections of cables and it would seem that it can be tied in different ways; there are 256 different options for tying it. But practice shows that not every knot from this number, tied according to the principle of a flat knot (alternating intersection of opposite ends with under and over), will hold securely.
Ninety percent of them are unreliable, and some are even dangerous for tying ropes designed for strong traction. Its principle depends on changing the sequence of intersection of connected cables in a flat knot, and it is enough to change this order a little, and the knot acquires other negative qualities. Before using this knot in practice for any important task, you must first remember its diagram exactly and connect the cables exactly according to it without any, even the most insignificant deviations. Only in this case will the flat knot serve you faithfully and not let you down. This marine knot is indispensable for tying two cables (even steel ones, on which significant force will be applied, for example, when pulling out a heavy truck stuck in the mud half a wheel with a tractor).
Dagger knot
Dagger knot
In foreign rigging practice, this knot is considered one of the best knots for connecting two large diameter cables. It is not very complex in its design and is quite compact when tightened. It is most convenient to tie it if you first lay the running end of the cable in the form of a figure 8 on top of the main one.
After this, thread the extended running end of the second cable into the loops, pass it under the middle intersection of the figure eight and bring it above the second intersection of the first cable. Next, the running end of the second cable must be passed under the root end of the first cable and inserted into the figure eight loop, as the arrow indicates. When the knot is tightened, the two running ends of both cables stick out in different directions. The dagger knot is easy to untie if you loosen one of the outer loops.
Herbal knot
Herbal knot
Despite its name, this elementary unit is quite reliable and can experience heavy loads. In addition, it can be easily untied in the absence of traction. The principle of the knot is half bayonets with other ends (a). Sometimes we have to tie two belts: or two ribbons, well, let's say, reins. For this purpose, the “grass” knot is very convenient (b). It can be tied by slightly changing the “mother-in-law” knot or starting with half bayonets, as shown in diagram (a).
When you tighten the “grass” knot by the root ends, the knot twists and takes on a different shape. When it is completely tightened, the two running ends point in the same direction.
Packet node
Packet node
Its name suggests that it is convenient for tying bags and bundles. It is simple, original and designed for quick knitting.
The packet knot is somewhat reminiscent of the grass knot. In terms of strength, it is not inferior to the latter.
Fisherman's knot
Fisherman's knot
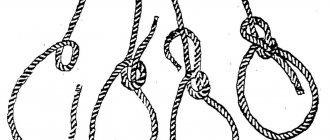
In Russia, this node has long had three names - forest, fishing and English. In England it is called English, in America - river or waterway junction. It is a combination of two simple knots tied with the running ends around the alien root ends. To tie two cables with a fisherman's knot, you need to put them towards each other and make a simple knot with one end, and pass the other end through its loop and around the root end of the other cable and also tie a simple knot.
Then you need to move both loops towards each other so that they come together and tighten the knot. The fisherman's knot, despite its simplicity, can be safely used to tie two cables of approximately the same thickness. With a strong pull, it is tightened so tightly that it is practically impossible to untie it. It is widely used by fishermen for tying fishing line (not synthetic) and for attaching leashes to fishing line.
Snake knot
Snake knot
This knot is considered one of the most reliable knots for tying synthetic fishing gear. It has quite a lot of weave, is symmetrical and relatively compact when tightened. With a certain skill, you can even tie the strings of a piano with it.
To do this, the place where the string is tied must be thoroughly degreased and coated with shellac. The snake knot can be successfully used to tie two cables made of any materials when a strong, reliable connection is required.
weaving knot
weaving knot
In weaving, there are about two dozen original knots for tying up broken threads of yarn and for connecting new spools. The main requirements imposed by the specifics of production on each weaving knot are the speed with which it can be tied, and the compactness of the knot, ensuring the free passage of the thread through the machine. Experienced weavers are truly virtuosos at knitting their ingenious knots.
They tie up a broken thread in just a second. They have to do this without stopping the machine. Almost all weaving knots are designed primarily for instant tying, so that in the event of a thread breakage, uninterrupted operation of the weaving machines is ensured. Some of the weaving knots are very similar to sea knots, but differ from the latter in the way they are tied. Some weaving knots have long been borrowed by sailors in their original form and serve them reliably.
The weaving knot can be called the “brother” of the clew knot. The only difference is in the method of tying it and in the fact that the latter is tied into a krengel or into a sail, while the weaving knot is knitted with two cables. The principle of the weaving knot is considered classic. Truly this is the epitome of reliability and simplicity.
Versatile knot
Versatile knot
This knot is similar to a weaving knot in its principle. The only difference is that in a tied knot the running ends point in different directions - this is very important when tying threads of yarn. It is not inferior in either simplicity or strength to a weaving knot and is just as quickly tied.
This knot is also famous for the fact that on its basis you can tie the “king of knots” - the bower knot.
Polish knot
Polish knot
It can be recommended for tying thin cables. It is widely used in weaving and is considered a reliable knot.
Clew knot
Clew knot
It got its name from the word “sheet” - a tackle that is used to control the sail, stretching it by one lower corner if it is oblique, and at the same time by two if it is straight and suspended from the yard. The sheets are named after the sail to which they are attached. For example, the fore-sheet and main-sheet are the gear with which the lower sails are set - the foresail and mainsail, respectively. Mars-sheets serve to set the topsails, jib-sheets pull back the clew angle of the jib, and foresail-sheets pull back the clew angle of the foresail, etc.
In the sailing fleet, this knot was used when it was necessary to tie the tackle into the fire of the sail, in the middle, such as the topsail-fox-sheet. The clew knot is simple and very easy to untie, but it fully justifies its purpose - it securely holds the clew in the sail's crank. Tightening tightly does not damage the cable. The principle of this unit is that the thin running end passes under the main one and, when pulled, is pressed by it in a loop formed by a thicker cable. When using a clew, you should always remember that it holds securely only when traction is applied to the cable.
This knot is knitted almost in the same way as a straight one, but its running end is passed not next to the main one, but under it. The clew knot is best used for attaching a cable to a finished loop, krengel or thimble. It is not recommended to use a clew knot on a synthetic rope, as it slips and can break out of the loop.
For greater reliability, the clew knot is knitted with a hose. In this case, it is similar to a brass knot; the difference is that its hose is made higher than the loop on the root part of the cable around the splash. The clew knot is a component of some types of woven fishing nets.
Windlass knot
Windlass knot
Just like the clew knot, it got its name from the name of the gear - the top sheet, which is used to stretch the clew knots of the lower edge of a straight sail when setting the top sails. If the single sheets of the lower sails are tied with a clew knot, then the top clew and boom halyards, top halyards and boom halyards, as well as top halyards are tied with a top clew knot. The clew knot is more reliable than the clew knot because it does not immediately untie when the pull on the cable stops.
It differs from a clew knot in that the loop (or krengel) is surrounded by the running end not once, but twice, and is also passed under the main end twice. In the days of the sailing fleet, the front clevis knot was widely used when working with gear. It was used when it was necessary to take some kind of gear into the fire, for example, top sheets and top sheets.
Usually they tied the bram-gins in the bram-halle and the gins in the topenant of the lower yards. The windlass knot is also reliable for tying two cables of different thicknesses. It holds well on synthetic cables of equal thickness.
Docker node
Docker node
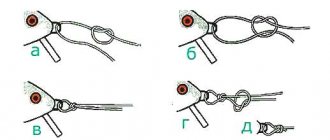
In maritime practice, it often becomes necessary to attach a much thinner cable to a thick rope. There is always such a need when a ship is moored to a pier, when one or several mooring lines need to be supplied from the deck. There are several ways to attach the casting end to a mooring line that does not have a light, but the most common is to use a dock knot.
To tie this knot, the running end of the thick cable to which you intend to attach the thin cable must be folded in half. Insert a thin cable into the resulting loop from below, make one run around the root part of the thick cable, pass it under the thin cable, then over the running end of the thick cable and, passing under three cables, insert it into the loop.
The docker's knot is reliable enough to use the throwing end to pull (or lift onto the deck from the shore) a heavy mooring line, and it quickly unties. It is best used as a temporary knot.
Furrier's knot
Furrier's knot
It seems strange that this wonderful knot, long known to furriers, has still remained unnoticed by sailors. His scheme speaks for itself. It is relatively simple, has enough crossed ends and is compact.
In addition, the furrier's knot has an excellent property: designed for strong traction, it is tightly tightened, but also untied without much difficulty. This knot can be successfully used for tying synthetic cables and fishing lines.
Liana knot
Liana knot
This knot, although not widely used in the navy, is also one of the original and reliable knots for tying cables. It is unique in that, with a very simple interweaving of each end separately, it holds tightly under very strong traction and, moreover, very easily unties after removing the load on the cable - just move any of the loops along the corresponding root end and the knot immediately falls apart.
It does not slip on synthetic fishing line and can be successfully used by anglers.
Hunting knot
Hunting knot
In our time, inventing a new knot is almost incredible, since no more than 500 of them have been invented over five thousand years. Therefore, it is no coincidence that the invention of a new unit by retired English doctor Edward Hunter in 1979 caused a kind of sensation in maritime circles in many countries.
British patent experts, issuing Hayter a patent for his invention, recognized that the unit was indeed new. Moreover, it holds perfectly on all lines, including the thinnest synthetic lines. Essentially, a hunting knot is a successful interweaving of two simple knots tied at the ends of the cables. Dr. Hunter did not pursue the goal of inventing a new knot, but tied it completely by accident.
Since the surname Hunter means “hunter” in English, we called this knot a hunting knot.
Sea knots
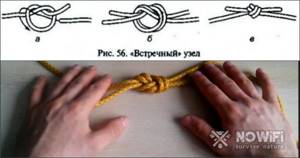
Knitting a Flemish counter knot
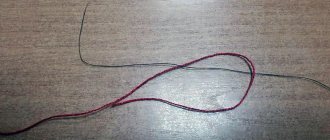
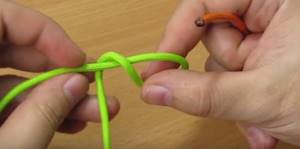
1. So, we need two ropes. First, we carry out manipulations with the first one. It is necessary to form a loop by placing the running end over the main rope.
2. Bring the end down and thread it through the resulting loop.
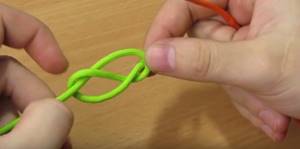
3. We pass the running part of the second fishing line through the loop.
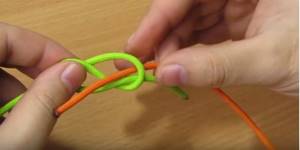
4. Having turned the running end of the fishing line around the first rope, we bring it inside the first formed loop.
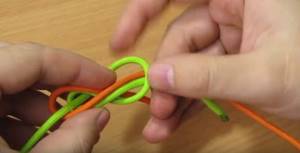
5. Draw the end under the second loop.
6. Tighten and the knot is ready.