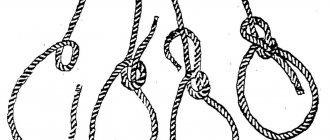
The page shows examples of tying horizontal and vertical lures with the most popular fishing knots.
Any lure plays better if it is not rigidly tied to the fishing line of the tackle. Therefore, fishermen often use special fishing knots to tie spinners, devons and balancers.
I am used to fastening my lures, both in summer and winter fishing, with the fishing knot shown at the bottom of the page. Thanks to this, it takes literally seconds of precious fishing time to replace the bait.
How to tie a lure with a fishing knot
The page presents fishing knots that can be used to securely tie a lure to a fishing line or braided tackle.
A “tight loop” fishing knot can be used to tie to a fishing line, in addition to spoons, wobblers, fly fishing flies, streamers and other baits.
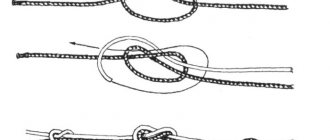
The sequence of tying a spinner or wobbler with a non-tightening knot is shown in the figure.
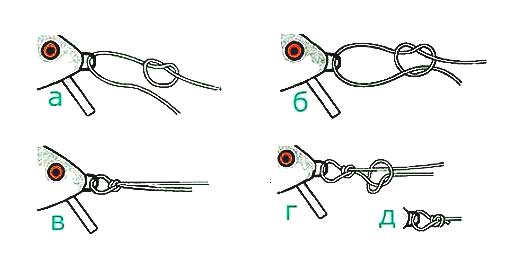
In order for the lures not to lose their playing properties, the baits must be given maximum freedom when moving in the water. Therefore, for free retrieving, we tie the lure with a fishing knot called a “tight loop” directly to the fishing line.
To do this, we form a simple knot and thread the fishing line through the ring of the spinner “a”.
We bring the end of the fishing line through the fishing knot “b” tied to the main fishing line, tighten it near the soldered end loop of the tied spinner “c”.
Tie another safety fishing knot “g” nearby. Tighten it "d". The result: your lure will be securely attached to the fishing line.
Fishing knot for tying a spoon
A fishing knot called a “choke loop” is used to securely tie the spoon to the fishing line.
With the help of a fairly simple knot, you can tie to the fishing line, in addition to the spinner, a balancer, a devil, a tee of a wormhole and another end element of the tackle.
The fishing knot got its gloomy name because it is self-tightening, that is, it can slide along the main fishing line. The stages of tying a spinner are shown in the picture.
Before tying a fishing knot, the ring of your spoon should already be in a loop of fishing line.
The next page shows knots with which you can tie two fishing lines or tie a leash to the main fishing line of the tackle.
READ MORE:
Fishing knots for tying fishing lines
Source: 99ll.ru
Oak loop (Fig. 66). This is the simplest loop of all existing non-tightening loops. It is knitted with a simple knot at the end of a cable folded in half. The oak loop is strong and safe, but it greatly weakens the cable by bending it. Unlike an oak knot, it can be used on a synthetic cable. Its significant drawback is that the knot at the end of the cable is very tight and the loop is very difficult to untie.
Vein loop (Fig. 67). If, when tying an oak loop, you make an additional hose with the running end folded in half, you will get a loop that will be a little easier to untie (hereinafter in the diagrams a working loop is indicated by a cross). It is used for thin fishing lines.
Flemish loop (Fig. 68). Knitted in a figure eight on a doubled rope, it is a strong and easy to untie loop at the end of the rope. The Flemish loop is suitable for tying on both thick and thin cables. It weakens the strength of the cable almost insignificantly. It is used for fastening the strings of musical instruments and for other purposes.
“Honda” (Fig. 69). Archaeological finds indicate that this method of tying a loop is one of the oldest. Long before our era, people on different continents of the Earth attached the string to the bow in this way.
An additional knot at the end of the running cable serves as a stopper, which, when tensioned, does not allow it to slip out of the loop of the knot.
“Honda” is the American name for such a loop. It is still used to lasso cowboys in Mexico and the southern states of the United States.
Eskimo loop (Fig. 70). The Eskimos used this loop to attach the string to the bow. The official name for this loop is the Eskimo bow string knot. It has an important property for this purpose: its size can be changed after the knot has already been tied.
When pulled by the root end of the cable, the loop remains motionless.
Perfect loop (Fig. 71). The knot with which this fixed loop is tied at the end of the cable is simple, reliable and does not slip even on the thinnest synthetic fishing line. The perfect loop is very popular among anglers abroad.
Fishing loop (Fig. 72). It is often called the English loop or fisherman's eye. It can be tied either at the end or in the middle of the cable. When tightening, the knots need to be brought closer together. This loop is widely used by fishermen. Sailors use it instead of a factory fire when the mooring cable breaks and in cases where it is necessary to securely fasten the cable to an object.
Burlatskaya loop (Fig. 73). English sailors call it a harness loop or a Pushkar knot. Apparently, the sailors borrowed it from the artillerymen, who used this knot in cases where they had to harness additional horses or soldiers to the team on steep mountain roads or off-road conditions. This loop can be made either at the end of the cable or in the middle. The Burlatsky loop is designed to apply traction in any direction. It ties easily and holds securely. True, before a load is applied to the loop, it should be tightened tightly by hand, since with a sharp pull it tends to turn over and slide along the cable for some time. Several loops tied in this way will help pull out a car stuck in the mud, allow you to climb to a height or descend from a steep cliff.
Driving loop (Fig. 74). Just like the Burlatsky, the driving loop is designed for traction in any direction and can be tied in the middle of the cable. It is knitted in a more complex way than the Burlatsky loop, but it is more durable and reliable.
“Grass” loop (Fig. 75). This is another type of non-tightening single loop. Knitting it should start with a simple knot. It got its name from the name of the node to which it corresponds.
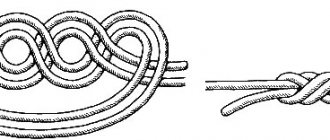
Gazebo unit (Fig. 76). People unfamiliar with nautical terminology may think that the name “gazebo” comes from the verb “to chat” or from the noun “gazebo.” In our maritime language, the name of this unit comes from the “gazebo”, but not from the usual one, but from a sea gazebo, which is a small wooden board - a platform used to lift a person onto the mast or lower it over the side of the vessel during painting or other work. This board is attached with the help of cables to the lifting cable with a special knot, which is called the gazebo knot. Its second name is bowline. It comes from the English term “bowline,” which refers to the tackle used to pull back the pointed side luff of the lower straight sail. This tackle is tied to the luff of the sail with a “Bowline Knol”, or simply “Bowline”.
It makes sense to dwell on this point in more detail. Indeed, it is admired by those who deal with cables and knot tying. This is one of the oldest and most amazing knots ever invented by man. Archaeologists testify that the gazebo knot was known to the ancient Egyptians and Phoenicians 3000 years BC. In English marine technical literature it is often called the “King of Knols”. Not every sea knot can compare with it in the number of positive properties it possesses. Taking into account the scope of its application and excellent qualities, the gazebo knot is rightfully awarded the royal title in the huge dynasty of maritime and non-marine knots. In appearance, it is similar to a weaving knot, but its running end does not go into the loop of the other end, but into the loop of its root end.
The gazebo knot, despite its amazing compactness, simultaneously contains elements of a simple knot, half-bayonet, weaving and straight knots. The elements of all these knots in a certain combination give the gazebo knot the right to be called universal. It is surprisingly easy to knit, even with strong traction it never tightens “tightly”, does not spoil the cable, never slides along the cable, does not untie itself, but is easy to untie when needed.
The main purpose of the gazebo knot is to tie a rope around a person under the arms as a means of insurance when climbing to a height, lowering overboard or in a smoky room during a fire on board a ship. A gazebo can be inserted into the non-tightening loop of this knot. A loop tied with a gazebo knot on the mooring line reliably serves as a firelight. This knot can be successfully used for tying two cables of any diameter or for tying a thick plant cable with a steel one (in this case, the cables are connected with loops, and the knots are tied at their root ends). Of all the ways to connect two cables made of different materials (for example, hemp and steel, Dacron and manila), connecting using two arbor knots with loops will be the most reliable. In addition, a reliable tightening loop can be made from a gazebo knot (see Fig. 85). It can be used for mooring and for attaching the cable to the hook. The gazebo knot can also be safely used to temporarily shorten the cable or in cases where it is necessary to exclude a worn-out piece of cable from work by tying the knot so that this piece fits on the loop.
There are many ways to tie a bow knot. The reader is offered the most rational and simplest one.
In life, the ability to quickly tie a bow knot around your waist can always come in handy. You need to be able to do this with one hand, with one continuous movement of the hand, in the dark, in 2-3 seconds. It is not at all difficult to learn this.
Take the main end of the cable in your left hand, and with your right hand, wrap the running end around your waist behind you. Take the running end in your right hand and, stepping back about 10 centimeters from its edge, hold it in your fist. Take the root end in your left hand and extend your left arm forward. Now, with the root end of the cable slightly stretched, with your right hand with the running end clamped in it, bend the root end of the cable from top to bottom towards you and up from you. Try to make such a movement with the brush that it does not completely fall into the loop. Next, wrap the running end around the stretched root end to the left and grab it with the thumb and forefinger of your right hand. While pulling the right hand out of the loop, simultaneously insert the running end into the small loop. Holding the running end with your right hand, pull the root end with your left hand. The knot is tied around your waist according to the pattern shown in Fig. 76. After doing this several times in a row, you will learn how to tie a bow knot on yourself in the dark or with your eyes closed.
Imagine this situation: you find yourself overboard a ship in the water, they throw you an end from the deck that you cannot climb up because it is slippery. By tying a bow knot around your waist and moving the resulting loop under your arms, you can ensure that you will be pulled safely out of the water onto the deck. This magnificent knot has saved the lives of sailors more than once. To untie the gazebo knot, it is enough to slightly move the loop of the running end along the weakened root part of the cable.
Double gazebo knot (Fig. 77). This knot, which has two non-tightening loops, is used instead of a gazebo to lift a person to a height, to raise or lower a person who has lost consciousness, and in other cases. When tying a knot, one of the loops is made almost half the size of the other. A person sits in one loop, the second loop clasps his torso under the arms. This allows him, having risen to a height, to work with both hands.
In maritime practice, there are several ways to tie a double bower knot. Let's explain in a moment. The knot is tied with a rope folded in half. After inserting the running end (in the form of a loop) into the small loop of the knot, the end must be pulled out a little and, wrapped around the large loop, placed in the upper part of the knot. Holding the main part of the cable with one hand, pull the right side of the large double loop with the other hand. After this, the knot will be tightened and ready for use.
Boatswain's knot (Fig. 78). This ancient sea knot is sometimes called the “Spanish bower”. It, like the double gazebo, serves to lift a person up or lower him from a height.
Using a boatswain's knot, insert a foot into each of its two loops and hold onto the cable with your hand. This knot can be used to lift (or lower from a height) an unconscious person. To prevent him from falling out of the two loops, one or two half-bayonets are additionally tied on his chest with the running end of the cable.
French top knot (Fig. 79). The loops of this knot on the tops of the masts of sailing ships served to fasten backstays, which were tied into them with a clew knot; the free ends of the knot were tied with a straight knot and thus a third loop was obtained, which was used to fasten the forestay. One knot simultaneously secured three pieces of standing rigging.
Top knot (Fig. 80). It was also used on the mast tops of sailing ships instead of yokes with butts (forged rings with brackets) for attaching backstays and forestays. This unit was used to attach temporary stays when installing masts and driving piles,
In English, the name of this knot is “Shamrock Knot”, which means the shamrock, which is the emblem of Ireland. The knot can be used on the shore for attaching flagpoles and antenna masts, seedling trees, etc. If you have a jug whose neck has a more or less large protrusion, using the top knot you can make a comfortable handle for it.
But it is best, as the author of the book is convinced, to use this knot for carrying watermelons and large melons. After all, it was once used on military sailing ships to carry cannonballs. A piece of any cable 3 meters long makes a reliable basket for the largest watermelon. In this case, the knot should not be fully tightened, but its three loops should be tied with two free ends. Of the four known methods of tying this top knot, the one shown in the diagram is considered the best.
“Southern Cross” (Fig. 81). This romantic name was given to this knot by sailors of the distant past. Sometimes it is called the “sea cross”. In its essence, this is also a top knot, but of a different knitting method and principle. If you pull out three loops of the knot, it will be shaped like a cross (hence the name). This knot was used previously for the same purposes as the top knot.
Source: www.starpomlom.com
Fishing knot for free spinner play
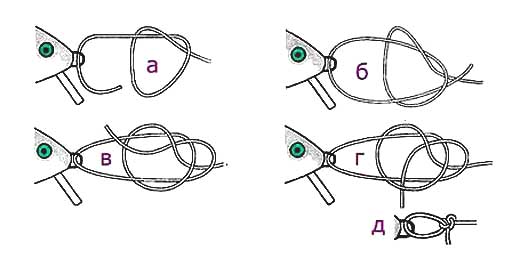
Shown here is the sequence of forming a fishing non-tightening knot for free play on the fishing line of a spinner, wobbler, or fly.
Form a simple fishing knot in the form of an “a” loop on the root line.
Pull the end of the fishing line through the loop of the attached spoon and the tied fishing knot “b”.
In the opposite direction, wrap the fishing line around the tied loop “c” and pass between the two loops “d”.
Position “d” shows the appearance of a tightened fishing knot, with the help of which your lure will be securely tied to the fishing line and which will not interfere with its free play when retrieving.
Untightened knots
13.01.2009
13703
0
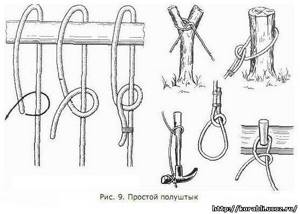
A simple half bayonet. This maritime knot , being the simplest of the non-tightening knots, is widely used in maritime affairs. It serves as the final element of many knots . Wrap the running end of the cable around the object to which you want to tie the cable, then around the root end of the cable and pass it into the resulting loop. After this, attach the running end of the cable with a grip to the root end. A knot tied in this way reliably withstands strong traction. He may move towards the object, but he will never be drawn in. A simple half-bayonet is used to connect two cables with “foreign” and “own” ends. (Fig. 9)
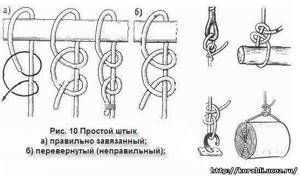
A simple bayonet. Two identical half-bayonets make up a knot, which sailors call a simple bayonet. The main use of a simple bayonet in the navy is securing mooring ends to mooring fixtures, fastening the guys of cargo booms to the butts and eyes, and attaching the cargo pendant to the load being lifted. The maximum number of half-bayonets in such a knot should not exceed three, since this is quite sufficient and the strength of the knot as a whole will not increase with a larger number of half-bayonets. He is very reliable. (Fig. 10)

Bed bayonet. For many centuries, a canvas hanging bunk in the form of a hammock served as a bed for sailors on a ship . During the day, rolled-up bunks along with a pillow, blanket and sheet were stored in so-called bunk nets along the side on the deck and served as a reliable parapet from cannonballs and shrapnel during the battle. In the evening, before lights out, at the command “beds down,” they were carried below deck and hung up. Tying a knot to hang a bunk is serious business. Here you need to use a knot that does not tighten, is easy to untie and holds securely. The most important thing is that it does not come undone on its own under the influence of the ship’s . Sailors used various knots to hang their bunks, but the bunk bayonet was considered the most reliable. (Fig. 11)

A simple bayonet with a hose. This knot differs from a simple bayonet by one additional hose around the object to which the cable is attached. It also serves mainly for fastening cables and railings when mooring using bollards, bits and bollards, but is used, unlike a simple bayonet, in cases where there is no need to quickly release the mooring lines. This knot is also convenient for attaching a cable to a hook, fire, eye, etc. Two hoses around the object make this knot more reliable during long stays; in any case, due to the additional hose, it will not fray as quickly as a simple bayonet. (Fig. 12)

A simple bayonet with two hooks. In fact, this is also a type of simple bayonet. The difference from a simple bayonet with a hose is the additional third hose. It increases the strength of the knot if the cable experiences constant friction against the bollard or biting. Using this unit to attach the cable to the hook is a very reliable method.
(Fig. 13)
Bayonet with carryover. If for a simple bayonet with two hoses the latter pass on the side of the attachment point of the root end, then for this naval unit they are placed one on each side. This gives the knot greater symmetry; when the direction of pull changes, the knot moves less along the object to which it is tied. To tie a bayonet with a bow, you first need to make one hose around the object with the running end, encircle it behind the root end and make a hose again, but in the other direction. This is followed by one or two half-bayonets. (Fig. 14)
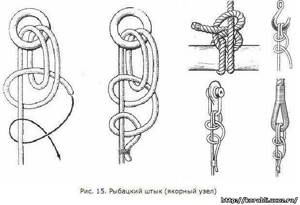
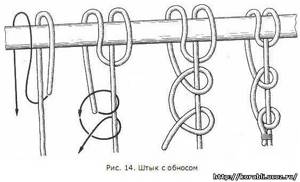
Fisherman's bayonet. One of the most important actions, the use of a knot in maritime affairs , is tying a rope to an anchor. Over the five thousand years of the existence of ships, people for this purpose could not come up with a more reliable sea hub than this. Tested by centuries of experience in maritime practice, this knot is recognized by sailors of all countries as the most reliable for attaching a rope to the eye or to the anchor shackle . A fishing bayonet (or anchor knot ) is to some extent similar to a simple bayonet with a hose. It differs from it in that the first of the two half-bayonets additionally passes inside the hose that clasps the object. When using this knot for an anchor, it is always necessary to grab the running end with a grip to the main one. In this case, even with very strong traction, the fishing bayonet does not tighten and holds securely. It can be safely used in all cases when working with cables when they are subject to strong traction. (Fig. 15)
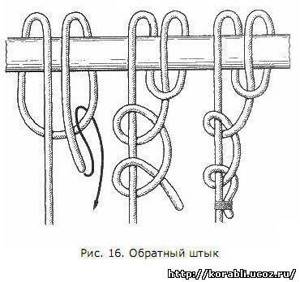
Reverse bayonet. When mooring ships to piers and moorings, a situation often arises when it is very difficult to enclose the running end of the cable around a pole or log. Sometimes you have to literally crawl under the pier in order to thread the end through a log or eye from the bow of a boat or boat. By using a reverse bayonet, you can wrap the rope around the desired object once and at the same time tie a knot with two hoes around the object to which you are attaching the mooring line. To do this, the running end of the cable needs to be folded in half over a length of 2-3 meters and, looping it forward around the object, pull the loop towards you. Now the running end of the cable needs to be threaded into this loop, and the slack should be taken out at the root end and the knot should be finished with two half-bayonets. The reverse bayonet is convenient for use in cases where access to the object to which the cable needs to be attached is difficult or inconvenient for tying a sea knot. (Fig. 16)
Mast bayonet. Here the original combination of two good knots produces a reliable and simple knot. First, a bleached knot is tied around the object to which the cable is attached, and an ordinary bayonet is made at the root end of the cable, which, as is known, is also a modified bleached knot. To prevent the mast bayonet from becoming too tight, the first knot is not fully tightened. (Fig. 17)
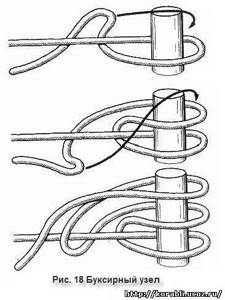
Towing bayonet. This marine knot is used to secure a cable to a towing hook or bit. They can delay or release the towing end. Thanks to the sequential application of several cable hoses on the bit, the towing end can be pulled from the bit, and when the tension of the tow is weakened, it can be pulled out again in the form of loops thrown over the top of the bit. (Fig. 18)

Port node. In cases where it is necessary to hold a synthetic mooring line on a single bit, there are several original units for this purpose in the maritime industry. One of them is the port hub. First, you need to make several hoses around the single bollard with the running end of the mooring cable. After this, fold the running end in half and in this form, in a loop, pass it under the tensioned root part of the cable, turn the loop 360 degrees and throw it on top of the bollard. This knot does not slip and holds securely. The cable can be released at any moment, even if the mooring line is under strong tension. To do this, you need to slightly select the running end passing under the root end and enlarge the loop, after which it will not be difficult to throw it off the biting. (Fig. 19)
- Knots for thickening
- Untightened knots
- Knots for tying two cables
- Tightening knots
- Non-tightening loops
- Tightening loops
- Quick release knots
- Special maritime knots
- Knots for fishing tackle
- Decorative knots
⇄ English (auto-detected) » Russian
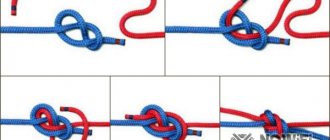
California fishing knot for spinners
The image shows a strong "California knot" for tying a fishing lure, formed from double fishing line.
In addition to a spoon with vertical or horizontal wiring using a California knot, you can attach a wobbler, sinker, swivel, clasp, hook to the fishing line of the tackle.
To tie a spinner, fold the running end of the fishing line in half and pass it through the ring of the spinner “a”.
Then a simple knot “b” is knitted. The folded loop should not be short, since the next step will be to pass the attached spoon through it.
ATTENTION! In position “b”, the loop is first bent to the left behind the spoon, then the bait is passed through the loop (in the direction of the arrow). The folded fishing line is thrown over the tied fishing knot “b”.
Finally, the formed knot is moistened with water or saliva and tightened in several stages. A view of a Californian fishing knot fully tightened on a tied spoon is shown in position “d”.
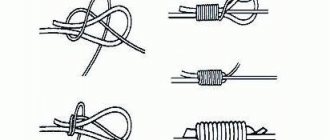
Non-tightening knot for tying a spinner
A fishing knot for tying a spoon called a “non-tightening loop” is shown in the picture.
Tie a straight slip knot on the line and pass the line through the spinner ring or swivel. In reverse, pass through loop “a”.
Twist the running end around the root line several times and thread it into loop “b”. Tighten the fishing knot "in". A knot that does not tighten will have minimal impact on the performance of the attached lure.
The number of twists in the fishing knot depends on the rigidity and thickness of the fishing line to which the lure is tied. The thicker and stiffer the fishing line, the fewer turns of twist there can be in the formed knot.
Non-tightening loop. fishing knots
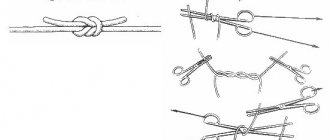
In the three previous issues, starting with number 14, we talked about several loose loops that are knitted using a simple knot, and we continue the same topic in this issue. The question arises: why so many nodes of the same type? The fact is that they are similar only in their purpose - they allow you to make a fixed end loop, but the fishing line itself can feel, and therefore behave - maintain tensile strength - in these knots differently.
In the three previous issues, starting with number 14, we talked about several loose loops that are knitted using a simple knot, and we continue the same topic in this issue. The question arises: why so many nodes of the same type? The fact is that they are similar only in their purpose - they allow you to make a fixed end loop, but the fishing line itself can “feel”, and therefore behave - maintain tensile strength - in these knots differently. One loop is better suited for thick and soft fishing line, the other for hard line, and the third will be preferable for thin line.
This is a general rule: there is no one best knot for tying hooks, another for wobblers, and a third for tying fishing lines or tying leashes. We will provide various knots that serve the same purposes, giving anglers the opportunity to make their own choice depending on the type of fishing line used or the convenience of the tying method.
The proposed loop is knitted a little easier than the Rapal loop, with fewer bends in the line. They start with a straight sliding knot, and not an oblique one, as in the Rapala loop. Then the running end is carried around the main end several times, bent back and passed into the lumen of the sliding unit from the same side on which it came out of it in the extending loop. How many times should you wrap the running end around the main one when tying this and similar knots? It is believed that a thick line requires fewer runs than a thin line. For example, for lines with a breaking load of more than 27 kg (60 lbs) 2 runs are sufficient, from 22 to 27 kg (50 - 60 lbs) - 3 runs, but for lines with a breaking load of less than 4.5 kg (10 lbs) it is possible You will have to make 7 cuts to make the knot as strong as possible.
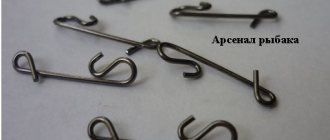
Fishing units for quick replacement of lures
The figure shows three fishing knots used to quickly replace spinners and other gear attributes.
And, to be more precise, the spoon is not even tied, but is simply fixed in a pre-tied fishing knot.
If a fisherman often replaces spoons in the process of catching predatory fish, then for him such fishing knots in the form of end loops can save a lot of sometimes very expensive fishing time.
Let’s say that for many years I have been using the simplest and most reliable fishing unit to quickly replace spinners, which I have tinted scarlet in the image for this occasion.
And I don’t remember a single case where a knot in the form of a simple single loop came undone when hooked or jerked by a predatory fish.
A fishing knot in the form of an end loop is convenient because when you quickly replace the spinner with bait for different purposes and build it, you don’t have to constantly cut it and tie a new knot.
Let’s say that a vertical perch spoon can be quickly replaced with a devil or a bolda during winter fishing. Read the next article for details.
Fastening the spinner with a knot for quick replacement

The sequence of tying a spinner in the loop of a fishing knot, designed for quickly changing bait, is shown in three positions in the picture. We quickly and securely attach the bait as follows:
Fold the loop in half and pass it through the ring of the spinner.
Next, we give the loop an oval shape and draw it around the end hook of the bait.
At the third stage of fastening, we tighten the fishing line on the tail ring of the spinner (devil, bulldozer). As a result: the spoon will be quickly mounted into the loop of the fishing knot.
The process of attaching or removing the spoon takes literally seconds, however, there is one “but”. The loop of a fishing knot can be short only if the knot tied on it passes freely through the ring of the lure being tied.
If the ring on the spinner is small, then the loop folded in half must be longer than the bait, otherwise the spinner simply cannot be passed through the loop.
Just the second case of quickly attaching a spinner in a loop tied from a thick fishing line with a massive fishing knot is demonstrated in the pictures.