A marker float is a piece of equipment that allows you to analyze the underwater topography of the bottom and make sure that you have chosen the right place for fishing, find flat areas or holes that you can feed and try to catch fish with a feeder or a float.
In order to find a suitable place for fishing, you will need to spend some time measuring the depths and relief using a marker float. You will find out what the depth is at each specific point of the reservoir and the nature of the soil: weeds, gravel, silt, shells.
Experience will come with practice for an angler who is not using a marker float for the first time - it will be much easier and faster to do all the necessary procedures, but there is nothing complicated in the equipment that will be discussed - and we will prove it!
Where to get a marker float: buy or make it yourself?
A marker float is not the best method for determining the fishing point. Why did he give in to wireless technology?
The first 4 listed components of the tackle are not difficult to find, but the marker float will need to be either made with your own hands or purchased.
You can buy a marker float at any fishing store. If you fish in still water, you don’t have to bother with the shape and size of the float. A 30 g float will be just right. But for fishing in the current, using a marker float is much more difficult. In a strong current, the likelihood that you will be able to measure the depth correctly is very low. It is necessary to use heavy loads (from 70-100 g) and floats of high load capacity, their shape should be spherical (barrel-shaped).
Making a marker float with your own hands
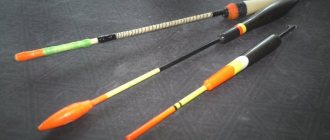
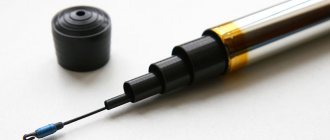
Marker float from a syringe (with rear tail and a swivel as an eye in the front part)
A piece of foam plastic is the simplest version of a marker float. The rounder it is, the better, because no one has canceled the aerodynamic properties and it is important for us that the float in the water and on the surface of the water receives as little resistance as possible from the water flow.
A marker float made from a syringe is also a good option and attaching the float is very easy. One of the designs is to glue a swivel into the tip (we get an eye for tying the float to the tackle), and at the back we make a bright plumage from a dart, or simply paint the back of the syringe in a bright color.
Marker float made of wood - similar to foam plastic - you can plan a float from a piece of wood.
A plastic egg from Kinder Surprise is a very good float
Marker float from Kinder Surprise. A yellow plastic egg is perfect as a float buoy, but due to its very large carrying capacity, it is necessary to either fill it with water or load it with sinkers, otherwise your tackle will turn out to be too heavy and you won’t be able to throw it with a standard spinning rod.
The fishing line is attached to such a marker float very simply: a small object is tied to the fishing line, for example a swivel or a hook or just a bead. This item is inserted into the egg and the egg closes. The line is now tightly secured. But this is more of a “travelling option”. If you are preparing the tackle at home, then it is better to make a hole with a hot needle exactly in the center of the bottom of the egg - insert the fishing line there and only then tie the stopper.
What is a marker float and how to make it yourself?
Today, manufacturers offer to purchase a lot of useful things for fishing. Thanks to unique tools and devices, fishing can be of the highest standard.
In addition to preparing groundbait, bait and equipment, it is equally important to measure the depth and learn about the features of the chosen area. This can be done using an ESP marker float or any other model of this product.
The tool allows you to analyze the underwater bottom topography and select the most suitable point for fishing.
What is a marker float?
Fishing floats are one of the important elements of equipment. With their help, the user navigates the area and reacts to a bite in time. The marker product allows you to find out all the information about the bottom of the reservoir, identifying each hole and the nature of the soil.
It is most advisable to use this device when fishing on a feeder. This way the fisherman can easily find the ideal place and bait the fish.
A marker float for feeder fishing is an ideal option for analyzing a reservoir, which takes a minimum amount of time but provides amazing results.
Most often, the product has a cylindrical shape and looks like a dart used in the game of darts. Also in the bundle is a weight (from 40 g to 140 g depending on the current) and a reel.
The fishing line, which is located on the reel, is threaded into the eye of this sinker and a float of any type is attached (a wooden block can be used as a material). It is important that the product floats up properly and is above average in size.
The final weight of the marker float depends on the weight chosen, but reaches no more than 150 g.
All information about the bottom of the reservoir can be found using a marker float
Making your own marker float
It would be a good idea for a fisherman to learn how to make a marker float himself.
A product for measuring depth can be purchased at a specialized store or you can make a float yourself. This procedure does not require large investments or time.
You can make a marker float with your own hands in several ways. Most often, foam is used as the main material. To do this, a piece of material is made as round as possible so that the resistance from the flow of water is minimal.
Types of floats and their classification according to fishing conditions
There is also the option of making a marker float from a syringe. To get an effective product, you need to glue a swivel into the tip. This will allow the formation of an eye, which will help tie the float to the tackle. You should attach bright feathers to the back of the syringe, or simply paint over the structure with bright paint.
A homemade marker float can be made from wood or a surprise Kinder box. In the first case, you need to plan a round block, in the second, place a sinker inside.
Attaching a fishing line to a plastic egg is very simple: just tie an object (bead, hook, etc.) to the fishing line and place everything in the egg, then close it.
Of course, you can make a hole for the fishing line using a hot needle, which will take a little longer, but will be more practical.
You can make a marker float yourself
Marker float accessories
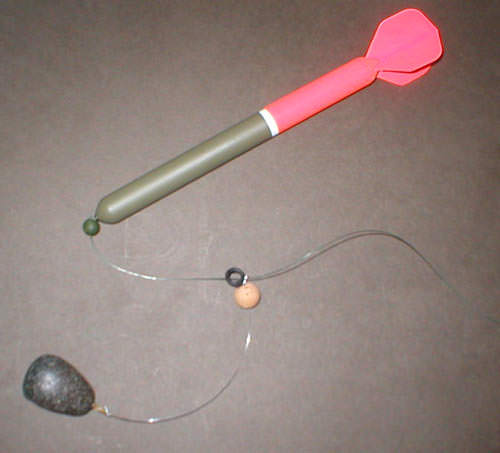
Installation of the marker float should begin by threading the fishing line into the eye of the sinker. It should move easily through the material without creating burrs or injuring it.
A stopper must be secured at a distance of 20 cm from the end of the fishing line. The material can be a bead or a rubber fragment.
This element should not move along the fishing line; accordingly, it should be well secured.
The float should be attached to the very end of the fishing line. The result of the process depends on the quality of fastening.
Use in standing water
Before making the product, you need to figure out how to measure the depth while fishing with a marker float. You need to start the process by throwing the equipment into the water. Afterwards, the fisherman needs to wait until the sinker reaches the bottom.
At the next stage, wind the line until the float stops in the eye of the weight. For convenience, marks are made about the line level at the reel itself, and the line is lowered to allow the float to float up. Bleeding stops when the marker comes out of the water. Next, a second mark is made.
At the end of the procedure, you need to unwind the fishing line and measure the distance of the marks.
It’s as easy as shelling pears to measure the depth of a reservoir using a marker float
On reservoirs, using floats to help measure depth is as easy as shelling pears.
Standing water gives virtually no error, and due to the absence of current, the product ideally floats above the weight.
The advantages are the absence of bending of the fishing line, quick ascent and minimal time spent on analyzing the depth of the reservoir.
A fisherman can purchase a unique marker float with a light sensor, which will improve fishing conditions.
Use on the current
The current is not the most favorable option for measuring depth. This is because the float sinks in one place and floats up in a completely different place (if the water flow is strong). This gives a large error. In addition, the bending line is lost, which also negatively affects the accuracy of measurements.
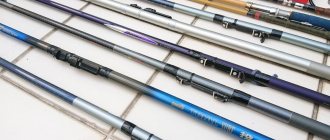
Fly rod equipment and fishing tactics
To solve this problem, you can use heavier weights and choose floats that have a flat shape. For fishing in the current, the Marker Float 80 marker float is ideal.
Among the popular and effective models is the ESP marker float, made of high-quality plastic. The product has proven itself to be durable, extremely buoyant and aerodynamic, resulting in high precision casting.
Use in ponds with silty soil
The use of a depth meter in silty soil also has its disadvantages, the main one of which is the ability of the weight to bury itself in the soil to its maximum depth, which will affect the accuracy of the measurement.
There are two ways to avoid this problem: use a plastic bottle to build a kind of umbrella for the weight, or use weights of a spherical, pyramidal shape, i.e.
products with increased area.
In any case, problems with the use of this type of float are easy to solve. Anyone can make a product, because the process uses available tools. The fisherman will definitely like this device and will help him catch more fish.
Originally posted 2018-08-10 14:46:40.
Source: https://rybalka.guru/poplavok/markernyj-poplavok
Making tackle
If we have all the components of the tackle with a marker float, we can start putting everything together.
We equip the rod:
- The reel is attached to the rod, then the fishing line is wound.
- The line is threaded through all the rings of the rod
Now we assemble the equipment itself with a marker float:
- We thread a sinker with a large eye into the fishing line. The eyelet should be free of burrs, so as not to injure the fishing line. The sinker should move easily and freely along the line.
- We attach a stopper 20 cm from the end of the fishing line. It is easiest to use a rubber or plastic bead, and it must be attached very firmly, it should not move along the fishing line. If you don’t have a rubber stopper at hand, as a last resort you can use a lead pellet, but it is much worse than a rubber bead, since it does not absorb the impact of the sinker well, and also greatly deforms the fishing line.
- A marker float is attached to the end of the fishing line using any reliable knot. Now the tackle is ready.
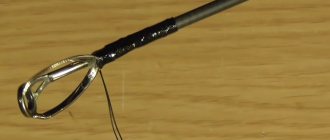
Design with a removed sinker and a free ring, which guarantees unhindered and free movement of the line through the ring
Marker equipment – installation. Step-by-step instruction
Today we will talk about marker equipment. I was not too lazy and prepared for you step-by-step instructions with photos for installing marker equipment. In fact, there is nothing complicated in it, but for a beginning carp angler everything is a first, everything is complicated and incomprehensible. So let's get started...
Let's start by figuring out what parts it consists of, and then we'll install each element. Let's take a close look at the photo of the finished marker equipment:
Marker equipment assembly
- Marker float
- Stop bead
- Cork ball with ring
- Shockleader tied to a float
- Leadcore
- Release bead fitted with a quick-change clasp
- Marker sinker
You can ask me a question: “Why do we need a marker tap? Why not just attach a swivel to the sinker loop and thread the line through it to the float?” Firstly, the cord eventually cuts through the iron ring of the swivel, secondly, the cord does not slide so readily through the metal, and thirdly, the cord itself becomes unusable faster, as it constantly rubs against the iron ring. But these are not all the problems that can await a novice fisherman.
Let's imagine that we have very deep, marshy silt. The marker sinker, landing on the bottom, begins to sink into the silt, pulling the shock leader with it. In this case, the cord will not be able to move freely through the sinker ring and the float will not float up.
The second option is algae, which can grow abundantly at the bottom. In this case, the cord together with the float may cling to them, which will also prevent or complicate the floating of the float.
To avoid the problems described in the two examples above, anglers use a marker line. To summarize: a marker outlet is needed so that in the event of viscous deep silt or the presence of vegetation at the bottom of the reservoir, the marker float can float up freely and perform its function.
In specialized fishing stores you can buy ready-made marker leads, for example, I saw bends from Korda and Fox. But I think it’s very easy to do it yourself, which is what we’ll do now.
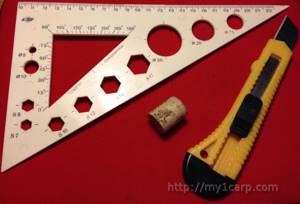
One of the very important elements that we need is a cork ball. If I had found it on sale I would have bought it, but since I couldn’t find it, I decided to make it myself. We take an ordinary wine cork; by the way, you can make two balls from it. In my closet I found this ruler, with a round hole with a diameter of 15 mm. We will need it in order to maintain the size and shape of the future cork ball as correctly as possible. We will also need a utility knife and fine sandpaper.
Step 1: Use a utility knife to separate the cork into two parts.

Step 2: Use a utility knife to shape the resulting cylinder into a ball.
Step 3: Sand the workpiece with sandpaper

Step 4: Check the shape and size against the template in the ruler
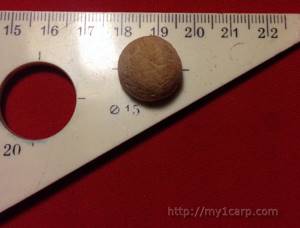
Step 5: The ball is ready
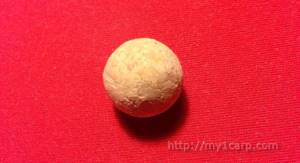
Cork ball
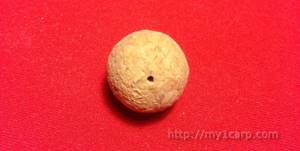
Step 6: Use a boilie drill to drill a hole in the center of the cork ball.
Attention! In the next step we will need a ring with a ceramic insert. The first time I bought this tulip:
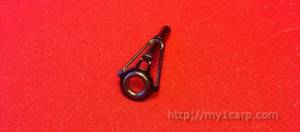
I cut off all the excess, but the insert was not securely fastened; I knocked it out with my fingers with little force, so be careful and check the fit in the store. I had to spend money again on the right ring, about which read on.
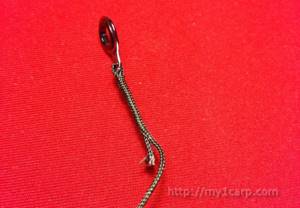
Step 7: Take a ring from a spinning rod with a ceramic insert and straighten it. If necessary, cut with pliers to create a loop with a ring. Use sandpaper to slightly rub the cut area so that there are no sharp parts of the metal, otherwise it will eventually cut the leadcore.

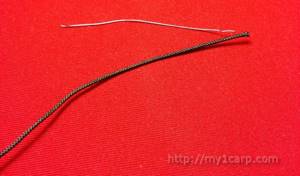
Step 8: Cut off the required amount of leadcore for the marker tap. When assembled, the length of the outlet should be such that the sinker is slightly lower than the tail of the marker float. This is done so that when the sinker falls and hits the surface of the water, it does not break the float.
Step 9: Make a snake on the leadcore (so that the lead rod does not move), expose about 6 cm of the rod, remove the leadcore winding with your fingers and tear off the exposed rod with your fingers, straighten the leadcore winding
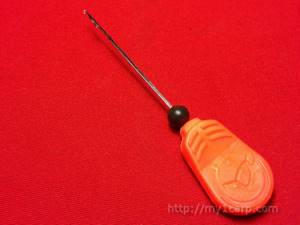
Step 10: Place the cork ball on the mounting needle, with the tip open. We hook the needle to the tip of the leadcore, close the tip and pull the needle with the leadcore through the ball.
Step 11: In the place where the leadcore rod we tore off ends, insert a mounting needle with an open tip and insert the needle into the winding approximately 2-2.5 cm
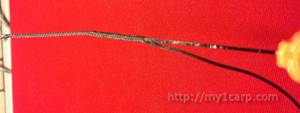
Step 12: We pass the tip of the leadcore through the loop of the ring, remove the needle from the winding, clamp the tip with the needle (close the tip)
Step 13: Slowly (turning) the mounting needle, we bring it back through the leadcore winding. We cut off the excess part and tighten it
Step 14: We get a finished loop of lead core threaded into the loop of the ring

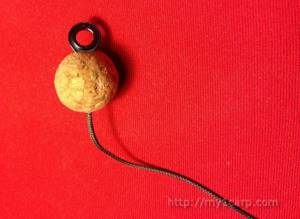
Step 15: Holding the ball firmly with your fingers, pull it along the leadcore to the loop of the ring and forcefully push it into the ball. You can see the result in the picture
Step 16: Similar to step No. 10, place a breaker bead on the leadcore
Step 17: Thread the tip of the leadcore through the quick-change fastener, clamp it with a needle (close the tip) and make a loop
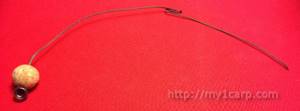
Step 18: We put a marker sinker on the quick-change fastener and tighten the release bead (this is done so that during casting the loop does not spontaneously fly off the quick-change fastener). And here is a photo of the finished marker tap
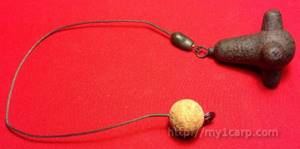
Marker tap assembly
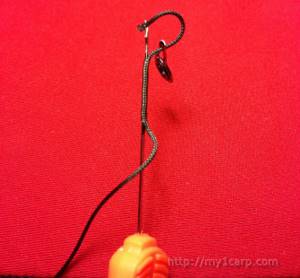
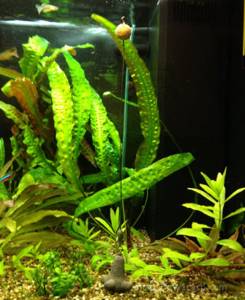
Now let's see how our marker branch will behave in its natural environment; to do this, let's immerse it in a home aquarium. As you can see in the photo, the weight fell to the bottom, and the cork ball lifted our ring up.
Now it's a matter of small things.
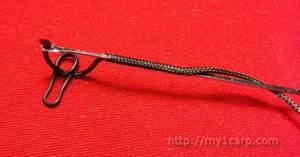
Step 19: Thread the shock leader through the marker tap ring
Step 20: We put a rubber bead on the shock leader, which will serve as a kind of buffer between the marker float and the outlet ring.
Step 21: Attach the float to the shock leader. The marker equipment is ready!
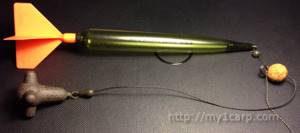
Marker equipment
Let's now see how our equipment behaves in the aquarium:
Well, now we have learned how to install marker equipment. A few words about what was not included in this article. Several times I came across advice from fishermen about attaching the shock leader to the marker float using a knotless connection. What's the gain? After every fishing trip, you don’t need to cut off the shock leader above the float assembly in order to disassemble the tackle. Accordingly, installation/dismantling becomes easier.
Thanks to the photographs, my instructions for making marker equipment turned out to be very long, but for me personally, as a novice carp angler, this is exactly the article that was missing when I understood its structure and production. Therefore, I will be glad if it helps someone and saves precious time!
Technique for measuring depth with a marker float
- Everything is very simple. In order to measure the entire water area from you to, for example, 100 meters in front of you, you need to:
- Make a long cast of 100 meters and do not slow down the line, even after the tackle splashes down.
- Make sure that the line still has a chance to come off your reel and wait for the float to rise. If the float floats, you can close the line guide and begin careful winding.
- We need the float to go deep to the very bottom (to the load), as soon as you feel when winding that you are no longer pulling the float to the bottom, but are moving the load along the bottom - stop.
- We take in our hand the line coming out of your reel. Open the line guide and select 1 meter of line from the reel. After every meter, we look to see if the float has floated up. If you have selected the fishing line 5 times (5 meters) and the float has not floated up yet, then the depth is greater than 5 meters. We select the 6th time and wait for the ascent again. Has it surfaced? This means the depth is slightly less than 6 meters.
This way you can deepen the float again, drag it 5-10 meters along the bottom and measure the depth again. As you can see, the marker float makes it possible to get a complete picture of the bottom topography.
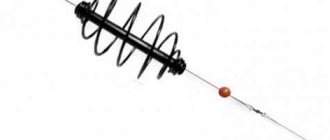
Marker sinker
It is best to use a spiked weight for a marker sinker or just a weight, as it allows you to identify small objects at the bottom: blades of grass, shells, pebbles, etc. When using a smooth weight, such information is difficult to obtain. The spiked sinker (with wings) is equipped with a bend, a kind of leash, the length of which must be known and added to all calculations.
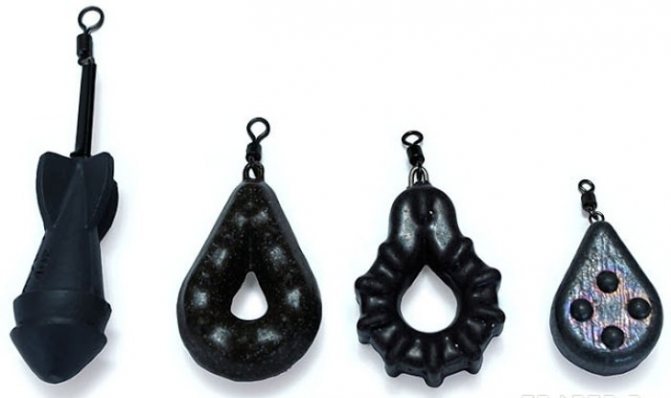
The weight of the marker sinker used ranges from 30 to 100 g or more. In order to determine the edge at the bottom, a sinker weighing 30–50 g is quite sufficient. However, you need to take into account the fact that the more the sinker weighs, the more difficult it is to throw it over a long distance.
If you are faced with the task of determining only the depth of a reservoir, a round sinker will be sufficient.