To successfully fish, you need to have a lot of special knowledge and skills, including the ability to tie two fishing lines together.

Situations when you need to use this skill arise quite often, and to avoid unpleasant situations, study the methods in advance.
Situations when it is necessary to tie two fishing lines
A huge number of situations can arise:
- If you don't use a leash, then if it gets snagged, the line will simply break.
- There was a need to tie fishing lines of different thicknesses.
- You need to tie it to another tackle with fishing line (reels or rod).
- If defects appear on the fishing line (roughness or quicksand).
Often, a fishing line needs to be repaired quickly, so it is always better to know a few basic components.
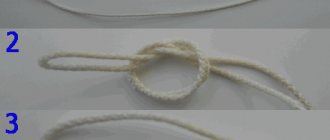
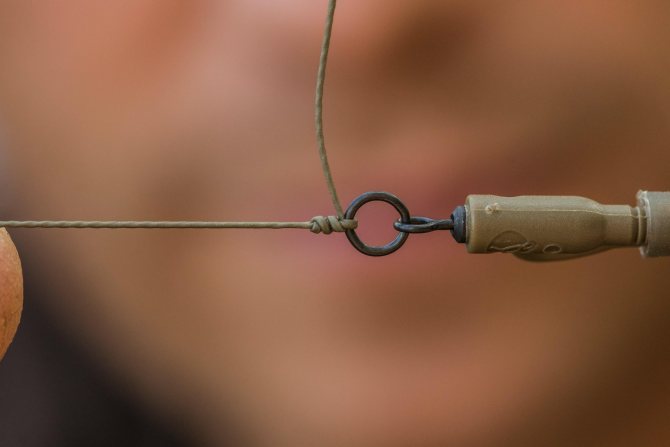
How to tie a swivel to the main line
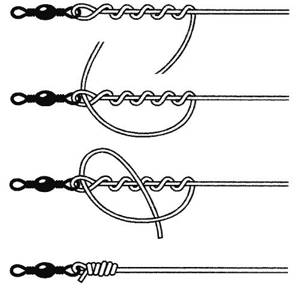
The swivel is easy to attach. We make a loop and pass it through the swivel ring. We tie a loop with a fishing line using a double overlapping knot. A very interesting detail, which, by the way, applies to all knots - warm up the fishing line or braid in hot water before tying a knot. You can also heat the knot, for example, with a curling iron to 90⁰C. But don't overdo it.
What should a good knot be like?
Each node has its own pros and cons and should be used in a specific situation.
Each node connection must meet several points:
- Reliability. A good unit must withstand heavy loads.
- Simplicity. The simpler the knot, the faster you can connect the fishing lines at the most crucial moment.
- Versatility. It is best for the node to solve several problems at once.
- Good structure. The connection should not grind on itself, slip or break when tensioned.
General rules, requirements and features of knitting knots
A knot is a connection that can securely attach two cords to each other or tie them to something else. There are a large number of different types of prisons; there is a whole science about them. Since the main element of fishing tackle and rigs is fishing line, knots play a major role here. Almost every node connection has its own advantages and disadvantages, but despite this, it must meet the following requirements:
- reliability. A well-chosen unit can withstand fairly high loads, under which the entire structure will remain intact,
- simplicity. There are two points here. A simple knotted connection can be easily tied in fishing conditions, and the simpler the knot, the more reliable it is,
- versatility. It is desirable that a specific type of unit is suitable for installing a large number of gear and equipment, while simultaneously coping with its tasks,
- presence of an optimal structure. The coils of an incorrectly connected or selected assembly can seem to “interfere” with each other, fray or break under tension. This phenomenon often leads to premature failure of the structure.
Some fishing knots may not be suitable for tying certain types of fishing line. We know that there are fluorocarbon, braided, composite and mono lines. Fluorocarbon is a material of increased rigidity, and as a result, many knots can randomly come undone. Braid can be compared to a “mini rope”; some knot connections are not suitable for such cords: they either unravel or destroy the structure.
Do not forget about curly braids with a triangular, square or multifaceted cross-section. The angularity of the cord with an incorrectly selected node connection causes the turns to “rub” against each other, microcracks appear, which is why premature rupture often occurs.
IMPORTANT! Promoted brands that produce braids sometimes include instructions for tying knots with their respective products, which they themselves developed. We strongly recommend that buyers do not ignore such instructions.
A knitting pattern for a special loop that allows you to attach any element of the equipment anywhere on the main line
Combined cords are a combination of monofilament and braid, that is, a monofilament core made of durable material is additionally wrapped in fibers. Such fishing lines are preferred by fishermen who catch large fish. With monofilament threads, things are simpler; almost all methods of knotted installation are suitable for them.
There are also rules for tying knots, following which the fisherman reduces the likelihood of premature wear of the structure. In fishing, these rules are the most important, because work is carried out not with ropes and ropes, like sailors and climbers, but with fishing lines, the diameter of which is tens of times smaller.
Important! The thinner the fishing line, regardless of type, the more negative impact any knot will have on it. Increasing the number of knots on the cord reduces the service life of the entire structure.
The rules are as follows:
- When tightening the assembly, the connection must be lubricated with saliva or water. If the knot is tightened “dry”, then a huge number of microcracks will form on the fishing line due to the friction force,
- You cannot apply “liquid nails” type glue to the finished assembly, which is often done by many beginners. Otherwise, the nodal connection loses its elasticity, becomes brittle, and rupture occurs faster. If there are doubts that the knot will not come undone, then it is better to install heat shrink or tighten the cambric,
- After tying, you should always cut off excess sections of the ends of the cord so that they do not unmask the equipment, interfere with the passage of the fishing line through the rod rings and do not catch underwater debris,
- If you have the opportunity to tie a simple knot, it is better to use it. The same principle works: the simpler the mechanism, the more reliable it is.
Herbal knot
A good way to tie two fishing lines of the same thickness together is to use a grass knot.
Read here Donka with a feeder: varieties, installation of gear, advantages of use and fishing technique (110 photos)
When tensioned, this knot becomes very strong, but in a calm state it is easy to unravel.
Linking it is also quite simple:
- The ends of the lines that need to be tied are laid parallel.
- They wrap around opposite lines.
- The ends must be passed into the loop formed by them.
- Tighten the knot and trim off the excess length of the ends.

The best knots for tying two fishing lines together
Many units have been invented for the installation of fishing equipment. Let's look at several popular options for tying two fishing lines together.
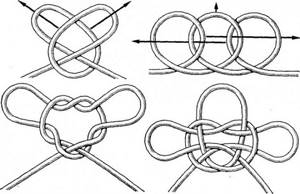
"Eight"
This is a reliable method for constructing non-tightening loops, used in navigation, mountaineering, and caving. This knitting does not slip and can withstand significant loads. There are different types of “Eight”: regular, double, fishing, Canadian and others.
"Eight"
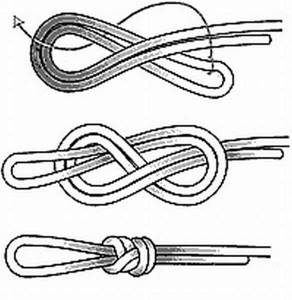
We offer an algorithm for how to tie a simple loop on a fishing line:
- Take the free end of the thread in your hand and attach it to the base, forming a loop.
- Make another loop from the double thread and turn it 180 degrees.
- Insert the first loop from below into the second, wet the knot and pull tightly.
The undoubted advantages of such a bundle are strength, ease and speed of execution. It also has a drawback - the “Eight” fishing knot is intended exclusively for thick threads.
"Carrot"
The compound is cone-shaped, similar to a carrot, hence the name. The main purpose is for mounting two braids or a braided cord with fluorocarbon.
"Carrot"
Let's look at knitting step by step using braid and monofilament as an example:
- First you need to put the threads side by side and form a small single loop on the braid. Insert the end of the monofilament, its length should be about 20 cm.
- Wind the end of the monofilament into a spiral onto the braid, you need to make 9-10 rotations in one direction and 8-7 turns in the other.
- Insert the tip into the loop hole and carefully secure the knot by pulling the cords in different directions. Trim unnecessary threads. Don't forget about the need for wetting.
The disadvantages of the technology are:
- complexity of manipulation;
- fragility;
- instability to vigorous mechanical influences.
The weave will need to be inspected and checked periodically. In case of the slightest doubt, you will have to untie and redo it.
Your question to an expert
Luka Strelnikov
Professional fisherman with extensive experience
Ask a Question
"Grinner"
We offer an algorithm for how to tie two fishing lines together using how to tie two fishing lines together using “Grinner”:
- Combine the threads and make a loop on one.
- Using the end of the monofilament on which the eye is formed, make a spiral winding: 5-7 turns around a pair of threads will be quite enough.
- Make a knot.
- Repeat with the adjacent fishing line.
- Gently pull the ends until the knots come together.
- Remove the excess.
"Grinner"
The resulting knot is stable when tying two lines. It is used to attach hooks to all types of threads. There is only one drawback to weaving: fishermen who do not have graceful fingers may experience difficulty in working.
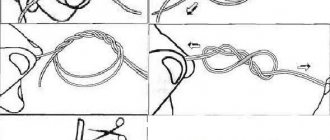
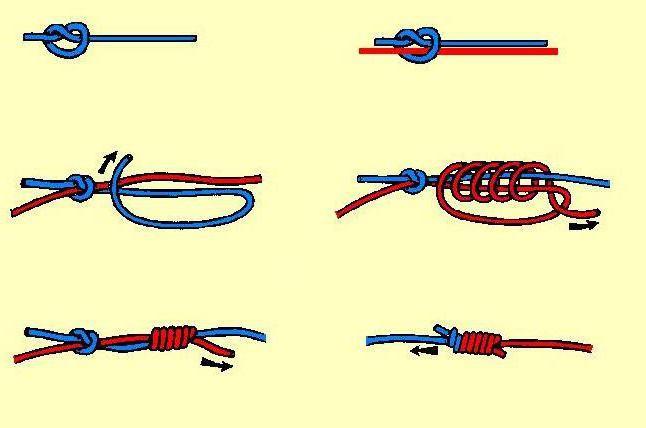
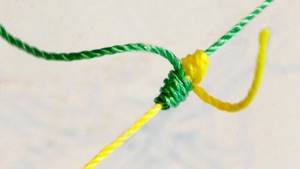
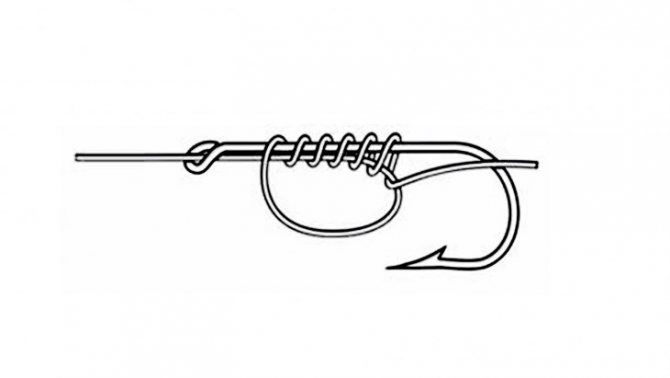
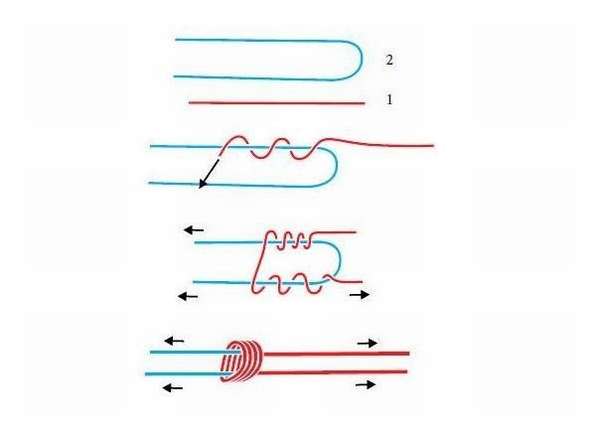
"Bloody"
This is the oldest method, which appeared more than four centuries ago. Let's look at how to tie 2 fishing lines together using a "Bloody Knot" step by step:
- Take 2 threads and cross them, leaving small ends of about 20 cm.
- With the first end, tie the adjacent fishing line 8-10 times.
- In the middle of the winding, move the twisted threads apart and thread the ends in opposite directions into the hole that appears.
- Holding the edges with your fingers, gather the threads into a knot.
- Wet the twist.
- Tighten the knot and remove unnecessary tails, leaving approximately 1.5 mm.
Fishing knot “Bloody”
The knot is suitable for repairing broken tackle and fastening elements to the main thread.
To finally understand how to tie two fishing lines together, watch the video that clearly demonstrates the sequence of work. It may not be possible to make a quality connection right away; this requires practice. Practice at home, starting with the simplest ligaments.
Bloody Knot
This knot is not particularly strong, but it is hardly noticeable and easily passes through the rings of the spinning rod.
If you practice, you can tie it quickly:
- The lines cross, there should be 15-20 cm from the end to the cross.
- The ends are wrapped around opposite lines 6-10 times.
- The ends are brought behind the intersection, and the knot is tightened.
We tie the leash to the fishing line on the spinning rod
Of course, you can buy ready-made equipment at a fishing store, attach it to a carabiner, attach bait and cast. But the equipment is not always connected well, and sometimes it simply comes off due to a snag. Then you need to show skill and learn how to knit leashes yourself.
For leashes we need a fishing line with a thickness of 0.3 -0.4 millimeters. At the end of it we make a loop of 10-15 centimeters. We make a double overlapping knot on the loop and tighten it. We have a loop that we pull into the sinker hole several times. We insert the other end of the fishing line into the loop.
Once the load is secured, you can begin tying the leashes. Three or four leashes can be prepared in advance. These are hooks of the required size with tied ends of a fishing line 15-20 centimeters long. The leashes will become shorter, but we need to leave a free length for manipulating the knots.
Let's say we want the length of the leash to be 12 centimeters from the hook, then at this level we knit a knot with a triple overlap.
Now we select the place where the leash is attached to the fishing line, which is tied to the load. At this point we knit a double knot, which, when not fully tightened, forms a figure eight. All that remains is to thread the end of the leash through the first and second ring of the figure eight and you can tighten it. The same operation must be done with the remaining leashes and the tackle is ready. Attach a carabiner ring to the end, and the tackle becomes removable.
If you need to tie a leash made of steel and fluorocarbon, then the knot on the leash is tied in the same way as on a carabiner or swivel:
Centaurus
We knit two fishing lines of different diameters. This knot is very strong and not very large.
- Place the lines parallel.
- Wrap one of the fishing lines around the other 5-7 times.
- Push the end of its loops through.
- Repeat the same with the other end.
- Tighten the knot and trim the ends.
How to tie fishing line with braid
Many anglers are looking for information on how to tie braid to a fishing line, since most rigs require connecting these materials together. All elements of the gear must be very strong and reliable. And as everyone knows, it is at the knots that the fishing line loses its margin of safety.
But for connecting each material there is a separate unit that is most suitable for such purposes. And in order to learn how to tie a fishing line to a braided fishing line, you need to take into account that the materials have different rigidity and structure. But the snake knot helps to cope with this, which we will talk about.
A fairly reliable and easy-to-make knot, perfect for connecting two fishing lines of different diameters
. A special feature of this type of connection is its compactness, which allows you to avoid friction on the rings when casting.
And so, let's take a closer look at how to tie a fishing line with braid and look at the step-by-step instructions for tying a knot that allows you to do this:
- Fold the fishing line and braid crosswise, as shown in the diagram. One of the ends should be 5 cm in length, the second - 15;
- It is best to take the long end from the braid and leave the main line short;
- We take the working end of the braid and wrap it 10 to 15 times around the main fishing line;
- Now repeat the same action with the fishing line;
- Now you need to hold both ends and stretch the twist a little in the middle, so that you get a loop;
- Pull the working end of the braid into the loop;
- Now pull the working end of the fishing line through the same window (you need to thread it in the opposite direction, towards the braided cord);
- Wet and tighten the knot as shown in the diagram;
- Cut off excess fishing line and braid;
The most interesting thing was watching the video, which I really liked, I think it will make you happy too. The video clearly illustrates how to tie a fishing line to a fishing line and braided cord using a blood knot. I think it's time to start watching.
weaving knot
Since it often becomes necessary to tie two different fishing lines with a knot, it is worth learning this knot connection; it is strong and not very large.
- Let's make a loop.
- We thread the second line into it and wrap it around.
- We pass the working tip into the loop.
- Tighten the knot.
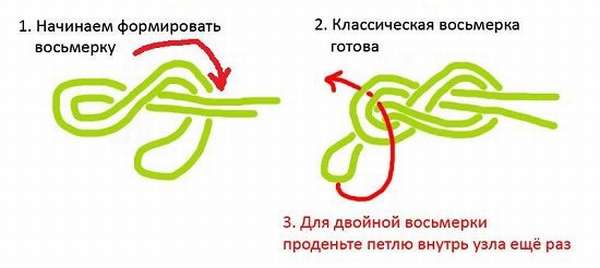
Figure eight knot for tying fishing lines
Two ways of tying fishing lines together using a figure eight fishing knot are shown in the picture. This method is also suitable for tying a leash to the main line.
Although both nodes are identical to each other, the eights are tied to them according to a different sequence of operations.
In position “a”, first a figure-eight knot is knitted at the end of one of the fishing lines (it is not shaded). The other end is inserted into a figure eight loop and drawn along (parallel) to the unshaded line.
The interconnected fishing lines are shown in position “c”.
In the second method of tying figure eights from fishing lines “b”, the ends of the veins are connected with a clew fishing knot consisting of two loops, and the running end of the closed loop (unpainted fishing line) is wrapped around its root (long) end and passed in a counter motion along (parallel to) the other end.
Then the running end of the open loop (dark fishing line) is carried around its own root and someone else's running ends and, in a counter-stroke, is carried along the other's root end. Thus, both fishing knots receive a figure-of-eight configuration.
Tightening the knot in the form of double figure eights “in” is done by first tightening the short ends, then the main ends. It is better to tie fishing lines of approximately the same diameter with this knot.
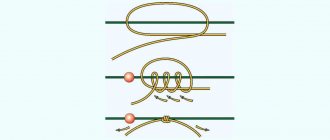
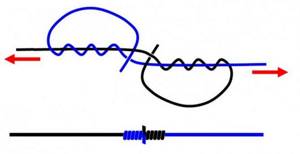
Water (water) node
This is a quick and easy way to connect fishing lines. If you are wondering what kind of knot to reliably tie two fishing lines in an emergency situation, then the best choice may be a water knot.
- Lay the lines parallel.
- The tip of the first line and the root of the second make a loop with four turns.
- The knot is tightened.
Knitting Instructions
In this section we will present instructions on how to tie fishing line to fishing line. We will give the most popular compounds that have shown themselves to be effective in practice for many years. Each instruction is accompanied by correct knitting patterns, because it is more difficult to navigate using just one description. Let's start with the simplest nodes.
Figure Eight Knot
The knot was called “Figure Eight” due to the similar arrangement of its turns to the number “eight”. There are a great many varieties of this compound, starting with the “Canadian” subspecies and ending with the “guide”, which is used by climbers and sailors.
To attach leashes, first use the “Double Loop” knot, and then the “Cape” method.
There is also a Figure of Eight option that allows you to tie 2 lines to each other. One end is folded to form the number “8”, and the other is threaded through the loops, repeating the turns, as shown in the diagram.
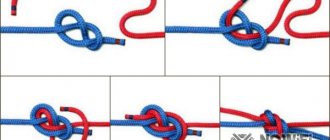
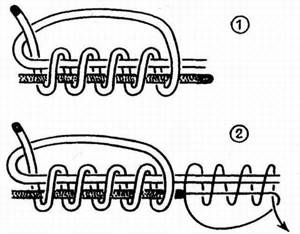
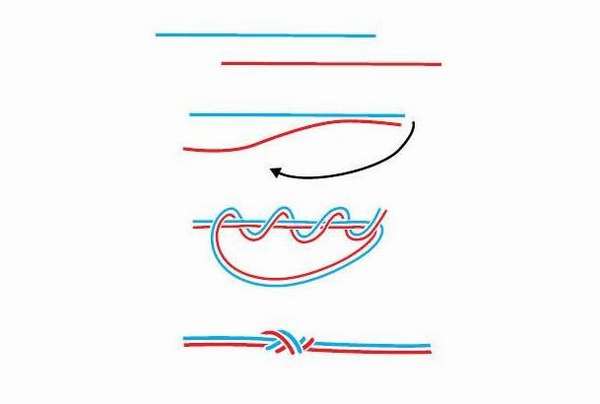
"Bloody" knot
The knot is quite strong, universal, suitable for both braids and monofilament, and it can be used to connect fishing line and cord. It is also possible to knit threads of different diameters, but so that the difference in thickness is no more than 1/3. Let's try to tie it correctly:
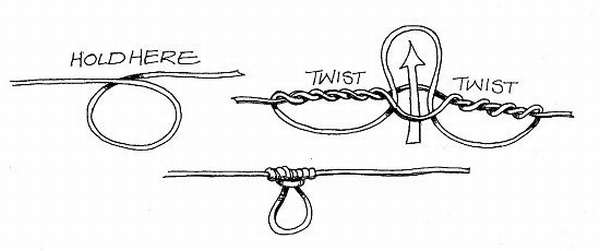
How to make a loop on a fishing line
- We fold two fishing lines so that the ends remain 20–25 centimeters long.
- With the first tip we wrap the adjacent thread 7-8 times and return it to the place where the winding began, there is a small loop there. Let's skip the end there. We fix this structure, do not tighten it.
- Using the end of the adjacent cord on another line, we make similar movements, only in the other direction.
- We return to the place where the twist began and skip the second end in the same way. Tighten, do not forget to moisten and trim off excess areas.

After tightening, excess sections of fishing line should be trimmed so that 0.5–1 mm remains.
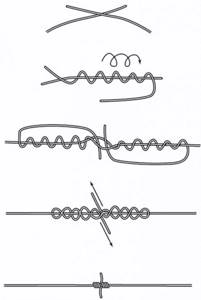
Grinner knot
As Okunev writes in his book about knitting knots, Grinner is suitable for both monofilament threads and braided cords, and this connection is stronger than “Bloody Ties.” The difference in diameters is no more than 1/5.
Instructions: Place two lines on top of each other.
- We return the working end of one cord to the intersection and wrap it around the resulting loop and the adjacent thread.
- We do this 5-6 turns, and then the tip comes out through the same loop.
- Wet it and tighten it carefully. We repeat the procedure with the second end.
- We pull the fishing lines until the knots “meet”; at this stage wetting is also required. Look at the diagram.
As with Blood Ties, the threads will converge towards the middle as it tightens.
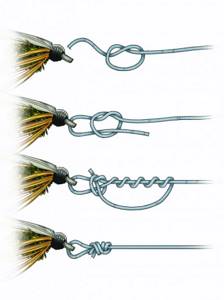
Carrot knot
The connection received its name due to the appearance of the finished unit. By the way, fishermen often tie a shock leader with this knot - a piece of fishing line that is used to ensure that the tackle can withstand heavy loads. You can tie two fishing lines using the Carrot knot as follows:
- A simple “Blind” knot is made on the main line; it will act as a stopper. Don't tighten it all the way.
- The end of another fishing line is passed into it, he wraps his own thread 10 times.
- At the last turn we fix the fishing line, and the tip again wraps around the already made turns in the opposite direction and returns to the loop of the “Blind” knot.
- We tighten the entire structure, having previously moistened it with water or saliva. We cut off the tails.
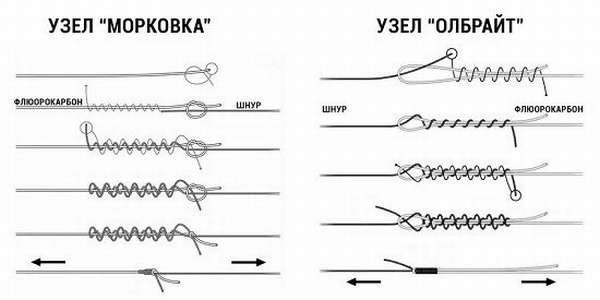
“Carrot”, by the way, is suitable for tying fluorocarbon and fluorocarbon lines
"Academic"
The “academic” knot is suitable for all types of fishing lines, including when their diameters differ. This connection can withstand heavy loads. The method of tying two threads together is very different from the methods described above; now the two ends of the fishing line do not overlap each other. Knit it like this:
- One tip is folded in half to form a loop.
- The second end enters the loop and wraps around its side five times.
- It is placed on the opposite side of the loop from the top, also wraps it and comes out of the loop.
This fastening on one side can be classified as a knotless installation; here it looks more like a cape
"Water" node
As fishermen say, the “Water” or “Water” knot is one of the simplest and most reliable connections. We try to tie two fishing lines with it:
- We place both cords parallel to each other.
- The running end of the first line and the root tip of the adjacent thread make a loop and 4 turns around the second ends. We tighten it. However, look at the diagram, it’s clearer.
The “water” node also has something in common with the “Figure Eight” node connection.
We have presented instructions for the most reliable and practical knots, with the help of which another thread is easily tied to one fishing line. It is important to remember that there are no absolutely “eternal” knots anyway, so it is recommended to tie them more often, especially for fishermen, whose gear often has to withstand heavy loads. There is a very high probability that sooner or later the structure will collapse precisely at the site of the node.
Carrot
Despite the funny name, this knot is quite durable and comfortable.
- A “stopper” is created on the main line in the form of an ordinary knot.
- Another line is threaded into this knot before tightening.
- We wrap the main line 7-10 times.
- We wrap it around again in a different direction.
- We insert the fishing line into the knot again
- Tighten the knot on the main line.
Tying leashes to the main line on a winter fishing rod
Ice fishing enthusiasts often use a retractable sliding leash. It is very easy to attach to the main line. You need to prepare the leash itself. We tie the hook to the fishing line, put the cambric on the fishing line and tie a loop at the opposite end of the hook. A little higher than the weight, we wrap a loop around the main fishing line and thread the other end of the leash into it. Tighten and fix the knot with cambric. Also, cambrics can be installed on the main line, above and below the leash assembly.
The following video shows how to organize lead leads on the main line in winter gear:
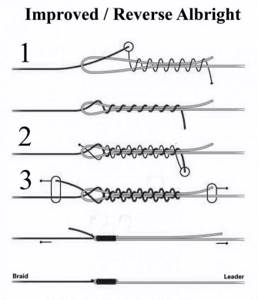
Albright
This knot is ideal for power casting; it is very durable; it is used to connect the cord and the shock leader. This knot can connect fishing lines with different diameters.
- Make a loop using thicker fishing line.
- We thread the thin fishing line into the loop and begin to wrap the thick fishing line with it in the direction of the loop.
- A thin line is threaded through the turn of a thick one.
- The knot is tightly tightened.
Every fisherman knows that the ability to tie knots is very important when fishing, the catch depends on it, so it’s worth spending half an hour learning knot connections.
how to tie fishing line to fishing line - "Bloody Reverse" fishing knot
fishing video "Bloody Reverse"
The Bloody Reverse Fishing Knot is a very effective knot for tying line to line. The knot is suitable only for thin and medium monofilament threads (up to 0.4 mm in diameter), and in this case it has much greater strength than the “Bloody” fisherman’s knot. For the “braid” it is better to use other fishing knots.
This fishing knot allows you to tie fishing line to fishing line with different diameters. The "Bloody Reverse" fishing knot should have from four to eight turns in each direction, depending on the thickness of the line (the thicker the line, the less).
| fishing knot “Bloody Reverse ” - characteristics | |
| The “Bloody Reverse” fishing knot allows you to tie a leash to the main line on a float rod, and in other cases when you need to tightly tie a thin line. | |
| Types of fishing line | |
| Knot tensile strength | 90-95% |
| Node purpose | Tie monofilament no thicker than 0.4 mm in diameter. |
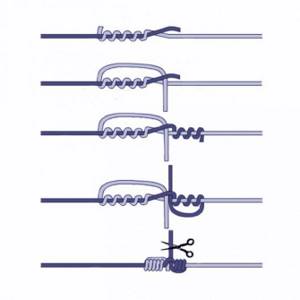
how to tie a fishing line to a fishing line - fishing knot "Bloody Reverse" picture 1
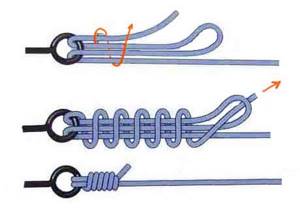
Make 4-8 turns around the other with the end of one line.
how to tie a fishing line to a fishing line – “Bloody Reverse” fishing knot picture 2
Take the outermost coil with your fingers (so that the coils do not fly off). Make the same number of turns in the opposite direction with the same end of the line.
how to tie a fishing line to a fishing line - fishing knot “Bloody Reverse” picture 3
Pull the end up and pass it between the two lines.
how to tie a fishing line to a fishing line - fishing knot “Bloody Reverse” picture 4
Don't touch the first node yet. On the other line, make a second knot of the same type.
how to tie a fishing line to a fishing line - fishing knot “Bloody Reverse” picture 5
Carefully tighten the fisherman's knot. To do this, first pull the long ends of the lines, then the short ones, and so on several times. Trim the ends. The "Bloody Reverse" fishing knot is ready.
Photo instructions on how to tie two fishing lines
Note!
How to tie a fishing line to a reel - methods, tips on how to tie correctly and an overview of the most reliable knots (85 photos and videos)
Cuts for wobblers and spinners - how to make a simple homemade cut. 110 photos and videos of practical tips
How to tie a hook to a fishing line - advice from professionals and the best patterns for beginners (115 photos and videos)
Help the project, share on social networks

1+