Knots for braiding
7 minutes Author: Alexander Messer 5445
When equipping gear with various types of body kits, connections are required. A knot is a special connection of one or more fishing lines (ropes) that are connected to each other. They form a strong connection that can withstand heavy loads. For example, for tying a leash to a braided line, a knot aimed at attaching a similar component to a monofilament is not suitable. In this article we will look at popular connections for braided line with instructions and illustrations.
Features of braids
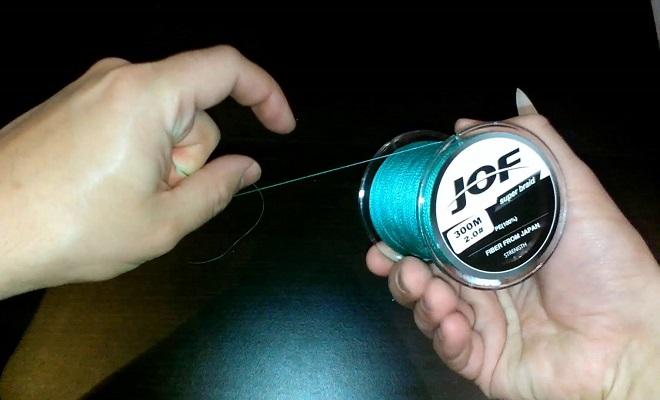
“Braided” is a fishing line that has clear advantages over monofilament. Its performance qualities are superior to ordinary fishing line in terms of withstanding loads. Anglers may be familiar with a variety of tying techniques, although there are many more out there. In most cases, fishermen try to limit themselves to ordinary braided connections, which, in fact, are not suitable here.
Braided cords have a completely different structure. It resembles an ordinary rope or shoelace. Such threads also differ in the number of turns, fibers and ways of weaving them. Monofilament consists of a continuous material. The corresponding difference involves the use of completely different adhesions. Some of the connections are suitable for tying two braided cords, and the other part of the nodes are suitable for attaching two different lines to each other (example: installing a monofilament leash to the main braid).
There are two consequences of using ordinary knots to tie monofilament threads when installing braids:
- rapid wear of the connection and its dismantling during operation;
- damage to the structure of the cord itself.
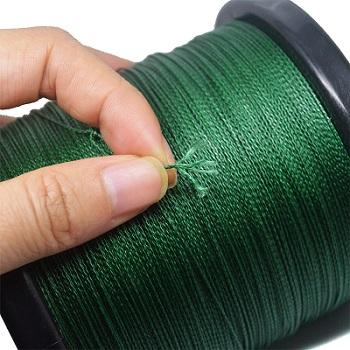
The cross-sectional shapes of braided lines also vary. There are square, triangular, round and multi-faceted textures. Incorrect selection of a knot for a particular type causes cracks or unraveling.
Important! The more complex the knot, the higher the friction force of its turns.
Best connections
In this section we will present several connections that a novice angler can master after 2-3 training sessions. Some of the presented knots are more difficult to knit, so we will try to describe them in more detail. Look carefully at the illustrations. It is known that knots are invented not only after the development of braided lines. The emergence of new fishing gear and methods of equipping it entails similar consequences.
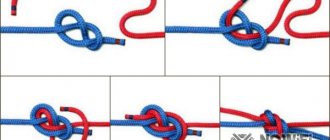
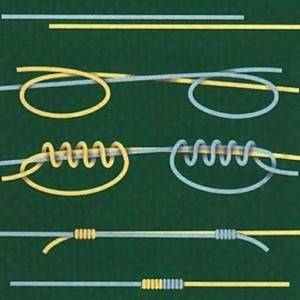
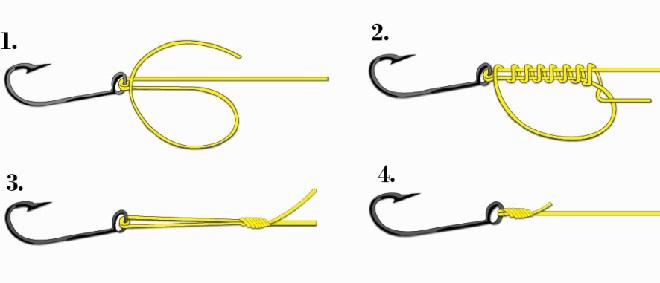
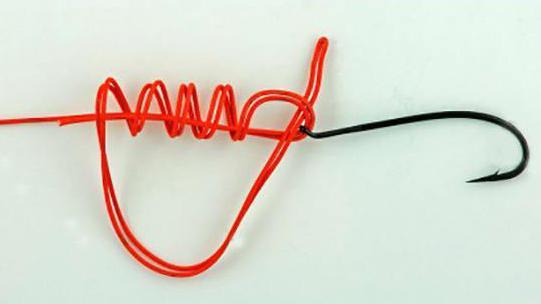
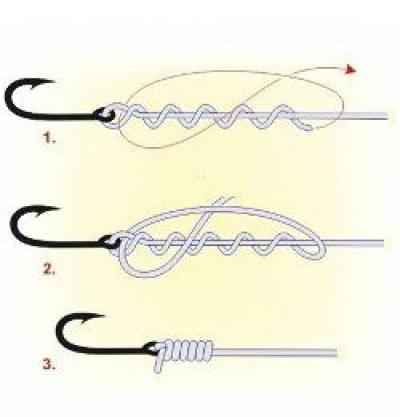
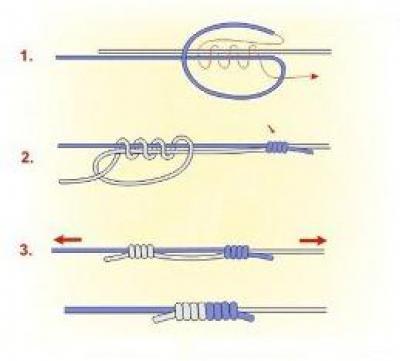
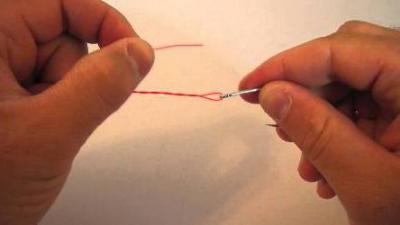
"Palomar" is considered one of the best knots. It is reliable and simple. Mentions of it are found in articles containing information about dropshot gear. In her equipment, Palomar is indispensable, because with its help the hooks, after tightening, take a horizontal position. The knot is somewhat reminiscent of, and, one might even say, is a type of the universally recognizable “eight”, the topic of which we will touch on later. Palomar is knitted like this:
- Take the end of the braid and fold it in half and hold it.
- We tamp the resulting loop and pass it through the eye of the hook.
- We wrap the loop with the double end three times. Throw the double cord over the point, do not tighten the knot yet.
- Lubricate the structure well with water or saliva.
- Tighten the knot as shown in the picture. Palomar is ready! Don't forget to cut off any excess cord.
Beginner fishermen are recommended to practice several times so that in fishing conditions they can quickly assemble any equipment with this connection.
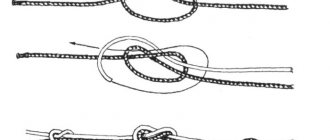
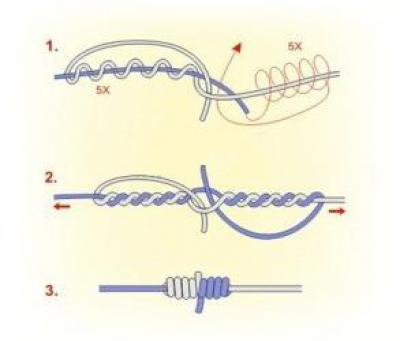
The Uni or Grinner knot (second name) is also suitable for knitting braided cords and is one of the best connections in the history of fishing. It belongs to the “Self-tightening” class. We knit:
- We take the cord and pull its end through the eye of a swivel, carabiner or hook. Only then do we make a loop.
- Wrap the end of the fishing line 5-6 times, making another loop.
- Bring it through the resulting loop.
- Blot the structure, tighten the knot and cut off the excess area. This is the Uni knot.
It is used not only for fishing purposes. Climbers readily use Grinner; they tie carabiners and stakes. Sometimes it is found in the sea and river fleets. Uni has one excellent quality - durability. Wear of both the connection and the material is reduced to a minimum!
The Clinch knitting technique can also be mastered by a novice angler. It is simple, which means it is reliable. Its advantages are similar to the previous knot: it is used when tying carabiners, hooks and swivels with a small eye to a fishing line, when it is not possible to create a Palomar. We train:
- We take the tip of the cord and insert it into the eyelet, move it about 10 centimeters.
- We wrap the end around a long section of thread 6-7 times.
- Take a closer look at the eye of the hook. A small loop formed near it.
- Place the end that you wrapped around the cord into this loop.
- You'll get another, bigger one. We skip again.
- Start tightening the knot, but not all the way! Wet it. Tighten.
- We cut off the excess fishing line. Clinch ready!
Knot Blood
No one knows why the corresponding installation method was nicknamed the “Bloody Knot.” There is an assumption that it was compared to the expression “death grip”. The blood knot is used by fishermen to tie two fishing lines together, regardless of their texture. Instructions that we decided to simplify without losing meaning:
- We take one cord. We wrap its tip around a long section of thread six times, and we thread it into a small loop.
- We do not tighten the structure, place it on the table and cover it with a coin (fixation with a weight).
- We take the second cord, the end of which we pass into the loop of the previous design. We repeat the procedure.
- The lines got stuck. Don’t forget to lubricate the loose connections with liquid, and then tie the knots. We cut off the ends with scissors or a blade (you can burn it if there are no sharp objects at hand).
Content
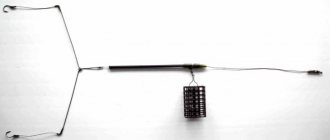
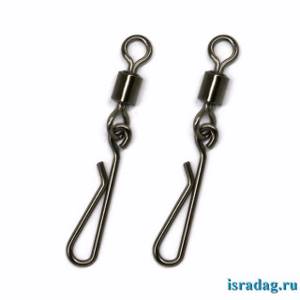
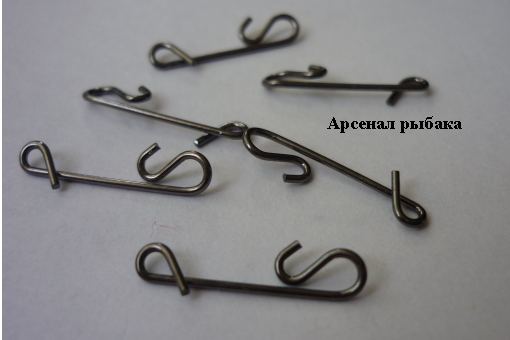
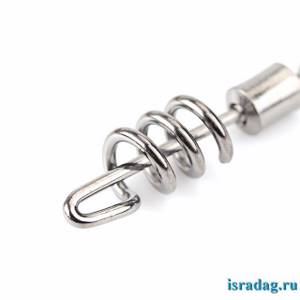
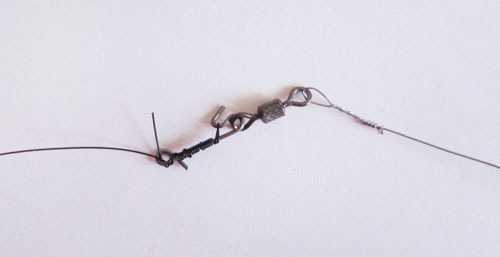
A knotless fastener is a small fishing accessory made from a small piece of wire with curved ends, which allows you to install parts of the equipment without tying fishing knots.
What does this do for the equipment? Firstly, the fishing thread used retains its original characteristics, which extends its service life. Secondly, the resulting structure becomes more durable, since it is devoid of nodal connections, which are considered the most vulnerable areas of installation.
Thanks to the fishing clasp, the resulting equipment can be easily disassembled by replacing its parts with others (for example, a twister with a vibrotail, or replacing a jig head, Cheburashka, etc.).
What is stronger is a knot or a knotless one, amateur fisherman A. Slepnev will tell you in his video
The design of the knotless design is determined based on the material used to make the accessory (metal wire) and is characterized by:
- elasticity;
- strength;
- resistance to corrosion.
Different knotless models differ not only in shape, but also in breaking load. A fastener is considered good if, under critical loads, it is deformed (stretched, twisted), but does not unfasten.
For example, the area of application of the fastener, depending on its design features, is ultralight when using mini wobblers and poppers. With this type of spinning fishing, light-weight fasteners are used, made of thin wire material and small in size, since they have minimal resistance in the water and do not affect the play of baits, for example, wobblers.
Like all equipment elements, knotless ones also have their own weight and dimensional characteristics, which are indicated by the manufacturer on the packaging, for example, test (strength) 15 kg, 35 kg and size S, XL, etc.
The knotless fastener test is a characteristic that indicates the strength of an element when exposed to a specific weight. If the specified figure is exceeded, the knotless part may become deformed or break.
Advice - select knotless ones with a test slightly less than the strength of the fishing line in order to preserve the fishing line and allow the connector to deform under excessive loads rather than the fishing line.
All the most interesting things about monofilament fishing line - read here
With the use of knotless fishing equipment, an important problem is solved - connecting equipment elements without the use of fishing knots.
What problems might arise? Unpredictability of braided line breakage (for example, with a diameter of 0.2 mm).
After all, when a knot is tied, the fisherman already assumes and allows for a break in the installation in this very place, but when using a knotless element, it is impossible to determine the area of the break, since it is impossible to know in advance where the manufacturing defect lies in a particular accessory. This is the main disadvantage of using a knotless fastener. Also, as a disadvantage, we can highlight the weight factor of the fishing rod equipment.
Advice: always carefully check all elements of equipment (swivels, crimp tubes, leashes, fish hooks, etc.) for quality and the absence of visual defects, to avoid breaks.
Area of application - mainly spinning fishing for predators (for example, pike, catfish, living in freshwater and flatheads, scorpion fish, sea dragon, faridae and other owners of the Mediterranean Sea).
Places of application - unsnaggled and algae-free areas of a reservoir with a clean bottom (for example, such areas are chosen when catching pike by twitching with minnow wobblers). Under such ideal fishing conditions, hooks are excluded, and the braided line used can be taken with the smallest diameter, which will ensure the flight range of the bait.
This type of knotless connection is especially popular among sports fishermen, for whom the speed of changing equipment is sometimes a fundamental factor in winning.
The variety of knotless fasteners is inextricably linked with their area of application. When choosing a particular fastener, you must take into account the following conditions:
- the dimensions of the bait, if the bait is large, then the fastener should have the appropriate dimensions and vice versa;
- the thickness (diameter) of the braided cord, the number of the knotless connection or the thickness of the wire of the product must correspond to the thickness of the braid;
- test the gear, since a powerful spinning rod requires appropriate equipment and the knotless rod must be made of thick wire and the required size to be in harmony with the rest of the mounting accessories.
As for choosing the shape of a knotless hook, at this point you should pay attention to the eye (loop) of the fastener itself, since its size will play an important role when attaching a particular bait, that is, its dimensions. The shape of the accessory itself only plays a role in the matter of personal preference of the angler.
- Thus, the following forms of knotless clasps are distinguished (on each of the links you will find a detailed description of the clasp and the cheapest offers for this product on the aliexpress website):
- A knotless clasp on a long leg will be very useful in microjig fishing, when a quick change of bait is required, and its design allows you to easily and comfortably hold the clasp with your fingers and perform all kinds of manipulations;
- Classic knotless, indispensable for attaching small baits;
A knotless fastener with a swivel is designed to solve a number of issues, including twisting of the fishing line, reducing friction of mounting elements, etc.;- A swivel with a knotless spiral clasp (carabiner) will be indispensable in leash installations.
Here you can find a selection of the best deals on fishing products we found on the aliexpress website. Thanks to this catalog, you can reduce the cost of installing gear by 2, and sometimes 5 or more times.
We suggest you read: How to tie two hooks on a fishing rod so they don’t get confused in different ways
You will find a detailed description of various products, their characteristics and justification for the benefits of purchasing them.
Tip: when winding fishing line onto a fastener of any shape, it is better to wet it first to ensure the strength of the interaction between these two elements.
Scheme for knitting cord to knotless
In this video you will learn in detail about the correct knitting of a knotless braid
Scheme for installing a knotless wobbler
And in this video, you will clearly learn how to equip a wobbler with a knotless
A knotless fastener for fishing can be purchased in specialized fishing stores in your city or in online fishing stores.
However, we suggest you pay attention to the online hypermarket aliexpress, which has long become one of the most popular online stores among fishermen around the world.
This is not surprising, because with its help you can reduce the cost of fishing equipment by 3, 5 or more times. Don't believe me? Read the results of our experiment.....
So that you don’t have to waste time and delve into the wilds of Aliexpress, for your convenience we have made a selection of the most delicious offers with the best prices and reviews.
Who doesn't know yet? You can return up to 15% of the price of your purchase on aliexpress. In addition to Aliexpress, the possibility of cashback (returning part of the money) also works for many other online stores.
Here is a detailed description of this service and everything about how to work with it. It really works and helps you save a lot of money.
The cashbacker website often runs promotions that allow you to buy goods at a discount of up to 90%.
useful links
https://charka.org.ua/bezuzlovaya-zastezhka/ - article about knotless fasteners and methods of their use;
How to properly tie knots for braiding using different methods
Modern fishing cannot be imagined without the use of braided fishing lines, which have greatly increased the reliability of fishing and at the same time made rigs more sensitive to bites due to their small thickness and increased rigidity in relation to monofilaments. The new material also entailed the development of modernized knitting methods, which make it possible to make connections both with other elements of equipment and with each other with the least negative consequences for the cord. Knots for braiding are largely developed by the accessory manufacturer, who takes into account the influence of all kinds of deformations from tightening loads.
By using the tying method offered to the fisherman, the company guarantees the smallest reduction in breaking load after the connection is completed. The conditions of the fishing itself have little effect on the method of tying or tying the components of the equipment. The decisive factor here is the structure of the material, its thickness and production method. To correctly tie a hook to a braid or to securely fasten the cord during installation, certain knowledge will help, which summarizes the ability to correctly determine the type of braid and, based on this, choose the most effective connection method.
The content of the article will help the fisherman understand the nuances of the process that allow making knots on braided line quickly and reliably, and will also instill confidence that these operations are absolutely simple in their technology.
Features of knots for braided fishing line
The fisherman should take into account that knots on a braided line will in any case negatively affect the breaking load parameter, and this even without taking into account the peculiarities of its structure.
Structural features that influence the type of knitting include the method of cord production. As you know, braids are made by weaving thinner threads into a common cord or by gluing straight fibers into a single structure. The same method of binding the material will cause different, essentially, deformations, twisting the threads to the limit with a woven circular cross-section and squeezing the structure with direct sizing of the fiber. In almost all cases, on new reels of purchased material there are recommendations with drawings and descriptions of knots for braided braids of a given brand. If the cord is not marked, then the fisherman will have to determine its structure visually. For welded even structures, knots with the least number of tightened loops are used. Knots for fishing cord with a woven structure are more resistant to deformation, but are afraid of excessive tightening of the knot, which is subsequently expressed by the effect of curling of the fibers from their single break caused by excessive overstrain.
Techniques for increasing the reliability of nodes
To get a strong knot you need to know some techniques that help improve the quality of knitting.
Important! The main criteria affecting reliability are the overall thickness of the material, the cross-sectional shape of the cord and measures that reduce frictional forces when tightening the knot, which are carried out by moistening the material at the site of the operation.
Thickness has a positive effect on strength properties and when knitting, in which even an ordinary knot is used, the cord loses a small part of its breaking load. From this we can conclude that braided fishing lines over 0.2 mm in diameter can be knitted in any way. We have already mentioned above that round sections are less susceptible to twisting of fibers when clamped, and the variety of knots on such a cord also has little effect on the strength characteristics of the connection. Flat glued structures require an individual approach to knitting with strict adherence to the supplier’s recommendations, or, in the absence of such, they are knitted using methods with the fewest number of loops. Let’s not forget about the third most important factor: even despite the diameter and method of production of the cord, before tightening the knot, you need to wet the material, thereby reducing friction forces and preventing burnout of the structure.
The most reliable knots for braiding
Fishing knots for braiding are distinguished by a wide variety and complexity of knitting technology. We will focus on the five most accessible, understandable and easiest to implement knitting options, which are easy to remember and perform directly on the shore of the reservoir, without resorting to additional equipment and gluing the installation. The scheme of these options is suitable for various types of cord structure and thickness, and will also help to assemble equipment from various installation elements into a single, complete structure.
Palomar, palomar knot

Palomar can be confidently classified as one of the most popular types of nodule. In addition, it is universal and can be applied with equal success to various types of material. This knitting is performed for an accessory that has a winding or fastening ring in its design. To perform the fastening operation according to this principle, you will need a piece of fishing line of at least 40–50 centimeters. The final tightening of the knot leaves the cord strength at 80%. For the most part, braided fishing lines of small diameters are connected using this type, since the technology by which doubly folded material is threaded into the eye of the element does not always allow this to be done with thicker cords due to the disproportion of the winding ring.
Uni, uni knot, grinner knot
The uni knot is a fairly common knitting when the accessory contains a very small element for fastening. Often this is a miniature hook or swivel in a microjig. The technology involves threading a single-diameter cut of wattle into a winding loop, after which we add the main loops, moisten and tighten the knot. The formation of the mating will require at least 50–60 centimeters of material. The strength after tightening will remain at 70–75%. To perform the technique competently, a short period of training time will be required to master a stable skill.
Clinch refers to the simplest tying technology, mastering the twisting technique of which can definitely be recommended to a novice fisherman. The improved clinch ideally copes with the problems of self-untying; it requires a piece of cord of 20–25 centimeters for installation, but the result of tightening the twist has a more negative effect than the options described above and affects the final strength of the fishing line, leaving no more than 65% of the strength to the original parameter.
This option is a type of knot for braided fishing line that allows you to connect two pieces of it. To carry out the joining operation, you will need two ends of the braid of at least 40 centimeters each. As a result of alternate winding of the same number of turns, and for braided cords, 3-4 twists are enough, and subsequent tightening of the installation, we obtain a neat, uncluttered structure. The connection is suitable for mounting leashes and shock leaders. The technology allows you to reliably connect braids that differ in diameter by 1.5-2 times.
Slip double knot
A more complex type of knot that requires a certain knitting skill. The technique mastered by the fisherman allows the use of twisting both for fastening the braid with accessories, and for connecting different diameters of cords that differ in thickness by four to five times. In addition, you can tie braid in this way with other types of materials, fluorocarbon and monofilament. For installation, use 50 centimeters of a free piece of cord, resulting in a connection strength of at least 70% of the initially stated parameters.
How to tie a braided line to a hook
You can tie a hook to a braid using Palomar, Uni and Clinch knots.
Important! The main criterion for choosing a connection option is the presence of a fastening loop on the accessory and a hole size comparable to the diameter of the cord.
Before joining, carefully inspect the winding loop for the absence of metal burrs and nicks that could cause chafing of the fishing line material, and after that they knit a knot, finally cutting off its free end to the body of the formed knit. The tightened installation is aligned along the fastener ring, symmetrically, placing the cord and hook shank in one straight line, and begin to attach the bait.
Knots for tying a hook
The Palomar knot is familiar to almost all beginners. It is used when tying the swivel to the main line. It is used to connect the twister heads with hooks and eyes. But due to the fact that it is knitted on a fishing line, which is folded in two rows, it is larger in size than other connections and also makes the leash shorter.
The Albright Special knot is one of the simple knots that is used when tying the main line to the shock leader. At the same time, it is quite reliable. It was shown in the video just above.
The “Blood” knot is used when connecting lines that have no more than 2 times the difference in diameter. The strength of the fishing line is 90%.
Features of nodes
Many anglers, having learned several types of knots suitable for regular or monofilament fishing line, do not even try to delve into the features of braid. But they require special connection methods. Simple knots for braiding are not always suitable. Often they even loosen the fastening. In the manufacture of this gear, different types of fibers and their weaves are used. In addition, the difference is also visible in the soldering method. Braids can contain different amounts of fibers and outer coating compositions. All these features must be taken into account when choosing connection methods. But this is where braid manufacturers often come to the rescue. They indicate on the packaging the most suitable knot for a given gear. Most often, two methods of fastening are recommended. This is the Palomar and Uni node. But these are far from the only connection methods, although you definitely need to know them.
Uni node (Grinner)
The knots for the braid must be strong and reliable. The most suitable is the “Uni” knot, or as it is also called “Grinner”. It is used for tying swivels and hooks with very small eyes. In this case, it is not possible to stretch a double line through such a hole. This unit is recommended by many American manufacturers, for example, the well-known company Power Pro. Knitting it is quite difficult; it requires skill and experience. To tie a hook using this method, you need to follow these steps. The end of the braid is threaded through the eyelet. Next, a loop is formed. The end of the braid is wrapped around the main fishing line. This creates a second loop. The end of the braid is passed inside it, while making 5 to 7 turns around the double line. The resulting knot is tightened and the excess is cut off.
Knots for tying a hook
The Palomar knot is familiar to almost all beginners. It is used when tying the swivel to the main line. It is used to connect the twister heads with hooks and eyes. But due to the fact that it is knitted on a fishing line, which is folded in two rows, it is larger in size than other connections and also makes the leash shorter.
The Crawford knot is a basic classic crochet knot. Its purpose is to tie hooks with an eye. It is simple and reliable, the load capacity is 93%, it is used for both braid and monofilament.
A bayonet knot is used to connect a hook to a monofilament line, but it is untied on a braided line.
“Fisherman’s Eight” and “Canadian Eight” - show a sufficient guarantee when attaching an eye hook to a fishing line. These knots can be easily untied.
A bayonet knot is used to connect a hook to a monofilament line, but it is untied on a braided line.
“Fisherman’s Eight” and “Canadian Eight” - show a sufficient guarantee when attaching an eye hook to a fishing line. These knots can be easily untied.
The Claw Knot (aka Clinch) is ideal for tying a hook with thin braided wire. But it does not hold well on hooks and lures with thick wire. Not recommended for winding rings.
The “Step” knot is often used when connecting hooks to a “scapula”. These hooks are durable due to the fact that they are made using forging. The strength of this unit is close to 100%.
The Twisted Dropper Loop knot allows you to tie a hook into a loop in the middle of the fishing line. Often used in sea fishing. It is easy to change one hook for another, or bait for bait.
The Centauri Knot knot practically does not deform the fishing line and increases the reliability of your entire tackle.
The Hangman's Knot is one of the strongest knots for lures and hooks.
The Scaffold Knot is a simple sea knot for tying hooks to heavy fishing line.
The Snelling A Hook is a pure hook knot that holds the line very firmly and is somewhat more difficult to knit than others.
The turtle knot is a simple and very strong knot for tying eye hooks. Suitable for tying a hook in a drop shot rig.
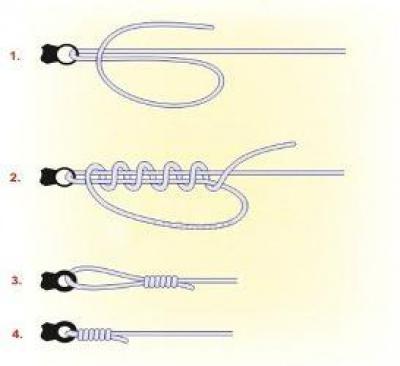
Palomar knot for braiding
This knot is light and fast. It is suitable for tying hooks, carabiners and swivels. The Palomar knot is applicable for most cases, and is suitable not only for braided lines, but also for ordinary fishing lines. Using this mount, most spinning anglers tie artificial baits. Despite the fact that this knot is universal, it is also very simple.
So, the “Palomar” knot for braiding is performed in the following way. Fold the line in half and pull it through the eye of the hook or the ring of the bait. Next, make a loop and pass the end of the double line inside. Let's not delay. Now, pay attention, we thread a hook or swivel through the bend (the place where the fishing line is folded in half). Now we wet the braid and tighten the knot. The disadvantage of this knot is that it is not possible to stretch the double line into each eye. It also greatly shortens the length of the leash. This also needs to be taken into account.
How to tie a hook to braid
The disadvantage is that you need to fold the line in half, which increases the volume of the knot and shortens the leash.
Node advantage:
- a bunch of not only monofilament fishing lines, but also braided cord and baits used both in spinning fishing and fishing with feeder gear;
- the ability to attach many equipment elements (swivels, hooks, flies, etc.);
- easy to knit.
Classic Palomar
“Double Palomar” is knitted like this
The “Triple Palomar” knot provides for the installation of fishing accessories and lures with a large eyelet to a braided fishing line. This is how the knot is tied
Palomar drop shot knot
Knot “Clinch” or “improved clinch knot” Let’s consider two types of this knot:
- normal clinch;
- clinch reinforced.
This knot is widely used, but has proven itself especially well in spinning fishing. The first version of the knot is used mainly for mounting sinkers, since it is inferior in strength to the “reinforced” knot, which cannot handle even the most complex hooks.
Scope of application: artificial baits, jig heads, weights, hooks, swivels, sinkers, feeders, carbines.
Where such a node is not used:
- for mounting sinkers with a transverse or longitudinal hole;
- for mounting tubes and factory rings.
Important! The size of the ear of the above accessories should not be more than 1.2 mm, since at diameters above the specified indicator the knot does not hold securely.
Learning to knit an improved knot model
Homer knot or homer knot
The knot tying pattern is shown in detail in this video.
Grinner knot or universal Uni knot This knot is also known as the Uni knot or ukni not. Uni means universal.
This is how the universal Uni knot, aka Grinner, is knitted
The double universal Uni knot is knitted like this
Figure Eight Knot This fishing knot is designed for attaching both hooks with and without an eye. It is also suitable for making mobile loops, tying feeders, sinkers, and leashes. In a word, it has wide application and can be used anywhere.
It is not complicated in execution and is suitable for beginner fishermen.
This knot can have several weaving options, for example, by folding the fishing line in two you will get a double figure eight.
Knot "Palomar"
Clinch knot for braiding
This is another way to securely tie a hook or swivel to the braid. This knot is simple and easy to master. It is suitable not only for braided line, but also for regular fishing line. To tie a Clinch knot, you need to perform a few simple steps. We thread a piece of braid into the eye of the hook or the ring of the swivel. Its length should be at least 15 cm. Next, take the end of the cord and wrap the main line about 6 times. But don't make the rings too tight. Now we pass the end of the braid through a small loop formed near the eye of the hook. And then it needs to be passed through a large loop. We wet the braid and tighten it. The result is a Clinch knot. For braiding, this is the best option. The fastening is secure and strong.
How to tie a hook to braid
A couple of years ago, Sports Fishing magazine tested what they considered three of the strongest fishing knots for braided line: Palomar (aka Palomar knot, Swivel knot), Grinner (more popular name - Uni, aka Grinner knot, Uni knot, Hangman's Knot ) and Homer (Homer knot).
As you can see, Palomar has a slight advantage when using various five cords, followed by the Uni knot. It is these knots, even compared to Homer, that are simpler and also have high strength and popularity when tying regular fishing line.
Several ways to tie hooks to fishing line.
Clinch Knot
There are many different knots, but as a rule, fishermen use 2-3 knots. Clinch knot.
Manufacturing:
- The end of the braid is threaded into the eye of the swivel at a distance of 7-10 cm.
- We bend the braid at the ear to form a small loop, which we pinch with our fingers.
- Make 5-7 turns with the end of the cord around its main part. We hold the turns around the main line with our fingers.
- Then the end of the cord is threaded into the first loop, which we clamped with our fingers.
- Next, the cord is threaded back into the large loop.
- Tighten the knot.
Knot "Palomar"
A universal knot, not only for hooks.
Manufacturing:
- Bend the end of the cord in half at a distance of 7-10 cm from the edge.
- We thread the double end into the eye of the hook 3-5 cm.
- We make a regular knot on a double section. Do not tighten the knot.
- We thread the hook through the loop at the end of the double cord.
- The knot is tightened after wetting it.
When tying braided line to the spool of a reel, it is important to remember that braided line is very slippery, so self-tightening knots, while effective, are not suitable for braided lines. In any case, you will have to use an adhesive plaster to prevent the cord from slipping on the spool.
On our website there is a detailed article describing the process of tying fishing line to a reel. Read more about knots and recommendations for tying here.
Manufacturing:
- The cord wraps around the spool.
- We bend the end of the cord around its main part.
- Make 4-6 turns with the end of the cord around the area going from the spool to the bending point. The main part of the cord is in the sliding loop.
- The end of the cord is then threaded back into the loop around the main part of the braid.
- The moistened knot is tightened.
"Bloody" knot
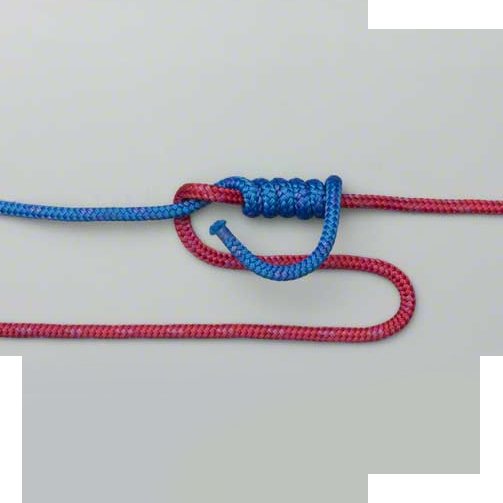
Thanks to this knot, it becomes possible to connect two pieces of braid or fishing line of different diameters. You can even tie cords this way. Although they may differ in thickness by 1.5–2 times. This knot is quite capable of connecting the main fishing line and a leash made of monofilament. The fastening will be very reliable. Every angler should know this method of tying.
So, the “bloody” knot for fishing line and braid is performed in the following way. We take two pieces of cord and place them parallel to each other. The ends should be directed in opposite directions. Now we perform the following steps. Take the first end and wrap it around the second braid 5-6 times. We do not tighten the coils too much. Now you need to pass the end of the cord through the connecting lines after the first turn. Next, we perform the same actions with the second segment. The number of turns must be the same. We thread the end of the second piece of braid into the same loop as the first. But at the same time he must “look” in the opposite direction. We wet the braid a little and tighten the knot. We cut off the remaining ends.
How to tie two braids together
The differences between braided cord and monofilament line are quite significant.
First of all, this is the material from which they are made.
- Monofilament thread is made of nylon.
- Braided cord is polyethylene fibers intertwined in a unique way.
The type of material and manufacturing process determines the characteristics of the fishing line and braided cord. Monofilament is more elastic and has a high stretch coefficient, which allows it to absorb sudden jerks of fish without breaking the equipment. Braided cords are practically inextensible and have great tensile strength.
Knot "Palomar"
For tying baits (wobblers, spinners, jig heads) to a braided cord, knots used for tying other equipment elements: hooks, swivels (how to tie swivels to fishing line) are also suitable. These are universal knots: Palomar, Clinch, Grinner, Uni, Figure Eight.
Grinner knot
Manufacturing:
- The end of the cord is threaded twice into the eye of the bait. The end of the braid should be 20-15 cm in size.
- The end of the cord is folded parallel to its main part.
- At a distance of 5-7 cm from the bait, bend the end of the braid back towards the bait so that a large loop is formed. The end of the cord is turned around the double braid in the direction away from the bait. That is, the end of the braid should wrap around its double section inside the large loop.
- After 5-7 turns the knot is tightened.
Rapala knot
A more complex but reliable knot for tying baits.
Manufacturing:
- At a distance from the end of the cord, we knit a simple knot, but do not tighten it.
- We thread the end of the braid into the eye of the bait.
- We insert the braided line threaded into the eye of the bait into a simple knot tied earlier.
- Next, use the end of the cord to make 4-5 turns around the main section of the braided cord.
- We return the cord back to a simple knot.
- Then we thread the end of the fence back into the large loop that has formed.
- The knot is wetted and tightened.
We hope our recommendations will be useful to you. Happy biting!
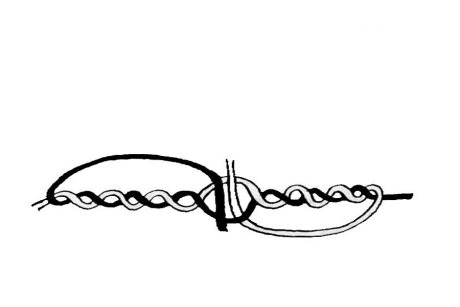
Well, the last knot is great for splicing the cord and connecting it to the fishing line. We take the two free ends of the braids, place them on top of each other and make several turns.
We suggest you familiarize yourself with: Mount for echo sounder sensor
The number of revolutions may vary. Usually they make from 5 to 8-10 revolutions. As the number of revolutions increases, the assembly itself and its strength also increase. And the size of the node plays a significant role when passing through the small rings of the feeder tip. If you tie braid and fishing line together, you can make 8 turns with the braid and 5 turns with the fishing line.
We take one of the ends back, thread it under the first turn and get a loop. Now we make the same turns with the other end and also thread it through the center. Wet and tighten the knot. The knot is complicated, but it perfectly connects two braids or fishing lines. In addition, it turns out to be small in size. If desired, you can drop a drop of superglue onto the finished assembly; it will improve the sliding of the assembly as it passes through the feeder rings.
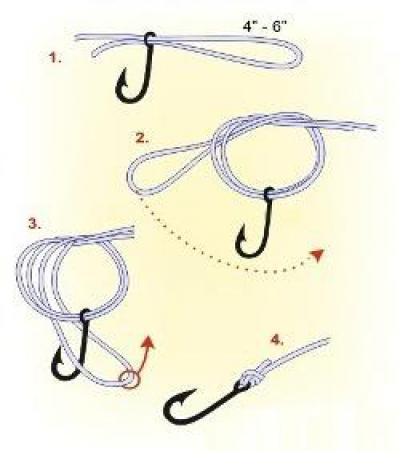
These four fishing knots are perfect for tying braided and regular fishing line. As you can see in the pictures, they are great for tying hooks.
Having studied and memorized them, you will no longer have doubts about the strength of your gear. Oh, and don’t forget to wet the knots before tightening!
How to tie a hook correctly
Let's figure out what braiding is and what its advantages and disadvantages are over fishing line (monofilament).
Fishing line is a clear or colored thread made by stretching nylon or fluorocarbon.
- Transparent monofilament is less noticeable in the water, which affects when catching cautious fish. When fishing, the fishing line has the ability to stretch, dampening the sharp pulls of the fish. The thicker the line, the greater the load it can withstand.
Braid - interlacing of polyethylene fibers
- The cord is more durable and has practically no dynamic properties. A 0.12 mm thick cord can withstand the same loads as a 0.5-0.6 mm monofilament. Not being able to stretch has a good effect on catching fish such as pike perch. When hooking, the hook penetrates the hard bone of the mouth more easily. The sensitivity of bait behavior and control over the caught fish improves.
Video.
The area of application of knots for fishing lines is mainly float, bottom and fly fishing. As a rule, the main fishing line and leader are tied with such knots, and in fly fishing - undergrowth.
What is connected:
- lines of different diameters between each other;
- fishing lines made of different materials (for example, monofilament and braid);
- in case of a break during fishing - the main line of 2 pieces;
- main line and shock leader (a thicker piece of line and 2 times longer than the rod, which takes on the entire load when casting).
Important! When tying two lines, you need to make sure that the strength of the lines at the knot is not affected. When tying pieces of fishing thread or shock leader, you need to ensure that the resulting knot passes freely through the rings of the tackle blank.
Knot “Triple” or “three - water knot” It is important to remember that when tying this type of knot you need to take monofilament fishing lines that differ in diameter by no more than 0.05 mm. It is by following this rule that the fishing line will retain about 90% of its load.
This knot will not fit through the guides of your rod, so it is best used in rigs where this is not required.
And here is the training video
Knot “Loop to Loop” or “double loop junction” A connection called “loop to loop” is a good alternative to a swivel. A fairly strong and reliable connection used for attaching the main line and leash.
How to make loops correctly, see the diagram
The blanks for forming the connection are nodes called “surgical”.
Training video for beginner fishermen from the channel “FishingVideoUkraine”
Look at the diagram and don’t make mistakes!
Knot “Blood Ties” or “blood knot” Other English names for this knot:
- attach knot;
- fisherman's bend knot.
To tie this type of knot, fishing lines with a difference in diameter of no more than 30% are used.
The advantage of this unit is not only its strength, but also its compactness, so that it can easily pass through the rod's guides. The disadvantage is that it is labor intensive and requires skill to perform.
We suggest you read: How to tie two leashes to the main fishing line
We align the free ends of the two threads with each other. Then we make 5 revolutions relative to each other. We pull one end of the thread back and drag it under the first turn. We perform a similar manipulation with the second end.
“Double Sliding” Knot This knot can be made as a connecting element of two monofilament lines, or a monofilament with a braided cord. However, the diameters of the material used should not differ by more than 50%. A fairly strong knot, it has an advantage over a blood knot.
And here is the execution diagram of this node
It is known that one of the disadvantages of braided fishing line is its ability to become flat after several times of use. Therefore, when forming a node, you need to take this into account. You should also know that the strength of the knot is also affected by the thickness of the cord; the thicker it is, the weaker the knot is.
“Shock Leader knot” The knot is not large and can easily slide through the rod’s rings, which gives it an advantage in use in many types of fishing.
This video clearly shows the order of execution of the node
The “Mahin leader knot” or “carrot” knot is a reliable and compact knot suitable for spinning rods, feeders and carp rods. Excellent connection between braid and monofilament or fluorocarbon leash. When fishing for carp, it is perfect for tying on a shock leader.
If vases have difficulty tying this knot, watch this video from V. Nikolaev
Albright knot When it comes to quality, we mean a universal knot for fishing with various gear. If you are exclusively engaged in spinning fishing and you need to tie a thin fishing line and braided cord or fasten a leash, then by all means use this tying method. But do not neglect the main rule of tying fishing lines - the fishing lines should not have a strong difference in diameter!
For float fishing, the knot is used instead of a swivel, when its presence is not appropriate, since particularly delicate elements of equipment are used and the swivel spoils everything with its bulkiness.
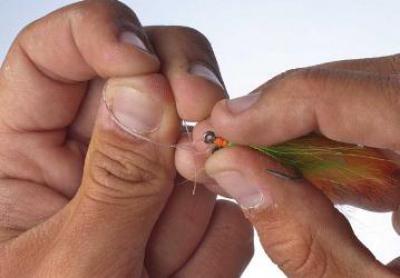
In this section we will introduce you to simple and complex installations of knots for hooks with a spatula. These hooks are available in small sizes.
It is difficult to make a knot on hooks of this type, since the execution process requires a certain skill and accuracy. The line should lie tightly and evenly on the fore-end, without layers layering on top of each other. It is very important after the process is completed that the fishing line is on the side of the hook and is thus a continuation of its shank. We also recommend applying a little glue to the assembly to maintain the reliability of the structure.
Suitable for crocheting both with and without eye hooks.
Knot “Ailit” or “eyelet knot” V. Nikolaev in his next video will continue to introduce you to the rules of tying knots. We present to your attention a mount called “Ailit”
Trombone Loop Knot Other knot names:
- trombone loop;
- spade end knot;
- sliding bait loop.
This knot fits well from monofilament and braid. Can be used on various types of hooks.
Instructions for implementation:
- We take the fishing line and fold it in half, so that the tails of the fishing line are parallel to the blade of the hook.
- We make a small loop, leaving the tip of the fishing line about 15 cm long.
- We attach a hook to the end of the fishing line, so that its tip is parallel to the shank of the hook, and press it with our fingers.
- Next, we begin to wrap the hook shank several times with the working end of the fishing line.
- We carefully thread the end of the fishing line into the resulting loop, moisten it with saliva or water and cut off all excess.
An example of making a “trombone loop” from V. Nikolaev
Knot “Outer loop winding” or “trombone loop” The only rule when making this type of knot is that the tighter you pull the line, the stronger the knot.
Slip double knot
Some fishing knots for braiding have increased strength and reliability. Such ties include the sliding double knot, known to many experienced fishermen. It is suitable for lines, braids and cords where the difference in diameter can exceed five times. This is very useful when you need to connect two different pieces of different thickness. This is perhaps the best option for fluorocarbon. Using this fastening method, it is easy to tie it to the main fishing line.
So, this knot for braid and fluorocarbon is performed in the following way. We fold and overlap the tied fishing lines. Their ends should “look” in opposite directions. We hold the folded pieces approximately in the middle with our fingers. Now we wrap one end of the fishing line to the fingers. You will get a loop. We pass the end of the braid into it and, wrapping both sections, we make from 5 to 7 turns. Now, having wetted the fishing line, tighten the end. The result was one node. Now we do the same on the other side with the second end of the fishing line. As a result, we will have two nodes formed in a common area. Now all that remains is to pull the connected lines in different directions. The knots will converge at one point. We cut off the excess ends. This method is similar to the “bloody” knot, but it is more reliable.
Advantages and disadvantages of a knotless fastener for braided cord
- The knotless fastener provides a unique opportunity to attach bait of various sizes to a braided fishing line without worrying about its abrasion in the process of catching large fish or breaking when hooked.
- Now you can tie and change bait very quickly. Previously, this would have required a lot of time. And now it's only 10 seconds. Moreover, the procedure for creating an unconditional fastener is very simple and elementary.
- Due to the absence of knots, the formation of weak points is eliminated. Because a line break can happen anywhere, but not where the bait is attached.
- Even a beginner can make such a fastener, not to mention experienced fishermen.
- During fishing, the possibility of weakening the fishing line or braid in the connecting places is eliminated.
There are practically no downsides to this type of fastener, although one should be noted.
This fastening is very strong, so the fishing line or braid can break in any other place.
A knotless connection helps reduce the number of bait breaks and prevent large fish from leaving. Thanks to the simple and compact part, there is no need to remember the intricacies of new knots in order to tie the bait to the fishing line.
The connector is a wire device with special bends at the ends. For the manufacture of this element, stainless steel wire is most often used. Knotless fasteners are now offered to fishing enthusiasts by many specialized stores.
It’s easy to make a wire device with your own hands.
But it’s not enough to purchase or make a clever fastener. It is important to learn how to use this part when connecting braided line with artificial baits.
In some cases, the use of a connector impairs the performance of the gear. Therefore, before installing a new accessory on a fishing rod, you should familiarize yourself with the strengths and weaknesses of a knotless line connection.
There are two ways to attach a leash or bait to the main line. Some anglers continue to use knots, while others prefer a knotless fastener. Each of these methods has its own area of application, which is determined by the strengths and weaknesses of the compounds.
The advantages of conventional nodes include:
- the ability to tie different fishing lines and braids;
- breakage of equipment most often occurs at the node;
- There are no additional elements on the equipment.
As for the weaknesses of nodal connections, it is necessary to highlight the inconvenience of forming a node and low strength.
Advice! Knots remain the main method of attaching hooks, swivels, microscopic baits and other small gear accessories.
Knotless clasps have their advantages and disadvantages.
- One of the important advantages of the “Not a knot” connector is the prevention of fraying of the cord when fishing for large fish.
- The wire device allows you to quickly change or tie baits or equipment. It takes any angler 10-20 seconds to install. Athletes especially value time during competitions.
- The absence of knots makes the equipment very strong, since weak points are eliminated.
Knotless clasps also have some limitations.
- This method of mounting baits is mainly suitable for braided cord.
- An additional detail appears on the equipment, which makes the fishing rod heavier.
Attention! The knotless fastener should be selected taking into account the thickness of the braided line. The element number must be the same as the cord diameter.
- With a dead hook, when you have to pull out the rig by holding the fishing line, a break can occur on any section of the cord. It's a shame to lose a long piece of expensive thread.
The fisherman must independently determine which installation method is best suited for him. For spinning and feeder players using braid, it will be useful to use a connector. But for lovers of a float or ultralight, a regular knot looks preferable.
We invite you to read: Catching carp with boilies - recipes, flavors and the best boilies
How knots affect the quality of braiding
To determine the best fishing knots for braid, you need to understand how a particular knitting method affects the characteristics of the fishing line. It is known that any fastening option certainly leads to deformation of the fibers. But the degree of damage and, as a consequence, loss of strength of the braid varies. So, when tying a swivel or, for example, a hook, then no matter which connection method is chosen, in the end you will still have to perform the same action - tighten the knot. In this case, the inner layers of the braid are displaced, this leads to a change in its structure. Some fibers are greatly stretched, while others experience excessive tension. All this leads to a decrease in its strength.
The cross-sectional shape of braids can be round or flat. When the knot is tightened, the line twists. This leads to tension on individual fibers. But if the braid is round, then it will be insignificant. But flat braided lines will experience severe stress and lose a greater percentage of strength. Fishing knots for braiding need to be selected consciously. If inappropriate tying is done, it will weaken the entire equipment, which will lead to the loss of not only hooks and artificial baits, but also trophies.