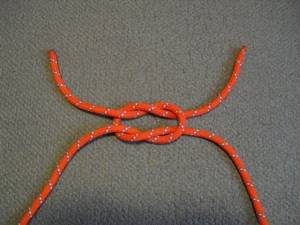
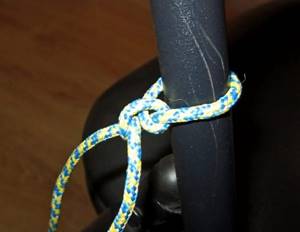
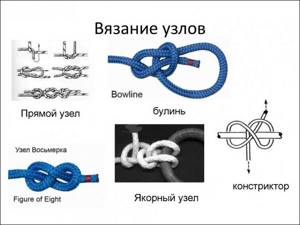
How to tie a bowline knot
It is also called a gazebo and is classified as a fundamental node. It contains elements of several schemes, which gives it universal properties: the fastening allows mooring, securing sailors, and fixing the rope to the hook. The bowline is very reliable, it can be used with almost all cables, regardless of material and thickness. The gazebo is quickly tied and easily untied (but not spontaneously), it does not slip, and is highly reliable when used in marine conditions.
Bowline knot
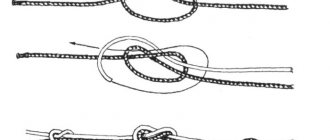
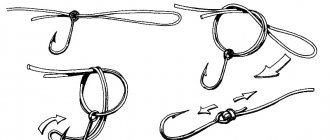
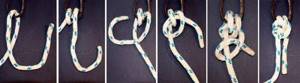
Sea knot tying pattern for beginners:
- Form a loop from top to bottom.
- Pass the running end through it from bottom to top.
- Pass the chassis behind the main one and pass it through the loop again.
- When the running end is enclosed in the small loop formed, the rope must be tightened tightly.
To untie the bowline, just move the loop slightly in the direction from the running end to the root end.
Classification of maritime knots
All names of sea knots came to us from other languages.
The term “anchor knot” was denoted by several different words depending on the design feature of the knitting:
- “knot” - they intertwine, connecting the running edge with the main one, a thickening is created at the end of the rope;
- “hitch” - designed to secure the running end to yards, masts, other gear and objects;
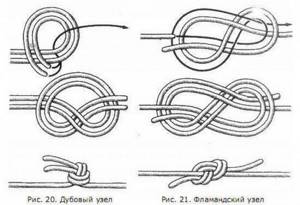
- “bend” - used to increase the length of the cable by tying the two ends.
Important!
The main section of the rope is a section that is permanently fixed. The running end is the free edge, which is not attached to anything; the rope begins to be tied from it.
Beginners are advised to master the technique of knitting basic knots, which are often used in sailing. You need to start with simple designs, gradually complicating the technique. Tying one knot should be brought to automaticity, only then begin to study a new design. It should be remembered that many node names come from English-language dialects. The same mount can have up to 7 names.
Knitting a figure eight sea knot
This is a typical modification, which got its name due to its characteristic shape. The figure eight is usually used to form a stopper or stable fastening. The main advantage is that it is easy to deal with, even if the rope gets wet.
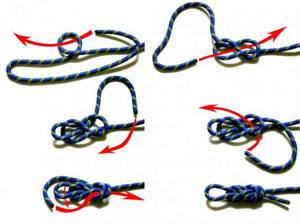
Figure eight knot
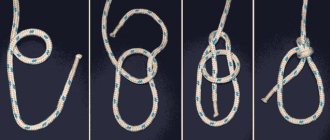
How to knit a sea knot:
- Circle the running end of the main one, pull the first one from above so that you get a loop.
- Pierce the resulting loop with the running end so that you can then pull it behind you.
- Tighten.
Types of figure eight knots
Among the types of knot execution, both classical and alternative methods are distinguished. We will look at the most popular of them.
Classical
The classic figure eight knot is knitted according to a simple pattern:
- Towards the end of the rope, make a loop with a diameter of 10 cm;
- The remaining end is passed through the loop and wrapped around it twice.
- The ligament is tightened.
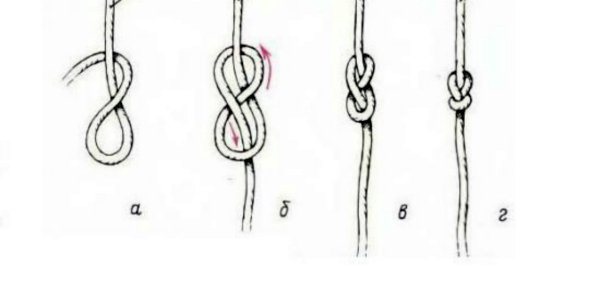
Figure 4. This is what the classic figure-eight knitting pattern looks like.
If the resulting connection resembles the number eight, this means that the knot is made correctly. But, if during the process you have difficulty tying, it is better to practice a little, and then you will learn how to do the “figure eight” quickly and correctly (Figure 4).
Double
The double figure eight knot is used to obtain an increased connection size at the end of a fishing line or rope, or to obtain a double loop of increased strength.
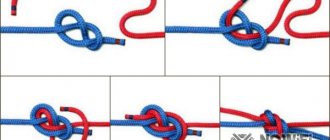
Knitting pattern for a straight sea knot
One of the oldest modifications, in Ancient Greece the knot was called the Hercules knot. With its help, you can firmly connect two ropes having approximately the same diameter. But the scheme cannot be called reliable: under heavy loads, the joint will be overly stretched, and it will often slide along the cable. It is not recommended for use in critical situations or when activities involving immersion in water are planned.
Straight knot
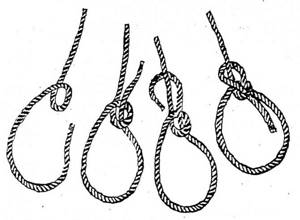
Classical technique:
- Take 2 running ends of the cables, one should cover the second.
- The other end forms an open loop.
- It is necessary to stretch the rope into this loop so that the first end is also braided.
- Tighten both ropes.
There is a subtype of the direct knot - the reef knot, which is distinguished by its ability to quickly untie.
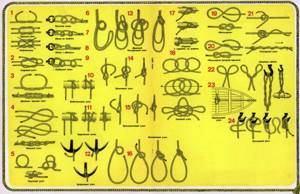
Maritime knots training. Nautical knots: purpose, classification, knitting pattern
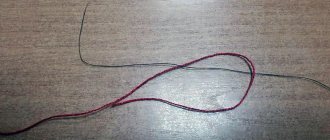
Tying nautical knots on a rope for its practical use is an important issue in maritime practice. First of all, I would like to make a small clarification. In the description of the marine knots presented below, the word “root end” means the stationary end of the cable, and the “running end” means the other, working (moving) end of the cable. In the description of the execution of the nodes, drawings are presented to facilitate study.
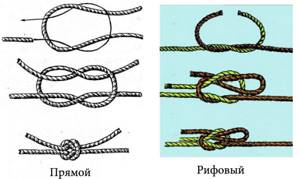
STRAIGHT KNOT
Performance.
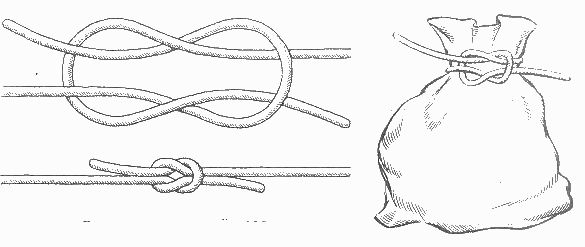
The ends of the connected cables are wrapped around one another, bent in opposite directions (Fig. 1, a) and tied as shown in Fig. 1, b. The tightened knot is shown in Fig. 1, c.
Application.
A straight knot is used when tying cables of approximately the same thickness. When there are large loads on the connected cables, as well as when the cables get wet, the straight knot is very tight. To prevent excessive tightening, a wooden insert is inserted into the loops of the knot.
REEF KNOT
Performance.
A reef knot is tied in the same way as a straight one, but one of the running ends of the knot is inserted into the corresponding loop folded in half (Fig. 2, a, b). Thanks to this, the reef knot can be easily untied if necessary. A tightened reef knot is shown in Fig. 2, c.
Application.
A reef knot is used to tie the ends of reef lines when taking reefs on sails. This unit is used when securing the pins of covers of ship's boats, compasses, and deck mechanisms; and in other cases when a reliable but quickly untied knot is required.
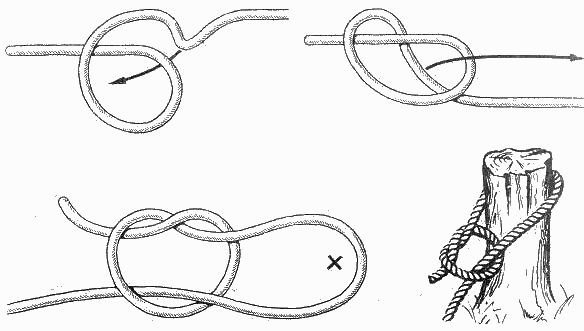
Half bayonet and bayonet
The half-bayonet is not tightened; to perform it, the running end is wrapped around the object on which it is planned to fasten the cable, the main one is circled and passed through the formed loop. Next, both ends are fastened together. The unit can withstand heavy weight and is reliable.
Bayonet Knot
Using a bayonet, the mooring ends are fixed and towing is performed. It is based on 3 half-bayonets - this quantity is enough for any purpose. It cannot be assumed that 4 or 5 half-bayonets are stronger; the effect when used will be the same.
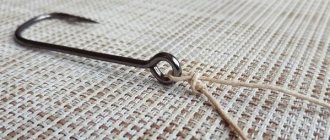
Anchor eye - an indispensable assistant
When figuring out how to reliably tie an anchor to a PVC boat, one cannot help but remember such a useful device as an anchor eye, which is also called a roller. It allows you to reliably and simply tie or secure a halyard on the side of the boat. The eye holds when the anchor is raised or lowered.
The peculiarity is that it is possible to fix or release the halyard using the roller quite quickly, that is, fishing hands eager for a good catch become free immediately after the weighting agent is immersed in the water.
The transom eye is useful for insurance and towing, while the anchor eye is placed on the bow.
Video on how to install an anchor eye:
Video about how the anchor release system functions and how the rope can be secured:
We hope our article on how to properly tie a PVC boat anchor is useful to you! Share your experience and life hacks in the comments.
A properly installed anchor is the key to safe and fruitful fishing, of course, if you have a reliable boat, which you can always buy in our store! We also have useful components for you.
Question answer
Question: How should I tie a boat anchor correctly?
Name: Tagir
Answer: You need a good rope. Loops are made at its end. The end of the rope can be attached to the stem with a special bracket, the other end is connected to the weighting material. If you plan to use the anchor where it snags easily, you can attach an additional line with a float, which will make it easier to pull the weight out when it gets snagged.
Question: How should you tie an anchor to a boat so that it is secure?
Name: Mikhail
Answer: It is best to use an anchor knot, which is considered the most effective and safe way to tie the line to the anchor system.
Share link:
How to tie a sea knot with a fisherman's bayonet
Marine knot fisherman's bayonet
This variation has ancient roots; it has survived to this day due to the fact that it allows the rope to be fixed as firmly as possible on the anchor, and is adapted for all types of manipulations in conditions of strong traction. Initially, you need to secure the cable to the object using additional hose, then you can begin to form half-bayonets. The first of them must capture the barrier encircling the base.
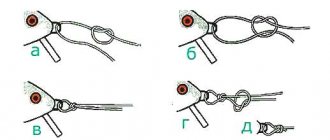
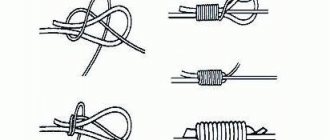
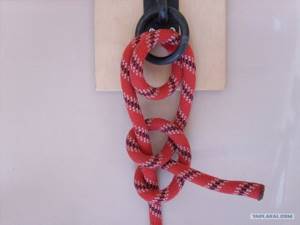
Anchor knot: how to knit?
To avoid misunderstanding among readers, step-by-step instructions without the use of marine terminology will be presented below:
- Wrap the rope twice around the object. Do the second carry without tightening, otherwise the rope will not fit under it.
- Lower the running end of the rope over the stationary one, pass it under the loose loop, and tighten slightly.
- Wrap the remaining section around the main part of the cable. Insert it into the resulting loop.
- Secure the free end to the fixed end with a tie or wire for additional security.
This is interesting: What to do if you are caught in an avalanche (action algorithm)
As previously mentioned, the anchor knot is extremely similar to another one, the name of which is a simple bayonet with a hose. People not involved in the shipping industry usually confuse them. And this is not surprising. However, it is worth remembering: when performing serious work, this unit is much better suited.
Additional half-bayonets (actions described in paragraphs 2 and 3) make it safer. And if the knot with which the anchor is confused was actually used to fasten any parts of the ship, it would quickly receive new modifications. Otherwise, he could not be trusted with cables with strong traction.
Scheme of the thieves' sea hub
Scheme of a thief's sea knot
If the ends of the rope are not visible, outwardly this knot cannot be distinguished from a straight one. It got its name due to the fact that this similarity was actively used on ships in order to identify the theft of sailors’ personal property and provisions. The connection is used mainly for domestic purposes, since when tensioned, the knot can spontaneously come undone.
Description and technique of performing the figure eight knot
The figure eight knot gets its name because of its inherent shape. It is mainly used in fishing and mountaineering (Figure 1).
So, with the help of this knot, fishermen attach hooks, leashes and other equipment elements to gear, and also use it to tie up broken fishing line.
The figure-eight knot is excellent for providing insurance for climbers during high-speed descents, since it never unravels without permission. At the same time, it cannot be called universal, therefore, in addition to the standard method of tying it, there are also alternative knitting patterns, which will be discussed below.
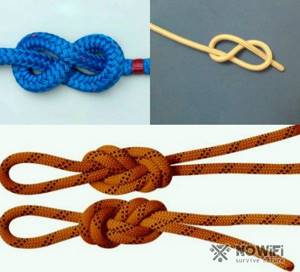
Figure 1. This is what a correctly tied figure eight looks like with and without a loop
A standard knot can be tied in the following sequence:
- Take the rope by one end and fold it into a loop. In this case, the lower part should be brought behind the upper one.
- The free end of the rope should be passed through the loop.
- Pull both ends at the same time.
Node purpose
A knot called a figure eight is used to connect the ends of a fishing line, knit loops, attach fishing equipment, and belay. It is used not only by fishermen, but also by sailors, as well as in speleology, rock climbing and mountaineering. The only caveat is that this type of connection is not suitable for fluorocarbon lines.

Figure 2. The connection is used both in everyday life and in specialized industries
Thanks to its simple and quick knitting pattern, this knot is quite popular. In addition, this method of tying knots provides a reliable and strong connection of leashes, which does not give way and is easily untied after prolonged tension (Figure 2).
Pros and cons of using
Among the advantages of using the “eight” are the following:
- Stationarity - the node does not move under any circumstances.
- Strength - the connection does not loosen or come undone on its own, which is why the figure eight is often used as a fishing knot.
- Fast execution - can be tied in a few seconds.
- Possibility of easy untying even after prolonged use of the rope.
- Impossibility of spontaneous tightening of the loop.
- Variety of intended purposes: maritime affairs, speleology, insurance activities, etc.
- Can be used as a stopper.
- The ability to retain the properties of a single piece of fishing line after tying, thanks to which its original strength can be preserved.
Along with the advantages, there are also some disadvantages:
- Labor-intensive application on thin line.
- The need for reinforcement in order to increase reliability when used on thin lines. So, to increase strength, you have to fold the running end of the rope in half, and only then tie a knot. This makes the installation process more complex and time-consuming.
- It is absolutely not suitable for tying fluorocarbon (other rigid) fishing lines, since the strength of the connection is reduced by half due to the deformation of the material on which the knot is tied.
- Knowledge of variations is a must, especially in mountaineering.
Basic rules of knitting
You should practice tying a figure eight knot using a step-by-step knitting pattern:
- Take a rope (line) no longer than 50 cm by the running end.
- Bend one end no more than 30 cm long in the form of an arc, applying it along the remaining part.
- Guide the undercarriage below the piece of fishing line (rope) that was not used and pass it through so that a loop is formed. In this case, the end of the chassis should be left down.
- The next movement is to direct this part with a turn around the fishing line, getting into the loop.
- Pull the knot tightly and finish knitting.
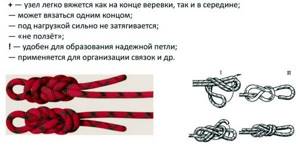
Figure 3. Basic nuances of knitting
A correctly tied knot looks like a “figure eight”. It also looks like an “infinity” sign (Figure 3).
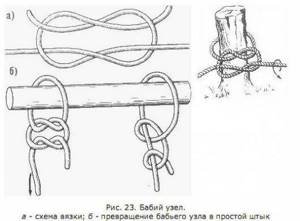
How to tie a woman's and mother-in-law's knot: a simple diagram
The variations are extremely similar: these are two erroneous ways of forming a thief's knot. The names “woman’s” and “mother-in-law” are based on everyday specificity of use - they are widely used to connect ropes, but do not take into account the unreliability and even some danger of sliding fastenings.
Babi knot
Knitting a sea knot is not difficult: two running ends are passed through each other in different directions and duplicate this action in a mirror image.
Professional sailors and adherents of an active lifestyle demonstrate the woman's knot only for educational purposes, since its use in field conditions is fraught with injury and damage to property.
The mother-in-law's knot differs from the woman's knot in that here the ends of the cable come from the finished combination in a diagonal direction. The modification was first used in European countries in shipping, but was later replaced by more practical and strong knitting options that do not have the ability to unravel spontaneously. Now, in practice, it can only be found in subsidiary farming as an auxiliary link for packaging raw materials and food products.
To perform the mother-in-law knot you should:
- Form a partial loop from the running end of one rope.
- Pass the second end into the loop from top to bottom, go around the first rope and bring it out.
Even if you tighten it tightly, there is a high probability that with further tension the ligament will open.
Frequently used sea knots
The bowline is a universal knot, as it can be easily tied on a rope of any thickness. It is also called a "gazebo knot". It will not untie on its own and does not slide along the rope, but it can be untied without effort if the need arises. The connection is one of the strongest. It is used for belaying, attaching to the ring and hook, mooring and connecting various cables.
Knitting pattern:
- A loop is created into which the running section is drawn.
- Next, it is brought behind the root part.
- Returned back to the loop.
- The small tip should remain in the second loop.
- Perform a tight tightening.
Eight got its name due to its external resemblance to the number of the same name. It is used as an independent option or as an element for tying other fasteners. Used for securing or stopping. Its peculiarity is that such an anchor knot can be easily untied when the rope gets wet.
Knitting pattern:
- The running edge is pulled along the root edge and drawn around it.
- The running end is brought behind itself and threaded into the resulting loop.
- Tighten tightly.
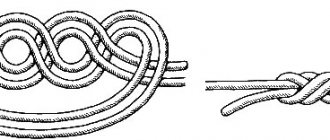
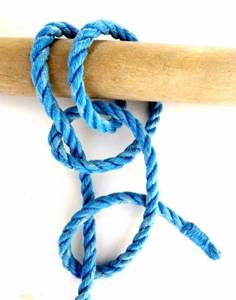
A noose is used to lift a load to a height, as well as attach a rope to a support. The chassis is wrapped around the object, and the root section is wrapped around the chassis several times. It is most reliable if a control tightening is used in the noose for fixation.
When using the maximum breaking load, after removing the load, the rope is easily untied. The connection is very strong and does not lose strength when wet. The carbine noose is widely used in mountaineering. The chassis is attached to a figure-of-eight carabiner, and the free part can wrap around a support, such as a tree.
The bayonet is tied from two knots. It is complex in design, suitable for towing and mooring. It is based on a simple half bayonet. The chassis is circled around the object, then several times around the root part. The bayonet is appropriate when the ship stays in port for a long time.
There are several variations of knitting. A variation of it is the anchor knot, which is also called a fishing bayonet. It is used in situations where strong thrust is involved, for example when lowering an anchor.
Straight knots are appropriate for fastening the running gear of two different cables. The disadvantage of the design is that it tightens very tightly after getting wet under excessive load, so it will be difficult to untie it. With intensive use, this anchor assembly may slip. Knitting pattern:
- The two root parts are connected.
- Move the running ends relative to each other and tighten.
- To prevent the structure from losing symmetry, the ends are brought out along both sides of the root sections.
The thief's knot is considered a type of straight knot; it is used for household needs, for example, tying bags of grain. It is knitted in a similar way, directing the ends of the structure diagonally in relation to the root part of the ropes. During loading, the connection may change shape, resembling a half-bayonet.
The displacement leads to mutual untangling of the ends. To prevent the rope from untying, change the location of the ends. They are pressed and the root parts are tightened. If the edges are hidden, the connection may be externally confused with a direct fastening.
The most fragile is the mother-in-law's knot. It is also called a woman's knot. It is not used in maritime affairs due to unreliability, but on shore it is successfully used for packaging goods and tying bags. The edges of the undercarriage are intertwined and tied. Despite the apparent strength, there is a high probability of the knot slipping and untying under strong tension.
The worst thing to do is connect ropes of different diameters. When choosing this design, the degree of danger should be assessed, since the connection will come undone at the most inopportune moment.
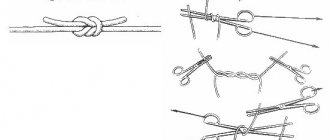
Technique for knitting a figure eight knot step by step
The figure eight knot is unique in its ease of knitting and practicality. At the same time, it is quite reliable, since it does not unravel spontaneously when tensioned, even when fixed around the support. It is used in both tension and slack ropes, ropes and cables (Figure 8).
Step-by-step instructions will help you on how to tie such a knot:
- We take a rope (fishing line, rope, cord) with one running end.
- We make a loop through which we pass the running end.
- Tighten the knot and fix it at both ends.
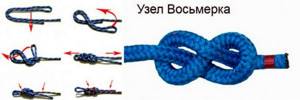
Figure 7. Step-by-step tying technique
By repeating the steps described above, you can make several such knots on one rope.