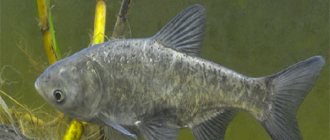
The side nod for summer fishing has become a common fishing accessory, working especially effectively in heavily overgrown reservoirs. Having transformed from one of the types of winter ice fishing, this direction has firmly established itself in the hunt for many types of fish in open water. In addition to the simple technique of execution, fishing is also distinguished by its special prey, because more cautious and larger fish try to stay in places overgrown with aquatic vegetation inaccessible to predators, feeling freer there due to the security created by the surrounding environment.
This article will focus on the configuration and preparation of a fishing rod with a nod for fishing in open water, fishing strategies and the concept of making an accessory for various conditions of obtaining freshwater trophies.
Choosing the right summer fishing rod
Fishing with a side nod is characterized by a high degree of dynamism, in which the angler constantly has to work with the rod, holding it suspended in his hands. These arguments require special criteria when selecting a fishing rod for the type of hunting presented. The fundamental one is considered to be the mass of the rod, which should be as small as possible.
Important! Low weight conditions include graphite telescopic rods in length sizes from 4 to 10 meters.
Depending on the intended use factors, the form can be equipped with guide rings or selected in a swing version. It is more convenient and more effective to use a rod with a semi-fast quiver tip action to make a jig retrieve. As one of the options for the basis of the nodding direction of catching fish, the equipment of a plug-type rod can be used.
DIY side nod for summer fishing
In June, we already talked about choosing a rod for fishing with a summer jig. Now let's talk about an equally important element of this tackle - the nod. Boris Elagin
With a side nod, as is known, fish are caught in two ways: with a blind or with a running rig. Accordingly, two different types of fishing rods are used: a fly telescope (blind equipment) or a fishing rod equipped with rings and a reel. Both fishing methods have their advantages and disadvantages.
For example, on reservoirs there are places where tree branches literally hang over the water. Fish love to stand in the shade under trees, but fishing with running equipment in such places can be very difficult due to the fact that there is no way to lift the fishing rod vertically above you without folding it. Conversely, there are places with a marshy shore, overgrown with reeds and sedges, where it is difficult for an angler to reach clean water.
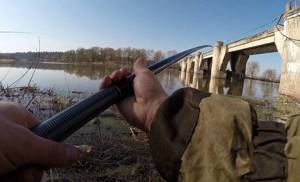
The fisherman has entered the water up to his waist, and in front of him there is still 4–5 m of grass lying on the water, reeds or sedges sticking out of the water. A fishing rod equipped with a running rig allows you to very simply and accurately lower the jig beyond the edge of the grass. With blind equipment, fishing in this situation will be difficult.
The bait will have to be cast by gradually unfolding the legs of the rod, while the bait will slide over the algae, reeds, sedge, all the time clinging to the hook. Therefore, many anglers, like me, have fishing rods with both blind and running equipment. And when going fishing, they choose equipment based on the upcoming fishing conditions. Usually, having bought a new fly telescope, I want to start fishing with it quickly, and I install a blind rig, which is easier to equip.
And when I collect the components, design thoughts arise, I gather my courage, and finally the time appears - I slowly equip the flywheel telescope with rings and a coil. Regardless of the fishing method, the same baits and nods are used with both blind and running rigs. The only differences are in the equipment of the rod.
What does a good side nod do? Firstly, show the bait touching the bottom. This is important because all fishing with a summer jig begins or ends at the bottom. Secondly, ensure a smooth presentation of the bait. The main summer fishing looks like this: a seemingly weightless bait slowly hovers in the water column, rising to the surface or sinking to the bottom, sometimes freezing motionless, sometimes swarming at the bottom.
But the tip of a long fishing rod is always in motion! This is clearly noticeable if one angler stands on the shore and holds a long fishing rod with both hands by the butt, as it seems to him, motionless, and at the same time another one comes up to see what is happening with the tip of the fishing rod. He will see that the tip of the fishing rod is not nearly as motionless as it seems from afar.

It fluctuates randomly, and with a decent scope. In real conditions, these fluctuations will be supplemented by the influence of incoming gusts of wind, swinging the fishing rod, and from waves hitting the angler’s legs and additionally rocking his body. Moreover, the longer the fishing rod, the greater the swing of its tip will be.
But, if the fishing rod is equipped with a sufficiently long side nod that has good shock-absorbing properties, and it corresponds to the weight of the bait, if on a 6-meter fishing rod a 25-centimeter side nod dampens vibrations well, then on a “nine” you will have to install a side nod 38 cm long. Thirdly, it is good to show decent vibrations in the tip of the fishing rod and will not be transmitted to the bait.
The bait will move smoothly and will interest the fish. True bites and give the bait “free movement”, which is necessary so that the fish calmly swallows the bait and the angler has time to hook the fish. Some bites are so sharp that if the bait did not have free movement, it would simply fly out of the fish’s mouth before the angler had time to think anything of it.

Authoritative opinion Vladimir Balovnev: Fishing with a side nod is not as popular as, for example, fishing with float tackle. And, most likely, due to its specifics, it will not become so widespread. Abroad, in my opinion, it is still almost not practiced. Because of this, the industry for producing side nod products is not at all developed. Adherents of this very interesting and dynamic fishing have to look for artisans or make the tackle themselves, so this material, it seems to me, is of undoubted value.
What shouldn't a good side nod do? Firstly, and this is the most important thing, the side nod should not create the slightest prerequisites for tangling the fishing line and the formation of knots. Often, when fishing at shallow depths, a gambling bite from a fish is followed by an equally reckless hook on the part of the fisherman.
The bait flies out of the water and makes another turn on the line. So, the design of the side nod should not allow the line to easily wrap around it, or onto the nod along with the tip of the fishing rod. And if the fishing line is already wound, the design should ensure easy release of the fishing line loops under the weight of the bait by simply turning the fishing rod around its axis with a slight shake. Secondly, the side nod should not overload the fishing rod with its weight and worsen its structure.
And, if possible, it should not have its own vibrations. This is achieved by making all the components of the side nod as light as possible. Thirdly, the side nod should not flap in the wind like a flag. To do this, the design of the side nod must be made so that it has minimal wind resistance. Fourthly, when fishing with a running rig, the side nod should provide minimal resistance to the passage of the fishing line.
What can we buy? I have already written about the difficult choice of a rod for fishing with a side nod. So, choosing a nod is not much easier: there is nothing more or less worthwhile for sale. The concept of what the nods should be comes quickly after the first three or four fishing trips. But where to buy them? Nowhere. Unless they come across it by chance.
Unfortunately, there is no longer a trace of the colorful grandfathers of home-made craftsmen who sold amazing exclusive handicrafts at the malls. The secret “boxes” where these grandfathers worked have long since disappeared. The main thing is that there are very few people who make their own gear and fish with it themselves. There are also no fresh ideas, for which I used to specifically go to the old Bird Market in Moscow.
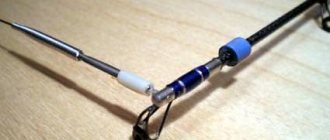
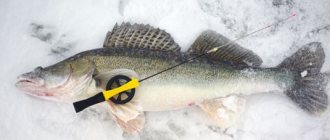
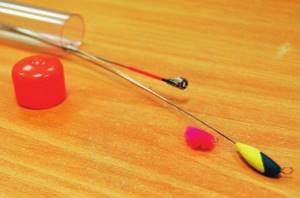
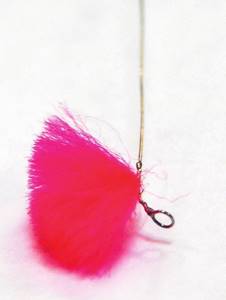
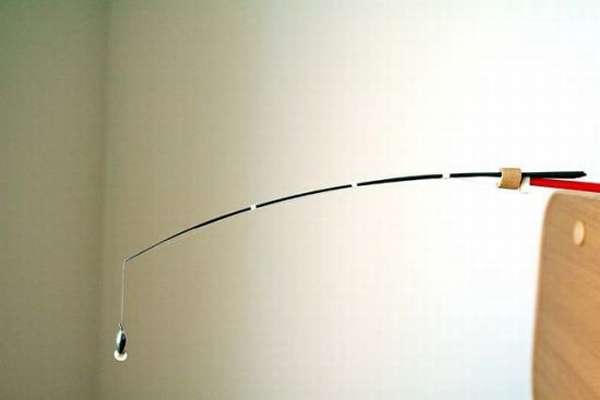
There are either copies all around, or cheap Chinese ones, or expensive ones from different artisans. At best, these are semi-finished products that are only suitable for rework. At worst - for disassembly for spare parts. The best of the side nods, which can be bought at the new Ptichka in Moscow, is shown in the photo at the top of the page. Many people started with such a nod.
Its working part is soldered from five stainless wires of different diameters: 0.7; 0.5; 0.3; 0.2; 0.15 mm and, accordingly, has five throughput rings. At the end is a signaling device in the form of a bright pink synthetic brush. At the base there is a spring that prevents the wires from deforming when strongly bent.
The load capacity of the version I have is 0.6 g, the length of the working part is 300 mm. It has only two advantages: you can still fish with it without modification, and it has low wind resistance. There are more shortcomings - three. The working part, assembled from round wires, has disgusting resistance to twisting. All you have to do is put a slightly heavier jig and bend the working part of the nod a little upward to balance the increased load (a common technique often used in fishing), and the alarm will roll to one side.
Second: the fishing line constantly gets wrapped around the numerous rings of the nod and gets tangled in knots on them. Therefore, fishing with such a side nod with a running rig is torture. But with braided wire it’s simply impossible. Lastly, this wire side nod is priced through the roof. In terms of labor costs, it probably corresponds to its price; it is really quite difficult and takes a long time to solder. In terms of consumer qualities - absolutely not! Only beginners buy it. Those who don't know how wonderfully a long, narrow, tapered, steel side nod works.
The working plate is the basis of the side nod. Material. A loving, happy, killer side nod is very hard to buy, but it can be done. First you need to select a suitable material for making the working plate of the future nod. Good side nods are obtained if you use strips of beryllium bronze or hard stainless steel to make them. But these materials have become difficult recently; they can only be purchased by chance.
Spring carbon steel works even better, it is more resilient and can be found easily. Spring carbon steel ribbons are found in the winding mechanisms of toys and alarm clocks, in old roulettes, and are sometimes sold at junkyards. The suitability of the material for the manufacture of the working plate of the nod is checked by its residual deformation, dragging the nod blank between the fingers. But uncoated carbon steel will rust, some more, some less. No problem!
Then we will cover the nod plate from a spray can with black flexible paint (for example, bumper paint). There will be both protection against corrosion and masking from glare, which is useful when fishing in clear water in shallow water. Shore fishing with a summer jig almost always takes place in calm water, at a depth of up to two meters, so we do not need a wide variety of nods in terms of carrying capacity.
In most cases, fishing takes place with one universal conical side nod: load capacity 0.45 g, length 350 mm, width at the base 3–4 mm, width at the indicator 0.6 mm. This shape of the side nod - a narrow cone - is dictated by the requirements for minimum weight and wind resistance, especially in the upper part. To make such a side nod, you will need a carbon steel strip approximately 0.2 mm thick.
I say “approximately” because steel of different grades and hardening has different elasticity. It would be nice if you had a couple more side nods in your arsenal: one with a load capacity of 0.3 g, 320 mm long, for catching small things in the calm; the other - with a carrying capacity of 0.65 g, a length of 380 mm, for catching large fish in windy weather or in small currents.
This applies to long fishing rods (8–9 m). When fishing with shorter, 6–7 meter rods, shorter nods, say, with a length of 250 mm or more, work well.

In strong winds on the windward bank and in the river during the current, the fish behaves much more boldly, and the transition to coarser side nods and heavy jigs is quite justified.
To feel completely comfortable in any fishing conditions, you will need a couple more nods: one with a load capacity of 0.65 g and a length of 380 mm, equipped with a special ceramic ring and fastening for fishing with a running rig with braided line; the second - with a carrying capacity of 0.65 g or more, short, 180–200 mm, for fishing in stormy winds and strong currents. Manufacturing. So, the material has been found.
Let's move on to making the working plate for the future side nod. The work plate blank must be cut off from the tape with a margin so that it is convenient to hold during processing. If the ribbon blank is wider than 8 mm and you want to save material, you can unravel it lengthwise with a cutting wheel inserted into an engraving machine. But I don't recommend doing this. This is a very labor-intensive and dangerous operation.
Once, while performing this operation, the cut part of the plate tore out of my fingers and stuck its sharp end into the wooden wall of the garden house. In addition, you can completely ruin the workpiece. Therefore, we will slowly grind the workpiece on sandpaper to the desired shape, evenly driving it across the width from the tip to the base. Naturally, you will need safety glasses and gloves - holding the workpiece with bare hands is hot.
The main thing is not to rush, grind the workpiece slowly, evenly, alternately on both sides, constantly monitoring its straightness. The fact is that in hardened steel there are strong internal stresses, and during the turning process the plate is moved either to the right or to the left. Having found a bulge, we grind it carefully on this side. Sometimes one pass is enough, and the nod will straighten.
And of course, under no circumstances should we allow local overheating of the workpiece and the appearance of so-called “discolorations.” If overheated due to oversight, a carbon steel workpiece irreversibly loses its properties and will have to be thrown away. Turning one working plate of a long side nod takes me 15–25 minutes, the time depends on the width and thickness of the original workpiece.
As a result of turning, you should get a single-cone plate with a width of 3–4 mm at the base and 0.6 mm at the apex, with two beads. Next, we cut off or grind off the bead at the top, pressing it with a finger to the surface of the sharpening stone on both sides alternately. We leave the influx at the base; it will be useful for further processing.
Note! The signaling device must be clearly visible, have minimal weight and windage, and also prevent the fishing line from getting caught on itself.
Everything, the main, most labor-intensive work is done. I usually store about a dozen plates in the form of such blanks. I can always choose from them the one that is suitable in terms of load-carrying capacity to make the nod I need. By the way, I also make winter nods for devil fishing from the same blanks.
If desired and with some skill, you can remove the metal in thickness. But it is much easier to match baits to a ready-made nod than to match a nod to baits. I abandoned the double cone nods. With them, bites are less visible, and when reeling in the fishing line, the tip of the nod easily breaks. We give the final shape to the plate by trimming its edges with a scraper and grinding them with sandpaper of different numbers.
Steel is planed poorly, the scraper quickly becomes dull, so you must try to get as close as possible to the final shape of the plate during the grinding process. An important point: it is better to sand the working plate of the future nod with sandpaper on a piece of dense rubber. Then there will be less chance that the plate will slip and bend.
Alarm
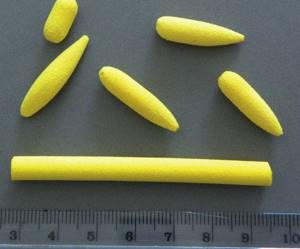
I make three types of alarms. To make the first type, you will need light yellow foam sticks 70 mm long and 6 mm in diameter. They are used in carp fishing to imitate floating corn and to raise the bait above the bottom. You can buy them at any fishing store.
We take a stick, sharpen one end of it to a cone with a sharp knife and round off the edges and irregularities with sandpaper. Then we cut the alarm blank to a length of 20–25 mm, round the cut and also process it with sandpaper. The result should be a signaling device of an elegant, elongated, smooth shape, weighing only 0.1 g. This does not have a large windage and does not create obstacles to the release of the fishing line if it gets caught behind the side nod.
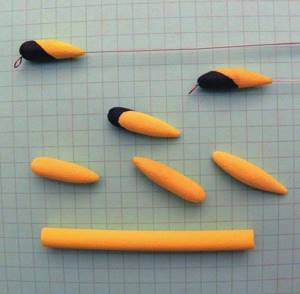
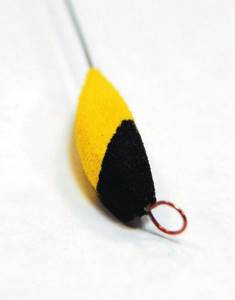
There is simply nothing for the fishing line to grab onto. The finished signaling device just needs to be painted. To do this, we prick it on a needle, half-immerse it in black nitro paint and dry it. Black color is visible better than others against the light, against the backdrop of glare of waves or a clear sky. There are conditions when only black color is visible. Yellow is an auxiliary color; it is clearly visible on the shore, against the background of grass, against the background of water on which a shadow falls.
After the signaling device has dried, we pierce it from both sides to the middle with a sharp awl and put it on the sharp end of the side nod plate, leaving a little space for soldering the ring. We solder the ring with active solder and wash off the remaining solder. Lubricate the soldering area with “Supermoment” gel glue and move the alarm onto it.
That's it, the alarm is installed. To make the second type of alarm, specifically designed for fishing with braid, you will need a tiny ultra-light plastic tulip with a Fuji SiC ceramic insert. It weighs only 0.07 g and is specially shaped to prevent line tangling.
A familiar supplier of components for assembling spinning rods sent them to me. He ordered his components from Japan, and at the same time ordered tulips. They cost me about 130 rubles apiece. Inexpensive, considering that the wire nod I described earlier costs more than 600 rubles!

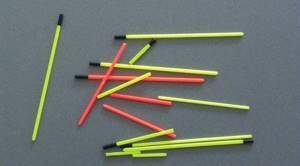
It must be said that now many fishermen are constantly ordering something at foreign “posyltorg”, so ordering and buying any necessary components for assembling fishing rods (at least from the Fuji catalog) is not a problem. You will also need replacement Colmic fluorescent float antennas with a diameter of 1.5 mm. They are sold in fishing stores everywhere.
We cut off half of the antenna and put it on the sharp end of the side nod working plate, leaving a little more space than is required to install the tulip. We wind a thin thread over the place where the tulip is installed, lubricate the winding with “Supermoment” gel glue and put on the tulip.
We cut off the tails of the thread, move the antenna close to the tulip and remove the remaining glue. Ready. The tulip can also be additionally spray painted black.
Some nodding heads make a signaling device from a piece of a rubber inflatable ball. It is light and “burns” even in cloudy weather.
I make the third type of alarm when there are good ready-made conical working plates (for example, bronze ones from winter nods), but they are too short for a side nod. The tip of the working plate is adjusted with a scraper to the required diameter, and the Colmic antenna is placed on it, to a depth of 5–7 mm, using Supermoment gel glue.

A ring is glued into the second end of the antenna for passing the fishing line, soldered from thin elastic wire, for example nichrome, with a diameter of 0.2 mm. For better visibility, I sometimes tie a synthetic tassel on it before gluing the antenna. If possible, good, bright synthetic yarn can be purchased at fly fishing stores.
It’s even better to ask your familiar fly fishermen to tie a few tassels - they will do it much more beautifully. You can generally make the entire first third of the side nod from an elastic wire with a diameter of 0.2 mm, soldering it to the working plate. You will get a side nod with properties no worse than those of a side nod made from a solid plate.
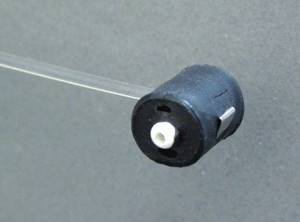
Attaching the side nod to the tip of the fishing rod. It's very simple. The principles remain the same: reliability, minimal weight and that the fishing line has nothing to catch on. We take a rubber coupling from a cheap store-bought winter nod. The main thing is to choose a rubber coupling with such a hole diameter that it fits very tightly on the tip of the fishing rod.
Otherwise, the side nod will turn, and after catching each fish it will have to be corrected. A plastic tube for passing fishing line - from a can of compressed air. We insert it so that it protrudes a millimeter from both sides of the rubber coupling, and melt both ends of it on the flame of a lighter so that it does not fall out when the fishing line moves. Instead of a plastic tube, any solid tube of sufficient diameter will do.
Next, we make cuts in the rubber coupling on both sides with a sharp blade in such a way that, when inserted into the rubber coupling, the working plate of the side nod moves away from the axis of the coupling at an angle of 100–105 ◦. This will reduce the number of line tangles over the side nod and the tip of the fishing rod by an order of magnitude.
Now you need to decide on the length of the side nod and trim off the excess from its base. Having cut the working plate of the nod to size, we round the cut with a file and sandpaper.
The longer the side nod, the better it is in terms of suppressing random erratic vibrations. But as its length increases, it resists wind gusts less well and its own resonant oscillations become more pronounced. Therefore, it is better to determine the final length based on the results of several fishing trips. First, make the nod a little longer, and then, cutting little by little, find the optimal length.
Next, we insert the side nod working plate into the rubber coupling a little deeper than necessary. Using round nose pliers we bend the protruding part and press it tightly against the body of the rubber coupling, so as not to leave the slightest gap for the fishing line. This will also help avoid tedious detangling.
If, instead of a plastic tube for passing the fishing line, you tightly insert into the rubber coupling a metal tube made from the refill of a ballpoint pen, into which the leg of a small ceramic passing ring is pre-soldered, you will get a nod for running equipment.
It can be used with a purchased lapdog if you want to try side nod fishing with running equipment, but you don’t want to waste effort, time and money on assembling a serious fishing rod. We pass soft wire through the frame of the lap dog tulip (but not into the ceramic insert!) and fix it in a small vice. We heat the tulip tube in the flame of a lighter, and as soon as the hot glue melts, pull off the tulip.
Instead, we put on a made side nod with a ceramic ring - and you can go fishing with a running rig. If necessary, you can always glue the removed tulip back in place. Designing gear is a painstaking task and requires perseverance; often you have to redo a lot, but I enjoy this activity no less than fishing itself.
And it doesn’t matter if it doesn’t turn out exactly what you wanted. Even if the homemade gear turned out to be unsightly, the soul of the fisherman was invested in their production. Therefore, homemade gear always catches much better than purchased gear and gives the fisherman much more pleasure from fishing.
Gear device
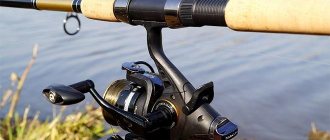
The nod for a summer fishing rod is mounted on one of the types of tackle described above. Bolognese types of fishing rods are equipped with inertial reels with low mass and without any type of additional functions. It is enough to have only a stopper in the mechanism; otherwise, the reel serves only to store a supply of fishing line. The fly tackle is equipped with a miniature foam reel, which is attached to the last knee of the blank with an elastic band. As in bologna, the reel plays the role of storage. The rest of the equipment does not depend on the type of gear and consists of a monofilament line with diameters from 0.15 to 0.2 mm, the nodding accessory itself, complete with its attachment to the quivertip of the rod and the bait. In installations, a combined artificial bait is used in the form of various types of jigs with different loads.
Important! The bait is tied directly to the fishing line, without swivels or fasteners.
Particular attention should be paid to the use of equipment associated with the difference between rods.
Important! It is more convenient to fish with fishing rods and reels from a boat, and it is more comfortable to work with fly gear from the banks and into wades.
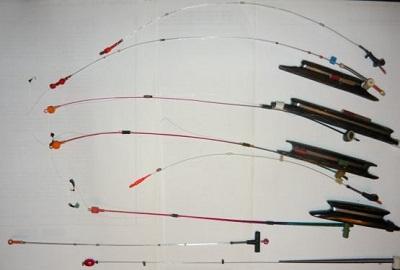
Making a nod
A side nod can be purchased at any specialized store or made by yourself.
Option 1
In this variation, you will need to prepare spring material. The most affordable in this case will be a plastic clamp, the length and thickness of which will allow you to easily adjust the sensitivity of the nod.
Before production you should prepare:
- copper wire – cross-section 1 mm;
- electrical tape;
- plastic clamp;
- rings;
- Super glue;
- heat shrink.
Step by step process:
- We construct a tulip with a small middle ring from wire .
- The rings are fixed to the clamp (to the smooth side without a notch) using several turns of insulating tape.
- If the given conditions are observed, the summer jig will spring well. If desired, you can use a couple of drops of superglue for better fixation.
- Next, the heat shrink is put on.
- Using copper wire, we construct a corner that will serve as an attachment to the tip of the tackle.
- The smaller side of the angle is fixed to the clamp in a similar way to fastening the ring.
- If desired, you can decorate the product. Insulating tapes of various tones, heat shrinks in bright colors, and varnishes for nail plates are suitable for this.
- Using insulating tape or a price tag, we make a flag on the top of the nod. This accessory will provide an opportunity to monitor bites without stress when fishing in the reeds.
Option 2
No less popular is the method of making a nod based on a plastic bottle.
When manufacturing a product, you cannot do without the following materials:
- plastic bottle 1.5 l;
- sharp scissors;
- flat file;
- paper clips;
- threads
Step by step process:
- Having prepared the body of the bottle using scissors, you should cut out the body of the summer jig, focusing on the recommended dimensional characteristics: length - 25 cm; width (base) – 0.7 cm; width (top part) – 0.4 cm.
- We process each cut line with a file. Be sure to remove all burrs and smooth out ribbing.
- Having straightened the paperclip, we form a ring with a diameter of 0.4 cm with two outlet legs.
- The legs are pressed against the body of the summer jig (at the top). We fix them by tightly wrapping the thread.
- The wrapping area is treated with waterproof glue.
Experienced fishermen recommend making 2-33 nods with varying lengths and base widths. This will be the key to success in fishing. Hard nods are usually used in conjunction with a heavy jig, and the soft version of the product is equipped with a light nozzle.
Option 3
If desired, you can make a side type of summer jig using broken tackle. In this case, the product will be universal, meeting all requirements.
Step by step guide:
- We cut out the body of the nod according to the recommended dimensions (listed above) from the broken knee of the tackle.
- All extreme lines are processed with a file, giving the maximum degree of smoothness and roundness.
- You can make a nod ring from a paper clip or use one that is on a broken tackle.
- The ring is fixed with a thread at the top of the nod.
- Be sure to cover the thread with an adhesive base (waterproof).
- We paint the body of the accessory in black and white.
How to secure a side nod
To install the signal accessory, a special mounting device is required, which is mounted on the last leg of the form used in the hunting process. The fastening device that allows you to fish with a nod in the summer is made from a piece of dense rubber. Three holes are made in the rubber blank to allow further installation of the equipment. One of the holes is used to thread the device onto the quivertip of the fishing rod, on which the fastener should fit fairly tightly without backlash or lateral displacement. A slot is made perpendicular to the first hole into which the alarm itself will be inserted directly. As a rule, a slot is cut on top of the hole for mounting on a quivertype.
Important! The mounting socket for the signaling device should allow the extension of the accessory to be adjusted by transverse tightening, but without backlash and with a solid tightness in its density.
The third hole is made parallel to the first in the lower part of the fastening blank, but with a much smaller diameter. A rigid polyethylene casing is inserted into this hole; an acceptable option is to protect the insulation of the electrical wire, which runs right through the entire fastener. This hole serves to pass the fishing line stretched from the reel or reel along the quivertip to the nod itself for a summer fishing rod.
When and where is the best time to fish with nod tackle?
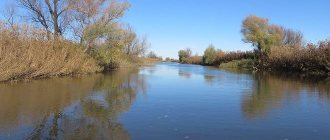
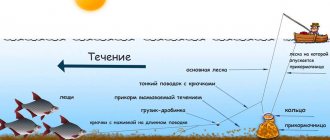
Fishing with a nod in summer is carried out in intensively overgrown reservoirs in free windows and gaps at depths of up to three meters. Fishing is carried out from the shore, in wades and from boats. The flow of the reservoir does not have any special significance on hunting. Loads from water jets are compensated by the amount of bait supplied to the production area. Fishing in the fall with a fishing rod with a nod, as in the spring, when the reservoirs are still loosely overgrown with underwater algae, is carried out in coastal areas near the walls of reeds or cattails.
Hunting attempts are successful on steep banks with the presence of underwater holes, from where the play of jigs lures out the fish hiding there. Fishing with a nod in the summer begins at the first dawn and can be successfully carried out throughout the daylight hours until deep sunset, especially if you fish shaded shores. In early spring and autumn, fish begin to actively take jigs closer to noon, which is especially noticeable on sunny days with more intense heating of the waters and the brightness of the natural light flux.
What is it and what is it for?
This piece of equipment is an interesting replacement for a float. Allows you to lure fish even without bait. Attaches to the top of the rod.
Another name for a side nod is a summer jig or a bite alarm. In terms of activity, the fishing process is second only to spinning. In the summer season, it is recommended to use the nod on ponds and lakes with high vegetation, where it is not possible to freely cast to the desired point.
The tackle is thrown with a nod into the open window between the algae.
From the purchased options, it is worth choosing products made of hard material so that the equipment does not react to gusts of wind and does not give signals of false bites.
A side nod for summer fishing should be used in reservoirs with weak currents or in standing water.
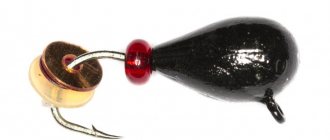
As a nozzle-free jig you must use:
- ant,
- goat,
- drop,
- damn.
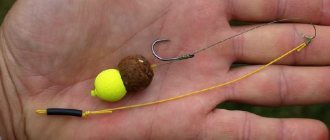
Experienced fishermen note the good performance of the combined version: a hook with beads (pendants) and a devil.
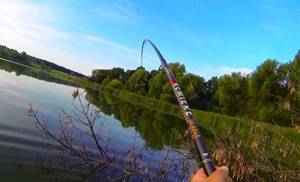
Fishing with a rod with a side nod
Having made a summer side nod and equipped the fishing rod with it, they look for places suitable for hunting, trying to approach promising points from the leeward side for a better view of the operation of the alarm. Based on the forces of the current, they select a load of bait and begin work on catching fish, the tactics of which and the baits used will be discussed in separate parts of the article.
Fishing tactics
The mounted jig is fed into the fishing zone, lowered to the bottom and pausing for a second. After a pause, the bait is moved along the bottom, which causes a cloudy spot to rise, which additionally attracts fish. In the absence of bites, they begin to raise the bait stepwise to the surface of the water, making stops at every 30–50 cm of the level and carrying out play of varying intensity. Each point is fished in two cycles and, if there are no bites, they move to a new place. The bite itself is expressed by a clearly visible bend of the signaling device, after which you need to hook the trophy and lift it with the rod.
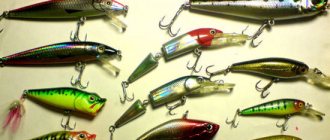
Nozzles
The attachments are heavy jigs of various types and shapes. As a rule, 3–5 gram nozzles are selected for the operating conditions of such equipment. In terms of color, dark shades of natural colors, gray, black, brown, copper, are more effective for open water fishing. Bright and shiny winter jigs alert fish in the summer and there are much fewer bites on them.
Important! When fish activity is low, adding bloodworms significantly activates the bite.
The hooks of a fishing tool must have an elongated shank and a much higher number according to their classification than the winter versions. Fishing points between thicket openings can be carried out using weighted and heavy artificial fly flies. They select options with fluffy but short plumage, performing a leisurely game with heavy stretches, carrying out vertical movements.
Nod for winter fishing rod
Winter nods are made from the same materials as summer ones, but in addition they use:
1. Carbon fiber nods are clearly visible to a fisherman in the water and are used in slightly windy weather, on calm rivers and lakes.
2. Very sensitive nods made from boar wool, used with micro baits. This is not the most reliable material for a nod, it does not withstand strong winds and is not durable in terms of the quality of the material.
3. Combined nods can be metal or plastic; metal is used in the hummock part of the nod. Such nods are used to lure the trophy in one place, and for smooth driving of bream fish.
Nod for spinning
Spinning gear is equipped with this type of alarm for fine and delicate bottom fishing, when catches are expected to include small and cautious fish that require hooking even at the slightest touch of the bait. This can be noticed using only the equipment described above. The type of installation of the accessory is similar to its installation on a fly rod and a Bologna rod. It is most likely impossible to pick up a spinning type of alarm in fishing supply stores, and it is best to make the nod yourself, on your own. Do-it-yourself nods for spinning rods are made more massive and longer than for fishing rods, using more rigid material.