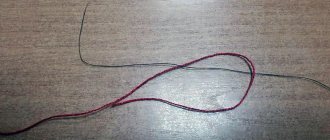
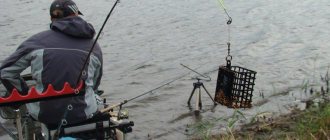
Most people associate fishing knots with needlework or knitting, but in fact their functions are broader. Often lovers of outdoor activities, for example, climbers, guides, and fishermen, have to make different knots. A good result depends on whether the technique is performed correctly. Fishing will only be possible when the leash is tied to the main line. If the fishing line is tied lightly, there is a possibility of losing baits and fishing trophies, because strength is lost by 25% in water. Many fishermen wonder: how to properly tie a leash to the main fishing line? The leash and fishing line are connected using knots. They are made very simply, quickly and provide reliability and a large catch. How to do this correctly and get a good result? It is worth having a fishing line and a leash in front of you. First you need to make loops on all elements of the equipment, twist the ends around their axis. All that remains is to stretch the elements and tighten the twist firmly.
There are several correct knots that should be used in fishing: centaur, bloody, albright, surgical, carrot and loop in loop. Each of the methods is not difficult to work with and helps you fish well. Let's look at techniques and patterns for tying fishing knots.
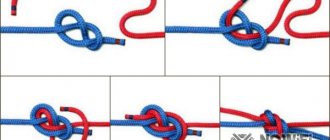
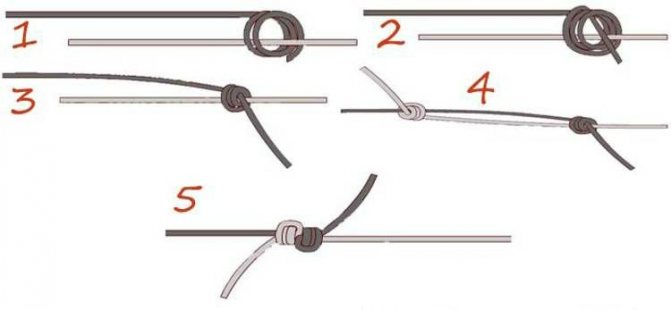
Surgical knot
The fastest and easiest way to tie a leash to a fishing line is called a surgical knot. This is the method doctors use during surgery. It is suitable for connecting two different lines. To make this knot, you need to draw two threads in parallel, form loops in them, then pull the ends into them and make a cross.
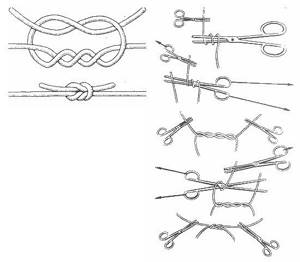
This movement should be repeated several times, and the ends should be tightened into a knot. It can withstand a fish weight of 25-30 kg.
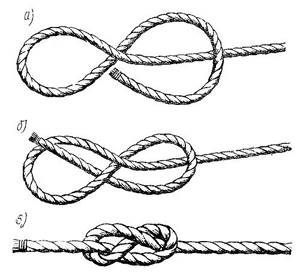
Types of loops
Simple loop
Many fishermen do not accept overly complex connections, making do with the easiest ones. This point of view has a basis - the simpler the knot, the greater the chance that it will be tied correctly . The easiest way to tie a loop on a fishing line, perfect for monofilament and braid, is as follows:
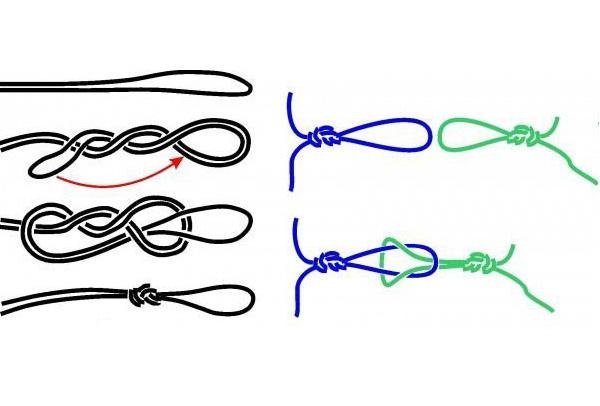
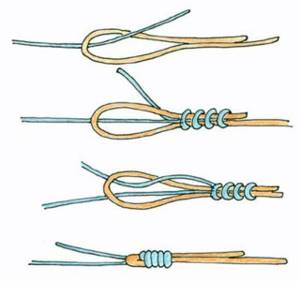
Measure about 10 centimeters from the edge and fold the fishing line in half.- With the end folded in half, tie a regular figure-eight knot, keeping an eye on its size (the resulting loop should not be too large - then the tackle may get tangled, nor too small - in this case it may not always be convenient to use). Optimal size: 20-30 millimeters.
- Moisten the knot that is not fully tightened (water, saliva). Wetting is necessary so that the resulting knot heats up less due to the friction that occurs during the process of tightening it.
- Tighten (this can be done either by hand or by using various auxiliary objects - a knitting needle, a pencil, etc.).
- Carefully cut off the excess part (not close to the knot - otherwise it may come undone, but not too far from it, 1-2 millimeters of indentation will be enough).
This is interesting: Wolves. On both sides of the flags
It is necessary to remember that by correctly and carefully connecting the parts of the equipment, you will often half guarantee successful fishing. And vice versa, inattention in this matter can lead to breaks in the gear, fish disappearances and a spoiled mood in general. If you are not very sure of the quality of the resulting connection, it is better to redo it at home than to regret later about lost time or fish in the pond.
Perfect loop
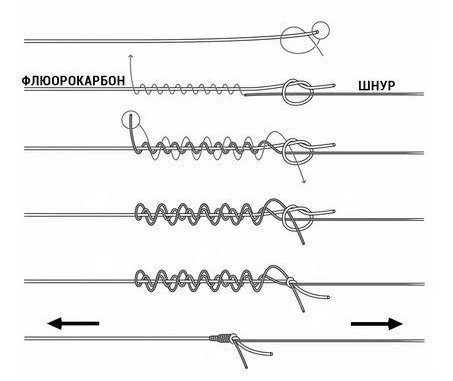
The connection is especially suitable for fluorocarbon leaders , which are characterized by high rigidity and low relative strength. It is not recommended to knit fluorocarbon with simple knots, in particular, “figure eight” knots. Their use can lead to disruption of the integrity of the thread with subsequent breakage of the gear.
- We take the main part of the leash in our left hand, holding its free end in our right.
- With your right hand we make a loop of the required size so that the free end goes down.
- We hold it between the thumb and index fingers of the left hand.
- With your right hand, from the free end of the leash, create another loop, smaller in size, on top of the first, passing the free end of the leash under the main one and moving it to the right.
- We pull the free end between the loops (not through them!) and lay them along the main segment.
- We pull the second through the first and, holding the main part of the leash with the free part adjacent to it in the left hand, smoothly tighten the knot with the right hand, not forgetting to wet it.
- Trim off the leftovers.
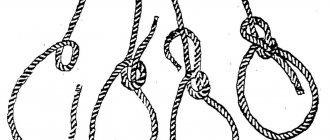
On the main line
It often becomes necessary to tie one or more leashes to the main line. This can be either float or bottom tackle. How can you make a loop on the fishing line in this case:

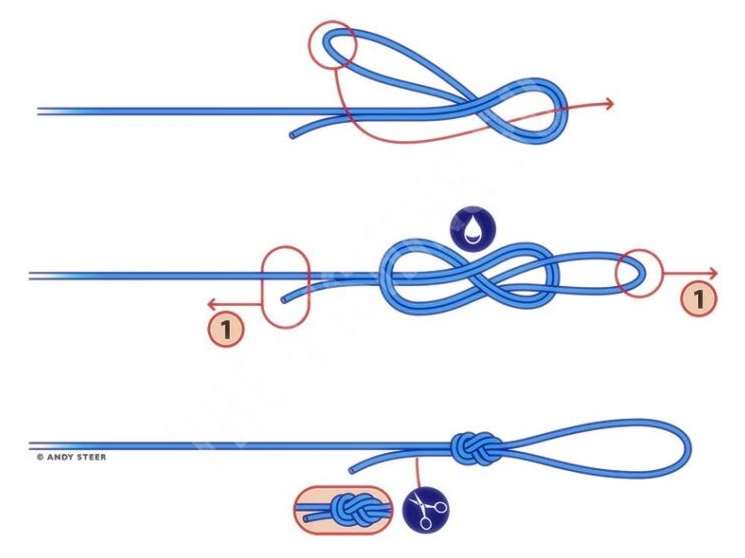
In the desired area, fold the fishing line in half.- Tie it with a regular figure eight, without tightening it completely.
- Measure out the sufficient length of the loop by moving the knot in the desired direction.
- Moisten the area of the resulting knot with water or saliva.
- Finally tighten the knot.
- Trim off the excess part.
This is interesting: How to fold a tent in a figure eight into a round cover: diagram
For beginners, when tying knots, it is recommended to leave a reserve of fishing line for ease of tightening them. In the future, as experience grows, you can save fishing line, leaving the required minimum.
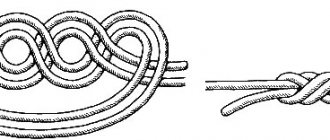
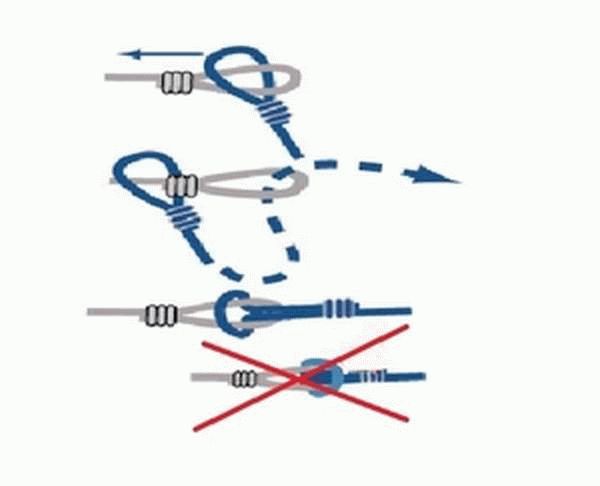
Loop in loop knot
The next technique is called the loop-in-loop knot, because the role here is played by the loops that support the weight of the catch. The method is more reliable than other knot connections and an excellent replacement for a carabiner.
It is enough to tighten both ends of the fishing line with a knot. Next, the loop of the leash is placed on the loop of the fishing line, and its end is pulled out through it. Then you need to stretch the main line and the leash in different directions, and as a result we get a reliable connection.
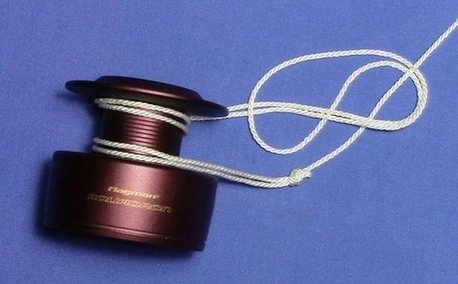
Knots for tying fishing line to reel
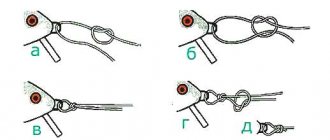
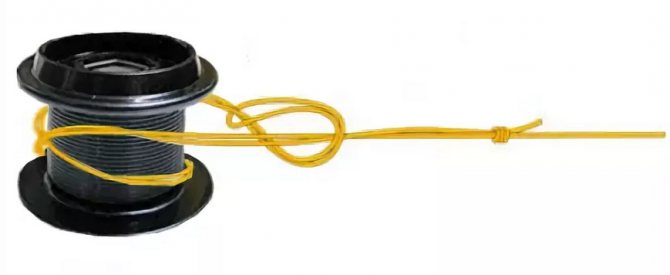
Arbor knot
The Arbor knot is the simplest and most reliable knot for tying fishing line to the reel spool. The knot has an ancient history; in old times it was used to tie the string to the bow. By design, the Arbor knot is self-tightening.
To tie line to the reel spool using an Arbor knot, follow these steps:
- Wrap the line around the reel spool, leaving a small end just enough to easily tie a knot.
- Wrap the free end of the line around the main line and tie a knot in it so that it slides along the main line
- Tie a knot at the free end of the fishing line, which will act as a stop knot and will not allow the first knot to come undone
- We wet the knot, carefully tighten it, cut off the excess end of the fishing line so that it does not interfere with winding the fishing line onto the spool
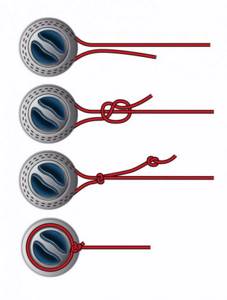
Attaching line to the reel spool using a loop
A simple and reliable way to tie line to a reel is to use a self-tightening loop. With this method of tying the line to the reel, the knot is tightened even tighter under load, does not turn, and can easily be removed from the spool if necessary.
To tie the line to the reel spool using a self-tightening loop, follow these steps:
- We make a small loop at the end of the fishing line, using a figure eight knot for this, tighten the knot tightly so that the knot is motionless
- We thread the main line through the resulting loop to form a large self-tightening loop
- We put a large self-tightening loop on the reel spool
- Rotate the reel handle to wind the line onto the spool
You may be interested in: Daiwa Revros MX reel
If when you turn the reel handle the loop turns on the spool, remove it and put it on the other side.
Tying the fishing line to the reel using a long loop is in many ways similar to the previous method with a self-tightening loop and is an improved version of it.
To tie the fishing line to the reel spool using a loop length, follow these steps:
- Make a loop about 15 cm long at the end of the fishing line using a figure eight knot, the knot should be motionless
- Thread the main line through the resulting long loop to create a large self-tightening loop.
- Place a large self-tightening loop on the reel spool
- Throw another round of loop over the spool and tighten the loop
- Rotate the reel handle to wind the line onto the spool
This method of tying fishing line to the reel spool has the same advantages as the previous option: it is tightened even tighter under load, does not turn, and can be easily removed from the spool if necessary.
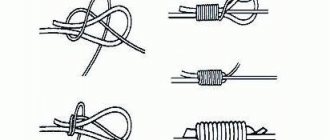
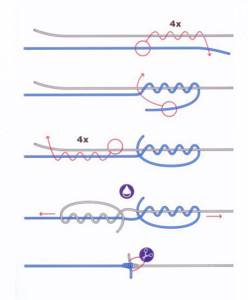
Spool Knot
The Spool Knot is used to tie line to the spool of a reel, somewhat reminiscent of the Clinch Knot.
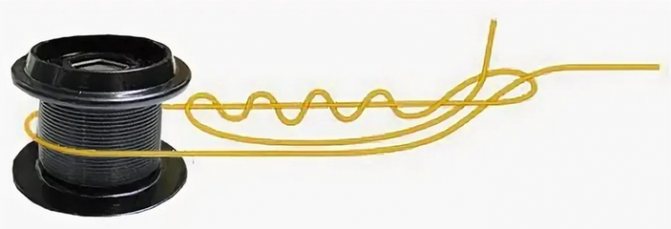
To tie line to the reel spool using the Spool Knot, follow these steps:
- Wrap the end of the line around the spool
- At some distance from the spool, we bend the end of the line around the main line going to the spool
- We make 4-5 turns with the end of the line around the line coming from the spool
- Pass the end of the fishing line through the resulting loop
- Wet the line and tighten the knot
- We cut off the excess end of the fishing line, rotating the reel handle, and wind the fishing line onto the spool
The knot is self-tightening; the greater the load on the line, the stronger it is tightened on the spool.
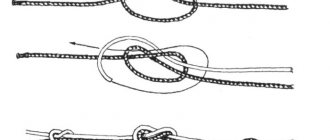
Centaurus node
The centaur knot is universal in use. It allows you to combine monofilament lines of different diameters. First, the two ends are folded together.
One thread is wrapped around the other several times, but not so tightly that the end can be passed through. The same actions are carried out with the other thread. Then the knot is tightened by one action at both ends. This method is the most durable in fishing.
Bloody Knot
The bloody knot is no less popular. The name of the technique is a little scary, although in practice this method is indispensable to others. To learn how to make this knot correctly, you don’t need a lot of effort, the main thing is desire and attentiveness so as not to miss any step. The two ends are aligned crosswise, then one is wrapped around the other several times. Then he returns to his place and passes between two monofilaments. This is the place you need to press with your fingers.
The same winding must be made with the free end of the fishing line. At the end, two knots come out, which are tightened one by one. To check whether the work was done correctly, you should look at the ends; they should be directed in different directions. The strength of the fishing line in water with this method is maintained up to 75%.
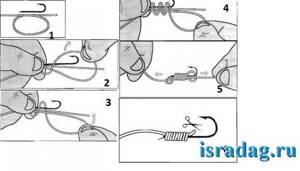
How to tie knots for a hook without an eye (with a spatula)
In this section we will introduce you to simple and complex installations of knots for hooks with a spatula. These hooks are available in small sizes.
It is difficult to make a knot on hooks of this type, since the execution process requires a certain skill and accuracy. The line should lie tightly and evenly on the fore-end, without layers layering on top of each other. It is very important after the process is completed that the fishing line is on the side of the hook and is thus a continuation of its shank. We also recommend applying a little glue to the assembly to maintain the reliability of the structure.
Knot “Universal” Line material used:
- monofil;
- fluorocarbon;
- braided fishing line.
Suitable for crocheting both with and without eye hooks.
The “Ailit” or “eyelet knot” knot V. Nikolaev in his next video will continue to introduce you to the rules of tying knots. We present to your attention a mount called “Ailit”
Trombone Loop Knot Other knot names:
- trombone loop;
- spade end knot;
- sliding bait loop.
This knot fits well from monofilament and braid. Can be used on various types of hooks.
Instructions for implementation:
- We take the fishing line and fold it in half, so that the tails of the fishing line are parallel to the blade of the hook.
- We make a small loop, leaving the tip of the fishing line about 15 cm long.
- We attach a hook to the end of the fishing line, so that its tip is parallel to the shank of the hook, and press it with our fingers.
- Next, we begin to wrap the hook shank several times with the working end of the fishing line.
- We carefully thread the end of the fishing line into the resulting loop, moisten it with saliva or water and cut off all excess.
An example of making a “trombone loop” from V. Nikolaev
Knot “Outer loop winding” or “trombone loop” The only rule when making this type of knot is that the tighter you pull the line, the stronger the knot.
Albright node
When fishing, an Albright knot is often used. In most cases, it is used when fishing with spinning rods. The technique is performed like this: one line is folded into a loop, and the second needs to be pushed into it and twisted 5-10 times.
Next, you should push its end into the small loop that remains. After which the knot is tightened and you can start fishing. This method is very popular among fishermen, because even when tying thin lines, it retains good strength.
Fishing knot carrot
Another technique that helps connect the leader and line is the carrot fishing knot. It is suitable for various materials and allows them to be combined with each other. A correctly made “carrot” looks no thicker than a thread. It is done like this: the two ends are folded together. One fishing line is tied with a light knot at a distance of 20 mm on the other, and with its end you need to tie the first fishing line in a different direction several times. Then you need to thread this end into the one that was made from the very beginning. To tighten the carrot, you need to take both lines and pull them together. This knot can be coated with waterproof glue for smoothness, because the ends that remain may prick.
There are many methods for connecting a leash to a fishing line. The fisherman chooses which technique to use. It depends on the product with which he catches fish, on the thickness of the fishing line and other fishing items. All units are practical to use and help you easily achieve a good catch.
The best knots for connecting the hook and swivels
Before considering the most reliable fishing knots in this category, we note that we do not recommend tying fishing line to hooks, swivels or rings made of thinner material (wire) than the fishing line itself; this will negatively affect the quality and reliability of the knot.
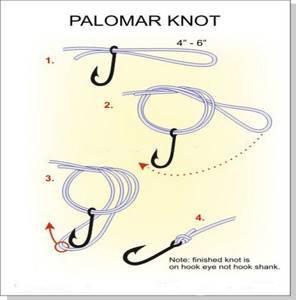
Knot "Palomar" or "palomar" Area of application:
- a bunch of main fishing thread with a swivel;
- for tying fishing line and hook;
- for attaching a weight, swivel, carabiner, etc.;
- for attaching silicone baits to a leash or fishing line.
The disadvantage is that you need to fold the line in half, which increases the volume of the knot and shortens the leash.
Node advantage:
- a bunch of not only monofilament fishing lines, but also braided cord and baits used both in spinning fishing and fishing with feeder gear;
- the ability to attach many equipment elements (swivels, hooks, flies, etc.);
- easy to knit.
Take advantage of our detailed recommendations for choosing braided line for jig fishing - here
Classic Palomar
“Double Palomar” is knitted like this
The “Triple Palomar” knot provides for the installation of fishing accessories and lures with a large eyelet to a braided fishing line. This is how the knot is tied
Palomar drop shot knot
Knot “Clinch” or “improved clinch knot” Let’s consider two types of this knot:
- normal clinch;
- clinch reinforced.
This knot is widely used, but has proven itself especially well in spinning fishing. The first version of the knot is used mainly for mounting sinkers, since it is inferior in strength to the “reinforced” knot, which cannot handle even the most complex hooks.
Scope of application: artificial baits, jig heads, weights, hooks, swivels, sinkers, feeders, carbines.
Where such a node is not used:
- for mounting sinkers with a transverse or longitudinal hole;
- for mounting tubes and factory rings.
Important! The size of the ear of the above accessories should not be more than 1.2 mm, since at diameters above the specified indicator the knot does not hold securely.
Learning to knit an improved knot model
Homer knot or homer knot
The knot tying pattern is shown in detail in this video.
Grinner knot or universal Uni knot This knot is also known as the Uni knot or ukni not. Uni means universal.
What is knitted with a universal knot:
- hooks (for example, offset), fasteners, baits;
- braided line to the spool;
- lines between each other.
For which lines is it applicable:
- monofilament;
- network.
This is how the universal Uni knot, aka Grinner, is knitted
The double universal Uni knot is knitted like this
Figure Eight Knot This fishing knot is designed for attaching both hooks with and without an eye. It is also suitable for making mobile loops, tying feeders, sinkers, and leashes. In a word, it has wide application and can be used anywhere.
It is not complicated in execution and is suitable for beginner fishermen.
This knot can have several weaving options, for example, by folding the fishing line in two you will get a double figure eight.