The fact that a boat anchor is considered an indispensable accessory is recognized not only by every avid lover of boating, hunting or fishing, but even by an amateur who decides to go out on the water for the first time. Persons who have special certificates for the right to drive small boats (they are often called water motorists) have experienced from their own experience the need to equip the vessel with an anchor, since its presence is checked when registering the vehicle.
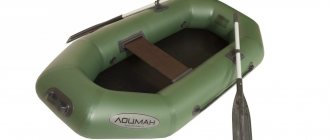
A PVC boat anchor can be bought in a specialized store, however, unfortunately for many, it cannot be chosen according to your preferences. The device must first of all be used for its intended purpose. This means that the anchor serves to hold the craft at rest in the current or during gusts of wind, and the outcome of fishing, hunting, and the degree of safety of the boat owner, as well as passengers, depends on its quality. I don’t want to remind you of the sad statistics, but on the water, even the most harmless mistakes at first glance often lead to tragic consequences.
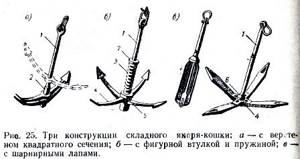
Today you can not only buy an anchor, but also choose the most suitable model. The days are not far off when boat owners were forced to get out of the situation on their own. There are still examples made from caterpillar tracks, weights or lead castings. Indeed, “museum” exhibits can supplement this list: a crankshaft, a barbell, an electric motor, dumbbells. Have you ever heard of a “dead” anchor? These are cargo that are submerged forever, meaning they never rise to the surface. The boat floats to the place where the anchor is sunk, the halyard is connected, and the boat is moored.
Purpose
To determine the beginning of the use of anchors, it is necessary to dive deep into the history of navigation. Even the ancient Greek sailors knew very well that a ship that, for any reason, lost its sail, practically lost control. In this case, one could only hope for the mercy of nature, because the ship became “subordinate” to the wind and waves. There is no need to say what the fate of the ship turned out to be in this case.
Having lowered the anchor, the sailors could calmly wait out the bad weather in relative safety. This is why ancient sailors called the anchor “sacred.” This also explained its incredibly high cost. Even in religious cultures, the anchor was revered. In Greek it sounds like “Soter”, which literally means “Savior”, and old tombstones often had an image of an anchor.
In the modern industry of water transport, it is unlikely that anyone will turn to a metal product, although it is difficult to judge anything here, because the veneration of a cult is a personal matter for everyone. And yet, the anchor did not cease to perform its main function. The only thing that has changed is the selection options. Now the determining factor is not so much the size of the device as its shape.
How to choose
Owners of light inflatable PVC boats are interested in this question. A lot depends on the right choice. Everyone understands that it is impossible to rely only on the weight and dimensions of the anchor, especially in conditions of limited space on the vessel. We can propose two elementary rules that take into account all the necessary parameters.
The maximum weight of the load that the boat can support is chosen as a guide. According to the first rule, the mass of the anchor is determined. It directly depends on the displacement of a particular boat model.
The mass value is approximately 10% percent of the mass of the load. For example, if the boat together with its cargo has a mass of 250 kg, then the mass of the anchor will be at least 2.5 kg.
The first rule is formulated for payol boats.
The selection of anchors for the NDND boat is carried out according to the second rule. Here the length of the boat is of decisive importance.
The mass of the anchor in kilograms is one hundredth of the length expressed in centimeters. For example, for a three-meter NDND vessel you will need a device with a mass of 3 kg.
Now let's add a fly in the ointment. The fact is that the calculations given are very conditional. Indeed, the mass of the anchor is only one, but not the only factor. The holding force depends on the type of bottom soil and the shape of the anchor. In sandy soil, the stopping device gets stuck better, so they use a simple ratio: 1 kg of load per meter of boat. It should be clarified that this relationship is valid specifically for an anchor that has a classical shape.
Using another load (stone, iron bar, piece of rail), you will have to increase the mass by as much as 5 times. The rocky bottom will not allow the anchor to strengthen, no matter how much mass it has.

To summarize, we can define a list of questions that every buyer must answer.
- What type of bottom is in the reservoir?
- Is there a current?
- Is there a tendency for air masses to constantly flow (is the wind blowing)?
The data already indicated is enough that it is impossible to select a universal device even for a specific boat. Considering some factors, you will have to neglect others.
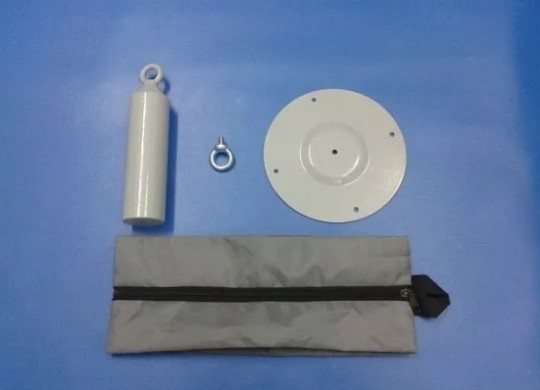
DIY boat anchor
Hello, dear readers and DIYers! Of course, among the visitors to this site there are fishing enthusiasts who own boats. In this article, the author of the YouTube channel “Samodelki Vitmana” will tell you how he made a very simple but quite effective anchor for inflatable boats.
This homemade product is quite simple to make, but will require welding.
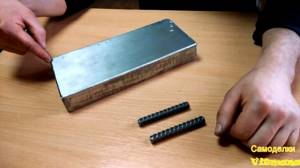
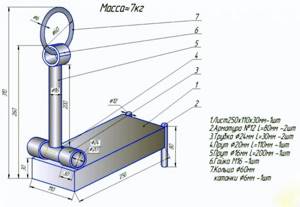
Materials. — Steel plate 30 mm thick — Fittings — Steel rods with diameters of 20 and 16 mm — Steel tubes, wire — M16 nut — Aerosol paint or primer.
Tools used by the author. — Welding machine — Grinder — Cleaning and cutting discs. Manufacturing process. So, this homemade product will consist of two main parts, the first is the load itself, the details for it are very simple. This is a steel plate with a thickness of 30 mm and dimensions of 250X110 mm. These dimensions are not particularly important, and even connecting dies for rails will do. It will also require two pieces of reinforcement about 100 mm long.
The second part is the shank, or movable fastening system.
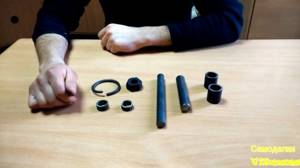
The anchor fastening system will have a swivel connection with the sinker, and will be attached to it using two bushings made from pipe scraps.
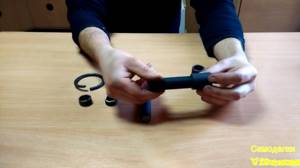
After welding and cleaning work, the result is this design with a ring threaded through the nut. The ring is needed so that the rope or cable tied to it does not fray.
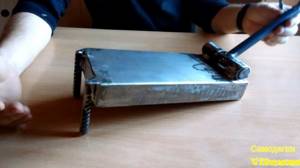
You can weld two pieces of reinforcement to the second edge of the load like this. They will improve the grip of the anchor on the ground.
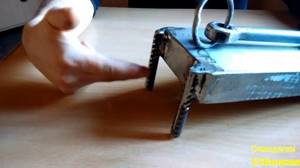
The resulting anchor structure should be thoroughly cleaned and covered with a layer of primer and paint. The total weight of the product made by the author was about 7 kg. And thanks to the folding mounting system, it is very convenient to transport. Also, the inclined rod will provide the desired inclination of the rope without displacement of the base itself relative to the bottom of the reservoir.
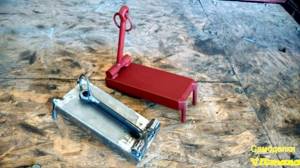
In addition, the master kindly provided drawings of this anchor.
I thank the author for a simple but useful device for fishing from a boat! Good mood, good luck, and interesting ideas to everyone!
The author's video can be found here.
Source
Become the author of the site, publish your own articles, descriptions of homemade products and pay for the text. Read more here.
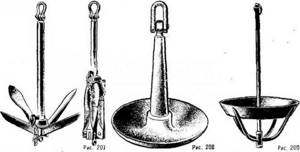
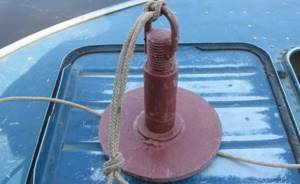
Features of a mushroom anchor
No matter how paradoxical it may sound, there are not many types of anchors for light boats. One of them is the mushroom anchor. It got its name for its specific shape, reminiscent of a mushroom. This invention, despite its simple form, has many advantages. The absence of pointed elements minimizes the likelihood of damage to the boat material when etching the anchor. Additional resistance is provided by the soil entering the cavity of the “mushroom cap”. The holes made in the cap facilitate the penetration of soil through them, which provides additional “suction” of the anchor.
The holding power of these structures is so great that they are preferred to be used in places with large currents and strong winds. Naturally, the highest performance occurs on a muddy or sandy bottom. This is where a high degree of viscosity is achieved. The rounded shape of the cap, even if it consists of separate sectors, still does not contain sharp or right angles. Such an anchor will not catch on snags or other unwanted obstacles. After lifting, the device is easily cleared of sludge and washed. Models coated with polyethylene are especially valued. This protective layer prevents the development of corrosion.
Making a collapsible anchor
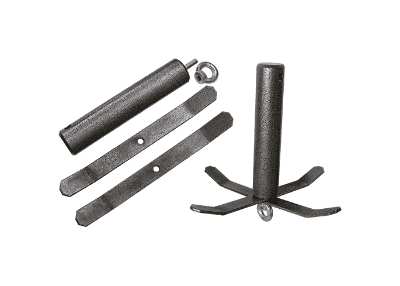
A simple version of a collapsible anchor is easy to move and compact. But you should not use it where there are a lot of snags.
Materials and tools you will need:
- A couple of kilograms of lead.
- A couple of 10mm screws.
- 2 ring nuts.
- Metal washer.
- Climbing clasp.
- Metal pipe (length about 30 cm).
- 4 pieces of sheet material (thickness 5 mm, length about 250 mm, width 50 mm).
Step-by-step instruction:
- Screw one screw into the pipe hole.
- Fill the pipe on the other side with prepared lead (visually divide it into three parts, fill only two).
- Wait until it hardens.
- Screw another screw into the hole where you poured it.
- Saw off the heads of two screws.
- Process the cut areas with a file.
- Bend the ends of the metal pieces at a 30-degree angle upward.
- Drill a hole in the middle of each piece.
- Screw a ring nut onto one screw. This is the anchor top.
- Place metal pieces on the second screw (so that the edges are bent upward).
- Fix the segments so that right angles are formed (a ring nut and washer are used for this).
- Attach a climbing fastener to the top nut eyelet.
The clasp and eyelet come in handy if the anchor gets caught on something.
In order not to lose the weight you have made, tie it correctly: first put it through the clasp, then securely fix it on the bottom nut. If the anchor gets caught on something, just pull the rope: the clasp unfastens, the structure turns over and is easily released.
Making a "cat"
The weighting material is also convenient, takes up little space, and is mainly used in areas with clean soil.
For a DIY design you need:
- Metal pipe, length about 30 cm, diameter - 3 cm.
- 4 twigs (you can also take reinforcement), diameter about 1 cm.
- Cable.
You will also need a grinder and welding.
The cat anchor you create will be useful if you follow these simple instructions:
- First we take care of the presence of the eye. It’s good if it is available on both sides, that is, for two anchors.
- We bend the metal rods, forming something like a hook (that’s why it’s an anchor called a cat). If necessary, you can sharpen the edges later.
- We weld the rods to the pipe in a circle.
- We weld a ring onto the top of the pipe (you can simply make a hole) to attach the rope.
- We attach a rope to the end of the weighting material and secure it to the watercraft.
Be careful not to pierce the boat with this design.
Making the “Kurbatov design”
This is a wire clamp and one plate, more precisely, a paw. It penetrates into the ground when falling, the angle of inclination is ensured by a fixing bar (that is, it is better to use the Kurbatov anchor in places with a soft bottom). Drawing:
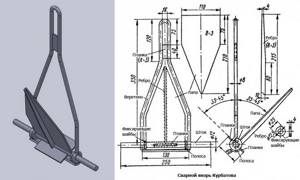
To make such a homemade product you don’t need many elements, but you do need experience with welding. But thanks to welding, the process of creating a structure becomes less time-consuming.
What you will need:
- A rod made of high-quality metal, with a diameter of slightly more than one centimeter.
- Steel wire.
- Washers (metal, of course).
- Steel sheet (thickness - 3 mm).
Process:
- We bend the wire so that it resembles a spindle.
- At the top of the wire “skeleton” we weld a metal strip so that our system cannot bend during use.
- We make loops at the ends of our “spindle”.
- Insert the rod (it is made from a rod)
- By welding we attach washers and fastening strips to the rod, then a “foot”, which must be obtained from sheet metal.
- We connect the frame edges with a strip of sheet metal to strengthen the product and limit the rotation angle.
- Using the same welding method, we attach a metal rib with the same thickness to the paw.
If the weight of such a structure is too small, you can supplement it with a lead weight.
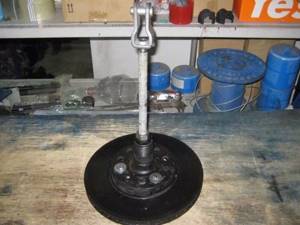
Making a Danforth anchor
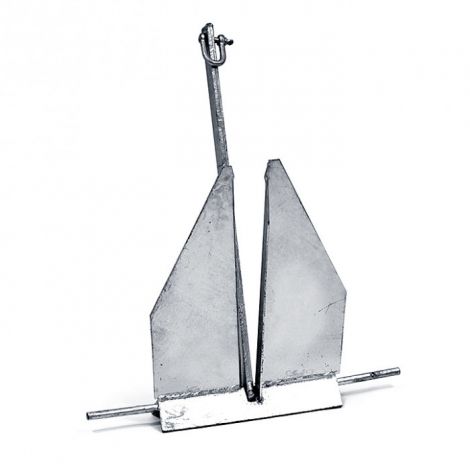
A special feature is the elongated lower cross member, thanks to which the structure does not tip over when it comes into contact with the bottom. The paws are triangle-shaped, flat, next to each other. This design can bury itself very deeply into the bottom of the reservoir.
In the photo there is a drawing:
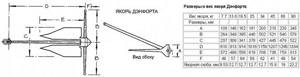
For this homemade product you need:
- 2 washers D8.
- Eye nut with bolt.
- Durable ring made of good metal.
- 5 nuts: two M5 and three M8.
- 3 bolts: one 8 by 60, the other 5 by 35.
- High quality steel tube: length 60 cm, diameter 3 cm.
- Steel sheet: thickness about 4 mm.
Useful video on how to make an anchor for a boat:
Manufacturing process:
- We make a pair of steel blades in the shape of a triangle (the corners should be beveled, as in the photo above).
- We cut the tube into 2 parts - 20 and 40 cm.
- In the shorter section, we make two cuts; the dimensions should be suitable for the paws.
- In the middle we cut out a section a little more than 3 centimeters long, the depth should be a little more than half the tubular diameter.
- We make five holes: one for the ring nut in the middle of the workpiece, four for installing the paws (two on each side).
- We insert the slots into the paws and drill them on the same axis as the holes in the pipe.
- On the other piece, on one side, we make holes for the ring. On the other hand, we make oblique cuts so that the shorter piece of pipe rotates. We also drill holes for the M8 bolt in the remaining lugs.
- We begin to assemble the structure. To do this, screw a ring nut to the short section to secure the rope.
- We make a blank for the rotation axis: we connect the bolt, washer and nut.
- Insert a short one into the longer segment. We pass the rotation axis through the holes and secure it with a nut. Place the washer and tighten the axle well with another nut.
- We install the paws with bolts. To eliminate the gap, we hammer in plugs (made of wood).
- We insert the ring at the top of the long pipe.
You can make such an anchor heavier by pouring lead into the pipe.
We hope you found this article about how to make a boat anchor helpful. But there are other practical ways. Share your methods and useful tips in the comments, and remember that a huge assortment of cool boats for beginners and experienced fishermen awaits you in the ARK store.
Question answer
Question: How to make a good boat anchor?
Name: Azat
Answer: Each design has its own instructions. For example, the basic steps for a collapsible anchor are: screw the screw into the hole in the pipe; fill two parts of the pipe with lead; after hardening, tighten another screw; saw off the heads of the screws. Then comes the work with a file, you also need to bend the ends, drill holes, screw on the ring nut, etc.
Question: What can be used to make a reliable PVC boat anchor?
Name: Nikita
Answer: It all depends on the type of anchor. For the “Cat” you need a metal pipe, 4 rods (rebar is also suitable), and also a cable. Kurbatov's design is made of steel sheet, metal washers, steel wire and metal rod.
Question: How to make a real anchor for a boat?
Name: Radik
Answer: According to the type of construction. For example, for Kurbatov’s design you need to bend the wire like a spindle. Weld a metal strip on top, make a loop at the ends of the “spindle”, insert a rod, attach washers, strips and a “foot”, connect the frame edges and a metal rib.
Question: How and with what can you weight an anchor for a boat?
Name: Albert
Answer: With a metal chain: it can be wrapped around the trend or tied to the spindle as a halyard. For weighting, you can use a lead weight.
Share link:
Homemade option
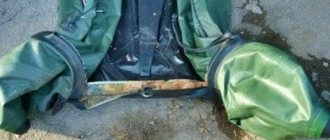
You can make a mushroom anchor for a PVC boat with your own hands. You don't need to draw a drawing for this. Aerobatics is a load cast from lead. Unfortunately, not everyone has the opportunity to make a suitable mold or collect the required amount of lead.
The simplest option, although it causes laughter, turns out to be quite effective. The anchor is made from a frying pan. First, the kitchen utensil is removed from the handle. A hole is drilled in the center. The role of the mushroom stem will be played by a steel rod with a diameter of 2 cm. A thread should be cut at one end of the rod. It will be attached to the pan using a nut. A hole for the halyard is drilled at the second end. After assembly, the anchor is coated with waterproof paint.
Homemade anchors for PVC boats, manufacturing examples
So, the reservoir, weather conditions and features of the upcoming fishing are determined, the nature of the bottom is known. The type of anchor has been determined, the design has been developed (it’s best to get it or make a drawing yourself, you can download it from the Internet), the weight has been calculated and the appropriate rope has been selected. You can start manufacturing. In addition to cutting metal with a grinder and drilling, plasma cutting may be required. The vast majority of technologies also require a welding machine.
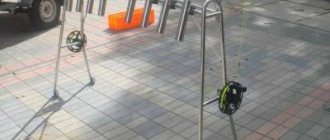
Anchor cat
An excellent option for use with PVC boats 3-4 m long in calm weather. The folding arms are mounted on a coupling sliding along the central rod. Before carrying the anchor, the arms must be secured at the bottom. The working position of the paws is fixed at the top using cotter pins. These cotter pins can be easily cut off if you need to remove a stuck anchor.
If windy weather is expected, the structure needs to be weighted. And, sometimes, in very significant ways!
Materials for production:
- A metal pipe (possibly a rod) with a diameter of 30 mm, length within 20...30 cm and, additionally, a piece of pipe slightly larger in diameter, 2...3 cm long. The short pipe must be placed coaxially on the long pipe and be able to move freely along the axis .
- Mounting rings, 2 pcs.
- Metal sheets 4...6 mm thick, from which the following blanks should be made: strips 10...15 cm x 2 cm, 4 pcs.;
- strips 4...5 cm x 2 cm, 4 pcs., rounded edges.
- strips 3 cm x 2 cm, 8 pcs., rounded at one end.
- paws in the form of a pointed triangle, 4 pcs.
Manufacturing technology:
- 4 of the 8 strips measuring 2x3 cm are drilled (one hole with a diameter of 5...7 mm is made). The same holes are drilled in medium and long strips, and in the middle ones you need to make 2 holes along the edges.
- Strips of 2x3 cm with holes are welded to a long pipe and will serve as brackets for attaching the paws.
- The remaining 4 strips of 2x3 cm are welded to a short pipe .
- Long strips are narrowed on a sharpener, then triangles are welded to them. An incision is made in the middle of the strips, the workpiece is folded and welded. This is how 4 paw horns are made.
- A short pipe is put on a long one, the welded strips on both pipes are connected in pairs with earrings (strips 4...5x2 cm) using rods.
Some useful tips
Finally, here are a few simple truths that can be considered useful advice. They are quite obvious, but in some cases ignorance led to unpleasant consequences. When going on the water, you need to at least approximately know the depth of the reservoir. The length of the anchor halyard should be several times greater than the maximum depth of the river, pond or lake.
For a more secure hold and grip, it is recommended not to tie the rope directly to the anchor. Between them you should insert a section of chain 1-1.5 meters long. The chain lying on the bottom provides additional grip. On large vessels, the chain plays a decisive role in holding.
In case of strong current or wind, two anchors are usually used. The first anchor, the main one, is calculated according to the rules given above. The auxiliary anchor may be slightly lighter than the main one, but its minimum mass should be half the mass of the main one.