At one time, when King Hammurami still lived, he argued that the time spent fishing is not included in the calculation of the total life time. This is also confirmed by many citizens who like to spend part of their free time fishing.
Typically, most anglers own a boat. Many boats, especially modern ones, are equipped with gasoline engines. And a boat without a motor, especially if you have to fish in the waters of a large lake, becomes a burden that requires enormous costs, effort and energy to move. And here you definitely need a motor: gasoline or electric - it doesn’t matter.
Still, special attention should be paid to the electric motor because:
- electric ones do not require either oil or gasoline to operate, which means there are no exhaust gases, which does not harm the environment;
- electric motors are smaller in size, lighter in weight and do not take up much space. This is especially true if you have to fish far away, and every kilogram of excess weight is always felt;
- they are much more economically profitable than their gasoline counterparts;
- modern designs are assembled using modern parts developed using modern technologies, therefore they have maximum power with minimal weight.
But these statements only apply if the boat owner already has an electric motor and has experienced such benefits to the fullest. But what to do if it is not there? This means you need to do it yourself.
Electric motor from a drill

Many enterprising boat owners use a drill or screwdriver that runs on batteries, since the industrial design of the electric motor is based on the same principle. The basic layout of such a unit is almost the same for all models and looks like this:
- the battery is the power source;
- the electric motor acts as a boat engine;
- a propeller with a gearbox is a working tool that allows the boat to move through the water;
- control unit - consists of a knob for turning the direction of movement and changing the speed of rotation of the electric motor.
Almost all elements can be found in an electric drill or screwdriver. In this case, one should take into account the fact that industrial devices are hermetically sealed, which allows the main components to be in the water.
If you use an electric drill, it is advisable that it be located away from water. This is the only problem, quite serious, that requires a technical solution. The slightest splash of water on the control unit can damage it, which will lead to the boat stopping.
Advantages of such a model
If you take an electric drill, you should always remember that its main value is the engine and the speed control unit (button). Choosing a drill or screwdriver has some advantages compared to buying an industrial outboard motor:
- in terms of price, this purchase will be much cheaper than buying a factory model;
- according to the law, it is necessary to adhere to the requirements related to the power of engines used on various bodies of water;
- the electric drill is powered by a battery or other power sources with suitable parameters;
- The electric drill is easy to repair, thanks to the availability of a sufficient number of spare parts on the market.
Power selection
When choosing a drill, you should take into account the fact that it is mainly designed for operation in cyclic mode. If the drill is installed on a boat, then you need to count more on a continuous cycle of work. This means that you need a reserve of power, otherwise the drill will overheat.
In such cases, you should opt for a power of 150 W or more. The power reserve will allow you to work with a propeller with a diameter of 130-150 mm. In addition, you need to take into account that the total weight of the boat will be 300 kg, no more. We can assume that this is the maximum weight.
Selection of operating voltage
You should immediately pay attention to the fact that drills and screwdrivers are available in different operating voltages, such as 12 V, 14.5 V, 16 V, 18 V and 24 volts. Batteries are also produced for the same voltage. And yet, the capacity of standard batteries that operate an electric drill or screwdriver under classic operating conditions is not enough to ensure the necessary movement of the boat on the water. In this regard, it is better to pay attention to a car battery, which has a much larger capacity. And since a car battery produces 12 V under load, a drill should be selected with an operating voltage of 12 V.
Naturally, you can make a battery from a set of manufactured batteries for power tools for any voltage, but this can be much more expensive.
Required tools and materials
For such a device you will need the following parts:
- electric drill for motor;
- clamps for mounting the motor (drill). Both ready-made factory and handicraft ones are suitable;
- the gearbox from the grinder is suitable if the motor is installed on the transom of the boat;
- round tubes with a diameter of 20 mm and profiled tubes 20x20 mm. A rod and a mount for the motor (drill) will be made from them;
- a round rod of metal from which the motor shaft will be made, as well as sheet metal for the propeller.
The following tools may be needed for work:
- metal scissors;
- welding machine, although you can do without it;
- electric drill and set of drills;
- grinder with cutting and grinding wheels;
- if the structure includes wood, then nails or screws (as well as wood).
Lifting mechanism for impeller
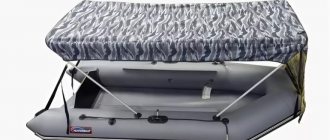
The presence of a lifting mechanism radically simplifies the operation and maintenance of the entire system, especially since there are cases when it is urgently necessary to lift the propeller. As a rule, such a mechanism controls the position of the electric motor in all planes (vertical and horizontal).
As an option, we can propose the following design of such a mechanism: the motor is attached to the transom of the boat using clamps, which are rigidly fixed to the plate. The clamps are equipped with rings through which the tube is threaded, and the motor shaft is threaded through the axle welded in the center of the tube. This results in a very simple articulated joint that can provide normal motor control.
Fastening the gearbox and manufacturing the propeller
As far as we know, the drill is designed for drilling holes and has a high final speed, which is not acceptable for supporting the operation of a propeller, which operates at slower speeds. Therefore, in order to reduce the speed transmitted to the propeller, the installation of a gearbox is required. Sometimes you need 2 of them, depending on design solutions. The upper gearbox should reduce the drill speed from 1500 to 200-300 revolutions, which will ensure normal boat movement.
The lower gearbox is used for horizontal installation of the propeller. When using a gearbox from an angle grinder, it is simply clamped in the drill chuck.
The manufacture of a propeller propeller begins by marking it on a piece of steel sheet. As mentioned above, its diameter should be no more than 130-150 mm. You can take a square of metal, 200x200 mm in size and 2.5-3.0 mm thick. It would be better if it was stainless steel, although it is much more difficult to process. As a last resort, you can use the impeller from an air exhaust fan or car cooling system. At the same time, it should be taken into account that the impeller profile is designed to work with an air mass. In this regard, you will have to start making it yourself.
A hole is drilled in the center of the square for the landing screw. Slots are made along the diagonals so that the sheet remains intact in the center up to 25-30 mm. After this, they begin to form the shape of the blades. Typically, they have a rounded appearance. In this case, you need to ensure that the blades are the same size, otherwise there will be vibrations. After this, the blades are slightly turned to a certain angle. In this case, the direction of rotation of the blade must be taken into account.
Testing the structure before installation on the boat
Since manufacturing takes place at home and, as they say, in order not to break off in the water, tests should be carried out. Any container of water that will fit the propeller will be suitable for this. Naturally, the larger the capacity, the better. As a last resort, if possible, it is recommended to go out into nature, to a river or pond and test it in action without installing it on a boat.
When the engine is running, a directed stream of water should be observed and felt. In addition, no serious vibrations should be felt. If the propeller is not operating at full power, you can modify it by increasing the angle of the blades.
The motor control system is modified depending on the wishes of the boat owner. The main thing is that it is convenient to manage. It is better to move the engine speed control button to a convenient place.
Correct calculations of the load on an electric drill
The following components should be included in the calculations:
- weight of the boat when fully equipped;
- power consumption of the electric motor;
- current and operating voltage.
During the assembly process, you should take an electrical measuring device and make sure that the engine power matches the load power. The engine power must exceed the load power. It is desirable that the engine power overlaps the load power by at least 20%.
If the engine power matches the power consumed by the electric drill: if the power consumption, calculated by the formula P = 12V x Ipot, corresponds to the declared power of the engine (electric drill), then we can say that everything is done correctly and the electric drill can be used as a motor for a boat. At the same time, we should not forget about the 20% power reserve. It will definitely be needed in case of emergency situations.
During the setup process, it is better to experiment with the impeller to select the correct blade configuration. As a rule, their shape significantly affects the economics of engine operation.
Creation of an electric motor
As mentioned earlier, you need to start making an electric motor with your own hands by creating a lifting mechanism for the impeller. It will allow you to lift this element above the water. To create it, you need to weld a metal tube to pre-prepared clamps.
You must first attach a base to this tube (a frame shaped like a pyramid, with its smaller base pointing in the direction of the water). A frame is attached to a large base, and another tube is welded to the lower edge. A bearing is installed on the frame. The shaft must be passed through it and the tube welded at the bottom.
You can use a tube or wire as a shaft. However, the first option is more successful:
- firstly, bearings can be attached to the tube (at both ends), which will reduce the friction force;
- secondly, it is desirable that this shaft be thin but strong. In the case of wire, you will have to use a large diameter product.
After all actions are completed, you can move on to the next stage. The next step is to install the gearbox and propellers.
Gearbox/propeller
It is recommended to attach gearboxes to the sides of the shaft. It is advisable to first create them yourself, focusing on the parameters of the electric motor. However, this process can take a very long time. Therefore, you can buy a device or use gearboxes installed on an angle grinder.
Depending on the specific engine, one or two gearboxes may be needed. When choosing a device, you need to focus on one basic rule - it is desirable that the transmitting number be small. It is optimal if the gearbox is capable of reducing the speed by 5 times. This will ensure the normal running of the boat.
The lower gearbox is necessary for horizontal mounting of the screw. If you use a gearbox from a tool such as an angle grinder, it will be enough to clamp it in a drill chuck. Elements of other devices can also be used as a propeller. If there is none, you can make a homemade screw. To do this you need:
- Cut a square (the length of one side is thirty centimeters).
- Drill a hole in its center.
- Make slits diagonally (the distance between the slits should be at least five centimeters).
- The resulting blades must be given a rounded appearance. It is important that the size of the blades is the same, otherwise third-party vibrations may occur.
The propeller can be secured to the shaft using a bolt and nut. It was for this purpose that a hole was made in the center of the metal sheet.
Latest improvements
Next, you need to connect the gearbox to the motor, that is, to the drill. This is easy to do - just clamp the gearbox in the drill chuck, as mentioned earlier. If the base does not match the size of the drill, you must use an additional tube.
The tube must be placed tightly onto the shaft. To prevent the latter from rotating in it, reliable fixation is needed. This can be achieved by making a through hole in the tube and shaft. Next, both elements must be secured with a pin. This fixation will prevent rotational movements of the shaft.
After the device is ready, the homemade boat electric motor must be checked. It is enough to fill the bathtub with water and start the electric motor in it. If pressure is felt by hand, the engine is operating normally. You can attach it to a boat and test it in a body of water.
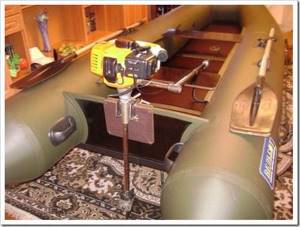
Motor based on a gas mower
Boat owners are constantly experimenting and finding amazing solutions. The high cost of industrial designs forces them to do this. As a result, the idea of installing a lawn mower motor on a boat was born. These are engines with a power of about 6 hp, which are designed for long-term operation under load in various conditions. Such an engine can be adapted to a boat if you use various spare parts intended for repairing Soviet boat engines.
Motor from the Ural-2 chainsaw
Some craftsmen easily adapted motors from Soviet chainsaws as motors for boats. At one time, a huge number of chainsaws were produced, the quality of which needs to be discussed separately. Despite this, some motors installed on boats still serve today. The main thing is to calculate everything correctly.
How to assemble such an engine yourself
Making it yourself will not be difficult. For this you will need the following materials:
- Steel pipes ;
- metal sheet 8 mm thick;
- steel bar with a diameter of 20 mm;
- electric motor;
- propeller pylon.
Electric motor assembly diagram
We punch a landing groove on the top of the flange; it will be needed for mounting the electric motor. We make 4 threaded holes.
They will be needed to secure the engine. Next, we punch a rectangular hole with sides measuring 50 by 100 mm. A handle is placed in it to control the engine in skew mode.
A bracket is welded to the flange on the reverse side. It is used to install the motor control lever. An aluminum pipe is used as a handle, the length of which is 26 centimeters and the diameter is 22 mm.
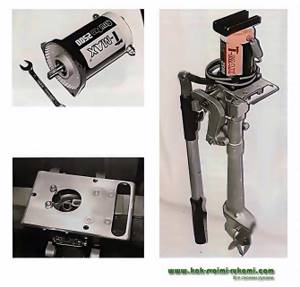
Electric motor for a boat from a trimmer
An original version of a motor for a boat: using a trimmer to mow grass. This device has a long rod with a rotating shaft and a fairly powerful motor.
To use it as a motor, you need to make a small transformation: replace the fishing line device with wide blades.
The device is reliably protected from water getting into the electrical wiring. A trimmer powered by gasoline works especially well in water. This option is suitable for pensioners and people with low income.
Electric motor application
This is a very interesting question. The use of conventional AC motors has been discussed for a long time. Such motors do not have a brush mechanism, so they are very easy to operate and operate.
But there are some factors that have to be taken into account. The first factor is the presence of an alternating voltage of 220 V. Alternatively, it is possible to install an inverter that can convert a direct voltage of 12 V into an alternating voltage of 220 V.
The second component is safety, because 220 V voltage is very dangerous for humans, especially on water. This requires special measures. But if there is water all around, it is difficult to even imagine what exactly these measures should consist of.
POWER AND CONTROL UNIT FOR HOMEMADE BOAT MOTOR
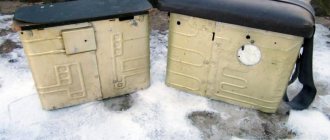
Industrially manufactured boat electric motors are usually produced with built-in controls - current regulators, mode switches, etc. From the manufacturer’s point of view, this is correct - the buyer receives everything in one unit at once, and which battery he connects is his personal business. But in operation it is more convenient if all control and monitoring devices are concentrated in the battery pack, and only a lightweight folding tiller remains on the engine. Thus, the battery pack turns into a power supply and remote control unit (BPU).
As already mentioned, a boat electric motor must be multi-mode, that is, have a maximum power mode and several economical modes with reduced current consumption. It is better if the regulation is carried out steplessly. The simplest way to control a DC motor is with a rheostat. This is used on Snetka (two fixed modes for 10 and 15 A of current consumption), on the cheapest imported boat electric motors and in fan mode switches for car heaters. However, from the point of view of saving precious battery energy, a rheostat is not the best solution, since it spends it on heating the environment.
Electric winch motor T-MAX ATV-PRO 2500. Voltage 12 V. Maximum power 500 W (0.7 hp) with current consumption up to 50 A
Duralumin adapter plate from the electric motor to the Salyut deadwood
The engine from the winch on the “leg” of the PLM “Salyut” - it turned out to be “ElectroSalut”!
In our age of electronics, there are more economical power regulators for DC electric motors based on the principle of pulse-width modulation (PWM regulators). The principle of their operation is that the supply voltage is supplied to the engine in the form of pulses. In this case, the pulse repetition rate remains constant, and their duration varies depending on the given power. The PWM signal is characterized by such a parameter as the duty cycle. This value is the inverse of the duty cycle and is equal to the ratio of the pulse duration to its period: D = (t/T)-100%. With this control method, the motor rotation speed will be proportional to the duty cycle of the PWM signal. There are theoretically no power losses, but in fact the power transistors heat up quite well.
The schematic diagrams of pulse-width regulators are simple; making them is not difficult even for a novice radio amateur. But, not being one, I preferred to purchase a ready-made device made in China. The set of such PWM regulators includes the actual circuit assembled on the board, a remote potentiometer with a control knob, and sometimes a digital indicator of the output power in percentage.
Sad experience has shown that these Chinese products usually do not have a power reserve, so it is better to choose a regulator designed for a current approximately twice the maximum for an electric motor. In my case, this is 50 - 60 A. The price of a 60-amp PWM regulator is approximately 2000 rubles.
All elements, except the battery, are installed on the inside of the battery pack cover. The total mass of the control unit, including the battery, was 21 kg.
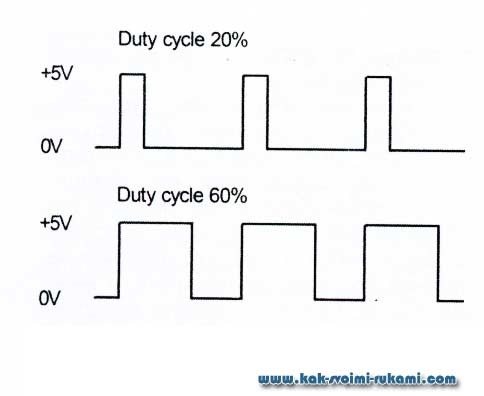
Principle of DC Pulse Width Modulation
How to make a homemade electric boat motor
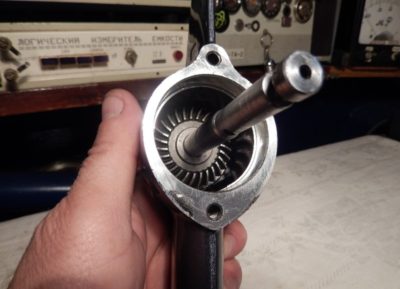
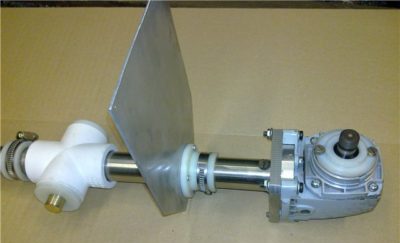
I present to your attention the design that emerged as a result of this decision. It is based on the engine from the VAZ-2121 interior heater stove. Actually, a regular 12-volt car battery is used to power the electric motor. The electric motor was placed inside a “cocoon” created from polyurethane foam, which was given the required streamlined shape by trimming the excess. Then the entire assembly is covered with gauze and EDP epoxy glue in five to six layers. Only the power wires and the motor shaft are routed outside.
I considered it inappropriate to make the unit detachable to allow replacement or repair of the engine, since the service life of the motor is quite long, and its operation is not so intensive. Therefore, I don’t think that replacing the electric motor will ever be necessary (at least it hasn’t been necessary in five years). And if necessary, you can quickly make the entire assembly again.
The screw shaft is sealed as follows: the neck of a plastic Coca-Cola bottle is cut off, a felt seal is glued into it, through which the screw shaft is passed. The neck is glued “tightly” into the motor housing, the felt is soaked in a suitable lubricant (I used car engine oil) and clamped by screwing on the cap from the same bottle, with a hole drilled in the center for the propeller shaft.
The outboard motor's deadwood is made of an aluminum tube with only the power wires running inside. At the upper end of the pipe there is a power switch, a clamp for attaching the motor to the transom of the boat and a control handle (tiller). The power wires are attached to the battery with quick-release alligator clips. The propeller is homemade, four-bladed, made of ABS plastic. Its diameter is 220 mm. The propeller is balanced using the two-blade method (more information about this can be found in the relevant literature). Balancing allows for a fairly large error, since the engine speed, like the mass of the propeller, is not large. Around the propeller, I made a ring nozzle from a strip - to protect it from winding up aquatic vegetation and to allow the boat to be controlled without a rudder.
During testing, the traction force of the electric motor was about 3 kg, which is quite enough to ensure the movement of a small fishing boat. Subsequently, I plan to install a variable resistor into the motor power supply circuit to control the propeller speed and, accordingly, the speed of movement.
www.umeltsi.ru
While walking around fishing forums, I saw and read about homemade electric motors and became interested. I now have a Cayman-330 and a Toha-5 two-stroke, and for trolling I decided to try making an electric boat motor with my own hands. In the "bins" I found two motors, one from the car's heater and ventilation, the other - an old Gnome-1 car compressor.
I decided to make the first electric motor submersible with a propeller on the shaft of the motor itself. The biggest problem with a boat motor is how to seal it in water.
The second, from the compressor, is more powerful and slightly larger than the first. I decided to place it vertically on top and connect it to the screw through the shaft and bevel gear from the angle grinder. With this layout of the outboard electric motor, it became a problem for me to coaxially connect the motor shaft with the gearbox shaft. To connect the shafts, I first took a pin with a diameter of 8mm, but it was both heavy and somehow too flexible. The duralumin fishing rod stand was just right for this: it is lighter in size, lighter in weight, and more rigid—I installed it.
The rotation (speed) controller is stepless, I ordered it from a Chinese store. One for two motors. The regulator is installed on an extension handle (tiller), by rearranging which you can use either one or the other motor. The transom mount is also one for two motors.
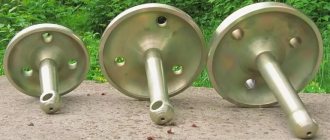
I also made propellers for electric boat motors with my own hands - from the impellers of a heating fan and the bumper of one of our cars... I took hubs from the impeller and made blades from the bumper. Some screws are entirely from the bumper.
I purchased a traction battery... Everything is in the photo!
I have only tested both self-made electric motors so far in the bathtub, and overall, I was pleased. Tests have shown that the propeller either runs out of air at high speeds (which can be corrected - you need to lower the engine lower), or it is a cavitation process (which means you need to do something with the propeller).
The exact answer to the question of which homemade outboard motor and which propeller to choose for it will be given by full-scale tests on the water, on a boat with a navigator.
gdekluet.ru
DIY boat motor
Every angler who has a regular inflatable boat sooner or later thinks about installing a motor on it. Still, moving around a body of water with oars is not so easy, especially against the current. The fisherman spends a lot of physical energy that he could spend on fishing.
Buying a new motor is expensive, and not everyone can afford it, but it turns out there is a way out. A boat motor can be made from cheaper components that are often found lying around in the garage or shed.
In some reservoirs it is prohibited to use gasoline engines, so electric motors are used, but in other cases a gasoline engine will do.
What are homemade boat motors made from?
Some products will be suitable, even faulty ones, but on one condition that their motor is working. Even if you buy a new gas mower or screwdriver, it will turn out to be much cheaper than a new outboard motor; all that remains is to modify the product a little. The financial issue turns out to be the main one in solving this problem, otherwise every boat would already have a motor.
- To make a boat motor with an electric drive, you will have to purchase a screwdriver or a battery-powered electric drill. It is possible that someone has a damaged screwdriver or drill lying around in their barn or garage. It is preferable to use a screwdriver, since its output speed is not so high.
- Naturally, those batteries that are installed on electrical appliances are not powerful enough to move around a body of water for a long time. In this case, a 12 V car battery is suitable. Naturally, devices must be purchased for the same operating voltage. The power of an electrical device of 300 W is enough for the boat to move around a pond with a load.
- The problem of reducing the speed of the electrical appliance must also be solved. In this case, you will need a gearbox. This is especially true when using an electric drill.
- You will also have to make or buy a drive shaft and propeller. The advantage of an electric boat motor is that it operates silently. In addition, repairing such a motor will cost much less than repairing a classic outboard motor.
- Gasoline engines are much more powerful, so they can significantly increase the fishing area. In addition, their power does not decrease, like with electric motors, and the battery has significant weight and takes up useful space. You can use power units from brush cutters, walk-behind tractors, chainsaws, etc. You should choose based on your financial capabilities, the size of the boat, as well as what device is available.
- Trimmers are most suitable for such purposes, since they require minimal modifications. It is enough to replace the device where the fishing line is attached and install the propeller, and the motor is ready and can be used.
- Other power devices require more serious modifications, since they require a gearbox, shaft and propeller. In addition, they need to be connected together.
On a note! Some fishermen use a motorized cultivator by removing the cutters and installing primitive rowing blades in their place.
In addition to making the motor, you should think about how to mount it on the boat. The fact is that not every boat has a transom and not every boat is suitable for installing a motor. It is especially difficult to install such a device on a rubber inflatable boat.
Boat motor from a screwdriver
Screwdrivers are best for making boat motors. You should choose a device with an operating voltage of 12 V so that you can install a car battery with a capacity of 45-55 ampere-hours. The device is being finalized in an elementary way.
Lifting mechanism
The task of the lifting mechanism is to move the motor in various planes, both horizontal and vertical, in order not only to control the craft, but also to be able to lift the engine out of the water.
The simplest design is a system of clamps with which the screwdriver is attached to the lifting mechanism. The lifting mechanism must be rigidly attached to the boat, especially if the boat is rubber.
The clamps must have rings through which the tube passes, and inside the tube there is a shaft made of a steel rod of suitable diameter. To make sliding easy, bearings are installed inside the tube.
Gearbox and propeller
The screwdriver develops high speeds, but this is not necessary for a homemade electric motor for a boat, so a gearbox is needed. A gearbox from an angle grinder is the most suitable option. To attach the gearbox, the upper part of its shaft is simply clamped in the screwdriver chuck.
You will also need a propeller, which is best made of stainless steel, 2.5-3.0 mm thick. Do not use aluminum or plastic.
Procedure:
- First of all, a square blank measuring 30x30 cm is cut out.
- A square measuring 5x5 cm is marked in the center of the workpiece and diagonal lines are drawn through the corners. Along these lines you need to cut the workpiece to a small square.
- The 4 resulting petals are rounded and rotated at an angle of 30 degrees.
- In the center of the product you need to drill a hole for mounting on the gearbox.
- After this, the propeller is installed in its place and securely fastened.
Boat motor from a lawn mower
To get a boat motor from a gas mower, you will have to modify the latter a little, spending very little time on it. Compared to an electric motor, gasoline engines are cheaper and easier to repair; moreover, they are more economical and do not require you to carry a battery with you.
Since there are conversion kits that include a stainless steel propeller and drive, as well as a set of other components, there should be no problems with installing such a motor on a boat.
If you purchase all the necessary parts, then in 20-30 minutes you can easily get a boat motor from a trimmer.
In this case, you get a simple device, but it can be complicated in order to make it more convenient to work with. Unfortunately, this will require not only ingenuity, but also technical conditions. One option is to install a vertical leg.
How to do it:
- You will need a gearbox from an angle grinder to get a right angle.
- The tube from the trimmer will have to be shortened, and bearings will have to be installed instead of bushings.
On a note! The bearings inside the tube are pressed with a regular hammer using blows around the circumference.
- The screw can be made from a strip of duralumin, 10x30 cm in size and 2 cm thick. First you need to make a stencil, which is then applied to the workpiece. Markings are made using the stencil, after which the screw is easily cut out using a sharp chisel. All burrs are removed with a file. Each blade should be bent so that they are 1 cm away from the horizontal line. To do this, you can place the screw on a flat surface and make the desired bend.
On a note! After the screw is manufactured, its shape is finalized during testing.
- A hole is drilled in the center of the screw to secure it to the motor shaft. You can protect the boat's cylinders from emergency situations by protecting the propeller with a ring attachment. After securing the motor to the boat, sea trials can be carried out.
Manufacturing of fastenings and installation on the boat
To install a homemade motor on an inflatable boat, you will have to make a special mount. The following option is possible: a ring is used to which the belt is attached. To connect the product to the transom, it is permissible to use an old unnecessary meat grinder.
To do this, the lower part is cut out in it, and a hole with a diameter of 12 mm is drilled in the transverse plane. To do this, you will also need a pin with a diameter of 12 mm and a length of 100 mm. One side must be flattened and a hole with a diameter of 6 mm drilled.
An M6 bolt is inserted into this hole, after which the scythe eye is attached to this bolt using a nut.
The homemade device is installed on the watercraft in the following order:
- The homemade product is attached to the transom of the boat using a pin and nut.
- After this, the motor is mounted and fixed using the appropriate connection. Then it is checked how the motor turns in one direction and the other.
Fishermen are a category of people who constantly come up with something. Many fishermen simply enjoy the process, while other fishermen just do it because they don't have the extra money to buy a new outboard motor. There is also a category for which it is possible to purchase both a boat and a boat motor at once.
Installing a homemade motor is not an easy procedure that requires certain skills, and not everyone can make such a fairly simple device. Firstly, you need to have a desire, and secondly, there must be conditions for its production.
In addition, you need to remember that everything must be done firmly and reliably, since water does not forgive mistakes. If the cylinders are damaged, the fishing result may be unpredictable. You shouldn’t count on long journeys across bodies of water, since a homemade design is not a completely reliable design.
Despite this, a homemade boat motor can make a fisherman’s life much easier. Loading…
Source: https://FishingDay.org/lodochnyj-motor-svoimi-rukami/
The device of a conventional motor
An integral part of any outboard motor is the tiller. It is used to control the device. The upper block of the model contains a flywheel, which is connected to the crankshaft. As a result, the rotational motion is transferred from it to the screws. In the lower block of the outboard motor there is a small head with bearings. In the middle part there is a deadwood, which includes many elements. If we consider a simple modification, then this is a pan, gearbox, and also a rod. There is a connector located next to the motor in the device. Its main task is to control the operation of the fuel system.
Features of Min Kota motors
Making a Minn Kota electric boat motor yourself is quite difficult. Their electric motors are most often two-stroke. They are designed for a maximum power of about 3 kW. In this case, flywheels are used on both sides. They are made for models only from aluminum alloy. In order to install them, a small camshaft is used. A wide variety of fuel pumps are used for outboard motors. Their deadwoods are most often produced with pallets.
«>
Watersnake models
Assembling Watersnake electric boat motors yourself is very difficult. First of all, this is due to the fact that their carburetors are used with special clamps. It’s difficult to get them in the store, but it’s possible. It should also be taken into account that steel pallets are used in all configurations. In order to secure them to the rotor, you need to use a rod. The pushers are attached to the outboard motor on the deadwood.
At this stage, you should calculate in advance the size of the rocker arm in which the valves are located. Lastly, it is important to deal with the lower head with bearings. Due to the durable propellers, these electric boat motors have good reviews. In this case, they can be removed from the broken model. Clamps are rarely used in devices, but they are ideal for homemade configurations. You can sharpen them at home using a machine. In order to secure the clamp to the pallet, it is necessary to disassemble the starter box. After this, it is important to disconnect it, and then the upper block will not interfere.
«>
HDX models
You can make an HDX electric boat motor using a single-stroke engine. Additionally, assembly will require a crankshaft, which must be installed above the deadwood. In this case, it is best to use a steel pallet. You should also pay attention to the intake and exhaust valves. They are installed in the outboard motor near the fuel system.
A small metal plate can be used as a reverse lock. It can be fixed to the body by welding. Additionally, a central rod must be installed in the deadwood. You can take it from an already broken boat motor. The last thing you should do is the bottom block of the device. Due to the high-quality rotors, these outboard electric motors deserve good reviews.
«>
Devices with double-sided handwheel
Let's move on to a more complex model. Making a boat electric motor equipped with a double-sided flywheel with your own hands (the drawings are shown below) is quite difficult. First you need to select the appropriate engine. In this case, it is more advisable to give preference to two-stroke modifications. Their cooling system is usually air.
To install the flywheel into the device, you will need to use welding. In particular, it is necessary to make a support above the camshaft. After this, the flywheel can be mounted on its wall.
The next step is to assemble the deadwood. For this purpose, it is best to use a large diameter rod, since the load on it will be large. Additionally, you should select a separate tray for the outboard motor.
Lastly, the lower block is connected, which consists of a head and screws.
«>
“BENCH” TESTING OF A HOMEMADE BOAT MOTOR
Electric motors, compared to gasoline ones, not only have many disadvantages, but also two undeniable advantages: quietness and environmental friendliness (“zero emissions”). Therefore, they can be tested without waiting for summer and without leaving home - in the bathroom of your own apartment, for example. I was interested in measuring the thrust and heat dissipation at different current consumption. In addition, there was an opportunity to take Snetok for testing in order to compare the traction characteristics of my ElectroSalut with a top-mounted electric motor and gearbox and the simplest electric-PLM with a bottom motor and direct drive to the propeller.
During testing, current, voltage, thrust (with a dynamometer) and temperature (with an infrared thermometer) were measured. First of all, it turned out that the transistors of the “energy-saving” PWM regulator get very hot. Even stronger than the electric motor itself. The thermal mode of the regulator returned to normal only after installing a small fan in the battery pack.
With longer operation, the temperature of the electric motor increased. In 20 minutes at full power at a current of 30 A, the temperature of its upper (collector) part increased to 80 °C and continued to rise. I had to interrupt the tests and attach a cooling radiator to the engine. With it, his temperature rose to 80 °C in 30 minutes and stopped rising, reaching a “shelf”. After running continuously at full power for one hour, I considered the problem solved.
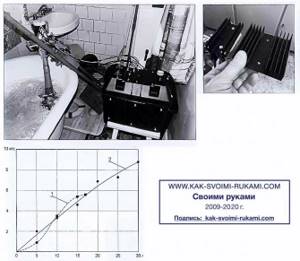
The noiselessness of “ElectroSalut” turned out to be very relative. When operating without load (in air) and at maximum speed, the spur gears of the gearbox produce a sharp and unpleasant squeal. In water, under load, the propeller rotation speed is much lower and the gearbox squeals quite tolerably. However, if you have a choice, it is better to use a helical gearbox from some imported PLM. But “Snetok” with direct drive to the propeller, as one would expect, is absolutely silent.
The dependence of the thrust (or, as shipbuilders say, thrust) of boat electric motors on the current consumed is shown in the graph. For “Snetka” 15 A is the maximum allowable current, but for a short time I “overclocked” it to 17 A. “ElectroSalut” with a motor from a winch briefly allows up to 50 A, but did not allow more than 30 A (about 350 W of power consumption) PWM controller. The resulting curves show that electric motors fully obey the law of conservation of energy: with an equal current of 15 A, the thrust they create is approximately 5.5 kgf for both. "ElectroSalut" at a maximum current of 30 A develops approximately 9 kgf of thrust. With a radiator, it can work in this mode for a long time until the battery is discharged. For comparison, a 2-horsepower gasoline engine, such as the Salyut, creates a thrust of 20 kgf.
True, with an upper position of the electric motor, nothing prevents you from increasing its power, for example, to 1000 W, as Vasily Rumyantsev did from Moscow. But in this case, you can’t do without an expensive lithium-ion battery. Solar energy with such power will also not help, since the area of a 1000 W solar panel is approximately 6.5 m2.
Do-it-yourself electric boat motor.
Models with two-stroke engines
To assemble a boat electric motor with a two-stroke engine with your own hands (the drawings are shown below), you need to prepare all the tools in advance. In particular, you will have to use a welding machine. It is impossible to install a deadwood on an electric boat motor on your own, so the help of two people is required. Many people use sanding machines to sand the pallet. In turn, the rod can be cut for the model using a grinder. You will also need files to fit the valve. In this situation, it is best to select a compact size rocker arm.
All this is necessary in order not to pinch the fuel system channels. Pushers for outboard motors are selected separately. Flywheels for a two-stroke engine are most often installed as conventional ones. Connectors in such models are used quite rarely. Additionally, it should be taken into account that the easiest way to remove the head is from an already broken outboard motor. The same goes for screws. If the assembly does not include the installation of a gear unit, then it is better not to install the tilt lock in the lower block of the structure.
«>
Devices with four-stroke engines
It is quite difficult to assemble an electric boat motor with a four-stroke engine with your own hands. First of all, you need to choose a good case for the model. Next, you need to prepare a clamp for it. With its help, a boat electric motor can be installed. Impellers for models are used in a variety of shapes. First, the deadwood for the engine is folded.
At the next stage, to assemble an electric boat motor with your own hands, you should secure the rod. This will allow the crankshaft to rotate above the sump. In order to install the drive gear into the head, the anti-quitting plate must be moved to the side in advance. Only after this the anode will not block the outlet. In this case, the propeller is attached last.
Materials and tools
When selecting equipment, you need to pay attention to two things: power and voltage. These parameters are fundamental, and the quality of operation of the finished electric motor depends on them. The power depends on the selected drill (in this case this tool is taken as the basis), so first of all you need to select this equipment.
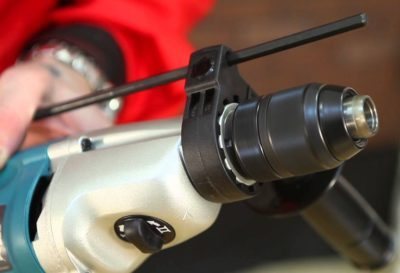
When selecting a drill, you need to focus on its power. This figure must exceed one hundred and fifty watts. It is not worth taking a tool with lesser characteristics. In this case, the finished device will not work effectively in moving water (that is, it will not be possible to swim with such a unit on the river). It is best to use a cordless hammer drill.
The hammer drill is equipped with reverse and has several operating modes. This circumstance is important for the motor that will move the watercraft, since it will allow in the future to control the speed of the electric motor.
The second important parameter is voltage. Eighteen volt batteries should not be used. They are difficult to find and expensive. The best choice would be a drill that operates at ten or twelve volts. Such a battery is comparatively cheaper, and, most importantly, it is much easier to find on sale.
After choosing the optimal equipment, you can collect materials. To create an engine you must first acquire:
- An electric drill that will act as a motor.
- Clamps with which the drill will be attached.
- Gearbox. You can use an element from an angle grinder if you intend to install the motor on the transom of the boat.
- Round tubes with a diameter of twenty millimeters.
- Profiled pipes (20*20 millimeters).
- A round metal rod. It will be used to create an electric motor shaft.
- Sheet metal from which the screws will be made.
You will also need some tools:
- scissors for cutting metal;
- welding machine;
- Bulgarian;
- electric drill with a set of drills;
- self-tapping screws with a screwdriver if wood will be used to create the motor.
After all the elements have been collected, you can begin to create an electric boat motor with your own hands. The whole procedure consists of several stages. Work should begin by creating a lifting mechanism for the impeller. In order for the future device to work properly, it is recommended to carefully follow the instructions provided below.
Modifications on recoil starter
Boat motors of this type are quite widespread. Single-stroke engine configurations are most suitable for them. In order to install it, you should prepare the housing as standard. You can easily take it from an outdated model. After this, it is important to assemble the upper block, which includes the motor and rotor. Only after this can you move on to deadwood. The manual starter is directly mounted above the sump.
In order to fix it in the body, you will need to use a welding machine. After this, it is possible to connect the rod to the crankshaft. If it is large in size, it can be shortened using a grinder. Also, problems during assembly may include the lack of a suitable flywheel.
In this case, it is necessary first of all to evaluate the size of the rocker arm. After this, it is important to take the existing model and simply grind it down to the desired size. However, the edges of the flywheel should ultimately be very smooth.
A wide variety of fuel systems are installed on an electric boat motor. The most common are two-valve modifications. They are inexpensive on the market and extremely easy to install.
«>