Choosing a fly rod for float fishing
A float rod is a universal tackle that can be used to catch many types of peaceful or predatory fish.
They have their own classification, but the most popular variety is fly tackle due to the ability to make long casts, as well as the ease of its use.
When choosing it, you should pay attention to the following features:
- Rod length is one of the main characteristics of a fly rod. To get used to such gear, it is recommended to use models with a length of no more than 4-5 meters; gradually you can switch to fishing rods 6 meters long. There are even longer options, but they are too heavy, and in this case the lightness of the tackle is very important.
- The material is also extremely important, since not only the weight, but also the strength of the gear depends on it. Today, the most optimal option is carbon, since it weighs little, but at the same time has a good margin of safety.
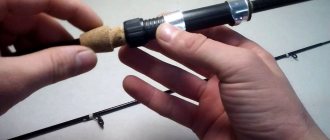
- Availability of fastenings for installing the coil if it is planned to be used.
- The sensitivity of the rod tip is another important feature of fly fishing rods; if the indicators are too low, hard hooks will be made, which will significantly increase the risk of line breaks or loss of prey.
Elements of equipment for a fly fishing rod for fishing with a float
The equipment of a fly rod usually includes the following elements, which the fisherman will have to choose on his own if he does not plan to purchase ready-made gear:
- The reel is not a mandatory part of the equipment, but its presence can facilitate the fishing process, since in this case it will be possible to make long casts. It is better to avoid purchasing and installing inertia-free models, since when using fly fishing rods there is no need to frequently reel in the fishing line. The only drawback of having a reel will be the increase in the total weight of the gear, so if there is no need to make long casts, you can use a reel that allows you to reel in the fishing line, but is not mounted on the fishing rod itself.
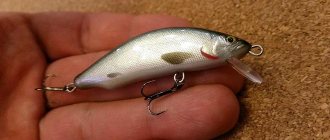
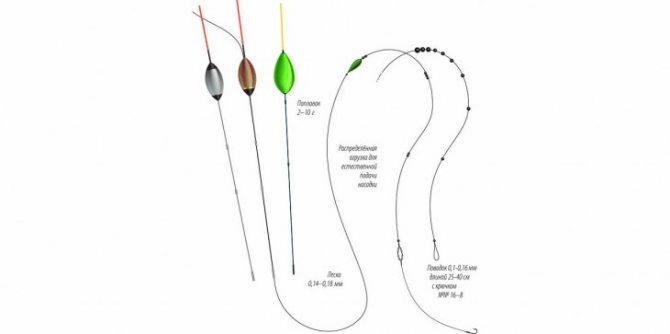
- Float. A variety of options are suitable for fly fishing rods; first of all, you should pay attention to their shape: the beginning of the float should have a significant diameter, and the tip, on the contrary, should be long and thin.
- Lead pellets are used to load the float; this process can be carried out at home even before going fishing. The weight of the pellets is selected experimentally; it is necessary to achieve such a result that only the tip of the float remains above the surface of the water, and its part with a large diameter is flooded.
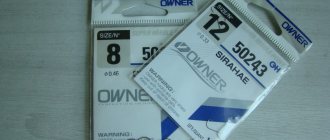
- Hooks are selected individually depending on the bait used, as well as the size and weight of potential prey. Hooks that are too small can cause frequent idle bites, and the fish may physically not be able to swallow an overly large hook, which will ensure the escape of prey.
- The fishing line and leash are also selected individually; their diameter will depend on other equipment parameters, fishing conditions, water transparency and the species of prey.
Fishing rod rig
In the case when you decide to use a fishing rod without rings, it is necessary that the length of the fishing line be equal to the length of the fishing rod. A maximum superiority of no more than half a meter is allowed. Only this amount of monofilament will make it possible to cast easily and pull out the catch comfortably.
Video showing the process of organizing the equipment of a float rod:
Choosing a float
The float is used to signal a bite, so its choice must be taken with full responsibility. First, you need to decide on the depth of the fishing spot. So:* a depth of up to one meter requires a float with a carrying capacity of up to 1 g;
- depth 1-3 m – from 1 to 2.5 g;
- depth more than three meters - float 3-5 g.
If the body of water has a strong current, then it is necessary to use special floats for fishing in the current.
There is also a very interesting type of float equipment - a sliding float. To fish with it, you usually use a rod with an inertia-free reel for long casts or, in extreme cases, a regular inertial reel with a drum.
Line and leash
The leash for the float type of equipment is itself a controversial point. Indeed, in this case, the gear is at the same time distinguished by its subtlety and invisibility, and clutter with bridles and loops. The leash is made on the basis of a thinner fishing line than the main monofilament for the reel. Its length will directly affect the quality of the bite:
- A short leader is the most sensitive and will allow you to see every touch the fish makes to the bait. Although in this case there is no need to rush, because you can catch the catch earlier than it would have to be done;
- a long leash may not allow you to feel the bite at all, and therefore the fish will be able to swallow your bait and go free swimming.
For this type of gear, it is recommended to use exclusively monofilament fishing line. It is desirable that it be thin - 0.08-0.1-0.12-0.14 mm. But this is not the most important thing, since a number of other factors need to be taken into account:
- fishing conditions;
- parameters of the fishing line itself and its properties;
- elements that make up the rod itself.
Correct loading
In order to produce the correct sensitive load, it is recommended that you secure a medium lead pellet under the float, carefully clamping it all with pliers. Throw the rig into the water. In the case when the body of the float is slightly visible, it is recommended to add more weight. In this case, be sure to make sure that the minimum depth is set. After all, in this case the weights should be suspended, and not lie at the bottom of the reservoir.
It is necessary to add lead darts until only the tip of the float . Only in this case will you achieve good sensitivity. But if fishing is in strong winds, you can allow some part of the float’s body to be visible. This way, you can eliminate the visual illusion as the float passes through the waves.
Read more about choosing and loading a float in the article about floats for crucian carp.
Hooks
Experts recommend choosing hooks depending on the desired catch and the size of the bait. You need to take a moment to imagine what kind of mouth your fish has, and whether it can calmly swallow such a hook. On the other hand, an excessively small hook will also become a hindrance. Because in this case there will be a lot of idle bites. After all, the fish will not be hooked and will get off the hook. Therefore, you can say goodbye to your trophy.
Attaching the fishing line to the float rod
The presence of rings on the float rod greatly simplifies the process of attaching the fishing line; it is described in detail below:
- Initially, a reel is attached to the fishing rod, with the help of which the winding of the fishing line begins.
- The free end of the fishing line is threaded through a ring located near the reel.
- In turn, the line is passed through all subsequent rings until it is brought out through the element with the smallest diameter located at the tip.
Fishing rod without rings
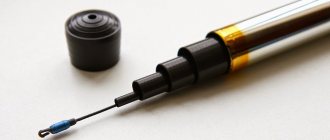
Some models do not have guide rings, in which case the fishing line will be attached according to the following scheme:
- A special mount is taken, which is glued to the tip of the float rod using waterproof glue.
- A suitable fishing line is selected and a small loop is tied at its free end; This is best done using a figure-of-eight knot.
- The resulting loop is put on the glued mount, after which its position is fixed by lowering a special stopper.
When using such models without rings, it means that the length of the working line will correspond to the length of the rod or exceed it by a maximum of 50 cm, otherwise difficulties may arise when casting or fishing for caught prey.
Equipping a float rod with a float

Methods for equipping a float depend primarily on its type and design features; all common options are discussed in detail below.
How to attach a float with a ring at the top to a fishing line?
If there is a ring at the top of the float, then the fishing rod is equipped with it as follows:
- The working line is threaded through the ring; this must be done from the bottom, moving upward.
- The fishing line is equipped with a cambric: it is usually sold complete with lead shot or a float, but if necessary, it can be purchased separately at a fishing store.
- At the last stage, the float is inserted with its lower part into the cambric.
How to attach a float without a ring to a fishing line?
If there is no ring on the float, the fishing rod is equipped with it according to a slightly modified scheme:
- The working line is equipped with two cambrics made of rubber.
- The top of the float is inserted into one cambric, and its lower part into the other. Given their different sizes, cambrics must be selected accordingly.
Rigging a fishing rod with a sliding float
Many anglers prefer to use sliding floats because they provide the ability to use large, heavy weights when the bait needs to get as close to the bottom as possible.
Their distinctive feature is the possibility of free movement between the stoppers located in the lower and upper parts of the equipment. There are also models that are initially equipped with a built-in sinker, which has a positive effect on the casting distance.
Special washers or tubes with screw threads are used as sinkers; their total weight should always be 2 times less than the weight of the float itself. Thread or silicone stoppers are also used, between which the sliding float has the ability to move freely; sometimes locking units are used for these purposes.
Most models of sliding floats have axial holes or lugs; they are installed as follows:
- Initially, the working line is equipped with an upper stopper, which determines the first limit of movement of the sliding float.
- The fishing line is threaded through the hole or ears on the float, and its position is fixed.
- The line is equipped with a lower stopper.
- The float is loaded and, if necessary, the float is fastened.
- Special adapters can be put on a piece of fishing line between the stoppers, designed for fastening certain types of sliding floats.
Float rod equipment
To properly equip a float fishing rod, you need to string a couple of small pieces of cambric onto the main fishing line. Subsequently, you need to insert the top and bottom of the float into them.
Some floats have a ring at the top, then a fishing line is threaded through it, and the bottom is secured with cambric. Then they take the pellets and place them on the fishing line, clamping them with pliers. According to the degree of approach of the fishing line to the hook, you need to reduce the weights in size. The last load must be moved ten centimeters away from the previous one. This sinker is provided to distribute the weight of the equipment.
Next, you need to connect the main line with the second, lead line. And at the end you need to attach a hook to the leash. The leash must be more than 10 centimeters long. The hook must be secured with a special knot.
How to attach a float with a ring at the top to a fishing line?
To secure the float using a ring and a cambric, you need to pass the thread through the mounting ring, and you need to attach a plastic ring to the antenna. You need to insert a monofilament thread into the plastic ring in advance. The ring is fixed at the top of the float. The thread should pass inside the ring and through the mounting ring on the keel.
How to attach a float without a ring to a fishing line?
To attach a float to a fishing line without a ring, you need to attach two optimally sized cambrics to the fishing line and insert the upper and lower keels of the float into them.
Proper float loading
The correct loading of the float is determined by its position in the water: only the tip should be above its surface. An exception is made only when catching predatory fish with live bait, since in such a situation the sensitivity of the gear is not of fundamental importance, and the absence of distortion of the movement of the float by the live bait is much more important.
Loading can be done on a pond immediately before fishing or at home; both options are discussed in more detail below.
How to load a float on a pond?
Loading on a pond is a fairly simple process that usually does not cause difficulties even for novice fishermen; it looks like this:
- A small lead pellet is attached to the fishing line under the float, after which it must be firmly seated with a suitable tool - pliers or pliers.
- A test cast is made, after which it is necessary to check the position of the float in the water: if its keel is visible above the surface, then more lead pellets should be added until the desired result is achieved.
- If the float is immersed too deep in the water, you will need to reduce the weight of the lead pellets; this can be done using scissors or tongs. The procedure is carried out extremely carefully so as not to damage the fishing line.
- When fishing in windy conditions, it is permissible for the keel to be slightly raised below the surface of the water, as this will eliminate the likelihood of false bites when passing through the waves.
When making test casts, you need to check the set depth so that the weights do not end up on the bottom surface, which can create a deceptive effect.
How to load a float at home?
Loading can also be done in advance; at home it is carried out in exactly the same way as on a reservoir, except for some points:
- The load is checked by immersing the equipment in a 1.5-2 liter container filled with water.
- The float descends as close as possible to the lead pellets, which will not allow them to sink to the very bottom of the container.
Do-it-yourself float equipment (video)
Which hooks to choose
The success of fishing largely depends on the correct choice of hook number and shape. But first, you need to decide on the intended catch, the type of bait, and the gear used.
The hook number is determined by the distance from the tip of the sting to the fore-end; according to European numbering, there are hooks No. 8-12. They differ not only in numbers, but also in the profile of the sting, the length of the forearm, and the shape of the beard. So, for example, for fishing with peas and wheat, it is better to use hooks with a short shank, and for crawling and dragonflies - with a long shank.
When fishing with small-sized hooks, naturally, more bites are observed, but the number of landings of large fish increases. But you should take thin hooks, since a live bait better retains mobility in the water.
Leash attachment
Most experienced fishermen recommend equipping the float rod with leashes, since this practice provides several significant advantages:
- The ability to catch the most cautious prey or fish with keen eyesight, which is able to notice and be afraid of the main fishing line.
- Reducing the risk of losing the entire equipment in the event of a fishing line getting caught and subsequent breakage.
Various fishing lines are used for leashes, the most common option is regular monofilament, but the fluorocarbon option is much more effective. Its cost is much higher, but using a reel allows you to reduce costs: 10 meters of fluorocarbon fishing line is enough for a whole fishing season.
How to tie a leash to a fishing line?
For the leash, take a piece of fishing line of at least 25 cm, its final length will be about 15 cm, since it decreases when tying and fastening the hooks.
Tying to the main line is easiest done by tying a reliable figure-eight knot; this can be done using the following instructions:
- The ends of the leader and the main line overlap each other.
- Both parallel segments are folded into a loop.
- The place where the loop is formed must be pinched with your fingers, and then rotated 360°.
- One of the free ends is passed through the loop.
- The knot is wetted and tightened; the remaining ends of the fishing line can be cut off with scissors if they are too long.
How to properly tie a hook to a fishing line?
Another important point is to follow the technology of tying the hook to the fishing line, otherwise the fish may tear it off when biting.
One of the most common and reliable methods is as follows:
- The working line is threaded through the hook: the passed segment should be equal to approximately half of its length. Threading must be done from the side where the sting is located.
- The remaining long piece of fishing line is wrapped at least 5-7 times through the short end and the hook itself, after which it is threaded from the opposite side.
- The resulting knot must be moistened and tightened securely.
Hook selection
When choosing a hook, you need to evaluate it according to two main criteria:
- Material of manufacture. Wire options are the cheapest, but at the same time they are characterized by their unreliability: strong and large fish can bend them, offering resistance when fishing. It is better to choose models made from alloys that contain hydrocarbon steel or vanadium: they will cost much more, but will increase the chances of catching.
- The size of the hook is selected depending on what kind of fish you intend to catch. If there are a lot of false bites or deep swallowing, it is necessary to reduce or increase the size of the hook used.
Rigging a fishing rod with two hooks
A float fishing rod can be equipped with two hooks at once; there are various options for implementing such equipment; Several successful techniques are discussed below:
- The first hook is tied to the main line according to the standard pattern. An additional leash is tied between it and the leash; its beginning should be a twist of several lines, which will prevent possible overlaps during the fishing process. The length of the additional leash is limited: it should not exceed 10cm.
- The first hook is tied as usual and the second hook is attached over the lead pellets. This should be done directly on the working line without using an additional leash, however, this technique has the disadvantage of increasing the number of idle bites.
Types of fishing rods
There are several types of fishing rods with floats:
A fly rod that is about 7 meters in length. It does not have a reel or only a small drum to store the fishing line. This equipment is very easy to throw into a pond.
Read here How to tie a hook to a fishing line - advice from professionals and the best patterns for beginners (115 photos and videos)
Match fishing rod. Her rod is about 6 meters. It is needed for long-distance casting of the float. There may be a sliding float fishing rod, as well as a blind one.
You can also fish using the plug method. This is a very long rod. It can be up to 20 meters in length.
Sinker
The sinker is the main element of the load; every angler should know and take into account the following features:
- The main criterion for classification is the shape; the sinker can be pellets, drops, olives or cylinders. Depending on their shape, they have different weights with the same volume.
- Another dividing criterion is the material of manufacture; the most common are tungsten or lead weights. Shots and cylinders vary in material hardness, depending on the composition of the alloy. The most preferable are soft sinkers, since they extend the life of the fishing line and do not contribute to its twisting during fishing. Tungsten elements are characterized by increased rigidity; novice fishermen often find it difficult to work with them.
- The pellets and cylinders are always of the stationary type, their position is fixed. Olives and drops can be gliding due to their shape and are used for the corresponding types of rigs, but they are not actually used for float rods.
Shepherd boy
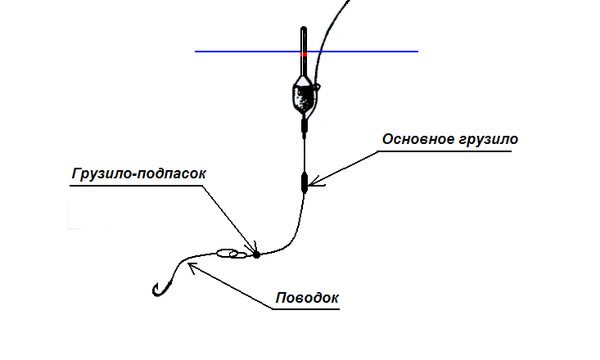
A sub-sink is a small sinker, its fastening is carried out near the hook with which the leash is equipped. Its main function is to load the tip of the float, but you need to maintain a distance between the hook and the hook, as it can frighten cautious prey.
When catching medium-sized fish, it is recommended to ensure a distance between these elements of no more than 15-20 cm, since otherwise the sinker may lie on the bottom surface and the fisherman will not notice the beginning of the bite in a timely manner, as a result of which he will miss the moment for a successful hooking.
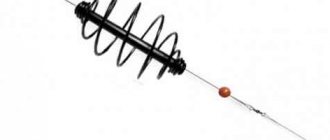
How to equip a fishing rod with a feeder?
Float fishing rods equipped with a feeder have the main advantage of a feeder: the close location of the bait mixture and bait, which attracts prey from all over the reservoir to the fishing site and significantly increases the likelihood of bites. This type of tackle can be used for catching various types of fish; most often they are used for catching crucian carp.
You can assemble and equip such a fishing rod with a feeder using the instructions below:
- The working line is equipped with a stopper, which is necessary for setting the depth, after which the swivel with a special fastener is wound on.
- A float is attached to a swivel with a clasp: it must be of the sliding type and be lighter in weight than the selected feeder.
- The fishing line is equipped with another stopper, which will determine the limit of free movement of the float and will not allow it to approach the leash or feeder, which can lead to tangling of the equipment.
- Take a feeder that has its own internal loading. The working line is passed through a tube in its design, then it is equipped with two beads with different diameters: the large element must be threaded first.
- A loop is knitted on the fishing line, which is necessary to ensure the reliability of fastening the leash equipped with a hook.
- It is necessary to make sure that the distance between the feeder and the lower stop is 2 times the length of the float, otherwise there is a risk of snagging on the feeder or tangling the fishing line.
How to equip a float rod with a reel?
Equipping a float rod with a reel is necessary if you want to make long casts, since in this case they will not be limited by the length of the rod.
The collection of such gear does not have any fundamental differences; the only nuances that the fisherman should know are the following:
- The only significant difference is that the working line must pass through the fishing rod's guide rings.
- The coil itself is installed on a special mechanism for fastening it, and if it is missing, you can use regular electrical tape.
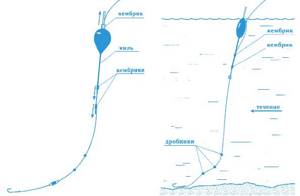
Float rod rig for current
When fishing in areas with rapid currents, you need to choose the right equipment; it will depend on the speed of the water:
- For fishing in weak and not very fast currents, you can limit yourself to a float that can withstand up to 4-8 g of load. Heavy lead pellets should be located in the upper part of the equipment, and lighter and smaller elements in the lower part, while maintaining a distance of about 20 cm between them. A 10cm piece of leash should lie on the bottom surface, which will ensure a slow sinking of the bait, which will not frighten the prey and will make it possible to notice even minor bites.
- For fishing in reservoirs with an average current speed, you will need to select a float with a load capacity of 6-20g. The length of the leash will be from 60 to 150 cm, a significant part should lie on the surface of the bottom, and not float freely in the water. Heavy and large lead pellets are moved as close as possible to the float, and a distance of about 10 cm is maintained between small pellets. The angler will need to learn to hold the fishing rod in such a way that the current carries the bait ahead of the float. If the technology has been followed, then the bait should sink evenly to the bottom and not be knocked down by the current, and the float will be in a horizontal position.
- Fishing in areas of the reservoir with the fastest and most rapid current requires some skill, since the equipment will need to be held with your finger on the spool or blocked its movement with a shackle. For fishing in such conditions, floats with a carrying capacity of at least 8-40g are suitable and two-meter leashes are used. All pellets are grouped in the lower part of the rig, and the leader along its entire length should be on the surface of the bottom so that the bait is not knocked aside by the current when diving.
DIY gear for open water fishing
Self-made gear is more convenient to use than store-bought gear. In this case, they can be completely customized. It is more convenient to fish on an open surface with your own gear, the main thing is to make it correctly.
Making a float fishing rod
Fishing rods of this design are called fly rods. Some of them are equipped with coils, although they are not particularly necessary. It is better to attach the fishing line to the end of the rod. The casting distance depends on the strength of the swing.
The presence of a reel makes the tackle heavier. It is preferable to use it for storing fishing line and not attach it to tackle.
Manufacturing of equipment:
- If a reel is used, then the fishing line is passed through all the rings, and the end, using a double loop, is tied to it. The unnecessary part is cut off. If there is no reel, then the fishing line is attached directly to the top point of the rod.
- If there is a reel, the fishing line is wound around it. If it is not there, then the length of the fishing line should match the length of the fishing rod or be 0.5 m longer.
- The line is threaded through the top ring of the float. Along with it, seals or cambrics are put on, which grip the lower part of the float.
- The float is moved up, and weights in the form of pellets are attached. There should be such a number of them that when testing the float, only its upper part stands out on the surface.
- Leashes about 20 cm long are attached to the fishing line. Their number can be 2 - 3 pieces.
- The ends of the leashes end with hooks.
Fishing with such gear occurs from the shore. The depth of the reservoir varies from 0.5 to 15 m. Casting range is 5 to 8 m.
DIY feeder equipment
Bottom fishing is carried out using feeder equipment. The fisherman watches the fish touch the bait.
You can make it yourself.
It has varieties:
- Paternoster. The fishing line contains a number of loops. Leashes with attached hooks and bait are attached to them.
- Asymmetrical and symmetrical loop. An asymmetrical loop is obtained when 1.5 m of fishing line is folded, making one end 10 cm longer. Twist the double fishing line up to 15 cm, then tie a knot. A swivel is attached to one end. It turns out that the long side is 50 or 70 cm, and the smaller section is 30-60. With symmetrical feeder equipment, the lengths of the ends are the same.
- Helicopter. A swivel is attached, which has a clasp for the feeder. To seal the swivel, a cambric is put on. The distance to the feeder ranges from 5 to 20 cm.
- With anti-twist. So, they call it a curved tube with a fishing line inserted. It is stopped by a damper bead. Next, a swivel with a leash is attached.
- Combine. The basis is also an anti-twist. Then the fishing line with the feeder is attached to the swivel.
- Inline. The swivel has a clasp with a stopper, and then a loop is formed for attaching the leash. The feeder is connected via a carabiner.
Spinning rod assembly
A spinning rod is very convenient for fishing on a flat surface.
Its assembly proceeds in the following order:
- I use glue and attach guide rings to the rod.
- These rings must be clearly located in the axis. Deviations are not allowed, since the line will rub against their sides. This will affect your casting distance.
- As a rule, the rod is sold with a reel seat. This is where the coil is attached.
- The fishing line, passing through the rings, is fixed with a bobbin and then wound onto a reel.
- The last stage is attaching the swivel.
Spinning is considered a universal tool for catching both large fish and small and medium-sized ones.
Making your own baits
When making bait with your own hands, you should remember that it is prepared for individual fish species. It should attract their attention with aroma and color.
Bait recipes:
- Porridge. After keeping the cereal in boiling water for 15 minutes, add aromatic elements: anise, dill, camphor.
- Simple earthworms.
- Potatoes and bread. The potatoes are boiled with the skins on until partially cooked. The bread is cut into small pieces and placed on a hook together with the potatoes.
- Bread and honey. These substances are taken in a ratio of 10:1. A well-mixed mixture is an excellent bait for crucian carp.
- Old bread. Dough is made from it. The crust is cut off and the flesh is softened in water. The required amount of sugar is added to obtain a solid consistency.
- Electronic lures. They are used in fishless areas. The fish swims not only based on the smell, but also on the sound effect.
Important to remember! That each body of water has its own characteristics. When fishing in an unfamiliar place, you need to study the habits of the fish in order to correctly decide on the type of bait.
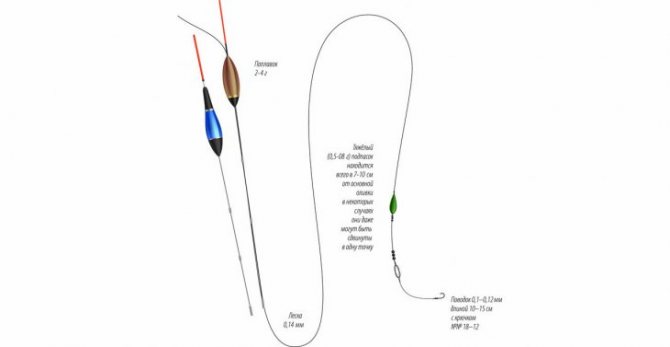
How to equip a float rod for long casting?
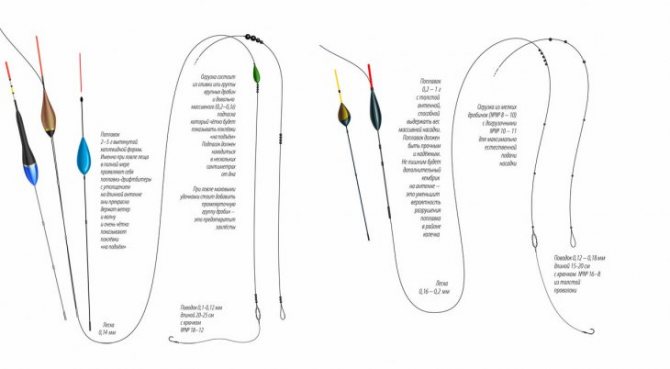
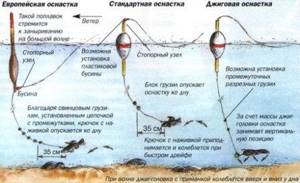
There are several methods for organizing equipment to ensure long casts when using float rods; some options are discussed in detail below:
- For English rigging, a fishing line with a diameter of no more than 0.2 mm is taken; the main load consists of 2-5 large lead pellets; a distance of at least 1.2 meters must be maintained between them and the end of the equipment. Sliding floats with a slight internal load are used; special adapters are used to fasten it, improving its sliding and ensuring blocking when making long casts. The main difference between English rigging and most analogues is that 25% of the load is provided by the float, and the remaining 75% is located on the fishing line. The length of the leash should be 25cm, it should be secured using a small swivel. Additional loads are small pellets, they must be located under the main load, and the same distance must be maintained between them.
- The Italian equipment also allows you to make long casts with a float rod; unlike the previous version, it involves the use of heavy floats: its load should be about 70%, and the remaining 30% comes from lead pellets located on the fishing line. The equipment itself looks like this: a large stopper bead, a heavy float, several rubber stoppers, a load of pellets No. 5-7 on a cambric, a swivel for blocking the end of the tackle.
- Another option for long casting is the Belgian rig. To do this, you will need to equip the fishing line with a tube, the length of which is 12-15 cm; a weight is placed in its upper part. Its function is to limit the movement of the float and provide protection against tangling of the fishing line; A small amount of wire is wound in the central part of the tube to provide balance. The distribution of the load is not of fundamental importance; it can be organized according to the Italian or English method.
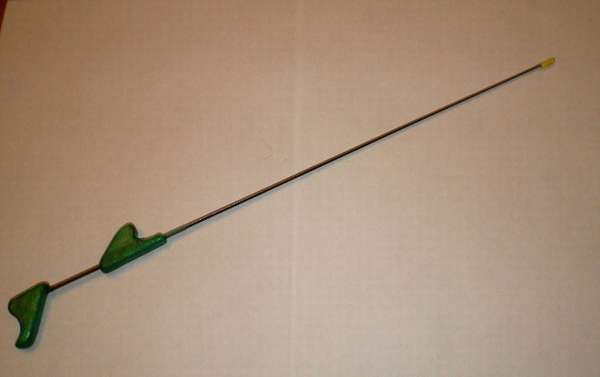
What you need to fish with a fishing rod without a reel
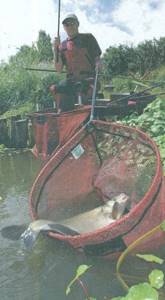
A kind of fishing rod without a reel was invented when man first caught a fish using a stick with a line and hook attached. And although modern carbon reelless fishing rods are high-tech pieces of equipment, the creation and operation of which use the latest discoveries in the world of technology, in fact they act exactly the same as that stick with a line attached.
Unlike a float or feeder rod, a fishing rod without a reel has a direct connection to the bait thanks to a line tied to its end. Instead of casting the rig to a strictly defined point in the reservoir, you pull the rod to the desired location and simply lower it into the water. It's simple.
However, because there is no need to use a large float or feeder, the rod can become so sensitive that it will signal a bite as soon as the fish touches the bait.
Let's start our journey into the world of fishing without a reel with an analysis of the rod itself...
What to consider when buying a fishing rod
Despite the fact that modern fishing rods operate on the same principle as their ancient ancestors, that is where the similarities between them end. The latest technologies in the fishing industry were used to create modern carbon models.
Carbon fiber technology has undergone significant developments over the past 20 years, thanks to huge investments in research by the aerospace, automotive and military industries. Gradually, it made its way into the world of fishing when companies began using carbon fibers to create strong, lightweight rods that were also very inexpensive.
Whatever fishing rod you purchase, the basic design will be the same: several adjacent sections that allow you to adjust the length of the rod. The more sections you use, the further you can cast your bait.
Apart from some short professional rods designed specifically for coastal fishing in lakes, most modern models are 12-14 m long, and some of them reach 16 m. Sometimes professional fishermen even use rods 18-19 m long! Compare these figures with those of a standard float rod (just over 4 m).
When choosing a fishing rod without a reel from a huge variety of different models, your choice can be especially difficult due to the ratio of the price of the rod and its length.
One common mistake many new anglers make is that they buy the longest rod without asking the seller how effective the rod is when using all its sections, or whether they even need a rod that long.
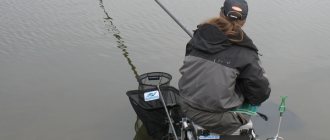
Equipment of a float rod in the wiring
When using a float rod for line fishing, its equipment should look like this:
- The rod should be long, but it should not be heavy; medium hardness; It is necessary to have access rings located on the legs.
- An easy-running inertia reel with a large drum or a medium-sized spinning reel with a removable spool and a high gear ratio.
- Floats and their loading speed are determined individually depending on the current speed.
- Regular hooks No. 12-16 or special wire jigs.
How to equip a Bolognese float rod?
Bolognese fishing rods are by far the most common type of float tackle due to their availability and cost-effectiveness.
Their standard equipment looks like this:
- The diameter of the working line is 0.16mm, and the diameter of the leader is 0.14mm. When catching large prey or trophy specimens, these figures can be increased to 0.18 m and 0.16 mm, respectively. The length of the leash is about 0.5 meters.
- A swivel is a mandatory part of the equipment if fishing is carried out in the current or there is a need to make long casts, otherwise the risk of line twisting increases.
- Hooks are selected depending on the bait and size of the prey; it is best to use No. 12-16, as they reduce the likelihood of false bites.
- An inertial reel is necessary to independently release the fishing line from the mass of the float.
- For loading, take 4-6 large and 2 small lead olive sinkers.
- Silicone stopper.
Assembling the ideal float equipment
Since when fishing with float gear, the main share of the load falls on the fishing line, the demands placed on it are serious. It must be reliable and inconspicuous, while having a minimum diameter.
Line for float equipment
The sufficient strength of modern fishing lines with a cross-sectional diameter of 0.15 - 0.18 mm allows you to catch not only medium and small fish, but also quite large specimens, the main thing is the competent technique of fishing for the caught prey. Even a slight decrease in the diameter of the fishing line sometimes significantly increases the number of bites.

We also recommend reading:
How to properly tie a jig to a fishing line Diagram on how to learn how to tie a hook to a fishing line Tourist knots - types and methods of tying Gardner's loop for a feeder: how to tie
In addition, the thicker the line, the more difficult it is to cast light baits over long distances.
Considering that the fish’s eyes, thanks to their large viewing angle, are able to clearly view surrounding objects, the color of the fishing line should be chosen based on the surrounding background.
What should a leash be like?
To make the tackle unnoticeable, to prevent the main line from breaking when hooked, and also to protect it from toothy predators, use a leash made of thinner fishing line (0.12 mm), which is tied to the working line. The leash length is usually 15 – 20 cm.
Summer fishing rod equipment
A summer fishing rod can be used to catch a wide variety of fish species, so the hook, line, float and other equipment elements are selected individually.
Some general rules for rigging such a fishing rod are given below:
- It is advisable to choose fishing rods that have guide rings and a mechanism for fastening the reel; the recommended material is fiberglass.
- Lightweight floats are suitable for fishing in calm waters, but when catching predators you need to use models with a large carrying capacity and a low level of sensitivity.
- The thickness of the fishing line is selected depending on the prey, but it is better to purchase synthetic cords, since they have no tendency to tangle or rot when kept in water for a long time, and the transparency of the material allows them not to scare off the fish.
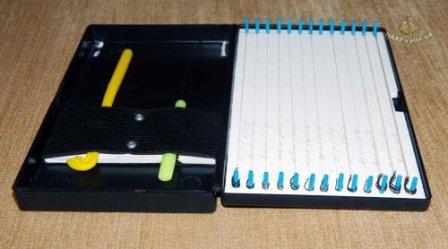
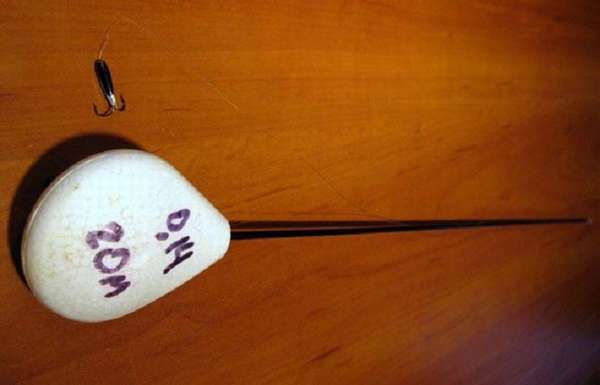
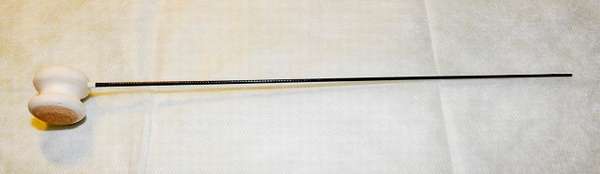
Noduleless fishing rods
The correct hookless tackle cannot be found in the store (with rare exceptions). Fishermen make such fishing rods themselves. There is nothing complicated about this - the main thing is to choose the right whip. Roughly speaking, the whip itself is the basis. It’s just that it’s also equipped with reels for storing fishing line. The correct grip is a pencil grip. The stick is clamped with fingers (two, three), and the game is played with the hand, not the forearm. To make a nockless fishing rod with your own hands, you do not need to have the skills of a mechanic. Materials, file, sandpaper, drill - everything is assembled literally on your knees. To begin with, you can try fishing with sports balalaikas or the lightest store-bought fishing rods, replacing the soft whip with a carbon one. However, over time it will become clear that it is better to lighten the fishing rod even more and switch to washers (fungi, buttons) or mini reels.
Constructions
Rod options:
- Axleless rewinder without nod.
- Sports balalaika.
- An ultra-light, no-kick, rewinder based on the Shcherbakov washer principle.
- Ultralight fishing rod with longitudinal reels.
The first two options are simple - instead of the factory one, a carbon whip is glued in, and the fishing line is clamped at the end with a cambric. However, such structures are still heavy. And if an angler is serious about fishing with a fishing rod without a nod for winter fishing, it is better to spend time and build ultra-light tackle. Let's look at how to make a nodless winter fishing rod for a reelless fish.
Whip
The nodless rewinder is, first and foremost, a whip. The whip is selected according to the weight of the jig, depending on the desired game. The best solution is a carbon tip from a summer fishing rod. The thickness (power) of the whip is selected experimentally. There are a lot of options in stores; brute force and logic will help. For high-frequency play, you need a shorter whip - with a long six, such vibrations cannot be achieved. For active perch, a short whip is what you need. In the dead of winter, and especially for bream, it is better to make a long whip, 30-50 cm. With such a lever, even the slightest attempt of the fish to take the jig will be felt in the hand. The game for bream is slower than the reelless game for perch. With a long six it is easier to make the desired soft vibrations. The length of the whipless whip is also selected individually based on the angler’s habits.
The soft or hard six of the rod for a nodless reelless fishing rod will become clear during experiments with the jig for which the whip is prepared. To do this, you need to attach a piece of 0.1 mm fishing line to it using a cambric, tie a reelless jig and try playing in a bucket of water. The sound of the jig as it oscillates should be felt in your hand. If it’s too weak, you need a softer whip. Solid sixes (not tubular) can be sanded to make them softer. A thin feeder whip for a nodless, reelless fishing rod is also suitable for the heaviest devils and jigs.
When the six is correctly selected, we can assume that the homemade nockless winter fishing rod is 90% ready. All that remains is to come up with a fishing line storage system. It is better to immediately prepare all the sixes for different weights, and the device for the fishing line (reel) can be made the same for the entire set of fishing rods. In a hollow six, the line can be passed inside; in a solid one, it is secured with a cambric at the tip.

Reel
For fishing at great depths, it is more convenient to use a reel, however, this will make the no-kick tackle heavier. Any design of minimalist sports balalaikas or specialized balalaikas will do. For fishing at shallow depths, round reels are used based on the Shcherbakov washer principle. The workpiece is cut from solid foam or foamed PVC sheet. Then, using a file and a sharp knife, a groove is carefully removed along the radius, into which, in fact, the fishing line will be wound. This can also be done using a wine or champagne cork. At the end, the workpiece can be treated with varnish that does not corrode the material. To make it even easier, the middle is also removed, but this greatly increases the fragility of the washer (button, fungus).
In addition to the radial version of non-kick washers, reels can also be cut horizontal, monolithic or composite. The blanks are cut from the same materials as the washers. The simplest life hack is the cut off part of a yogurt bottle (near the neck). Burrs are processed with a needle file. Holes of the required diameter are drilled with a drill, and a six is attached to them with superglue. It is better to glue the pole at an angle slightly downward - this will make it easier to lower the line from the reel when fishing for large fish. The winter fishing rod without a nod is ready.
How to make a float rod yourself?
You can not only buy a float rod at a fishing store, but also make it yourself. An example of a simple instruction is given below:
- Initially, you should choose a suitable stick; bamboo, rowan, walnut and birch are well suited for making a fishing rod.
- The stick is cut so that its length is 3.5-4 meters, after which it is cleaned with sandpaper.
- A ring with a diameter of 3.5 mm is attached to the tip of the future rod. Next, the entire stick is equipped with the same rings, the distance between them should be 80cm.
- A reel is installed at a distance of 40 cm from the handle, onto which a small amount of fishing line is immediately wound with a reserve.
- The fishing line is passed through all installed rings, the free end should go down to the handle. After this, all that remains is to equip the fishing rod, and it will be ready for use.
Float rod equipment for different types of fish
How to properly equip a float rod for crucian carp?
Crucian carp is the most popular prey caught on float rods. You can choose the following equipment:
- A regular fly rod or a match rod if you plan to make long casts. The length can be from 4 to 6 meters.
- Lightweight float with an antenna top, painted in a bright color.
- Sinkers in the form of washers or pellets are selected individually; it is necessary to ensure that only the float antenna remains above the water. Some models have a collapsible keel, which also reduces their weight, which is then added to the line to change the speed at which the bait sinks.
- An inertial reel or a non-inertial variety if a long rod was chosen.
- The main line with a diameter of 0.12 to 0.2 mm depending on the weight of the prey.
- Leash with a diameter of 0.16-0.18mm.
- Single hook No. 10-16.
Gear arrangement for roach fishing
Roach are another common prey species that are very easy to catch with float rods. The optimal equipment option looks like this:
- The rod should belong to the ultra-light class.
- It is better to choose a float with a voluminous keel and a thin antenna-top, which will rise above the surface of the water with virtually zero buoyancy. Its weight should not exceed 1.5g.
- The diameter of the main line is 0.07-0.1mm; for the leash, a line of 0.06-0.09mm is used: it is important that it is colorless and transparent, which will ensure invisibility.
- The total weight of the equipment should not exceed 1.2g: this will be enough, since the roach is fished out without any resistance. When fishing in reservoirs with fast currents, it can be increased to 1.6-1.8g.
- Hook No. 8-10, made of thin wire.
How to properly equip a float rod for carp?
When fishing for carp, standard equipment that can withstand the resistance of strong fish is suitable. It is best to equip a float rod as follows:
- Rod from 2.5 to 6 meters. It is recommended to take solid fishing rods made of natural material, especially juniper or birch, which reduces the risk of them breaking during fishing.
- The main line should have a thickness of no more than 0.2-0.25 mm, but at the same time have a good margin of safety; reserve of at least 50 meters.
- A vein leash that can be pre-tinted using tea leaves or ink to ensure high-quality camouflage. When catching large carp, it is better to use a metal leash to prevent it from being bitten.
- Small weight float with good sensitivity.
- Forged single hooks No. 2-6 with a short sting or high-quality double hooks that carp cannot break or bend.
- Sinkers are selected depending on the fishing conditions, but carp are most often caught at shallow depths, so heavy weighting is not required.
Equipment for pike fishing
In some cases, float rods are also used for pike fishing; for these purposes they are equipped as follows:
- Almost any rod is suitable, but it must be strong enough, and also have guides and fasteners for the reel. Length at least 2.7-3 meters.
- A reel of any type, but large enough and equipped with a friction brake.
- Nylon fishing line or braid, its diameter depends on the expected weight of the predator; reserve 50-100 meters.
- You can purchase a metal leash at a fishing store or make it yourself using a guitar string.
- A swivel for connecting the leash to the working line, it is necessary to prevent entanglement during resistance from the predator.
- A large float and sinkers, after installation of which it will be able to remain afloat. The greater the weight and size of the intended prey, the larger the float should be. The approximate weight of a lead sinker is 5-10g; it is best to use cylindrical elements.
- The hook is also selected individually; it can be a regular model, as well as a double or tee.
How to properly equip a float rod for bream?

If the main prey is bream, then the fishing rod should be equipped as follows:
- A medium-action rod with a length of 7-9 meters will be quite sufficient: with such tackle you can make long casts, and there will be no problems with fishing for prey, since the bream does not have significant strength and offers long-term resistance.
- An inertia-free reel equipped with a soft friction brake and a high-quality line guide.
- The maximum diameter of the working line is 0.25 mm, the diameter of the leader is no more than 0.14-0.16 mm.
- The float should have an elongated shape; homemade devices with a goose feather are also suitable. When making long casts, it is better to use a sliding type float.
- A heavy weight of any shape is placed at the top of the rig, and a lighter weight near the leash.
- The size of the hooks depends on the expected weight of the prey. When using vegetable baits, hooks with a short shank are used, and when fishing with a worm, it is better to use elongated models.
Float fishing rod equipment: rod, reel, fishing line, float, sinker, hooks
Today, fishing with a float rod is very popular.
This fishing requires special equipment, which must be prepared in advance. A float fishing rod is one of the simplest gear and is affordable. A fishing rod consists of a rod, a fishing line with a float, a reel, a sinker and a hook with bait. The success of fishing with a float rod lies in high-quality equipment. If the tackle is heavy, rough and inconvenient to handle, then the fisherman quickly gets tired and fishing becomes uninteresting. Such a fishing rod can cause failures, especially for novice anglers. The fishing rod should be light and comfortable.
You can fish with a float rod for most freshwater fish, the main thing is to choose the right hook and bait. According to the fishing results, the float rod is not inferior to any other fishing tackle. Fishing with this rod is good both from the shore and from a boat. A properly equipped fishing rod is already the key to victory when catching the coveted trophy.
Proper fishing rod equipment
The equipment consists of a rod, reel, fishing line, float, sinker, hook.
Algorithm for rigging a float rod
- A small reel is attached to the rod. If the rod is without a reel, then the fishing line will be attached to the tip of the rod.
- The line wound from the reel is passed through the rings, from the one closest to the reel to the very last ring at the tip of the rod.
- Float mount. The line is passed into the ring of the float (from top to bottom), and then a small rubber cambric is put on the line. The lower part of the float (keel) is inserted into the cambric.
- Loading the float with lead pellets. By attaching ordinary lead pellets to the fishing line, it is necessary to ensure that only the bright tip of the float appears from the water. This will make the equipment very sensitive to the slightest touch of the fish and will not arouse suspicion in it, since the resistance of the float will be minimal.
The last sinker (lead pellet) should be the smallest sinker - the so-called “backup” and it is placed directly in front of the leash.
- Then a 10-20 cm piece of thinner fishing line (leash) is tied to the end of the fishing line.
- And a hook is tied to the end of the fishing line (at a distance of 10-15 cm from the beginning of the leash).
Selecting a rod
When buying a telescopic fishing rod, you need to check the serviceability of each knee and the strength of the butt plug; special attention should be paid to the strength of adhesion of one knee to the other (the length of the clutch joint should be 1/6 the length of the knee).
The length and strength of the rod is selected depending on what kind of fish the angler is going to fish for. To catch large fish you need a strong and long rod, for small fish you need a light and short one. Float rods can be equipped for both reel and blind tackle.
Installing a small reel on the rod allows you to quickly change the length of the line, making it possible to catch large fish using thin and light tackle. For fishing with a reel, the rod is equipped with a device for attaching a reel and guide rings. At the tip of the rod, an end guide ring is attached - a “tulip”.
Rings should be light and small in size. They are made from thin brass or copper wire. Split rings are the most convenient.
You can insert or remove a line in them without removing the float, leader and sinker from the line. Depending on the length of the rod, 5–6 rings can be installed on it.
The distance between the rings on a rod 4.5 m long, counting from the butt of the rod, can be 150, 90, 80, 60, 40, 30 cm.
Tips for choosing a reel
An inertialess reel has many advantages; when casting, tangling of the fishing line is practically eliminated, they are convenient and easy to use. Reels for float fishing, where power fishing is not required, are inexpensive. Even if the clutch is tightened all the way, the line will still be released under heavy load, thereby avoiding deformation of the reel.
When purchasing a reel, pay attention to the smoothness of the movement; there should be no jerking, noise or crunching when turning the handle. After unwinding, the spool should not immediately slow down, but make several revolutions. Pay attention to what material the spool for winding the fishing line is made of.
With a plastic spool the reel is lighter, but with a metal spool the bait will fly further. The last thing is the handle of the spinning reel, it should fold. The best option would be a push-button one, but more often they are sold with a nut for attaching the handle. The nut tends to unwind spontaneously and sometimes needs to be tightened. If it gets lost, stores sell spare ones.
Main line
The diameter of the fishing line is selected based on the expected size of prey and biting activity. As a rule, in competitions the diameter of the fishing line is rarely more than 0.1 mm, and sometimes even 0.08 mm. Thin lines are used to catch sluggish, small fish.
Such thin lines are used to reduce drag, making casting easier and the gear sinking faster. This line allows you to cast any light equipment without much effort, and they sink much faster.
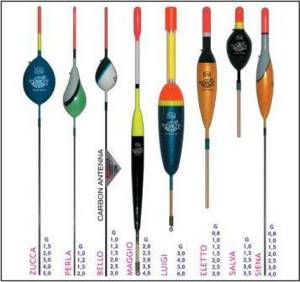
Float selection
This is perhaps the most important part of the equipment. The components of the float are the body, keel, antenna, and ring. The body of the float can be made of any buoyant material, but is usually balsa or foam. The keel of the float is made of thin wire or made of plastic. The antenna is made from a colored plastic tube.
The length of the antenna can vary from 2 to 6 centimeters. The color of the antenna can be any, the main thing is that it is noticeable to you, since sometimes you have to fish at a great distance from the shore. A float can greatly influence the result of fishing, so all fishermen treat its choice with special care.
Floats that flow from a thick diameter to a thin one are also considered good floats. If a fisherman needs a particularly sensitive float that will respond to any movement of the bait, it is better to use goose feather floats, which are famous for their responsiveness.
Equipping a float rod with a float
In order to make the equipment correctly, it is necessary to distinguish between its types and installation, which will make it easy to complete this task. Attaching the float with a ring at the top to the fishing line:
- The fishing line is inserted into the float (upwards from the bottom)
- Cambric on fishing line
- The lower part of the float in the cambric
Attaching a float to a fishing line without a ring:
- In this case, if the float does not have a ring, one cambric will not be enough. That's why fishermen use two
- Also, for convenience, elastic bands are used, which should not be too narrow.
Loading a fishing rod
The load with which the float rod is equipped, like the float, can be sliding or blind. A sliding load is usually used when the weight of the sinker is sufficiently large. The sinker is a drop or an olive with a through hole, which is not clamped on the fishing line so as not to deform it, but moves freely along it.
The movement of the sliding sinker is stopped by a blind weight - a pellet split into two-thirds of the diameter, rigidly fixed on the fishing line, however, the weight can move along the fishing line with little effort.
Be sure that the minimum depth is set, or that you are casting to a sufficient depth, the weights should be suspended and not fall to the bottom.
Leash attachment
The float serves to ensure that when a force occurs that exceeds the breaking load of the fishing line (a hook, or a large fish). To tie a leash to a fishing line, you need to put insulation on the fishing line according to the number of leashes. Then you need to tie the loops on the fishing line. Each cambric should be located inside the loops.
Types of hooks
Hooks are one of the most controversial parts of the rig. They can come in different sizes and shapes. Hooks can have a long shank or a short shank, and which hook to use in a given situation depends on the bait used. For larger and more predatory fish, you should choose medium or large hooks. And for peaceful river fish, small ones are suitable.
Tips for rigging a float rod
Master class on how to properly equip a float rod.
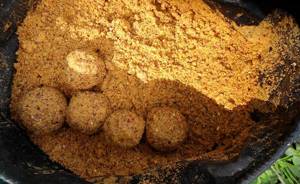
Groundbait and bait
Don't wait for the fish to bite on an empty hook - use bait and lures. Proper baiting of the fishing spot always improves the fishing result. The first, preliminary step is the starting feeding of the place before starting fishing. This is the most abundant feeding, designed to attract fish swimming “somewhere out there”.
The average quantity is 5-10 balls the size of an orange. The second step is supplementary feeding during fishing. It involves feeding fish that have already swam and is designed to keep it at one point (namely where we fish). Perform every 10-15 minutes with one ball the size of a chicken egg. In the spring and autumn seasons, it is preferable to use animal baits.
If the bite is bad, use “sandwiches” - two different types of baits (maggot and worm, maggot and bloodworm, corn and maggot)
Animal nozzles
- bloodworm
- maggot (fly larva)
- dung and earthworm
Plant attachments
- dough
- steamed corn
- steamed pearl barley and other cereals
Video “Fishing with a float rod”
Experienced fishermen share their secrets on how to catch fish with a float rod and how to properly feed the fishing spot.
- rybachka-iz-karelii.org
- ranoutrom.com
- caccia.ru
- lovitut.ru
- fastcarp.ru
- fishingwiki.ru
Source: https://rybamechty.com/snasti/udochki/poplavochnaya-osnastka.html
Features of rigging a float rod for different baits
Float rod for live bait fishing
Sometimes when fishing with a float rod, live fish are used as bait, most often this happens if the main prey is pike.
The equipment of a fishing rod with live bait should look like this:
- A rod at least 5 meters long with a stiffness level above average. An important quality of the gear is its mobility, since catching a predator involves frequent movements along the shore.
- A reel with a spool capacity of at least 3000.
- Monoline with a diameter of 0.28-0.35mm.
- The leash is selected depending on the fishing conditions; it can be made of steel, Kevlar or alloys of various metals; Fluorocarbon varieties or regular monofilament are suitable.
- Treble hooks, size depends on the weight of the live bait. When using fry as bait, lookalikes may be used.
- Sliding float, other varieties are not suitable.
- Olive sinkers, the weight should be equal to a third of the lifting capacity of the selected float.
Fishing with bloodworms
When using bloodworms as a bait, special attention is paid to the balance and sensitivity of the equipment, so it should look like this:
- The leash can be made of any material, but it can be shortened as much as possible.
- An olive sinker and several lead pellets for making quick casts. One pellet is placed at the bottom of the rig, but slightly above the place where the leash is attached to the working line.
- Float with an elongated keel and a thin antenna tip.
- A thin wire hook of minimal size that will not damage the bloodworm when hooked.
Fishing with maggots
Maggot is another popular attachment for a float fishing rod; the equipment is best organized as follows:
- A teardrop-shaped float with a thin antenna at the top.
- A distance of 18 cm must be maintained between the float and the lower sinker, which allows reducing resistance during biting.
- A thin and small round wire hook.
Fishing with hemp seed
Hempseed is a light bait that is not very popular, but in some situations it performs well and can provide a good catch.
Equipment for such a nozzle is selected as follows:
- An elongated float with the thinnest and longest antenna possible.
- Round wire hook.
- The sinkers can be of any shape, but it is better to avoid using olives. The weights are placed far from the hook as the bait sinks into the water without assistance.
Fishing with wheat grain
Wheatgrass is a hard and heavy bait and is therefore only recommended for experienced anglers.
The float rod rig should look like this:
- A heavy float with a large keel, preferably made of metal; the tip should be a thick and weighty antenna.
- The minimum leash length is 20cm.
- #8 weight or larger.
Bread as bait
Bread as bait is also used only by experienced fishermen, since such fishing requires certain skills.
The equipment is prepared as follows:
- A float with a short keel, but the longest and thinnest antenna tip.
- Sinkers of any shape, but one of them should be located near the hook, and the other on the leash to increase the sensitivity of the float.
- High hook.
Fishing with a chrysalis
Pupa baits are used for catching large prey at a depth of at least 1.8 meters, so the equipment is prepared in a special way:
- A sinker of any shape, it should be located at a distance of 30cm from the leash.
- Lightweight float without antenna top.
- Hook No. 20, rounded.
Worm as bait
The earthworm is the most popular bait because it is very easy to fish and is good for beginners.
The equipment should look like this:
- A large float with a hard carbon keel and an antenna-shaped tip.
- Lightweight pellet weights, they should be grouped in one place.
- The size of the hook is selected individually; it must be made of durable material.
Float tackle provides anglers with ample opportunities: with its help, you can practice different fishing styles and catch almost any prey. The main thing to remember is that equipment should always be selected individually, depending on the type of prey, the bait used and the fishing conditions.
How to make a fishing donk with your own hands
There is a great variety of different bottom gear that you can easily make with your own hands. The most popular donks are:
- the simplest, classic donka,
- Donka with an elastic band,
- Donka with a feeder,
- rod for donkey from a spinning rod,
- feeder.
The simplest classic donka
The simplest bottom tackle that you can make with your own hands is a simple reel with the main fishing line wound around it, to the free end of which a hook is attached . The sinker is installed above the hook. In another version of the rig, the sinker can be tied to the very end of the fishing line, and the hook is higher than the sinker. In this case, the hook is attached to the main line using a leash. The bottom rod is missing. Such a donka is popularly called a zakidushka.
An improved version of a simple bottom tackle has some semblance of a fishing rod in its design. Its role in this case is played by a short thin whip on which a reel with fishing line can be attached.
The lower thick and pointed end of this whip is stuck into the bank. The upper thin end is equipped with a loop for attaching the main fishing line. It is most convenient to make a reel for fishing in the form of two wire hooks, which are mounted on the rod approximately in the middle or slightly higher, so that the reel does not interfere with sticking the rod into the ground.
We also recommend reading:
How to properly tie a jig to a fishing line Diagram on how to learn how to tie a hook to a fishing line Tourist knots - types and methods of tying Gardner's loop for a feeder: how to tie
A piece of main fishing line 20 to 50 meters long is wound onto the reel , and a sinker is tied to the free end of it. The fishing line must be strong enough, since it is intended to catch large fish. Above the sinker, at a distance of 30 to 60 cm, a leash is tied: a piece of thinner fishing line 20 to 30 cm long with a hook at the end. There can be several leashes. In this case, they are tied to the main line at such a distance from each other to prevent them from overlapping when casting.
The moment the fish bites is determined by sharp twitching of the main fishing line . To make it easier to track, a bell or small weight is mounted on the main fishing line at a distance of 30 to 50 cm from the thin tip of the bottom rod.
The main disadvantage of the classic donkey is the need to cast the tackle every time there is a need to remove the catch from the hook or check the safety of the bait. Every new cast of the tackle creates a noisy splash in the water, which scares away sensitive and cautious fish like carp or carp. You have to wait a while until everything calms down and the fish approaches the bottom again.