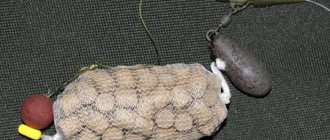
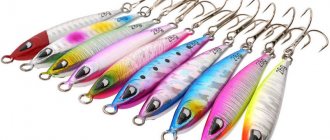
DIY silicone baits
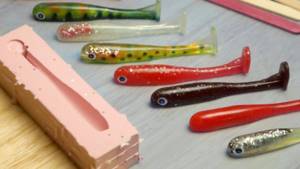
During the fishing process, some silicone baits lose part of their bodies, and it is a pity to throw them away after that. If you collect several processed silicones, you can use them to make new working baits.
Manufacturing technology
- In the prepared container, gypsum is diluted to the state of thick sour cream. After this, old vibrotails or twisters are dipped into the solution to obtain templates; after the plaster has hardened, the baits are removed very carefully so as not to damage the mold. If there are any irregularities, they are smoothed out with a sharp, thin object.
- The mold prepared in this way is thoroughly greased. The most suitable option is sunflower oil. This is necessary so that the finished product does not stick to the mold during the manufacturing process.
- All mold filling operations must be performed outdoors or in a well-ventilated area.
- Old, used silicone products are crushed into pieces and placed in a bowl that is heated on the stove. To prevent the silicone from burning, it must be stirred regularly, and the fire should be at a distance of 15-20 cm from the container with silicone. If you add dyes to silicone, you can get bait of the desired color, and if you add flavoring, it will become edible silicone.
- The well-heated and thoroughly mixed mass is poured into the mold. If you plan to get a two-color bait, then each new layer is poured after the first layer has dried.
- After about 15-20 minutes, when the silicone has cooled, the finished bait is removed from the mold, the mold is cleaned, greased with sunflower oil and the process is repeated.
DIY silicone baits...bogomaz05
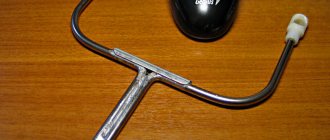
DIY mini clasp for changing attachments
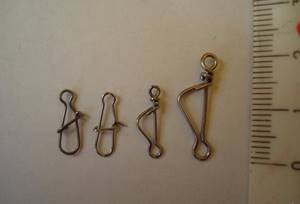
Almost always, when fishing, it is necessary to quickly and efficiently change the bait or modify the equipment by changing the leash or feeder. For these purposes, there is a fastener design that is quite small in size. Making it at home will not be difficult.
Manufacturing technology
- The following tool is required:
- wire cutters;
- round-nose pliers;
- tweezers.
- The basis of the material can be a large stapler from a stapler.
- The wire is bent with pliers into a shape similar in appearance to a paper clip, but smaller in size.
- Excess ends are cut off with wire cutters.
- A cambric of the appropriate size is selected so that it fits freely on the fastener.
- The size of the cambric should be slightly larger than the fastener, so the excess is cut off.
- A piece of cambric is put on a fishing line and secured with a knot.
- Any bait is attached to the other end of the mini-fastener, after which, with effort, the cambric is pulled.
- Mini clasp, ready to use.
DIY universal fastener in a minute. Fishing.
Quirky Switch buildable multitool for fisherman
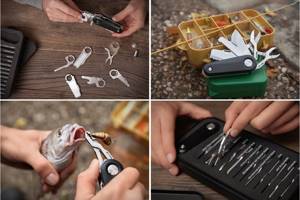
Quirky Switch is another specialized multi-tool for those who like to cast a fishing rod or spinning rod at 4 am. Unlike Kombo, the accessory in question is made in the format of a folding knife and can easily fit into a pocket. Moreover, you can independently determine the current set of blades, of which there are 12 in the set, but the multitool only holds five pieces. In terms of tools, Quirky Switch offers a knife, a wood saw, a serrator, a bottle opener, a flathead screwdriver, a miniature flathead and Phillips screwdrivers, a nail file, pliers, scissors, an LED flashlight, and a few other small items.
Feeder for feeding fish from a boat
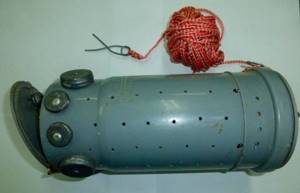
For those who regularly fish from a boat, it will be useful to have a simple but effective feeder. It will come in handy if you have to fish on a river where there is a current. To do this you will need the following elements:
- a piece of plastic sewer pipe;
- two fasteners;
- lead;
- electric drill;
- rope, rivets;
- loop and lock.
A piece of pipe up to 30 cm long is taken and plugs are installed on both sides. One of them is installed solidly, and the other is installed in such a way that it can be easily removed. After this, holes are drilled over the entire surface. A rope is attached to the plug that opens. To prevent the plug from opening on its own, a lock or latch of any design is installed.
On the reverse side, where the plug is rigidly fixed, weights should be secured.
The feeder is lowered to the bottom on a rope and remains there until the end of fishing. Thanks to the drilled holes, the bait is slowly washed out of the feeder, which allows you to keep the fish at the fishing point.
DIY feeder for fishing from a boat. Feeders for fishing from the boat with their hands.
Camera "Piranha" for fishing

When you fish, you almost never see what is happening in the depths of the water, how the fish grabs the bait and, in general, what kind of magical life is happening there. But this is the most magical moment when you feel that some sea or river life has caught on a hook, and you begin to drag your prey. Imagine what a thrill it would be if you could then see all this underwater with your own eyes?! Piranha camera, this is now real. The compact device attaches in front of the spinner and records in 480/30p resolution. Not HD, but quite enough. The device is waterproof to a depth of 10 meters and can work without recharging for 2.5–3 hours. There are many alternatives in the link below.
DIY wobbler

Every spinner wants to have a good, catchy wobbler, but not everyone can afford to buy one. As a rule, wobblers are expensive baits, especially if they are related to well-known manufacturers.
In this regard, some fishermen have mastered, and very successfully, making wobblers at home. This is a very interesting and exciting process that does not require special equipment or tools.
How to make a wobbler
- To begin with, you should decide on the shape and color of the future bait. To do this, you will have to take up art and draw a sketch of the future wobbler on paper. Regardless of the material of manufacture, the wobbler is made of 2 symmetrical parts. There should be a reinforcing wire running inside them.
- Foam can also be used as a material for manufacturing, but it is not as durable as wood or plastic. Therefore, having taken the necessary material, they are engaged in the manufacture of blanks.
- Fastenings for rings and tee hooks are prepared from thin stainless steel. The fasteners are mounted in specially cut out places located on the body of the 2 halves of the bait. the two halves are connected using glue. After the glue has dried, a cut is formed for the front blade, after which it is rigidly attached using the same glue.
- After this, the wobbler should be adjusted based on personal preferences.
- Any depressions or voids left on the bait are filled with epoxy resin, after which the bait is sanded and prepared for painting. Painting is also carried out depending on your own imagination.
Making a wobbler with your own hands
Fishing sweatshirt
I recommend this sweatshirt to anyone who is serious about fishing. Even a child knows that proximity to water adds coldness. The fishing process lasts for hours, or even the whole day. Therefore, to maintain health, it is necessary to insulate yourself. Fleece clothing will be just right.
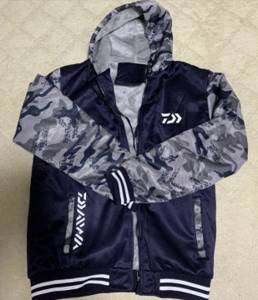
The coldest hours of the day are night-early morning, at about 3-4 o'clock. Fishing enthusiasts can go to the reservoir just at this time. It can be cold even in summer, a sweatshirt will be in place.
It has a soft lining and a hood. The size range is pretty standard. But it won’t hurt to look at the table once again. I recommend not limiting yourself to just this set of clothes. Especially for those who go into the water while fishing.
✨ We pick it up with a good discount - 25%