Fishing tackle is an important part of a fish hunter’s equipment. To catch an aquatic animal without a fishing rod and hook, you need strong tackle. Sailors need reliable methods of fastening. However, the knowledge accumulated by sailors will also be useful in everyday life. For example, handicrafts, rock climbing, both at home and at work. You will never be able to say with certainty what awaits you in a few hours, and it is better to have in your stock a strong and reliable ligament technique, one of which is a surgical knot.
By an interesting coincidence, this type of mating is called surgical by sailors, and by the adherents of Hippocrates themselves - naval. This causes inaccuracies in interpretation. Today we will tell you how to knit such a weave, what varieties it has and where it came from.
Use and features of the surgical knot
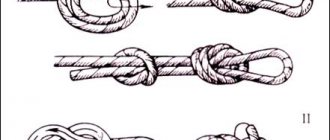
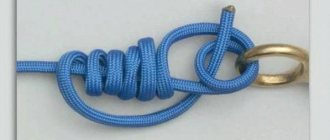
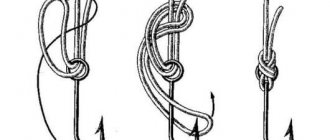
An easy way to tie a thread. It is mainly used when tying two different threads with approximately the same cross-sectional diameter. It will come in handy when one of your climbing ropes breaks, when fastening household rope, for creating a hammock on a tree, while traveling (Figure 1).
Suitable for a wide range of materials including:
- Nylon and other synthetic fibers. In particular, vicryl, monocryl, fluorocarbon, and a number of monofilaments.
- Ropes made from natural materials, twines, cables, cords, sewing threads.
- Flexible vegetation and even dough are enough.
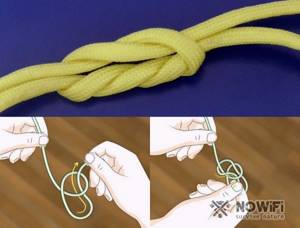
The peak load is no more than 27 kg, but it also depends on the material. It is one of the most popular in medical practice.
Historical reference
It began to be used in fishing after the advent of monofilament threads like fishing line and gear based on this material. This plexus technique comes from medical textbooks and operating rooms.
In terms of its structure, the fishing line used by fishermen is almost identical to the medical ligatures that are used in surgical techniques to stitch together tissues when they are torn.
According to some features, it is similar to a woman’s knot, but contradicts the principle of its construction. It is synonymous with double running, because the very name “surgical” implies two turns. The surgeon's handbooks describe two main methods of tying it - with one hand and with two. While the first method is quite risky, it can still come in handy when one hand is irreparably busy.
Advantages and disadvantages
The double surgical has several operating configurations that are used based on the conditions and circumstances for which it can be used.
Loops used in surgery
Women's, mother-in-law's, and thief's knots are given for reference only as examples of improper tying of knots that differ from sea knots.
One of the conditions that ensures the strength of the seam is tying knots that secure the threads. Tying knots is an important element of any surgical procedure. A surgical knot is the result of the sequential execution of two actions:
- formation of a loop due to mutual entwining of the ends of the thread;
- tightening the loop tightly to bring together and firmly hold the connected edges of the wound (the actual formation of a knot).
Correct execution of all the details of these actions ensures the achievement of high quality surgical units, which are subject to numerous requirements.
Requirements for units used in surgery
1. Ease of implementation.
2. Maximum strength with a minimum number of loops.
3. Minimum unit volume.
When forming loops and tightening the knot, it is necessary to use techniques to avoid:
1) thread chafing and tissue damage when tightening the knot;
2) weakening of the previous node when performing each subsequent one.
In practice, you have to use different methods of forming loops and tightening knots.
Methods for forming loops
Methods for forming loops (knots) used in surgery are divided into two groups:
- manual;
- instrumental (apodactyl).
The main method of forming loops and knots is manual. Apodactylic methods are used in the following cases:
- for tightening a knot deep in a wound of complex shape;
— in microsurgery;
— in endovideosurgery.
In the latter case, loops can be formed both extracorporeally and intracorporeally.
The instrumental method of forming and tightening knots, compared to the manual method, can significantly reduce the consumption of suture material.
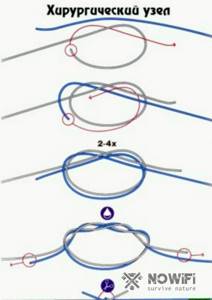
Loops used in surgery are divided into single-wrap (simple) and multi-wrap (complex) (Fig. 65).
Rice. 65. A simple loop formed by wrapping a thread once (the left part of the thread is dark, the right part is light) (according to: Semenov G. M., Petrishin V. L., Kovshova M. V., 2001 [53]).
Increasing the mechanical strength of the knot by increasing the contact surface of the thread is achieved by increasing the number of entanglements, the number of which varies from 2 to 4 (Fig. 66).
Rice. 66. A complex loop formed by repeated winding of a thread (the left part of the thread is dark, the right part is light) (according to: Semenov G. M., Petrishin V. L., Kovshova M. V., 2001 [53]).
A knot when tightening a loop with a double twist of thread is called a surgical knot (Fig. 67).
Rice. 67. Double-turn loop of a surgical knot (according to: Semenov G. M., Petrishin V. L., Kovshova M. V., 2001[53]).
A significant increase in strength due to an increase in the contact surface of the thread can contribute to the manifestation of the “sawing” effect and its fraying.
Depending on the number of loops used to fasten the ends of the thread, knots are divided into three groups:
- single-loop;
- two-loop;
- multi-loop.
Single-loop knots
usually used for temporary fixation of the thread (for example, when applying so-called stay sutures) (Fig. 68). After completing the appropriate stage of the operation, the thread secured with a single-loop knot can be easily removed.
Rice. 68. The use of single-loop stay sutures for intestinal surgery (according to: Semenov G. M., Petrishin V. L., Kovshova M. V., 2001 [53]).
Double loop knot
most often used. The second loop, as a rule, securely fastens the thread, preventing the knot from untying or slipping.
In surgical practice, double loops are used to form simple (female), marine and complex nodes.
Application options with fishing gear
Fishing gear has a fatal flaw: it is consumable. But by improving your knitting skills, you can minimize the chance of losing valuable sinkers, hooks and jigs. Surgical braiding allows you to connect different types of fishing lines together, thereby opening up new possibilities for securing gear parts. It is mainly used for feeder-type fishing gear that uses additional feed to attract fish. Note: Since aquatic life is almost always hungry, the feeder must be secured firmly, otherwise there is a high risk of losing the fish and part of the equipment.
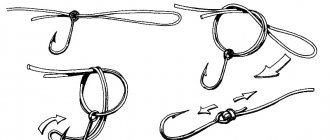
For knitting gear, in places where it is not necessary to fasten two different fishing threads, a loop version is used.
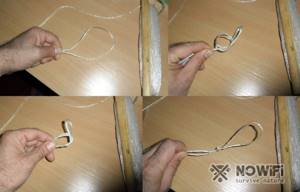
How is it done?
- In the place where the loop is supposed to form, bend the thread in half, with a margin of 5 cm.
- Now take the folded loop and form a ring on it as for tying a regular knot.
- Thread a loop through it 3 times.
- It should look out of the ring with its eye, slightly wrapped around the double thread.
- After this, tighten the loop.
Symmetrical loop
A relatively simple method of knitting tackle, which uses a surgical loop knot to secure the feeder to an equal double loop without distortion in length. It has increased sensitivity to bites and is suitable for fishing in calm waters without serious current eddies (Figure 3).
The advantage is that it is a removable part that can be detached from the end of the line of the fishing line, since it is attached using the “Loop to Loop” method.
It also has the property of self-cutting due to the fixed feeder. This happens thanks to a leash with a hook, which is located at a certain distance behind the feeder. Trying to grab every piece, the greedy fish swallows the hook along with the scattered bait, after which it hooks, trying to cope with it, because the feeder rests on the bottom.
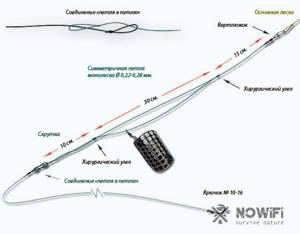
Figure 3. Symmetrical loop for attaching the feeder
Where is the best place to use this gear? On reservoirs with fish, stunned with hunger, entering the feeding stage, which loses all fear and shamelessly eats everything it sees. Unfortunately, larger fish will not mindlessly risk their carcass, but every animal is greedy for food. Most often you will come across medium and small fish; larger specimens may be disdainful. The second condition is a tenacious bottom, where the sinker will have something to cling to to achieve the self-cutting effect.
How to correctly form a symmetrical loop?
- Take a spool of fishing thread and a measuring tool. It is recommended to use fluorocarbon as a material, but ordinary braid will also do.
- Measure exactly one meter. Focus on the distance from your elbow to your wrist, measure this length twice.
- Place one end to the other and trace the middle with your fingers. After this, form a loop at the bend.
- Knit a loop with medical weaving for security.
- After this, begin to form the twist, its length should be approximately 10 to 15 cm, as desired. What is it for? It adds rigidity, thereby minimizing the chance of it being thrown over the main thread.
- You can make your work easier by holding the loop in your teeth or draping it over a pencil.
- Having brought the twist formation to the border, tie it with the above-mentioned knot.
- Now take the thread from the other side and thread a swivel onto the thread, then adjust it to the border with the twist.
- Measure 10-15 cm from the fastening where the swivel is located, and tie medical weaving there. The swivel is now fixed inside the symmetrical loop.
- Next, tie the two ends into one and form a loop.
After carrying out all the above steps, all that remains is to secure the feeder. If desired, select a weight that is convenient for you, taking into account complementary foods. Please note that the effectiveness of the weight can be affected by factors such as bottom texture, current strength and even the turbidity of the water. Take them into account when thinking about selecting sinkers. It is recommended to have a couple of feeders with a difference of several tens of grams.
Asymmetrical loop
Another use of a surgical knot in fishing would be an asymmetrical loop (Figure 4).
In this case, your prey is a cautious inhabitant of fresh waters. The advantage of an asymmetrical loop and its main difference from a symmetrical one is the absence of the feeling of a load when swallowing bait. The fish will not feel the load until it is too late, therefore, they will not suspect a trick and will be more willing to bite.
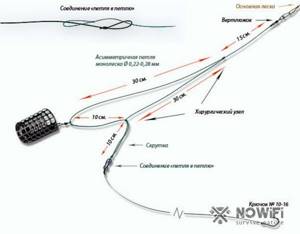
Figure 4. Asymmetrical loop is great for catching wary freshwater fish
This is achieved precisely thanks to the asymmetry of the garter, because all the weight goes into the feeder. Increased stability of the gear will also be an additional advantage. Any vibrations, interference and twitching will be absorbed by the feeder, not reaching the hook. This way, invisibility will remain, and the fish will not suspect anything. For a full effect, it is recommended to use fluorcarbon threads up to 0.30 mm inclusive. For what? Fluorcarbon has a good refractive index, comparable to that of water.
- Who is the main prey? A cautious, trophy-class fish that, even during the feeding period, will not rush to a hook moving suspiciously in the darkness of the waters. An important point is that this type of tackle is only suitable for bottom-feeding fish, not for active predators.
- Main application? Rivers with fast and medium flow. Also suitable for fishing in bad weather, wind and other natural disturbances.
- Flaws? Your game is a large and wary fish, capable of breaking loosely tied nets.
Unfortunately, this is also a consumable material, so it is recommended to make such a knitting with the expectation of replacement, and not attaching it to the main fishing line. Tying a surgical knot at the control points of this tackle will increase its reliability.
How to make?
- Go through the steps of making a symmetrical loop exactly until the moment of forming the twist and garter of its honey. By weaving.
- Place the swivel on one of the ends and bring it to the connection with the twist.
- Now hook the feeder to the swivel.
- Pull it 2 cm away from the knot. Great, remember this point because it's a critical point. Also take a close look at the base of the loop from the twist side. The gap between the knot where the loop for attaching the hook is located and the beginning of the feeder should be within 2 cm.
- Without taking your eyes off the swivel, secure it in this section with a second knot. Measure along the second segment 12-14 cm.
- After fixing the swivel, form a loop at the opposite end.
- The equipment is ready.
Like its symmetrical neighbor, this loop has the cunning property of self-cutting. This is achieved due to the absence of tangible resistance. After swallowing the hook, it does not tighten, and the fish continues its movement.
The hook goes deeper into the flesh of the fish, and when it realizes what has happened, it makes a sharp jerk to the side. Here the weight of the feeder comes into play, representing an obstacle that gives the hook the opportunity to go even deeper and finally catch on to the fish.
Gardner rig
Light, simple, unpretentious. It was created by the talented angler Steve Gardner when he thought of a way to simplify feeder fishing to avoid long sessions of braiding tackle. Suitable for both beginners and experienced fishermen. It has exceptional sensitivity, which is due to the simplicity of the design, but whether it can compete with an asymmetrical loop is debatable. The main advantage is that the texture of the bottom does not affect the effectiveness of the gear; even if the feeder sank in unstable mud, the fish can still be felt (Figure 5).
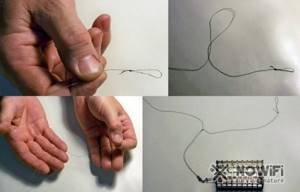
Figure 5. Gardner rig can significantly simplify the fishing process
Who is the main prey? Any type of peaceful fish, regardless of caution. But versatility comes at a price.
Application area? It shows itself ideally when the bottom texture leaves much to be desired and other gear does not work. Designed for running river water. This is a simple variation of the feeder fishing loop, requiring a minimum of movements.
How to weave it?
- Take a reel of your monofilament.
- Rewind about 50-60 cm.
- Form a surgical knot on the fishing line with a 10 cm long loop.
- After this, thread the swivel on the clasp into the loop. An alternative is to place a swivel in the loop before tying it.
- Attach the feeder to the mounting.
- Now lift the installation, holding it by the loop weave.
- Take the remaining end and take a closer look.
- The gap from the end of the feeder to the beginning of the fastening loop in the remaining part of the thread should be 2 cm, with an error of 1 cm.
- Having measured the distance, start knitting a medical loop.
- Installation is ready.
There are various ways to implement this gear. Some suggest attaching the entire equipment to a swivel, making it removable. But this will visually clutter the structure, which will reduce its effectiveness against attentive and timid fish.
Types of surgical nodes
We move from theory to practice. Let's look at how to properly braid various types of surgical knots. There will be three of them in total.
Simple
There are three different types of surgical knot techniques, including the simple one. This plexus is also known as the female plexus. But its main name is a simple surgical knot, and its main purpose is to teach the knitting process (Figure 6).
It is woven as follows:
- At the fastening point, we intertwine the two ends once.
- After this, we form a loop using the tails as for tying a regular bundle.
- We tighten it.
Now try to untie this ligament. It doesn't hold its ligature well, but it's good for fastening something for 10 minutes.
Nautical
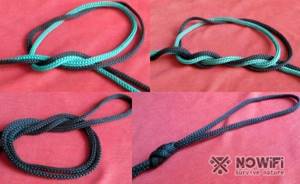
A stronger version of the previous weave is called a naval surgical knot. It is relatively more reliable, but still has its drawbacks (Figure 7).
How to tie this surgical knot?
- As you can already understand, this is a complication of a simple variation.
- According to the technology, it is necessary to intertwine the ends twice, but for greater strength, do this three times.
- Make a ring, tighten the ends - the knot is ready.
This ligament will be much stronger than its predecessor, try to untie it yourself.
Complex
It is called complex for increasing the number of loops formed. More than one, usually two or even three - a fishing surgical knot has a flexible design. Physically more voluminous than its counterparts, precisely due to the increase in the number of loops.
It is knitted as follows:
- To conveniently implement this knitting, you need to measure out your ends with a reserve.
- Let's remember the moment of knitting a loop on a sea rope.
- From the ends remaining after the first loop, form another loop.
- If there is enough length, make a third one, it has a stopping purpose.
- For a completely dead fastening, you can add another loop.
An attempt to untie a surgical knot at this level will not be successful, but if you get the hang of it, you can spend a couple of evenings on it. After casting on more than two loops, it is not recommended to bother with untying this fastening, so just cut it off.
Fishing
One of the main advantages of the surgical unit is that it can work without the use of fingers, but with the help of a tool. All anglers know how difficult it can sometimes be to tie a knot, loop or rig on a line. The cord is very thin and soft. It is difficult to hold it in your fingers, it is difficult to insert the tip into a loop, it is difficult to twist. The cut end may start to get a little frizzy, which makes working with it even more difficult.
Many people completely abandon knots and classic rigs using a cord, and replace them with knotless American ones, as in jig fishing. But a real feeder adheres to traditions and uses a tool - a looper. The looper allows you to make a surgical knot, while making a slightly modified loop, almost like in the previous example.
The difference from the classic surgical knot is the greater strength of the knot made using looper. The fact is that in this case the number of fixing turns of the thread is exactly the same as the main turn. This slightly modifies the surgical knot, allowing you to make non-tightening loops. Working with looper is quite simple; on average, it takes a person a couple of hours to master it. But then you can knit the loops at the same speed as an experienced surgeon fixes the thread at the base of the suture. The Gardner loop is a feeder installation that actively uses the surgical knot.
In addition, you can use a surgical knot for auxiliary purposes. For example, tie the boat that was used to travel to the fishing spot, or tie the awning to the posts. The number of cases when an angler needs a good knot is large. And knowledge of a surgical site will never be superfluous.
Technique for tying a surgical knot
Great, you have mastered the three basic principles on which this plexus is based. Now let's move on to its variations modified to suit specific needs. There will be two of them, and they have different purposes.
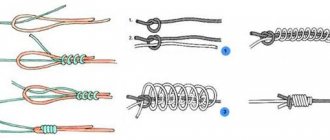
How to tie a feeder knot? It’s clear that you are interested in the loop (Figure 8).
It is necessary to implement loop-loop fastening in removable installations:
- Start simple. Take a spool of regular thread.
- Cut yourself a piece about the length of your palm.
- Take the end, measure three phalanges of your finger and fold it in half at this point.
- You have a coiled thread in your hands, great. Now stretch it a little at the intended place of attachment of the ligament.
- Take the fold by the tip, form a loop and thread the fold through it twice.
- Tighten. You should end up with a loop with a thick attachment at the base.
If you are making loopless installations tied to the main fishing line, then the procedure will be slightly different.
For fishing, the surgical plexus scheme will be as follows:
- Place the ends that need to be tied together on top of each other.
- Allow a margin of 5 cm in each direction.
- Pull the ligament tight.
- Form a ring into which the two ends of the loop should fit on one side - the leading and driven ones.
- Tighten the knot gradually.
- Now try stretching the ends in different directions. If they come undone, then you made a mistake somewhere.
- Repeat the procedure until a strong bond is obtained.
Surgical loop – How to knit Fishing knots video
Fishing knot Surgical loop (Surgeon's Loop knot) for attaching leashes and sinkers using the loop-in-loop method video - How to knit “Fishing knots” you can watch online in good quality on our website. Enjoy watching!
Fishing knot A surgical loop, also called by fishermen an end loop or a leader loop. Due to its simplicity and exceptional strength, the Surgical Loop Fishing Knot is very popular among anglers. The surgical loop is suitable for knitting loops on both monofilament and braided lines.
To ensure that the Surgical Loop knot made of slippery braid does not “float”, instead of two turns it is better to make three or four turns of the loop. To learn the Fishing Knot Surgical Loop correctly, just watch this video. It has found wide application in fishing practice. In particular, when knitting non-tightening end loops on a fishing line, for connecting the leash to the main fishing line using the “loop to loop” method, etc.
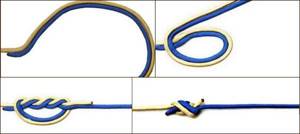
Scheme of connecting two fishing lines of different diameters
It just so happens that you have on hand samples of two fishing lines of different diameters that need to be combined into one. There are several ways to do this. For example, a surgical knot for fishing on a feeder will not be fundamentally different from those described above, but there are more complex modifications designed to strengthen the connection between the two fishing lines (Figure 9).
Let's move on to the obvious, and complicate the situation as we go along:
- We take the ends of two fishing lines that need to be tied.
- We bend it with a margin of two fingers.
- Now intertwine the end of the smaller diameter fastening thread with the larger fishing line.
- Do this on both sides of the thick line fold. Weave at least three times on each side.
- After this, tighten the loop. You've got an academic knot weave, known for its strength.
A more complex version of the double surgical knot is the greener. It is used to fasten hooks.
You will need to do the following:
- Intertwine the two ends of the fishing line, making at least 3 wraps with each end.
- Lightly clamping the ends, make a hole in one of the middle turns.
- Pull the ends through the resulting loop.
- Tighten and trim the ends.
Great, you've completed a Greener knot to attach two different lines. It has a high level of strength and stability, but the number of revolutions directly affects its reliability. Aim for a minimum of two and a maximum of five. Avoid overly thickening the ligament, as this can make your rig unnecessarily bulky.
How to fix the thread at the base of a surgical suture
Of course, this has an indirect relation to fishing. However, in order to tie a swivel at the end of a fishing line, and for other purposes, it is quite suitable. A description will be given of how to make a fixation using your hands. Experienced surgeons do everything using available tools - clamps, tweezers. This is one of the main advantages of such a knot - the ability to make it using a tool, but more on that later. The use of the instrument saves the surgeon’s fingers from pricks, which saves the doctor from infections when performing operations on patients, for example, HIV or tuberculosis, as well as minimizing contact with large surfaces such as gloves to reduce the likelihood of microbes from outside being introduced into the treated wound.
- At the beginning of the suture, the surgeon threads the needle through the edges of the wound.
- He then makes a loop, which he crosses on his finger, placing one end of the thread over the other.
- After this, one end of the thread is passed through the loop several times.
- A loop is formed, and it tightens, tightening the edges of the wound.
- Then make another loop on top, passing one end of the thread into it and tightening it. It secures the knot from unraveling quite reliably.
Victoria Leshchenko
I've been working hard in the fishing tackle department for the past six years. I can help you assemble almost any gear.
Ask a Question
This type of knot is used by all surgeons, without exception, at least once in their practice.
We tie two threads with a simple surgical knot
Practice, practice and more practice. Before you learn how to quickly connect everything that catches your eye, you need to try yourself on something simple. You probably just want to tie a loop more securely on your sewing needle, but the standard methods aren't working for you. In this case, the simple sea stitch described above will suit you; it will be enough for sewing.
Let's look at how surgical knots are knitted to connect two different threads:
- Essentially, the design will not differ from the previously described options. However, it is recommended to use more complex curls for different threads.
- Use fasteners with threads parallel to the loop.
- It is recommended to knit with this weave only ropes with a dense texture, i.e. the fastening does not hold the binding for a long time or under loads.
Let's sum it up
- The concept of a surgical knot combines 3 different installations at once - simple, marine and looped.
- Various versions of this connection can be used to fasten two fishing lines or mount swivels, carabiners, sinkers and other equipment elements. This installation has gained the greatest popularity among bottom fishermen. It is quite often used when fishing with a feeder and similar gear.
- The disadvantage of a conventional Surgical Knot is that it is not well suited for assembling two long lines (for example, if the main line is broken and two parts need to be connected). The marine version does not have such a defect.

