Knitting fishing knots and loops is an integral and one of the important parts in fishing science. Probably, every fisherman has had this experience when the bite is interrupted due to poor-quality connection of the equipment elements and not only the long-awaited catch is missed, but also expensive fishing accessories. Such a failure will unsettle even the most “experienced” hunter. It is at such moments that you understand that everything requires quality, accuracy and skill.
In this article, we have selected for you the highest quality and most reliable fishing knots, the technique and knitting of which we will consider in detail.
How to tie stopper knots
Material for making locking units:
- monofilament line;
- wool thread.
The purpose of the stopper assembly is to set the bait or equipment elements to the required depth.
Area of application : float fishing using a sliding float when fishing over long distances.
Requirements for a sliding float stopper:
- must determine the required depth of descent of the float for fishing, and securely fixing it on the fishing line;
- the fastening of the locking unit must be movable, but without independent movement;
- the knot must pass freely through the gear rings;
- should not deform the main fishing line.
Stopping units are prepared immediately before the fishing process on site. Before you start tying a knot, you need to first moisten the fishing line (with water or saliva) so that it does not heat up during the process and thereby weaken the knot itself.
A detailed article about monofilament fishing line, its characteristics, features, and advantages is here
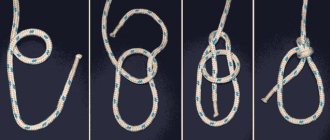
“Single knot” For knitting you will need a 15 or 20 centimeter piece of monofilament (wool thread)
Node linking scheme
Knot “Double” or “kremkus” For this knot design, you need to fold the fishing line in half
Knot “Stop Clinch” or “clinch knot”
Knot “Bud” or “button knot” In order to learn how to correctly knit this type of locking knot, we suggest watching this video
Important! The diameter of the monofilament line should be slightly larger than or equal to the diameter of the main line.
Advice:
- In order not to waste precious time on tying knots when fishing, you can prepare several stoppers in advance by taking a plastic tube (for example, a cocktail tube) no more than 10 cm, put it on the main fishing line and tie several of your favorite stoppers onto the tube. Then pull the tube and tighten the knots on the fishing line.
- It is better to knit two knots at once, one of which is well tightened, this will help fix each other when landing fish.
- When tying a knot, you need to control the tension of the thread, since when it relaxes, it can become deformed, which will affect the quality of the structure.
- The remaining tips do not need to be cut too short, as they help the knot pass easily through the guides of the rod blank.
- We do not recommend hanging beads between the knot and the float.
Fishing knots and their testing
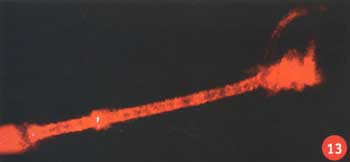
The laser beam comes out from the L G-311 gas laser. Then it passes through a collecting lens (this is done to focus the beam). At the focal point (the point where the beam of light becomes focused) we place a platform on which the fishing line is attached. The laser beam enters the cross section of the fishing line - using the same principle, light is launched into an optical fiber (light guide). Next, our beam spreads along an improvised “fiber fiber”. The laser passes along the fishing line without stress caused by knitting a knot, about 12-15 cm (photo 12), and the intensity of the glow at the points of passage is almost the same, only minor fluctuations are discernible. So, to put it quite roughly (from the point of view of physicists, but clearly for you and me), in places where the glow weakens, there are tensions in the fishing line. At first glance, it looks like alchemy, but there are physical explanations for this - the anisotropy of the fishing line changes, as well as, slightly, the optical density and optical thickness. If we repeat the experiment, only this time with a knot previously tied on our fishing line, then, armed with a microscope, we will be able to see with our own eyes the “tension zones” on the fishing line. In photo 13, places with a weakened glow are visible in front of the knot (on the right) and immediately behind it - these are the most “cliff-dangerous” places on the fishing line.
Having analyzed the experiments made, we will now try to create a short recipe for a high-quality nodal connection. As we have already understood, one of the main enemies of the strength of monofilament fishing line in general, and, therefore, of knot joints for monofilament fishing lines, is torsional deformation.
In other words: a twisted fishing line is a weak fishing line, and a knot that causes significant twisting of the fishing line during the tying process is a weak knot. Next are the not entirely predictable properties of the fishing line, which are not so easy to describe on paper. These are different stresses (tangential and normal), and not very good fluidity of the line... A simple way to try to solve the problem is to wet the line before tying a knot, which should reduce friction and prevent damage to the line at the knot joints. In any case, the coefficient P (the ratio of breaking loads, see above) will be clearly greater than with the dry tying method. During testing, we knitted knots exclusively in a dry manner in order to eliminate the error that arises from unequal wetting of different knots. To be fair, we note that a knot wetted during the knitting process turned out to be stronger than its dry “clone” by an average of 1-8%.
Regardless of the type of knot that we want to make, one of the key points when tying, which largely determines the strength of the future connection, is the stage of final tightening of the fishing line. A carelessly tightened knot is unlikely to show good results during testing. Most of the knots known to us are tightened simultaneously from both ends - the root (from the coil side) and the working (short) one. Therefore, when tightening, you have to break between two fronts at once: we tighten the knot with our fingers from the root end, and with our teeth (because we haven’t been able to come up with anything better yet) - from the working end.
A good knot is a beautiful knot. We can say this with absolute certainty, because with proper tightening, the knots usually come out even and symmetrical in the longitudinal plane. In general, it has long been noted: if you put your soul into something, it will certainly succeed.
Well, that's all. We really want to believe that the knot tied by a person who has mastered this article will not let its creator down at the most crucial moment, which all real fishermen are waiting for with bated breath.
The authors thank the Department of Experimental and Theoretical Physics of BITU and personally Razvin Yuri Vladimirovich, Ph.D., Associate Professor of BNTU for their assistance in organizing testing. — for the provided samples of fishing lines.
How to tie two fishing lines together
The area of application of knots for fishing lines is mainly float, bottom and fly fishing. As a rule, the main fishing line and leader are tied with such knots, and in fly fishing - undergrowth.
What is connected:
- lines of different diameters between each other;
- fishing lines made of different materials (for example, monofilament and braid);
- in case of a break during fishing - the main line of 2 pieces;
- main line and shock leader (a thicker piece of line and 2 times longer than the rod, which takes on the entire load when casting).
Important! When tying two lines, you need to make sure that the strength of the lines at the knot is not affected. When tying pieces of fishing thread or shock leader, you need to ensure that the resulting knot passes freely through the rings of the tackle blank.
Knot “Triple” or “three - water knot” It is important to remember that when tying this type of knot you need to take monofilament fishing lines that differ in diameter by no more than 0.05 mm. It is by following this rule that the fishing line will retain about 90% of its load.
This knot will not fit through the guides of your rod, so it is best used in rigs where this is not required.
And here is the training video
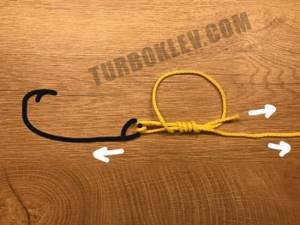
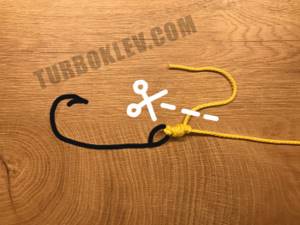
Knot “Loop to Loop” or “double loop junction” A connection called “loop to loop” is a good alternative to a swivel. A fairly strong and reliable connection used for attaching the main line and leash.
How to make loops correctly, see the diagram
The blanks for forming the connection are nodes called “surgical”.
Training video for beginner fishermen from the channel “FishingVideoUkraine”
Look at the diagram and don’t make mistakes!
Knot “Blood Ties” or “blood knot” Other English names for this knot:
- attach knot;
- fisherman's bend knot.
To tie this type of knot, fishing lines with a difference in diameter of no more than 30% are used.
The advantage of this unit is not only its strength, but also its compactness, so that it can easily pass through the rod's guides. The disadvantage is that it is labor intensive and requires skill to perform.
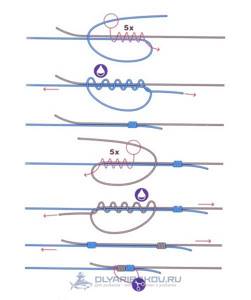
We align the free ends of the two threads with each other. Then we make 5 revolutions relative to each other. We pull one end of the thread back and drag it under the first turn. We perform a similar manipulation with the second end.
“Double Sliding” Knot This knot can be made as a connecting element of two monofilament lines, or a monofilament with a braided cord. However, the diameters of the material used should not differ by more than 50%. A fairly strong knot, it has an advantage over a blood knot.
And here is the execution diagram of this node
How to tie two fishing lines with a Grinner knot
To tie two fishing lines with Grinner, you need to make two knots. This connection is also called a double Grinner, like the previous version, used for tying hooks, lures and the like.
- The threads must be folded in half and a loop must be formed from one of them.
- Make 5-7 turns with the free end inside the loop around two folded lines, moisten the connection.
- Tighten the knot.
- Do the same with the second line.
- Trim off excess ends.
What types of lines are connected to each other does not matter. They can be the same or different in type - for example, braid with braid or monofilament with braid.
As mentioned above, the advantage of Uni is that it can be used to connect two fishing lines with a fivefold difference in diameters. If the knot is tied correctly, the connection will be strong. It takes practice to learn how to knit a neat, even Grinner that will hold two threads securely.
How to tie knots to connect monofilament line and braid
Conditions affecting the strength of the braid:
- fishing line structure;
- diameter;
- wetting the cord.
It is known that one of the disadvantages of braided fishing line is its ability to become flat after several times of use. Therefore, when forming a node, you need to take this into account. You should also know that the strength of the knot is also affected by the thickness of the cord; the thicker it is, the weaker the knot is.
Read a detailed article about braided fishing line, its characteristics, features, advantages here
“Shock Leader knot” The knot is not large and can freely slide through the rings of the rod, which gives it an advantage in use in many types of fishing.
This video clearly shows the order of execution of the node
Knot “Mahin leader knot” or “carrot” This is a reliable and compact knot, suitable for spinning rods, feeders and carp rods. Excellent connection between braid and monofilament or fluorocarbon leash. When fishing for carp, it is perfect for tying on a shock leader.
If vases have difficulty tying this knot, watch this video from V. Nikolaev
Albright knot When it comes to quality, we mean a universal knot for fishing with various gear. If you are exclusively engaged in spinning fishing and you need to tie a thin fishing line and braided cord or fasten a leash, then by all means use this tying method. But do not neglect the main rule of tying fishing lines - the fishing lines should not have a strong difference in diameter!
For float fishing, the knot is used instead of a swivel, when its presence is not appropriate, since particularly delicate elements of equipment are used and the swivel spoils everything with its bulkiness.
Double greener knot. DOUBLE GRINNER KNOT, DOUBLE UNI-KNOT
Grinner knot, or Uni knot, is one of the best fishing knots that many people actively use. A lot depends on the strength of fishing equipment. To reduce the number of breaks to a minimum, it is necessary to reliably connect different elements of the gear. Therefore, nodes must be selected carefully. The Grinner is a great option for a variety of fishing situations. Let's consider its features, pros and cons, scope of application and knitting methods.
Content
Features of the unit, advantages and disadvantages
The name Uni is more often used in the USA, while Grinner is more often used in Europe. This knot comes from the Hangman's Knot. In its modern form, Grinner was invented in the 1960s by Norman Duncan.
Grinner's prototype was included in the Ashley Book of Knots, which was published in 1944. According to Pro-Knot Fishing's list, Uni is one of the top 12 fishing knots. It’s also interesting what exactly Uni recommends for knitting its cords from Power Pro.
It can be used in fishing in a variety of situations:
- for tying hooks, baits, swivels, carbines (the main purpose of this knot);
- for fixing floating (pop-up) baits in feeder and carp fishing;
- You can also use Uni to connect two fishing lines, although in this version it is used quite rarely.
Grinner's scope of application is not limited to fishing. For example, climbers often use it for tying carabiners or stakes. Uni is used in both river and sea fleets. It can be useful in various life situations when you need a reliable connection.
Grinner has quite a lot of advantages:
- In terms of strength, Grinner is among the best. The breaking load of the connection made using it is about 89% of the original one. More precisely, it can range from 70 to 90% - depending on the thread used and the quality of knitting.
- Durability. By making a connection using Grinner, you can be sure that it will last a long time, since it makes the wear of the material minimal.
- Uni can be used in cases where it is not possible to thread a double-folded fishing line into the small eye of a hook or bait because its diameter is too large.
- In some cases, Yuni turns out to be practically irreplaceable. With its help, you can reliably connect two fishing lines, one of which is 5 times thicker than the other (for example, tie a fluorocarbon leader to braid). For example, when using another popular Albright node for these purposes, only a threefold difference in diameters is permissible.
How to tie knots for a hook without an eye (with a spatula)
In this section we will introduce you to simple and complex installations of knots for hooks with a spatula. These hooks are available in small sizes.
It is difficult to make a knot on hooks of this type, since the execution process requires a certain skill and accuracy. The line should lie tightly and evenly on the fore-end, without layers layering on top of each other. It is very important after the process is completed that the fishing line is on the side of the hook and is thus a continuation of its shank. We also recommend applying a little glue to the assembly to maintain the reliability of the structure.
Knot “Universal” Line material used:
- monofil;
- fluorocarbon;
- braided fishing line.
Suitable for crocheting both with and without eye hooks.
The “Ailit” or “eyelet knot” knot V. Nikolaev in his next video will continue to introduce you to the rules of tying knots. We present to your attention a mount called “Ailit”
Trombone Loop Knot Other knot names:
- trombone loop;
- spade end knot;
- sliding bait loop.
This knot fits well from monofilament and braid. Can be used on various types of hooks.
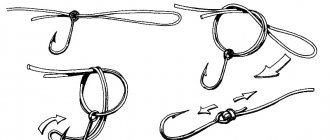
Instructions for implementation:
- We take the fishing line and fold it in half, so that the tails of the fishing line are parallel to the blade of the hook.
- We make a small loop, leaving the tip of the fishing line about 15 cm long.
- We attach a hook to the end of the fishing line, so that its tip is parallel to the shank of the hook, and press it with our fingers.
- Next, we begin to wrap the hook shank several times with the working end of the fishing line.
- We carefully thread the end of the fishing line into the resulting loop, moisten it with saliva or water and cut off all excess.
An example of making a “trombone loop” from V. Nikolaev
Knot “Outer loop winding” or “trombone loop” The only rule when making this type of knot is that the tighter you pull the line, the stronger the knot.
For which lines is it suitable?
Braided and monofilament lines hold a knot well. In the case of braid, it is advisable to make 1-2 more turns, this will increase the strength of the knot. It's a matter of the thinness of the cord. You can apply this rule on most nodes. The thinner the line, the more turns you can make. You are unlikely to do any harm, unless, of course, you do too much, when the turns begin to layer on each other and deform the line.
With fluorocarbon the situation is worse. But this is the case on most nodes. However, the Grinner knot is excellent and recommended for tying hooks, spinning lures and sinkers with fluorocarbon line.
The best knots for connecting the hook and swivels
Before considering the most reliable fishing knots in this category, we note that we do not recommend tying fishing line to hooks, swivels or rings made of thinner material (wire) than the fishing line itself; this will negatively affect the quality and reliability of the knot.
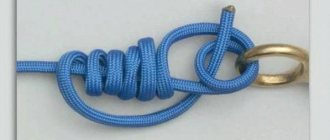
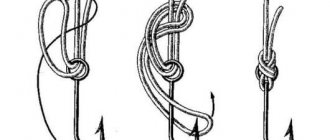
Knot "Palomar" or "palomar" Area of application:
- a bunch of main fishing thread with a swivel;
- for tying fishing line and hook;
- for attaching a weight, swivel, carabiner, etc.;
- for attaching silicone baits to a leash or fishing line.
The disadvantage is that you need to fold the line in half, which increases the volume of the knot and shortens the leash.
Node advantage:
- a bunch of not only monofilament fishing lines, but also braided cord and baits used both in spinning fishing and fishing with feeder gear;
- the ability to attach many equipment elements (swivels, hooks, flies, etc.);
- easy to knit.
Take advantage of our detailed recommendations for choosing braided line for jig fishing - here
Classic Palomar
“Double Palomar” is knitted like this
The “Triple Palomar” knot provides for the installation of fishing accessories and lures with a large eyelet to a braided fishing line. This is how the knot is tied
Palomar drop shot knot
Knot “Clinch” or “improved clinch knot” Let’s consider two types of this knot:
- normal clinch;
- clinch reinforced.
This knot is widely used, but has proven itself especially well in spinning fishing. The first version of the knot is used mainly for mounting sinkers, since it is inferior in strength to the “reinforced” knot, which cannot handle even the most complex hooks.
Scope of application: artificial baits, jig heads, weights, hooks, swivels, sinkers, feeders, carbines.
Where such a node is not used:
- for mounting sinkers with a transverse or longitudinal hole;
- for mounting tubes and factory rings.
Important! The size of the ear of the above accessories should not be more than 1.2 mm, since at diameters above the specified indicator the knot does not hold securely.
Learning to knit an improved knot model
Homer knot or homer knot
The knot tying pattern is shown in detail in this video.
Grinner knot or universal Uni knot This knot is also known as the Uni knot or ukni not. Uni means universal.
What is knitted with a universal knot:
- hooks (for example, offset), fasteners, baits;
- braided line to the spool;
- lines between each other.
For which lines is it applicable:
- monofilament;
- network.
This is how the universal Uni knot, aka Grinner, is knitted
The double universal Uni knot is knitted like this
Figure Eight Knot This fishing knot is designed for attaching both hooks with and without an eye. It is also suitable for making mobile loops, tying feeders, sinkers, and leashes. In a word, it has wide application and can be used anywhere.
It is not complicated in execution and is suitable for beginner fishermen.
This knot can have several weaving options, for example, by folding the fishing line in two you will get a double figure eight.
Best knot for attaching to fluorocarbon line
For fluorocarbon monofilament, it is quite acceptable to use the same types of knots that were used when installing a swivel on a monofilament line. However, it is better to pay attention to the fastening method that is optimally suited for this particular material.
"Rapala"
The Rapala knot was created specifically for fishing with light balsa wobblers and goes well with material such as fluorocarbon. It is knitted according to the following pattern:
- A simple knot is formed 5 cm from the end of the fishing line, which does not need to be tightened completely.
- The free end of the monofilament is inserted into the knot formed, which is then wrapped around the main line 5–7 times.
- The tip of the line is passed through a simple knot and loop formed by the previously made turns.
- Before tightening the assembly, the assembly is wetted.
- The remaining tip is cut off.

Knitting pattern for the Rapala knot.
A wobbler secured in this way to a fluorocarbon fishing line is distinguished by the most realistic play, which is due to the free connection. The same type of knot is successfully used when fishing for live bait, since it does not restrict the movement of the fish on the hook.
How to tie knots for wobblers
Before you start attaching the wobbler to the fishing line, you need to keep in mind that some of the small wobblers are very delicately balanced and any extra fishing accessory (leash, clasp) can significantly affect the performance of the bait. Therefore, for each type of wobbler you need to choose your own method of attaching to the fishing line.
Knot "Tight loop" or "homer-rhode loop knot"
Tying this knot can be applied not only to attaching wobblers.
Knot “Rapala” or “rapala knot” A knot recommended by the bait manufacturer itself.
Knot “With a blind loop” or “compound knot” This method of knitting is not suitable for fishing lines with a small diameter. It is better to use braided, Kevlar or fluorocarbon leashes.
Useful tips
- The knot does not like strong (excessive) tightening, since it is in this “tightened” state that it weakens.
- If you don't wet the knot, you'll get a break.
- The knot may become loose and the line may slip out if not tightened enough.
- Untying can occur due to the tip of the fishing line being too short, which is cut after making the knot. Always leave a small piece of line.
- In order to tie the leash as efficiently as possible, dip it in warm water, this will warm it up and become more elastic.
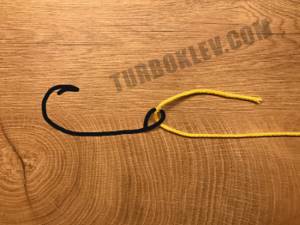
1.2. STOPPER USING DUNCAN STOPPER KNOT, SPRINGER KNOT
1.2.1. Take a piece of monofilament fishing line with the parameters as in paragraph 1.1.1. Place the auxiliary end 5 cm long under the main line, place the working end behind it and press the loop thus formed to the main line with your fingers, leaving the working end 10 cm long.
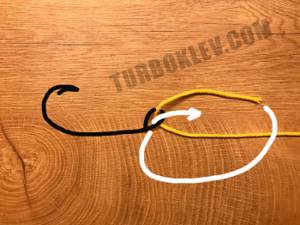
1.2.2. Place the working end under the main line and begin wrapping it and the loop.
1.2.3. After making no more than 4 turns of the working end around the main line and the loop, thread it through the latter.
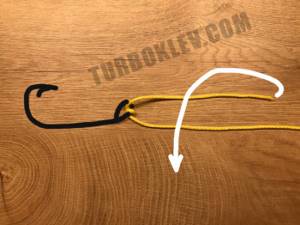
1.2.4. After wetting the knot with saliva, smoothly tighten it by the working end, holding the auxiliary end and the main line with your hand.
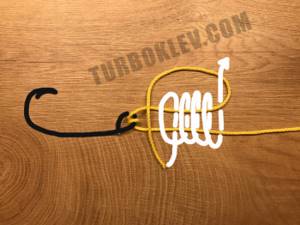
1.2.5. If you do everything carefully, there will be only even turns of winding outside the stop assembly. Such a knot will be easier to pass through the guide rings of the rod than the previously discussed one. But forming such a node is more difficult.
1.2.6. By the way, if you take a piece of plastic straw (a “straw” for a cocktail or something similar) 7-10 cm long, tie several locking knots of the type considered on it at home (preferably made of woolen threads), then you will no longer spend time to knit stoppers.
www.e-reading.club
Knots for tying a swivel
Palomar
This knot is suitable for tying a swivel to both braided cord and monofilament fishing line. A very good choice for tying a swivel.
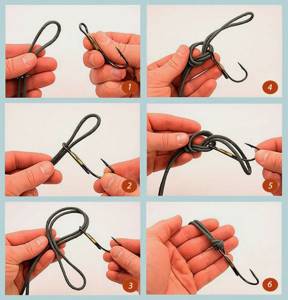
Photo demonstration of the organization of the “Palomar” node
Sequencing:
- At a distance of 7–10 cm, bend the end of the fishing line.
- We thread the end of the bent line (bending point) into the eye of the swivel. The swivel should be in the middle of the double section of the line.
- We make a regular knot from a double section of fishing line. Do not tighten the knot. The swivel should be at the bottom of the resulting loop. On one side of the knot is the end of the bent part of the fishing line, and on the other side, the remaining part of the main fishing line and the end of the short section.
- We thread a swivel into the resulting loop from the bent part of the fishing line on one side of the knot and tighten it.
Clinch Knot
The knot is suitable for tying a swivel to a monofilament line with a diameter of no more than 0.4 mm. Fishing lines with a larger diameter cannot be tightened tightly and securely. The sequence of actions when knitting a commonly used reliable knot:
- We thread the end of the fishing line into the eye of the swivel (distance 7-10 cm).
- We bend the fishing line along the eye of the swivel. A loop is formed, which we pinch with our fingers.
- We make 5-7 turns with the end around the main fishing line. We hold the turns around the main line with our fingers.
- We thread the end of the fishing line after the turns into the first loop (where the swivel hangs).
- We thread the end of the fishing line back into the large loop formed between the main fishing line and the end threaded into the first loop. Tighten the knot.
Greener
Scheme of binding with the “Griner” knot
A very strong knot for knitting swivels to a fishing line, as well as a leash to a swivel .
Sequencing:
- We thread the end of the fishing line into the eye of the swivel twice. The end of the fishing line should be 20-15 cm in size.
- Fold the end along the main line (double line).
- At a distance of 5-7 cm from the swivel, bend the end of the fishing line back towards the swivel at a distance from the double fishing line (a large loop is obtained).
- We make turns around the double fishing line so that the end of the fishing line passes inside the resulting large loop.
- Make 5-7 turns and tighten the knot.
Figure Eight Knot
A good knot for tying a swivel to the main line. For instructions on how to properly tie a knot, see the special article.
Double knot
This knot allows you to change swivels without untying the knot. Simple and reliable.
Sequencing:
- At a distance of 5-7 cm from the end of the fishing line, bend it.
- We tie the double fishing line into a double knot (we wrap the end of the bent fishing line around the loop twice). Tighten the knot.
- We thread the resulting loop into the eye of the swivel. We thread the swivel itself into the resulting loop. It turns out to be an ordinary noose.
Hangman's Knot
A fairly strong knot, easy to knit.
Sequencing:
- We thread the end of a fishing line 15-20 cm long into the eye of the swivel.
- Bend the line back at the swivel. It turns out to be a double line.
- At a distance of 7-10 cm from the swivel, bend the free end of the fishing line back towards the swivel, making a small loop. We clamp the loop and double fishing line with our fingers.
- We make 5-7 turns with the free end of the fishing line around the double fishing line.
- We pass the free end of the fishing line into the held loop. Tighten the knot.
Pay attention to the Albright knot - an excellent tool for tying two fishing lines together so that it has minimal impact on the operation of the spinning tackle when casting.
Jensik node
Sequencing:
- We pass the end of a fishing line 10-15 cm long into the eye of the swivel.
- We form a loop at the eye and again pass the end of the fishing line into the eye of the swivel.
- We form a second loop equal in size to the first loop, and thread the end of the fishing line into the eye a third time.
- To form the third loop, wrap the end of the fishing line three times around these loops (inside the loops).
- Tighten the knot.
Rules for reliable connection of the swivel and fishing line
There are a number of principles that should be followed when attaching a swivel to a thread:
- Swivels with various defects on the rings, such as burrs, spikes or splits, should not be used. They will inevitably damage the line, slow it down, and ultimately lead to it breaking.
- The cross-section of the thread should not be flat, but round , because a round one twists less when tying and tightening loops, which means the fastening is much stronger.
- The thread should be lightly moistened with water before tightening the knot. Thus, it will not overheat and will not lose its elastic properties, the knot will hold better.
- The thicker the section, the more reliable and stronger the fastening will be, since thick fishing line is less susceptible to ruptures , stretching and deformation.
- For thin lines, simple types of fastenings , since they have less impact on the structure of the fibers.
- When cutting off excess ends of the fishing line, leave ends of 1.5 - 2.5 mm .
- Open fire should not be used for circumcision.
- You should not tighten the loops unless necessary.
To monofilament line
Grinner knot
Grinner is most often used for monofilament fishing line. It has a good strength indicator: 85% . This fastening method is simple to implement, yet lasts a long time and has good load-carrying capacity. In addition to the swivel, this method can be used to correctly knit hooks and carp sinkers.
How to tie a Grinner
- The tip of the thread must be threaded into the ring of the swivel. In this case, the length must be at least 18 cm.
- The other tip needs to be folded in half to form a loop.
- The area where the two tips intersect must be grasped with two fingers and wrapped with at least six turns of fishing line.
- You need to thread the other end of the fishing line into the larger loop and carefully tighten the knot, after wetting the fishing line with water. When pulling, the knot should be pushed towards the swivel loop by the main loop.
- Trim the excess line at the tip by 2 mm.
Homer node
This knot is extremely popular among fishermen due to its reliability. The strength of this unit is as much as 98%.
How to tie a homer
- Measure the fishing line 15 cm long.
- Pull the tip of the fishing line into the eye of the swivel.
- Wrap the free end of the fishing line twice around the main fishing line and thread it into the resulting loop.
- Do not tighten the resulting knot, holding it with your hand, wrap the other end of the fishing line around the main fishing line 6-8 times.
- Pull the other end of the fishing line into this loose loop.
- After wetting both the main and working lines, tighten them simultaneously.
- Push the resulting knot towards the swivel ring so that it rests against the eye of the clasp.
- Trim the excess line, backing off a couple of mm.
Step-by-step instruction
Use the following step-by-step diagrams to quickly tie the Grinner knot.
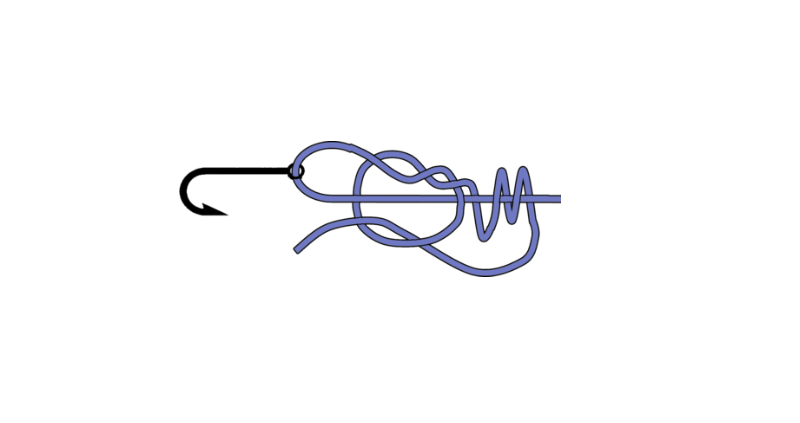
Step 1. Thread the tip of the fishing line into the eye of the hook from the inside.
Step 2: Pull the line out and then thread the eyelet again in the same direction as in the first step.
Step 3. Pull the line out again and create a large loop at the top of the future knot.
Step 4. Wrap the end of the line around the 2 main lines coming out of the eye 5 times.
Step 5. Bring the tip out and tighten the knot by slowly pulling both ends of the line and the hook. Before final tightening, be sure to wet the loose knot.
Step 6. Cut off the excess line with scissors or tweezers. Do not cut too close to the knot, so that if you pull too hard, the knot will not come undone. Well, try to cut only after the knot has been tightened very tightly.
To fluorocarbon line
Rapala knot
It is believed that this type of knot helps maintain the greatest strength of the fishing line due to its structure. In addition, a knot according to this pattern allows the spoon to move most naturally and naturally.
How to tie a Rapala
- Step back 10 cm from the end of the fishing line and tie a loop without tightening it.
- With the end wrapped around the loop, thread it through the swivel ring and then through the loop.
- Make 3 turns around the main line and wrap the tip back towards the loop, then thread it through the loop. You should get a large and small loop.
- Thread the tip into the large loop and tighten the knot, after moistening the line with water.
- Trim off the excess end of the fishing line.
The best knots for attaching to monofilament fishing line
There are several types of knots that are best used in rigs that use monofilament fishing line. They are ideal for this type of monofilament because they maintain their strength characteristics.
"Grinner"
Beginner fishermen can be recommended to tie the swivel to the fishing line using a Grinner knot. This method is quite simple to implement, but at the same time very reliable. It is usually used by spinners and match tackle enthusiasts. To form a strong connection, perform the following steps:
- The tip of the fishing line is threaded into the “eye” of the swivel.
- The free end is folded in half towards the swivel so that a small loop is formed.
- The tip is wrapped around the loop 5-6 times and then threaded through it.
- The knot is moistened with saliva or water and carefully tightened.
- The remaining end of the fishing line is cut to a length of 2-3 mm.
Knitting pattern for the Grinner knot
The Grinner knot is excellent for thin fishing lines because it allows you to use double-folded monofilament without changing the execution process. Of all the methods of tying swivels, this is one of the simplest and most common.
"Homer"
The Homer knot is considered quite complex, but due to its reliability it is no less popular than the Grinner knot. This type is most often used when it is necessary to connect the leash to the main fishing line, in spinning and live bait rigs. To properly tie a swivel in this way, you will need:
- Thread the monofilament into the eye of the swivel (the length of the free end must be at least 15 cm).
- Wrap the free tip 2-3 times around the main fishing line, and then thread it into the formed loop.
- Without tightening the resulting structure, wrap the end of the fishing line around the main monofilament 7 times and thread it into the previously formed loop.
- Moisten the assembly and carefully tighten the knot at the very “ear” of the swivel.
- Trim the free end to a length of 2–3 mm.
How to tie a Homer knot
Having learned how to tie a monofilament line to a swivel using a Homer knot, you can be confident in the reliability of the tackle. This connection can withstand significant overloads without losing strength.
To braided line
Braid has a number of features due to which the knots discussed above may not be suitable. When tying knots, the inner layers of the braid shift, its structure and properties change: some fibers are pulled in too much, others are overly strained. These changes significantly affect the strength of the fishing line.
Depending on the cross-sectional shape, all braided fishing lines can be divided into round and flat. As the knot is tightened, the line inevitably twists, which causes excessive tension on the fibers. In round braid this effect is less pronounced. Flat braids twist more strongly, so the knots are noticeably less strong.
Braided fishing lines differ in both the number of fibers and the composition of the outer coating. Modern braids come with recommendations on which knots will be most suitable.
Palomar
This connection method is distinguished by its versatility . It takes a minimum of time to create and is easy to implement. This type of connection is suitable for both swivels and hooks and carabiners.
How to tie Palomar
- Fold the tip of the fishing line in half.
- Thread the end through the eye of the swivel.
- Make a loop, then thread the tip of the double fishing line into it without tightening it.
- Take the swivel and push it through the bend.
- Wet the braid and tighten the knot.
Clinch Knot
This method is suitable for both braided and regular thread . It won't be difficult to do either.
How to tie a Clinch
- Insert the end of the braid no shorter than 15 cm into the eye of the swivel.
- Wrap the other end around the main thread about 6 times, the rings should not be too tight.
- A small loop should appear near the eye of the swivel. You need to thread the tip of the braid into it.
- Moisten and tighten the braid.
How to tie a double clinch
- Pull the end of the fishing line 5-6 cm through the eye of the swivel.
- Repeat the process to form a loop.
- Wrap the end of the fishing line around the main fishing line 3-4 times and insert it into both loops between the twist and the eye of the swivel from the bottom up.
- After wetting the line with water, tighten the loop.
- Trim off excess line.
Bloody Knot
This type of connection is considered the most ideal for braided fishing line . This knot is suitable for connecting two pieces of braided fishing line, or fishing line of different thicknesses.
How to tie a Bloody Knot
- Two pieces of thread must be placed parallel, the ends must be in opposite directions.
- Wrap one end around the other 5-6 times, without tightening it too tightly.
- Thread the end after the first turn through the lines that need to be connected.
- Do the same with the second segment; both pieces should have an equal number of turns.
- Insert the end of the second segment into the loop where the first tip was previously inserted. The direction should be the opposite.
- Tighten the knot by moistening the line with water.
- Trim off excess line.
Slip double knot
This type of connection is rightfully considered the most durable . It is suitable for both braid and fishing lines up to 5 times thicker.
How to tie a slip double knot
- The threads need to be overlapped, with the ends pointing in different directions.
- Press the pieces approximately in the center with your fingers.
- Bring one end of the fishing line to your fingers to form a loop.
- Insert the end of the thread into this loop.
- Wrap each of the segments 5-6 times.
- After wetting the attachment point, tighten the end.
- Repeat exactly the same steps with the other end of the braid so that you end up with 2 knots.
- Pull the lines that were connected in different directions until the knots close.
- Trim excess thread.
Grinner knot. How to tie a Grinner knot and when is it best to use it
How to tie a Grinner knot and when is it best to use it
Grinner knot, or Uni knot, is one of the best fishing knots that many people actively use. A lot depends on the strength of fishing equipment. To reduce the number of breaks to a minimum, it is necessary to reliably connect different elements of the gear. Therefore, nodes must be selected carefully. The Grinner is a great option for a variety of fishing situations. Let's consider its features, pros and cons, scope of application and knitting methods.
Features of the unit, advantages and disadvantages
The name Uni is more often used in the USA, while Grinner is more often used in Europe. This knot comes from the Hangman's Knot. In its modern form, Grinner was invented in the 1960s by Norman Duncan.
Grinner's prototype was included in the Ashley Book of Knots, which was published in 1944. According to Pro-Knot Fishing's list, Uni is one of the top 12 fishing knots. It’s also interesting what exactly Uni recommends for knitting its cords from Power Pro.
It can be used in fishing in a variety of situations:
- for tying hooks, baits, swivels, carbines (the main purpose of this knot);
- for fixing floating (pop-up) baits in feeder and carp fishing;
- You can also use Uni to connect two fishing lines, although in this version it is used quite rarely.
Grinner's scope of application is not limited to fishing. For example, climbers often use it for tying carabiners or stakes. Uni is used in both river and sea fleets. It can be useful in various life situations when you need a reliable connection.
Grinner has quite a lot of advantages:
- In terms of strength, Grinner is among the best. The breaking load of the connection made using it is about 89% of the original one. More precisely, it can range from 70 to 90% - depending on the thread used and the quality of knitting.
- Durability. By making a connection using Grinner, you can be sure that it will last a long time, since it makes the wear of the material minimal.
- Uni can be used in cases where it is not possible to thread a double-folded fishing line into the small eye of a hook or bait because its diameter is too large.
- In some cases, Yuni turns out to be practically irreplaceable. With its help, you can reliably connect two fishing lines, one of which is 5 times thicker than the other (for example, tie a fluorocarbon leader to braid). For example, when using another popular Albright node for these purposes, only a threefold difference in diameters is permissible.
The downside is that some people may find it difficult to knit a Grinner. Problems arise for fishermen with thick fingers. When knitting Uni, they have to make a large loop of fishing line, as a result of which the consumption of this material increases.
In the case of monofilament this is not a problem, but when using more expensive fluorocarbon and especially braid it is undesirable. But still, if you practice and get used to it, anyone can tie a Uni with little effort and fishing line.
Fastening without knot
You don’t have to tie knots if you don’t have the desire, time or appropriate skills. There is a knotless technique , which is appreciated by many fishermen. This method is not only pleasant because it saves time and does not require memorizing complex techniques, but it is also useful, because the tackle is attached very firmly in this way.
A knotless device is a small device that has curves at both ends. It is usually made of steel wire. There is a wide variety of manufacturers; such a device is presented in every more or less serious fishing store.
The knotless connection is very strong. This type of fastening takes significantly less time than tying a knot. However, the clasp is more suitable for smaller lures. Large gear has a noticeable weight on its own, so it is better to fasten it with a knot. The use of a fastener is more than justified when fishing in competitions, but when fishing from the shore and in snags, it can only complicate the process.
The knotless clasp is used primarily for braided braids.
When purchasing swivels, be sure to carefully inspect their rings for nicks, small roughness and cracks; all these shortcomings will certainly lead to wear and subsequent breakage of the tackle at the most inopportune moment! Try to choose swivels with well-processed rings, otherwise there is a risk of losing both the gear and the trophy.
Be sure to moisten the thread with water when tightening , then the fastening will be strong and reliable.
If you want to learn how to tie knots as quickly as possible, practice on regular ropes, tourist or even clotheslines, because practice is the most important thing!
klevyj.com
Purpose of the swivel
A swivel (swivel) is one of the significant elements, made in the form of a hinge, of any equipped fishing tackle, regardless of the type and method of fishing.
Its main purpose is to prevent the gear from twisting:
- when casting equipment:
- when placing bait (spinners);
- when the leash is working in the current;
- when landing hooked fish.
The absence of this detail can lead to further confusion, which will result in great dissatisfaction for the angler.
Characteristics of a node connection
When preparing to go out onto the pond to meet your dream - a cherished trophy, the main attention is focused on eliminating the “little things”. One of the main ones is knots. The “golden rule” of every angler before fishing (both summer and winter) is to check the quality of the condition and re-bandage the connection.
This rule also applies to the location of the swivel. The reliability of achieving the desired result depends on this.
There are a considerable number of types and types of fastening of connecting elements, which are improved using the practical experience of each fisherman, adapting them to the convenience and strength of their gear.
Each angler practices 1-2 types of knots, which are the simplest for him (so that he can tie with his eyes closed) and correspond to the individual characteristics of the gear.
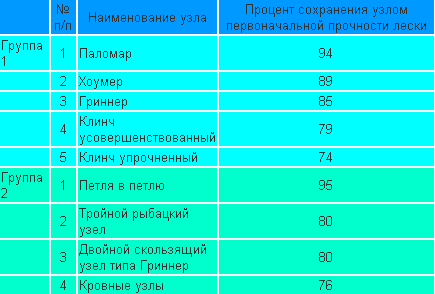
Approximate characteristics of some nodes are given in Table 1.
Table 1
| Fishing knot | Tensile strength,% | Application |
| Palomar Knot | 94 | thin and medium lines |
| Improved Clinch Knot | 79 | thin line |
| Homer Knot | 89 | thin and thick line |
| network | ||
| fluorocarbon | ||
| Grenner Knot (Uini-Knot) | 85 | for heavy loads |
| Clinch reinforced Attached Clinch Knot | 74 | network |
| fluorocarbon | ||
| Double Clinch Double Loop Clinch Knot | 90 | universal |
Approximate characteristics for braided cords are given in Table 2.
Table 2.
| Tensile strength,% | |||
| Braid brand | Node type | ||
| Palmar | Grinner | Homer | |
| Benkei | 79 | 72 | 70 |
| Aqua | 63 | 55 | 55 |
| Salmo | 66 | 65 | 65 |
| Daiwa | 75 | 73 | 73 |
| Jiq Line | 60 | 67 | 66 |
How to increase your fish catch?
Over 7 years of active fishing, I have found dozens of ways to improve the bite. Here are the most effective ones:
- Bite activator . This pheromone additive attracts fish most strongly in cold and warm water. Discussion of the bite activator “Hungry Fish”.
- Increased gear sensitivity. Read the appropriate manuals for your specific type of gear.
- Pheromone -based lures .
Requirements for node connections
When tying, no matter what the knot connection may be, the following requirements apply:
- when tightened, the place where the loop is formed is wetted;
- the thickness of the tied element is not less than the diameter of the fishing line/braid;
- when cutting off the excess, ends of 1.5...2.5 mm are left;
- do not use open fire when performing circumcision;
- It is not allowed to untie the connection under load or after removing it;
- “creeping” of the unit under variable load is not allowed;
- “dead” tightening of the loop unnecessarily is not allowed;
- The turns of the thread should lie on the shank of the hook in an even row without jumping.
Types and techniques of knitting knots
In addition to those listed above, other types of ligaments are used to attach connecting elements. When purchasing consumables, manufacturers indicate recommended tying methods on the packaging. But the number of direct producers differs sharply from the number of those selling the goods, which is reflected in the geometric characteristics of the thread. Therefore, it would be nice for the fisherman to have other options for connecting elements “at hand”.
The success of the result is also determined by other factors: for example, sudden changes in weather conditions and breakage of gear sometimes lead to unfavorable moments. Who enjoys sorting out the intricacies of knots with frozen fingers?
The following types of connections are most often used in practice. They are the most suitable for attaching a swivel. But each fisherman has his own ideas and his own capabilities. The main thing is that it is reliable, simple and beautiful. A beautifully executed connection can be considered half the key to success.
The beauty is affected by bulkiness, depending on the diameter of the thread and the number of turns. There is no clear interpretation of this concept. But you can take the amendment as a basis: smaller line diameter means more turns. When the loops are tightened, a zone of increased tension is formed, which leads to stretching and thinning of the thread fiber. The tension zone at the contact points is reduced by using the substrate and the mobility of the connection, which leads to an increase in turns. All of the above points are reflected in the nodal ligaments under consideration.
"Palomar"
- the fishing line is folded, forming a loop 10 centimeters long;
- the tip of the loop is inserted into the eye of the swivel;
- a simple knot with a swivel inside is knitted on the main double line;
- the initial loop is thrown through the swivel;
- the knot is tightened;
- the excess tip of the fishing line is trimmed to 2...2.5 mm.
"Offshore Swivel Knot"
- the end of the thread is folded in half to form a loop 12 cm long and threaded through the eye of the swivel;
- turn the loop around its axis 1 turn and attach it to the double main thread until a double loop is formed;
- pass the swivel through the formed loops 6...7 times;
- holding both branches, slowly tighten the knot, carefully moving the turns towards the eye of the swivel;
- the tip of the thread is trimmed to ~2 mm. Offshore Swivel Knot
Improved Clinch Knot
- 5...6 cm of fishing line is pulled through the eye of the swivel;
- the running end is wrapped around the main end 5...6 times and inserted into the loop between the twist and the eye;
- the running end is inserted from top to bottom into a large loop formed after twisting;
- the loops are tightened and the excess end is cut off.
Double Loop Clinch Knot
- the end of the thread 5...6 cm is pulled through the eye of the swivel;
- repeat the process, forming a small loop;
- the end of the thread wraps 3...4 times around the main thread and is inserted from the bottom up into both loops between the twist and the eye of the swivel;
- the noose tightens;
- the excess end of the thread is shortened to 2...2.5 mm.
Homer Knot
- thread the thread through the eye;
- Having covered the root, make a simple knot without tightening it;
- wrap the end of the thread around the main thread 5…6 times and thread it into the knitted loop, bypassing the loop between the twist and the eye of the swivel;
- tighten the loops;
- Trim off the excess end. Homer
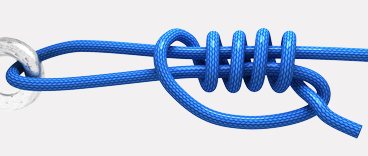
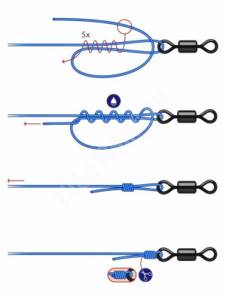
"Grinner" Grenner Knot (Uini Knot)
- pass the line through the eye of the swivel:
- form a small loop;
- pass the running end through the resulting loop, wrapping the main one 6...7 times;
- tighten the knot;
- Trim off the excess end.
"Centauri Knot"
- the end of the thread is inserted through the eye of the swivel;
- 3...4 turns are performed around the main one;
- the end of the thread is threaded through the turns, starting from the swivel located on the side;
- the knot is tightened, carefully moving the knot towards the eye;
- Excess thread is cut off.
"Clinch Reinforced" Attached Clinch Knot
- the end of the cord is folded in half to form a loop 14 cm long;
- the tip of the loop 8...9 cm is inserted into the eye of the swivel and applied to the molar;
- the running end is wrapped, starting from the eye, around the main end with a loop 5…6 times;
- the tip of the cord is inserted into the remaining part of the loop;
- the loop is tightened, carefully moving the resulting turns towards the eye;
- the excess is trimmed off. Attached clinch knot
"Braided Line Knot"
- the end of the thread is folded in half to form a loop 14 cm long;
- the tip of the loop 8-9 cm is inserted into the eye of the swivel and applied to the main one;
- holding the loop and the main thread, wrap the folded thread with the end of the loop 7-8 times towards the swivel;
- the tip of the loop is passed through the loop formed between the eye and the twist;
- the knot is tightened;
- Excess thread and loops are cut off.
How to tie two hooks
- 1st method. On the main monofilament line, in place of the planned additional leash, a simple loop is formed, through which the leash is threaded to cover the main monofilament line. Its other end is tied into a figure eight knot and tightened in such a way as to prevent it from slipping out of the loop. The correct position of the leash is perpendicular, which will prevent it from getting tangled with the main monofilament line. This will require a minimum of overlaps, which would reduce the strength of the monofilament.
- 2nd method. After determining the distance of the hooks, the monofilament is threaded into the eye. The free tip is used to wrap 5-6 turns of the hook forearm, which is clamped, and the free tip is inserted through the eye. The knot is tightened lightly. After attaching the 1st hook, the 2nd hook is attached to a free piece of monofilament.
- 3rd method. After forming a loop on the main monofilament, its free end is used to wrap one of its edges three times. Afterwards, the ends of the monofilament are slightly tightened. The loop should be folded into a figure eight with the edges arranged crosswise. The tip of the leash is inserted into the first part of the figure eight and withdrawn through the other. The leash is secured by winding its free tip several times around the non-free tip. After which the free tip is inserted through the original loop and tightened, alternately moving either the leash or the main monofilament line.
- 4th method. A knot is tied at the end of the leash to prevent it from slipping. Why, after forming a loop around its edge, wrap the free tip of the leash twice and tighten it. A loop should be formed on the main monofilament line to securely attach the leash. Why is a simple loop made, through which another one made nearby is threaded. The tip of the leash is inserted into the threaded loop, and the main monofilament is carefully tightened.