Let's start simple
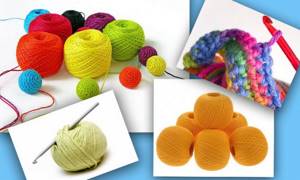
Before you start learning, you need to choose the right hook and working thread.
Beginning craftswomen should not choose a hook with a sharp head, as it can ruin the thread. It’s worth giving up on a hook with a round handle, since you have not yet developed the skill and do not have a uniform knitting density.
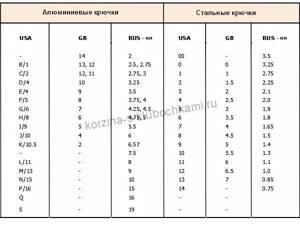
The size or number of the hook is usually indicated on its head and is expressed in millimeters.
The diameter of the head is equal to the size of the hook if it is made in Russia. In other countries, the numbering is different; in order to understand the sizes of hooks from foreign manufacturers, we suggest using the table below for matching the sizes of crochet hooks.
How to choose the right thread and hook for the job? You must adhere to the basic rule: the hook should be twice as thick as the thread. The thicker the thread, the larger the hook.
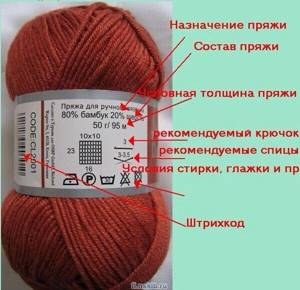
When purchasing yarn, beginning knitters should pay attention to the main reference point - the label, which always indicates the recommended hook number. With the help of such a tip, you definitely won’t go wrong with your choice of hook.
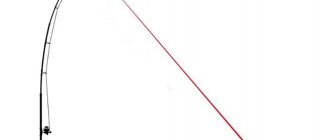
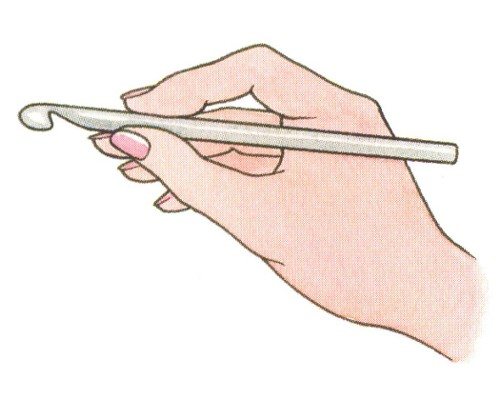
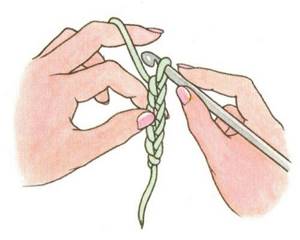
In order for the knitting to be neat and uniform, you need to learn how to hold the thread and hook correctly. How to do this is shown in the photo.
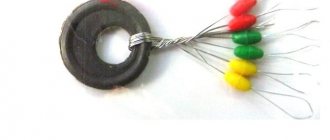
Hook without eye
Step knot
Tying a knot is difficult, but due to its great strength it is popular among fishermen. Used on synthetic fibers.
Tensile strength: 90–95%:
- The tip of the fishing line is folded together with the fore-end so that the tip is directed in the direction opposite to the bend.
- Wrap the end around the forend with fishing line 2 times.
- Press the curved extension of the fishing line and wrap it all three times (the widow's fishing line folded with the fore-end).
- Once again, wrap the end of the thread around the forend with a bent loop of fiber and thread it through the resulting eye.
- Tighten the knot.
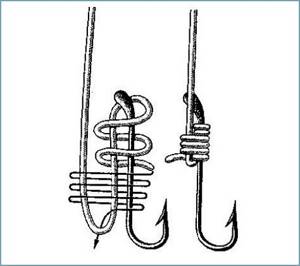
Spiral knot (Dumhof)
Designed for braided lines.
Tensile strength: 95%:
- Wet the fishing line.
- Fold it in half, apply it to the shank of the hook and wrap the tip around it 4-6 times.
- The end is pulled into the loop, which is obtained by folding the fishing line.
- Tighten the knot.
Types of loops
In order to learn how to crochet, you need to master the basic methods of crocheting loops. Let us examine in detail the main types of loops:
- The slip or starting stitch is the first or working stitch in crocheting and is never counted.
Related article: Knitted fashion for amigurumi dolls. Scheme
- Air loop. Make a loop, thread a hook through it, yarn over and pull it through the loop.
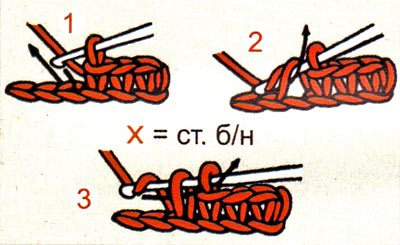
- Single crochet. It is necessary to insert the hook into the loop of the chain or the bottom row, pull out a new loop, grab the thread, and knit two loops in one go.
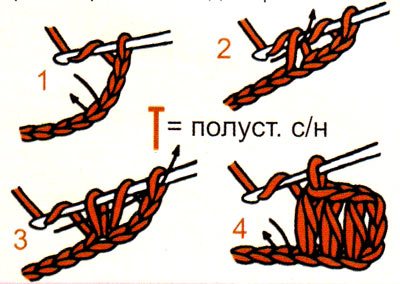
- Half double crochet. Yarn over the hook, insert the hook into the loop and pull out a new one, knit the resulting three loops on the hook in one step.
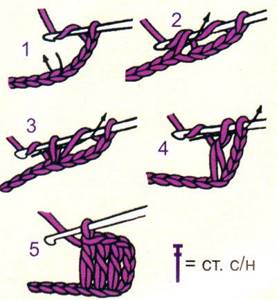
- Double crochet. We make a yarn over the hook, insert it into a loop of the chain and pull out a new one, knit the resulting three loops on the hook in two steps in pairs.
The basics of knitting chain stitches, single crochets, half double crochets, and double crochets are presented in the video master class below.
- A column with two or more crochets. We make 2,3,4 yarn overs on the hook, insert it into a loop of the chain and pull out a new one, knit the resulting 4, 5, 6 loops on the hook in pairs in 3, 4, 5 steps.
- Double crochet artesanal. We make a yarn over the hook, insert the hook into a loop of the chain and pull out a new one, without catching the yarn over, knit the subsequent loops in pairs.
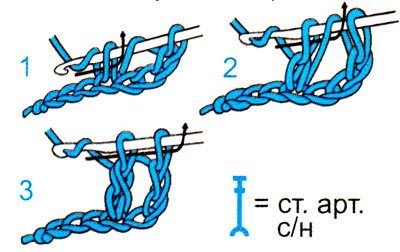
- Artesanal column with two (3, 4) crochets. We make 2, 3, 4 yarn overs on the hook, insert the hook into the loop of the chain and pull out a new one, without catching the yarn over, knit the subsequent loops in pairs.
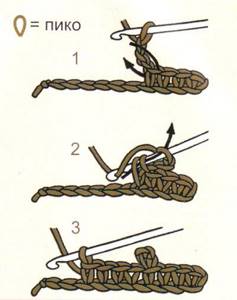
- Pico. We make three air loops, insert the hook into the first and knit with a single crochet.
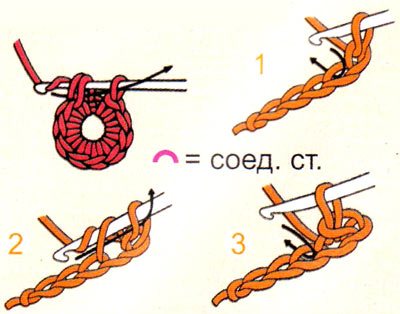
- Connecting post. Insert the hook into the loop of the chain, grab the thread and pull it through the loop of the chain and the loop on the hook.
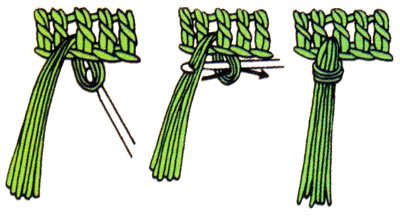
- Fringe or tassels.
- Ring.

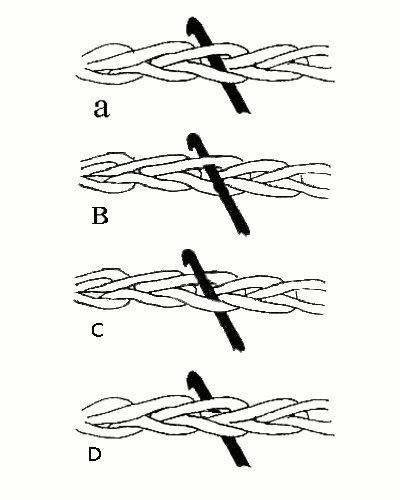
The process of knitting basic and complex loops is presented below in pictures.
The appearance of the future product depends on how the hook is inserted when knitting loops. The diagram shows the main methods of inserting a hook.
Related article: How to straighten a Barbie doll's hair at home
Learning to crochet
HOOKS AND YARN
Crochet hooks vary in size and the materials from which they are made. If you use different types of threads in one work, then for each type you need a separate hook. There is a rule: the thicker the thread, the larger the hook should be.
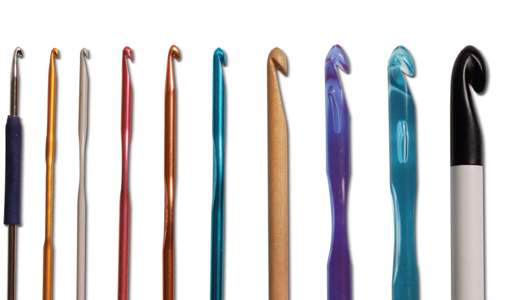
Hooks
Usually the hook size is indicated in millimeters or as a letter designation. In stores you can find good quality steel hooks, the largest ones are often made of aluminum or plastic, there are also wooden ones, which are also quite popular. But still, steel and aluminum differ in the maximum variety of sizes. Avoid cheap plastic alternatives, which often have a rough surface. The Tunisian knitting technique requires very long hooks with caps at the ends. Sometimes the required hook size is indicated on the yarn label. I advise you, especially at the beginning of your practice, to adhere to these recommendations.
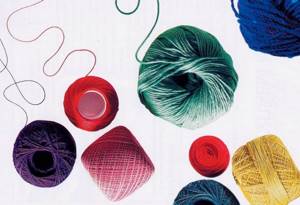
Yarn
Threads vary in thickness and density. There are generally accepted designations for thread thickness. Yarn can also be twisted from several, usually two, three or four, threads. For beginners, I would advise using soft and dense threads that will not unravel while working. A thin single or double thread is usually used to knit lace or decorate the edge of a product. It is approximately twice as thin as a triple one. Triple thread is recommended for knitting children's items and thin summer clothes. A thread consisting of four single threads is used for light sweaters, cardigans and shawls - this is a thread of medium thickness. If you want to knit a warm sweater or jacket, then you need a thread folded in half. Thread folded in three is suitable for jackets and woolen scarves. Clothing that you are going to wear outside in cold weather should be knitted from thick yarn. It can be imagined as consisting of four parts, each of which is the original thread folded four times.
LET'S START KNITTING
You start with a loose starting stitch and continue to knit one after the other. You will get a chain. This will be the first row of your product. I recommend that you first practice holding a hook and thread in your hands a little. It is important that you are comfortable. In general, there are no strict rules on this matter. The hook should move freely. The following are the two most popular ways to hold a hook, but you can create your own unique method. There are also several ways to hold the thread. This is very important, because its tension, and therefore the quality of work, depends on it. Over time, you will be able to constantly maintain the desired tension, make the same loops and even rows, without thinking about it at all. Try different methods to find the one that works best for you.
HOW TO HOLD THE HOOK
Both methods are convenient - use the one you like best.
Method 1: Hold the hook between your thumb and index finger as if you were holding a pen or pencil.
Method 2: Grasp the hook on one side with your thumb and on the other with your other fingers, so that its long part is in contact with your palm the way you usually hold a knife.
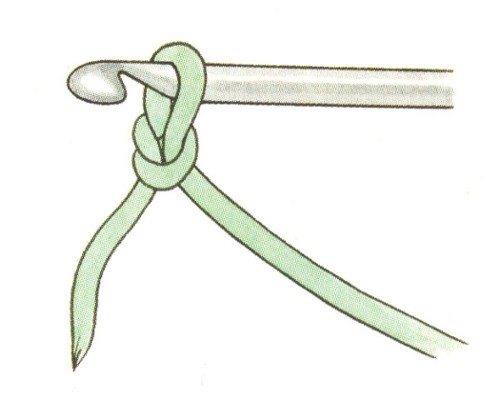
Making a knot
You have started knitting. First you need to make a knot. Step back about 15 cm from the end of the thread and make a loop. Hook the thread through it and pull it through the loop. Pull the ends of the thread, thus tightening the knot. The hook will be inside it.
Hold the thread
The working thread must have a certain tension and at the same time be in a sufficiently free state. This can be done in two ways. You can wrap the thread around your little finger, stretch it in front of your ring and middle fingers and pinch it with your index finger, then the tension will be created by the middle finger. Or wrap the thread around the little finger and pull it behind the next three fingers, and then the index will provide tension. If the thread is thin, then you can hold it with your ring finger and little finger. In general, choose the method that is most convenient for you.
Method 1: Wrap the thread around your little finger, extend it in front of your middle and ring fingers and behind your index finger. Keeping your hook threaded through the starting loop and pinching the first knot between your thumb and middle finger, prepare to make a loop by lifting your index finger slightly.
Method 2: Wrap the thread around your little finger and pull it behind your middle and ring fingers. Keeping your hook threaded through the starting loop and pinching the first knot between your thumb and forefinger, prepare to make a loop by lifting your middle finger.
FIRST LOOPS
The first connected row is called the main chain, and the loops of this chain are called air loops. The chain can be short - two or three loops, or it can be long. The chain is the basis of the product, so it must be done carefully. So, you have already learned how to hold the thread and hook correctly, perform the first knot and are ready to knit your first chain of air loops. To do this, you simply need to thread the thread through the initial loop, then pull a new one from the resulting loop, and so on. Air loops are also used as a separate knitting element, for example, in lace and openwork products. The size of the main chain is usually indicated in the knitting instructions for each item. A simple loop, or the so-called half-column, is the simplest type of loop. The first crocheted products consisted only of them. Nowadays, the half-column is used mainly for connecting a chain into a circle, and also if you need to reduce the number of loops in a row or tie two parts of a product together, you will come across this type of loop more than once.
Counting loops
To count the number of stitches correctly, make sure that the chain is not twisted and that the front side is facing you. The loop through which the hook is threaded (the so-called “working loop”) does not count. The first knot at the beginning of the chain is also not considered a loop.
Making air loops
1. Take the hook in your right hand. While holding the thread, pinch the first knot between the thumb and middle finger of your left hand. Pass the hook through the starting loop and hook the thread with it, as if turning it counterclockwise. Now the thread seems to wrap around the hook. 2. Thread the hook and thread back into the starting loop. You have completed your first air loop. 3. Repeat the previous two steps. Having made several air loops in this way, raise your left hand a little so that the hook is perpendicular to the chain - this will be more convenient, and continue.
We knit a half-column
1. Tie the main chain. 2. Pull the hook out of the last loop in this row and insert it back, but on the other side. Then insert it into the second loop from the end (not counting the loop on the hook). Next, hook the working thread so that it wraps around it, throw the thread over the hook. 3. Pass the hook with the thread through two loops at once. You now have your first half-column. Keep knitting. Insert the hook into the next loop and repeat the steps described in the previous two steps.
Single crochet
1. Tie a chain. Turn the hook and insert it into the third loop from the end. 2. Hook the working yarn with the head of the hook and pull it back through only one loop. 3. You now have two loops on your hook. Hook the thread again and pull it through both loops. So you have knitted your first single crochet. 4. Knit the row to the end in this way. 5. To move to the next row, turn your product to the opposite side and knit one air loop. This stitch counts as the first stitch of the next row. Then make a single crochet by inserting the hook into the second stitch of the previous row. Knit further in the same way.
Half double crochet
1. Tie a chain. Turn the hook. Yarn over and insert the hook into the third loop from the end. Hook the thread. 2. You now have 3 loops on your hook, counting the yarn over. Pull the working thread through one of them. Hook the thread again. 3. Next, pull the hook and thread through all 3 loops. You have just worked a half double crochet stitch. Continue knitting until the end of the row. 4. To move to the next row, turn your product with the opposite side facing you and knit two air loops. They count as the first half double crochet of the next row. Then work a half double crochet by inserting the hook into the second stitch of the previous row. Continue in the same way.
Double crochet
1. Tie a chain. Turn the hook. Then throw the working yarn over the hook and insert it into the 4th loop from the end. That is, you need to skip 3 loops of the first row. Hook the thread. 2. You have 3 loops on your hook. Pull the crochet thread through only one of them. Hook the thread again. 3. Now pull the yarn through the 2 loops on the hook. Hook the thread again. Pull the working yarn through the 2 remaining loops. You have knitted your first double crochet. Continue to double crochet until the end of the row. To move to the next row, turn your project over and work 3 chain stitches. The loop you currently have on your hook is the first stitch of the next row. Make 1 double crochet by inserting the hook into the 2nd stitch of the previous row. Continue knitting longer in the same way.
Double crochet stitch
1. Tie a chain. Yarn over 2 times and, skipping 4 loops of the previous row, insert the hook into the 5th row. Hook the thread and pull through 1 loop on the hook, 2. Pull the hook and thread through 2 of the 3 loops and hook the thread. Pull it through 2 loops. Hook the thread and pull through the remaining loops. When you reach the end, turn the product and make 4 air loops. You will receive the first stitch of the new row. Tie a double stitch to the idas and, inserting the hook into the second stitch of the previous row, continue in the same way.
Double crochet stitch
1. Tie a chain. Turn the hook, make 3 yarn overs and, skipping 5 loops of the previous row, insert the hook into the 6th. Hook yarn and pull through 1 loop on hook. 2. Hook the thread and pull through 2 loops - these steps must be repeated 3 times. Knit a row in this way, turn the product and make 5 chain stitches. Work a double crochet stitch by inserting the hook into the second stitch of the previous row.
Susie Jones
Knots for Beginners
Learn how to properly tie a hook to a fishing line in advance. Beginner fishermen, having difficulty understanding the huge number of knitting patterns, want to choose the ideal hook fixation.
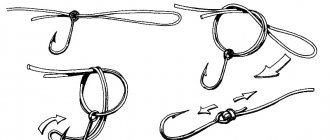
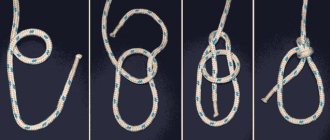
The first thing they need to master is “Snood”: reliable and suitable for all types of lines and hooks. Diagram of how to tie a hook to a fishing line:
- Bend the thread to form a loop.
- The bent fishing line is applied along the fore-end, leaving a loop free, then a thread is threaded through it.
- Hold the edge of the loop with one hand, with the other hand wrap the tip around the main thread and forearm, make from 3 to 10 turns.
- The forend is wrapped and the free end is threaded into the eyelet created earlier.
- While supporting the turns, carefully tighten the loop. All excess is cut off.
The second knot that is mastered is the “Eight”. “Eight” is the simplest, which can be tied very quickly even in the dark.
- Form a loop with the free end of the thread.
- The free end is wrapped three times through the previously formed loop.
- They tighten the loop a little and get a figure resembling a figure eight.
- Push the shank of the hook through the first and second rings of the figure eight.
- Tighten, cut off excess.
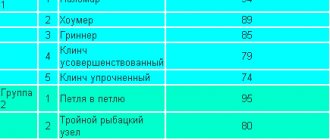
Be sure to learn how to knit “Palomar”, “Clinch”, “Bloody”, “Step” - these are classic fishing knots. Here are their knitting patterns.
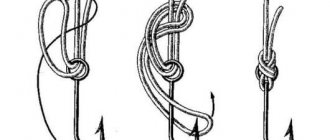
“Stepped” is used for hooks with a spatula, it is very durable. Knitting pattern for a step knot:
- Twist the fishing line in half, form a loop, and bring it to the hook.
- With the free end, make three or four turns around one thread, folded in half, and tie it to the forend.
- Next, two strands of fishing line are tied and three or four turns are performed.
- The end of the thread is threaded into the loop formed in the first step, tightened, and the excess is cut off.
Palomar is ideal for eye hooks. The disadvantage of this fastening is the high consumption when tying:
- Fold the fishing line in half, with a small margin.
- The formed loop is threaded into the eye of the hook, the free end of the bent thread is passed into the resulting loop and it is made one turn around the loop.
- Straighten the loop created in the first step and pass the hook through it.
- The resulting structure is tightened and the excess is removed.
“Bloody” is named after its color; it used to be tied at the end of whips that were used to punish offending fishermen, and they took on a bloody color. The main purpose is to tie fishing lines of different diameters. Here is a diagram of fixing the hook with this knot:
- Insert the thread into the eye and stretch it about ten centimeters.
- Fix the thread near the eye with your fingers, wrap the free end around the main fishing line, and make three to seven turns.
- Pass it through the loop formed in step two and tighten. Trim off the remains.
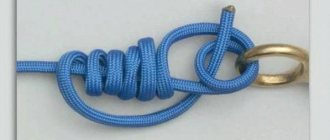
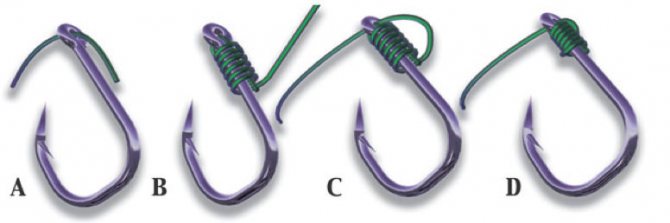
The “clinch” fixes the hook very reliably and has great tensile strength. Used for eye hooks. It is not recommended to use it on braided threads and threads of thick diameter. The method of tying is similar to the “Bloody” one, but at the end an additional knot is added, which better secures the fastening.
- The fishing line is threaded into the eye of the hook and the thread is pulled out fifteen centimeters.
- Fix it with your fingers near the eye, to form a loop in the future, wrap the thread around the main thread, make about seven turns.
- After winding, the free tip is threaded into the loop formed in the second step.
- Having threaded the fishing line into the loop, you get another loop formed by the threaded thread, its tip is threaded through it.
- Gently tighten and cut off excess.
Node classifications
To choose the right knot, take into account: its strength, thickness, type of fishing line, type of hook, technique and knitting conditions. In accordance with the conditions of use, the following types of nodes are distinguished:
- With maximum tensile strength . Studies have shown that knots weaken the strength of the thread due to its deformation when twisted. Poor fastenings reduce the strength of the fishing line by up to 90 percent. Some of the most reliable fastening points are “Snud” (95% strength) and “Step” (95% strength).
- With ease of tying . There are times when this is difficult to do: cold, numb fingers, sticky hands, a cloud of mosquitoes, dark. In such cases, there are simplified nodes, such as “Eight”, “Palomar”, “Clinch”, “Bloody”.
- With ease of untying . Sometimes you need to easily untie a knot, for example, change a hook; the “Eight” is suitable for this.
- For different types of fishing line . There are three main types of thread: monofilament, braided, and fluorocarbon. Best suited for monofilament: “Clinch”, “Snood”, “Bloody”. Braid is best tied with “Snud”, “Palomar”. Fluorocarbon is tied with “Clinch”, “Snood”, “Palomar”, “Eight”.
- Eye hooks are tied with Palomar. If the ear is used with a spatula, tie it with “Stepped” or “Snood”. For huge hooks use Palomar.
- There are universal knots that can be used to tie any gear. One example of this is "Snood".