Most malfunctions of spinning reels that arise during the operation of the latter can be eliminated independently. In other cases, you still have to contact a workshop, where experienced professionals will repair any reel for a fee.
With both options, the owner will be able to not only save significant money, but also continue to use the favorite model rather than buying a new one. Before reviewing common breakdowns, it would be useful to remind you once again that the efficiency and durability of any reel largely depends on regular maintenance!
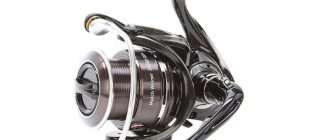
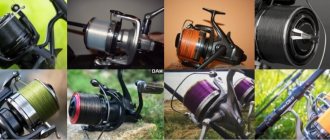
When buying a new reel, pay attention to its manufacturer; you should give preference to reels from Shimano , Daiwa and Ryobi .
Frequent coil malfunctions:
- Coil creaking
- Noise inside the coil
- The reel mechanism jams under load
- Self-resetting line handle
- Reverse stop failure
- Damage to the spool edge
- Line breaks under the clutch nut
- Spiral line feed
- Uneven line winding
- Self-tightening of the clutch
If you want to understand the topic of choosing spinning reels in more detail, we recommend our interesting review - link.
How to disassemble a coil
Before planning to repair a fishing reel with your own hands, you should worry about the availability of the necessary materials and tools. For these purposes, the fisherman will need a small and medium-sized figured and flat screwdriver, pliers, tweezers, an awl, a soft and hard hair brush, an oil can, a piece of rags, as well as any type of cleaning agent containing alcohol and a special mineral oil intended for lubricating rubbing parts. device details.
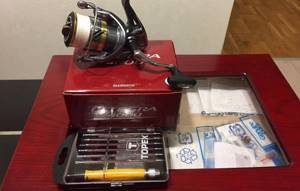
It is convenient to carry out repair manipulations on a desk under a bright lamp with a white spectrum of light, on a backing made of a sheet of white paper, where small parts and connecting elements of the product will be clearly visible.
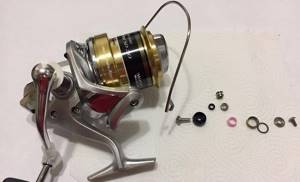
Disassembling the coil
The coil is disassembled according to the clear algorithm presented below. In the process of performing work, it is important to remember the order of the sequence of operations and scrupulously delve into the nuances that contribute to the accuracy of the work associated with the application of efforts to disconnect the threaded, bushing and locking connections of the elements and assemblies of the product.
- unscrew the nut of the brake system and the spool;
- remove the gears and washers located under the spool;
- remove the reel handle;
- unscrew the clamp nut in the mechanism;
- disassemble the rotor;
- dismantle the line-laying bow;
- dismantle the line guide latch mechanism;
- dismantle the line pulling roller;
- unscrew the screw of the reverse locking device;
- dismantle the switch lever;
- unscrew the plug screw;
- dismantle the plug;
- dismantle the wall.
Disassembling the line roller
After manipulating the parts and the body of the mechanism, we proceed to disassembling the line layer. It is not possible to construct an unambiguous algorithm for dismantling the parts of this element, due to significant differences in the design of the device in each version of the device. To ensure the reliability of the work, it is recommended to take step-by-step photographic recording of each operation performed, which today is quite accessible to the average person using a smartphone for these purposes.
Having recorded the disassembly process in photographs, after diagnosing and repairing the spinning reel, the fisherman can easily cope with its reassembly, bringing the product back to its original and functional form without errors.
The most popular problems and their repairs
In continuation of the article, we will look at a number of the most common problems with inertialess motors. These problems, which are not critical for the complete failure of the mechanism, can be associated both with defects in the materials of the product and with incorrect operation of the device. After all, the unfavorable conditions under which the meat grinder units operate, such as high humidity, abrasive sand particles and elementary dirt, certainly only have a negative impact on the operation of the unit as a whole, despite the scrupulousness and care with which it is treated.
But often, in fishing practice, even if the minimum rules for using inertia-free gear and regular maintenance of gears and bearings are observed, these troubles occur due to exhausted periods and resources exceeding the maximum capabilities of the components and parts of the product. The presented reel breakdowns should not confuse or unsettle the fisherman, because he should be able to put the device in order on his own, which is quite doable.
Reverse stop failure
When faced with a situation where the handle begins to rotate freely in both directions when the lock is on, this indicates serious contamination or thickening of the lubricating substances caused by large amounts of dust entering them. The problem of failure of the reverse stopper is solved as follows: the fisherman needs to unscrew the screw of the reverse stopper and remove the clutch. Then the unit is thoroughly cleaned of dirt and old lubricants, rinsing the cleaned surfaces with white spirit or solvent. After these manipulations and drying, fresh lubricant is added and reassembled. The functionality of the unit is restored to its original state.
Spiral line feed
Feeding a fishing line in a spiral when casting baits is one of the common problems in the operation of spinning gear, which can be solved in a fairly simple way, because the problem of incorrect operation lies in the clogging of the line roller. The essence of repairing a spinning reel when this problem occurs is to clean the line-laying mechanism assembly from dirt.
You will need to disassemble the line roller, following the recommendations presented in our article in previous chapters, and remove visible blockages with a brush, followed by washing the parts. Having lubricated the unit again, it is assembled sequentially and the device is used comfortably.
Line breaks under the clutch nut
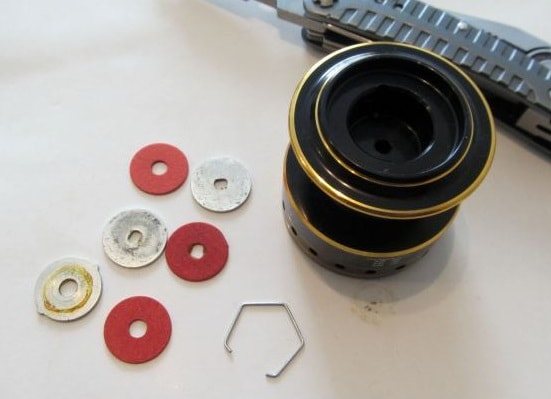
The problem in question threatens the loss of baits and is inherent in new, newly acquired mechanisms with a front position of the friction brake adjustment knob, during the so-called running-in of the reel on the first fishing trips. In devices of these designs, the locking nut is raised above the edge of the spool to a height of 1–2 mm. When an angler reels in the rig, the line often gets caught on the nut and gets pulled under the edge of the spool, causing further tangling, deformation and line breakage. To eliminate incorrectness during winding, it is necessary to disassemble the spinning reel with the spool line, unscrew the clamping nut with the washers of the friction brake device and replace the factory felt pad with one of exactly the same size, only cut from thin plastic.
Important! Particular attention is paid to the problem when purchasing inexpensive mechanisms, in which manufacturers most often sin by installing low-quality gaskets in this unit.
Noise inside the coil
Noise inside the mechanism body can indicate both minor and serious problems. If you hear extraneous sounds in the form of creaks or rattles, you should stop using the device until the essence of the problem is clarified. In any case, you will need to disassemble the spinning reel and visually inspect the transmission mechanism. The reason may lie in the penetration of contaminants into the housing, when sand and solid dust fractions get onto the surfaces of gears and shafts, as well as into the working parts of bearings.
The problem is solved by mechanical cleaning and washing of the unit, followed by adding fresh lubricants. If deformation of parts and bearings is detected, which is most likely, they will need to be completely replaced with new spare parts.
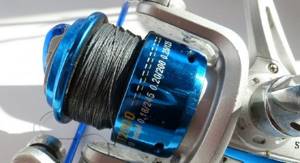
Uneven line winding
Uneven winding of the fishing line is typical of old, long-life devices. The problem manifests itself in the form of a cone-shaped front laying of the cord during winding, or the same rear winding of the line onto the spool. If a conical arrangement is formed in the front part, the washer should be completely removed and removed from the main shaft of the part.
An option for repairing an inertia-free coil when winding with a cone upward is to add another washer to the shaft, compensating for the resulting wear. In both cases, the problem is eliminated in full, allowing you to wind the cord in the original, convenient for casting and originally designed factory style.
The reel mechanism jams under load
If the reel mechanism jams under load, then there is a high probability that the driven or drive gears will need to be replaced. To determine this, diagnostics will be required, which consists of disassembling the housing and visually inspecting the transmission mechanism to identify defective parts. The problem arises due to poor-quality material of gears and toothed shafts, as well as due to the long service life of the inertia-free drive. Symptoms of the problem initially appear as light knocking inside the case, which subsequently turns into a limp when turning the handle, and then into its jamming and jamming even under minimal loads. It is worth considering that to fix the problem you will need spare parts that fit the parameters.
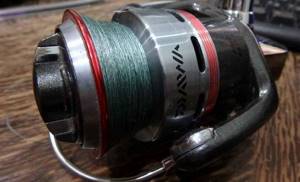
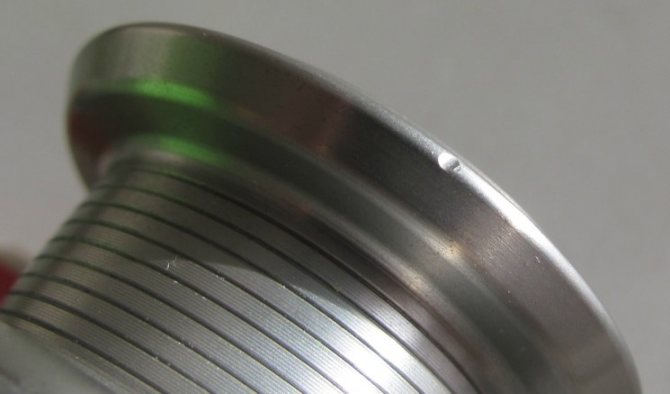
Damage to the reel spool
Damage on the sides of the spool is considered an unpleasant defect. Most often, a problem of this nature occurs as a result of shock loads on the body of the device, less often, and this problem is of a low-quality product, it is caused by the use of rigid cords. Microcracks, chips and nicks appear on the side of the spool. When casting, the descending line clings to obstacles and uneven parts of the part, which leads to a decrease in the range of the tackle, and in the worst case, to deformation of the cord and its further breakage, even with minimal load.
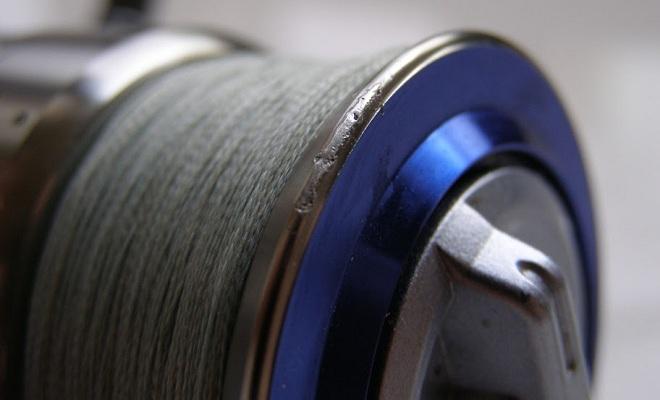
Do-it-yourself repair of a spinning reel involves grinding the side of the spool and completely eliminating irregularities and roughness that lead to discomfort when casting and reducing the breaking loads of the line. For these purposes, sometimes it is enough to use fine abrasive sanding paper and a couple of minutes of easy-to-perform work.
Self-tightening of the clutch
Self-tightening of the clutch, to the great regret of the fisherman, should be classified as a malfunction in which it is not possible to repair a spinning reel. The problem often causes the line to break, especially if fishing is carried out on delicate gear with small diameter cords, suddenly appearing when the thread is released. When fishing with heavy gear with thick cords, spontaneous clamping of the clutch can result in a breakdown of the transmission mechanism itself. An irreparable defect is the fate of poor-quality assembly of a cheap product, which, if possible, should be returned under the manufacturer’s warranty and a new product purchased.
Self-resetting line handle
An irritating defect during fishing is a defect in the device, in which the line-laying arm self-resets, which occurs in the cord rewinding mode. In one of the repair options, the problem can be resolved by tightening the clamping screws securing the bow. If tightening the mounting screws does not resolve the issue of incorrect operation, it is worth increasing the stiffness of the spring located under the device cover. There are two ways to adjust the required spring stiffness: install a spacer on the rod, reducing the working stroke of the spring, or replace the original part with a spring with greater rigidity.
Cleaning the line roller
Cleaning the line roller should be perceived by the fisherman as a regular DIY repair of the reel after a certain period of use. The device is carefully disassembled into individual parts, which, with the exception of the bearing, are thoroughly washed in solvent to completely remove all dirt. After washing, the components of the assembly are wiped dry with napkins or a piece of soft cloth. Reassembly should be accompanied by applying a small amount of lubricant to each joint made.
Important! Excessively added lubricants, when leaking from the joints, can get on the cords and cause irreversible defects on their surface.
The bearing is wiped with a rag and lubricated in the same way as other parts. When screwing the connecting bolts, avoid tight tightening that affects the freedom of rotation of the roller. After assembly, the roller should rotate freely at the slightest touch in the direction of movement.
Coil creaking
If constant squeaks occur inside the coil, it is necessary to lubricate its parts. Of course, it is not so easy to determine which parts require lubrication, so the best option in such a situation would be to completely lubricate the entire reel mechanism. If you have at least basic skills in disassembling, cleaning and lubricating the insides of the reel, no difficulties should arise. How to disassemble, clean and lubricate the coil, read the article - Coil Maintenance.
The procedure for disassembling a spinning reel
Disassembly and maintenance of coils must be carried out in a well-lit, prepared workplace. Considering that they consist of many different parts, after removal it is recommended to lay them out sequentially, preferably from left to right . This will greatly facilitate the process of reassembling the product. For bolts and nuts, you can prepare a small separate container , for example, a jar or box.
Expert opinion
Knipovich Nikolai Mikhailovich
Zoologist, hydrobiologist. I am interested in fishing at a professional level.
Attention! To lubricate the parts of the reel mechanism, it is best to use the lubricant recommended by its manufacturer. As a last resort, you can take lubricant from reels of other brands. But under no circumstances should you use WD 40 or other lubricant not intended for such products; they can damage the plastic elements of the mechanism.
To avoid additional contaminants getting inside the mechanism, before disassembling, the entire outer surface of the reel must be thoroughly cleaned of dirt, fish mucus and sand that may have remained on it after fishing trips. This can be done using a cotton pad dipped in soapy water.
The disassembly sequence is as follows:
- The spool is removed. To do this, just unscrew the clutch nut. Immediately remove all dust and dirt accumulated under the rotor.
- Disconnect the handle.
- Carefully remove the retaining ring and gear from the main axis of the spool.
- Using a suitable wrench or pliers (as a last resort), unscrew the clamping nut. It is removed along with the lining.
- The rotor is removed.
- We remove the shackle from the rotor and disassemble the mechanism that facilitates its automatic latching.
- Now it's time to start disassembling the coil body. To do this, you first need to unscrew the bolt of the reverse lever and remove the toggle switch.
- Unscrew the plug bolt with a screwdriver and remove it.
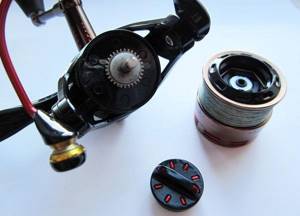
- Carefully remove the coil wall. You may need to pry it up with a flathead screwdriver or tweezers.
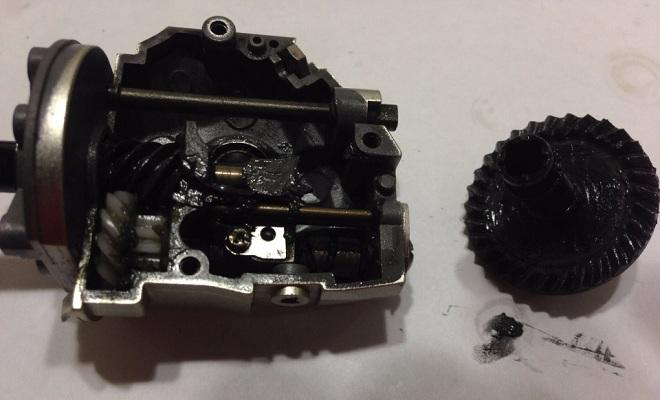
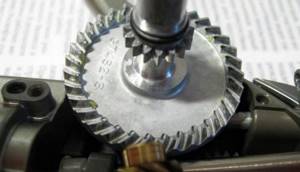
- The main mechanism of the product opened before us. Its main components are a slider and a pair of gears that are responsible for rotation. If it functions normally and access to it was opened for the purpose of routine inspection, further disassembly is not required.
- Using cotton swabs, you need to thoroughly clean the entire mechanism of old grease, paying attention to each tooth of the gears.
- Lubricate the mechanism with thick lubricant recommended by the manufacturer of this reel.
That's it, after this you need to assemble the product . This must be done in reverse order , taking into account the relative position of each part.
Expert opinion
Knipovich Nikolai Mikhailovich
Zoologist, hydrobiologist. I am interested in fishing at a professional level.
Important! When lubricating the internal mechanism of the inertia-free mechanism, it is very important not to overdo it with the amount of lubricant. In the future, when it is used and heated, for example, in the sun, its excess will begin to flow out of the cracks, and this contributes to the adhesion of sand and dirt.
After the coil is assembled, it must be wiped with a clean cloth, removing excess grease from the surface and checking its functionality. It should work smoothly, without unnecessary sounds and delays in the rotation and movement of the spool.
Uneven line winding
Sometimes a small incident arises, which consists in uneven winding of the fishing line, when a front or rear cone forms on the spool.
This minor error can be easily corrected as follows: winding the line with the cone down is eliminated by removing one washer from the main shaft of the reel, and the problem with the direction of the line cone up is eliminated, on the contrary, by adding another washer.
Common problems with spinning reels
Many problems that arise during operation can be eliminated on your own. Although, if individual elements fail, you will have to contact a specialized workshop. In any case, it will cost much less than purchasing a new coil.
We have already written in the article “Memo to a fisherman on how to use a spinning reel” about the structure of this mechanism. I would like to remind you once again that the service life of any device depends on periodic and competent maintenance.
Among the malfunctions are the following:
- noise inside the case;
- when loaded, the device jams;
- The scaffold stacker bracket closes spontaneously;
- gusts of the line under the clutch;
- spiral scaffolding;
- poor-quality winding of the scaffolding.
If you constantly hear extraneous noise inside the coil, it needs to be lubricated. It is almost impossible to determine the location of the squeak, so you will have to lubricate the entire structure. The mechanisms are processed so that the lubricant is evenly distributed inside. A thicker lubricant is applied to the gears, and open bearings are treated with liquid.
Sometimes a problem arises with uneven winding of the line, which forms a taper. Eliminating this little thing is also quite easy. It is enough to remove or add an adjusting washer from the main spinning shaft. On the rear and front clutches this is done exactly the opposite.
Another common case is that the bracket of the line layer spontaneously snaps into place, which can lead to the gear breaking at the moment of casting. It’s one thing when there is a light bait, but what if there is a feeder rig with a heavy feeder? First you just need to tighten the bolts securing the bracket. If that fails, you can either place a spacer under the rod or simply replace the spring.
When the reverse stopper stops working, the handle begins to turn in all directions, despite the blocking. The stopper in most reels operates under the influence of the overrunning clutch, and if there is severe contamination or accumulation of thickened lubricant, correct operation stops. In this case, only cleaning will save you.
Self-resetting line handle
A fairly common problem is when the line laying arm automatically resets to the position for reeling in the fishing line, which can often lead to disastrous consequences. To fix this problem, you should first try to tighten the bolts that secure the bow. If this simple procedure does not help, you should add more elasticity to the spring under the cover. This can be done by installing a spacer on the rod or simply installing a new, stiffer spring.
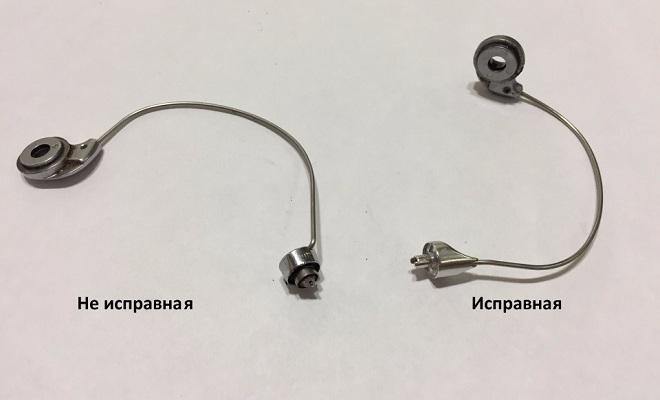
Repair of the line handle bracket
- VK
The cause of unintentional “casting without return” is most often the spontaneous closing, or, as they say, “slamming,” of the line handler. There can be quite a few reasons that cause this behavior of such an important “spinless” unit, but there are three main ones: weak fixation of the shackle in the open position, the large mass of the shackle itself and too small a stroke angle of the line roller lever.
We will consider all these phenomena in more detail using the example of different designs of arc return units for common models of inertia-free reels.
It couldn't be simpler
Most economy class reels are equipped with the simplest systems for returning and fixing the line handle. The shackle itself is usually made of solid steel wire, either stainless or coated with relatively inexpensive titanium nitride. The diameter of the wire can reach up to 2 mm with a bow weight of about 8 g with a fastening unit. Actually, there is no need for such excess power - the bail is little subject to loads, its task is only to grab the fishing line after the casting is completed and reeling has begun.
It is worth recalling that spinning reels were originally invented in order to simplify the casting and reeling of bait as much as possible, thereby making the fishing process more comfortable even for “dummies” who finally decided to devote one weekend to this activity. Therefore, initially the return of the bow to the “winding” position was made automatic.
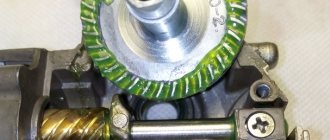
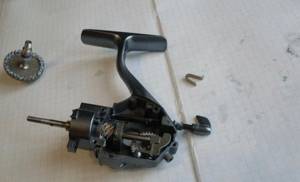
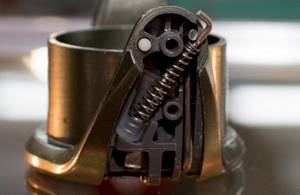
As soon as the angler turns the “spinless” handle, the control lever in the rotor strut will hit the “hill” of the body (photo 1), its opposite end will set in motion a system of levers interacting with the end of the bow (or directly on the lever), and the bow will make a characteristic click will close.
photo 1
Thus, it will grab the fishing line and, with some tension, direct it to the stream of the line roller. The translation of the bow is carried out by a fairly powerful spring made of steel wire, which is made in the form of a 3/4 turn spiral. One end of this spiral is fixed to the reel rotor stand, and the other to a figured lever with a line roller, but sometimes also to the tip of the opposite end of the bow (photo 2).
photo 2
Fixation of the bow in extreme positions is carried out through the passage of the “dead point” (photo 3), where the spring force is maximum.
photo 3
Sometimes the return system, that is, the spring and the lever mechanism that controls it, is located in one rotor strut, but often these units are separated: the spring is in one strut, and the lever device is in the other (photo 4).
photo 4
We will consider the advantages and disadvantages of single and spaced systems below, but for now we note that a double-armed spiral spring is as simple as it is short-lived. It is this system that experiences constant dynamic loads in the entire return system of the line handler, the full cycle of which is twice the number of casts. Accordingly, it often fails, that is, it simply breaks, and at the most inopportune moment, and the coil becomes completely inoperable. Repairing it at home is quite simple - craftsmen have long been using safety pins for such springs, suitable for the size and diameter of the wire. But in the field, it is very useful to have a spare spring with you, made in advance to size.
Conclusion: coils with a return system of this type with a monolithic bow are most prone to spontaneous slamming with all the ensuing consequences. “Curing” self-reset in such designs is quite troublesome, since the design is so simple that it does not provide for the possibility of adjustment.
Does more difficult mean better?
It would be a mistake to believe that the designers and manufacturers of spinning reels are not aware of the problem of “shooting” or have deliberately built it into the design so that poor spinning anglers will more often fork out money to buy new wobblers, jig heads and all sorts of other baits to replace those that have irrevocably flown away. The bail fixation system was improved along with other “inertia-free” components, its design, production and assembly became more complicated, and as a result, the quality and price of the reel increased. In an effort to eliminate “self-reset”, the designers made the following improvements: - improved the performance of the spring by replacing the spiral double-arm spring with a long spiral spring operating in compression;
- the return and control system was distributed across two coil rotor stands;
- added additional parts to the bow return control system;
- reduced the mass of the bow itself to reduce the moment of inertia; installed additional spring clamps for the roller lever;
- and finally, they created a controversial system among anglers for braking the reel rotor when the bow is open.
The long spiral compression spring (photo 5) is more durable, it practically does not break; “settlement” of the spring is an extremely rare phenomenon in branded products.
photo 5
It was finally decided that the spring drive should act directly on the roller lever (photo 6), and not on the opposite end of the bow, as in simpler models.
photo 6
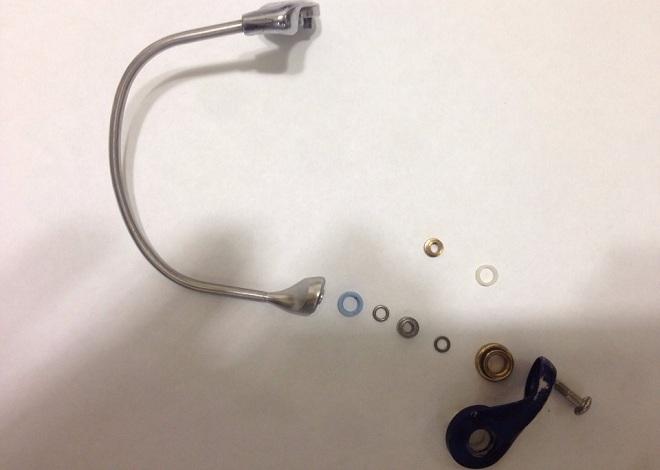
The drive itself consists of a twisted cylindrical spring, a rod in the shape of the letter “L”, the short end of which rests against the hole on the roller lever, and a slider (spring body) that has a trunnion lug for rolling on a plane (see photo 5). The lever return control of the bow, located in the rotor counter (photo 7), the so-called spaced system, is considered optimal because it improves the balancing of the rotor and reduces the overall weight of the product.
photo 7
As you know, the bow is not rigidly fixed at its ends, always having some mobility, especially in the attachment point for the return end of the bow. In addition, due to its own elasticity, it can change the initially specified curvature. This collectively leads to the fact that the force applied by the spring to one end of the bow (for example, to the roller lever) is also spent on overcoming the elasticity of the bow itself. Accordingly, the angle when fixing the bow in the open position will be slightly less than we would like for reliable fixation. So, in my opinion, the good old system, where the spring and control lever were located on the same rotor strut (photo 8), better meets the requirements of clearly fixing the line handle in the open position.
photo 8
Moreover, “bringing it to mind” is somewhat easier with skill and desire. If we compare a monolithic wire bow and a tubular one, then the tubular one has significant advantages. It is lighter, and therefore has low inertia, which means that it is more difficult to throw it off during a sharp cast, and only a small amount of effort is needed to fix it. At the same time, the tube is stiffer than a monolithic wire of the same diameter, and when the units are spaced across different rotor struts, it will better transmit the force of the return spring.
Additional roller lever clamps are usually made in the form of a spring-loaded ball (or a cylinder with a spherical working surface), which fits into a recess in the lever sector. Such a device, with a click, rather notifies the angler that the bail is open, rather than significantly improves its fixation before casting. There is no point in modifying this unit yourself. As for braking the rotor when the arm is open, this option is only available on expensive reels, which themselves have a fairly reliable locking unit for the open arm. Braking is carried out due to the fact that a small lever on the rotor, after opening the arm, rests with one of its shoulders against a rubber ring placed on the reel body under the rotor. It is believed that reels with a very light stroke can turn under the weight of their own handle, thereby forcing the bow return system to operate against the will of the angler. Therefore, if the purchased reel has such a device, then let it remain, but if not, this is not a reason for sadness.
Conclusion: increasing the complexity of a design does not always guarantee an increase in its reliability and durability. When choosing a coil, it is more useful to familiarize yourself with the structure of the bail return unit according to the assembly drawing than to shake the coil with the open bail as hard as you can, “testing” it in such a stupid way for “self-reset”.
For skilled hands
In most cases, any angler who has the skills to work with simple tools can easily fix the annoying “self-reset”. The goal is not to increase spring power, as many people believe. Increasing the power of the spring will lead to the fact that the operation of the control lever will be more rigid, not designed for all other parts, and some of them (down to the “mountain” on the body) will simply be erased or fail faster. You need to increase the angle of travel of the lever with the line roller. To do this, you will have to disassemble the assembly, carefully ensuring that the return spring of the bow does not “jump” in an unknown direction. Carefully inspect the roller lever itself: it may not be possible to increase the angle of its stroke towards the “opening”, since there is too little room for its deflection and the protrusion of the lever simply rests against the rotor strut. In this case, you can try to slightly bend the upper elbow of the rod so that it goes slightly to the left relative to the rod with the spring (photo 9).
photo 9
Accordingly, the fixation force will be increased and the “self-reset” will disappear. On most models, it is enough to change the configuration of the hole on the roller lever into which the rod elbow fits. It is necessary to make it oval so that the rod elbow in the “open” position of the bow moves 1.5-2 mm up the lever sector (see photo 9). Thus, the spring force will be directed at a different angle to the lever sector, and its fixation will be more reliable.
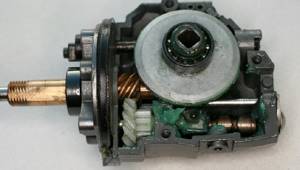
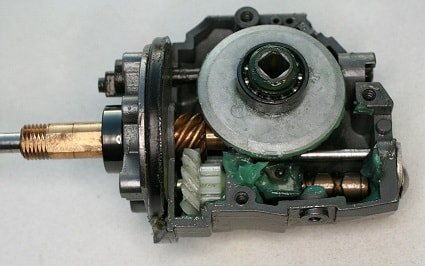
A few words about the prevention of the line guide return unit and its lubrication. Quite often, spinning anglers, having noticed abrasions of the paint layer on the rubbing parts of the bow (the end of the lever, the roller lever itself), believe that the unit has become unusable or at least needs maintenance. So, I recently received a Splendor 3000 reel, which worked for no more than one season. Its owner, an experienced spinning fisher, noticing scuffs of the paint layer on the rubbing parts, doubted their reliability, deciding that these parts should be replaced. When disassembling these units, it turned out that the doubts were in vain: all parts (both control and spring drive) had no wear, were not contaminated with sand and soil particles (photos 10a, 10b), their paint coating was only partially erased at the points of contact .
photo 10a
photo 10b
There was no need to even change the lubricant. Note that the rubbing parts of the unit under discussion are made of plastics that have a low coefficient of friction, and excessive lubrication will not improve their performance. On the contrary, in some situations it will become a place where abrasive particles (sand, soil) accumulate, which will lead to increased wear. The most reliable thing is to carefully open this unit after the warranty period, coordinating your actions with the assembly drawing that is attached to the reel, remove the remnants of old grease and dirt with a brush (preferably made of artificial hair) dipped in lighting kerosene. After this, apply a thin layer of silicone grease to the rod, put on the spring and install everything in place. The same procedure must be carried out with other rubbing parts of this unit.
And lastly
Among spinning anglers, it is considered good form not to slam the line handle with a roar while turning the handle of the spinning reel, but to quietly and smoothly throw the handle by hand. Of course, this only improves the reel's longevity. But since almost all “inertia-free” machines have a line handle that automatically returns to rewind (a couple of elite models from Vaan Stal don’t count), try to choose one that does this without unnecessary shock and stress. Sometimes you can stop the flight of the bait only in this way. Regarding the sharpness of casting, which leads to unwanted self-closing of even a well-fixed bow, I can recommend mastering the technique of using a spinning rod, rather than complaining about an allegedly bad reel. It's better to be a good dancer and have fun with it than to constantly complain about your own physique.
Related articles:
Good reel care
Homemade jerkbaits
Repair of inflatable rubber boat
Homemade balancer
Noise inside the coil
If you hear unnatural sounds coming from the coil, it is advisable to stop using the product immediately. The appearance of noise may be associated with the same contamination, as well as with the breakdown of bearings or other parts. Further actions are to disassemble the coil and then lubricate or replace damaged parts, depending on the specific problem.
Reel Maintenance
As a rule, a new spinning reel has a pleasant velvety stroke, smooth and silent rotation. But after prolonged use, some crunching, rustling and vibration appear in the mechanism. To get rid of or prevent this, it is necessary to periodically disassemble the coil, clean it of dirt and change the lubricant.
High-quality lubrication of the reel makes the operation of the reel smooth and pleasant; moreover, the new lubricant extends the service life of all mechanisms.
Maintenance of the coil should be done periodically, several times a season, depending on the frequency of use. And once a year you need to completely disassemble the coil and replace the lubricant.
Naturally, you need to constantly monitor the reel, do not drop it on hard surfaces, try to avoid water getting into the mechanism and try to avoid all kinds of contamination.
The reel mechanism jams under load
When, when reeling in the fishing line, knocking noises inside the reel are clearly audible, it periodically jams and even jams under some load, we can safely say that the main gear mechanism is damaged. Most likely you will need to replace the drive and driven gears with new ones.
Damage to the reel spool
The presence of damage on the side can significantly affect the casting distance, and, naturally, only in a negative way. Also, due to scratches and unevenness of the spool, the fishing line itself often suffers, and its service life is reduced.
Therefore, after detecting such defects, hurry to eliminate them by grinding and polishing the surfaces. In some modern reels, a special coating of a hard metal alloy is applied to the side of the spool, which it is advisable to leave in place.
Important article on this topic: the best spinning reels
Line breaks under the clutch nut
In reels with a front drag, the locking nut is located slightly above the edge of the spool, only about 1-2 mm. Because of this, the line often gets caught on the nut and gets under the edge, which leads to tangling and breaks. To eliminate this problem, you need to disassemble the coil, remove the nut and washers of the friction brake, and replace the felt spacer with a thin plastic spacer.
The most popular problems and their repairs
Repair of a spinning reel may be required due to careless handling while fishing. The most common problems and their consequences arise from the spinning reel coming into contact with water or being carelessly thrown onto the sand or ground. The problem may also arise due to a manufacturing defect or the fault of the fisherman himself. Pay close attention to the line roller washer and bushing.
Line breaks under the clutch nut
In designs with a front-mounted clutch, the locking nut is raised 1-2 mm above the edge of the spool. When the line is wound, it often gets caught on the nut and falls under the edge of the spool, which leads to tangling and breakage.
To solve the problem, you need to disassemble the reel with the spool line, unscrew the nut with the brake clutch washers and replace the felt gasket with a similar one made of thin plastic.
The reel mechanism jams under load
If, when winding the fishing line, tapping noises begin to sound inside the device, periodically jams and jams under minor loads, this indicates a failure of the gear mechanism. In such cases, replacement of the driven and drive gears is required.
Reverse stop failure
A sign of wear is slight rotation of the device handle in both directions when the lock is engaged. This is due to the adhesion of contaminants or thickening of the lubricant composition. In such a situation, you should unscrew the reverse stop bolt, dismantle the clutch, and clean and lubricate it.
Noise inside the coil
If the spinning reel squeaks or grinds, you should immediately stop fishing. Noise may appear due to dirt, damage to bearings or other components. Such a problem requires disassembling the mechanism, cleaning, lubricating or installing spare parts.
Spiral line feed
Sometimes, in the process of casting the bait, the line spirals together. This defect occurs due to contamination of the line roller. The solution to the problem is to disassemble and lubricate the mechanism assembly.
Uneven line winding
Occasionally, a defect appears due to uneven, cone-shaped front or rear winding of the fishing line on the spool. In the first case, the washer is removed from the main shaft of the part. And when winding with a cone up, on the contrary, an additional washer is added.
Self-tightening of the clutch
When etching the fishing line, sometimes a break occurs due to the self-tightening of the clutch. This happens with cheap low-quality parts and the problem cannot be eliminated.
Self-resetting line handle
A common defect is the spontaneous reset of the line-laying bow into the line reeling mode. In this case, tighten the screws that secure the headband. If the shackle is self-resetting, try increasing the stiffness of the spring located under the cap. To do this, install a spacer on the rod or install a spring with greater rigidity.
Cleaning the line roller
At the first stage, the fastening screw is unscrewed. The device is disassembled, taking into account the presence of a washer in the cheek of the roller. After removing the washer, the mechanism is disassembled. After carefully inspecting the parts, rinse them in a solvent placed in a container of 50 to 70 grams. The ball bearing should not be washed, as its lubricant will be washed away and it will quickly become unusable.
After washing the parts, carefully remove any remaining dirt and wipe dry with paper towels.
When installing, add one drop of oil per assembly. Excess lubricant is undesirable, since under the influence of centrifugal forces it can get on the fishing line or cord and ruin them.
After installing the roller on the rod, check for ease of rotation. To do this, run the edge of a folded napkin along the edge of the roller. It should turn easily.
When installing the second bushing, it is necessary to apply half a drop of grease to the bearing. The arm and the rod are matched and connected with a screw, tightened tightly, but without tightening. It is unacceptable to treat the screw with a thread locker, since with further maintenance it will be impossible to unscrew it.
- After completing the assembly, finally check the operation of the roller. To do this, run the edge of a paper napkin over it. The roller should rotate easily and naturally.
Reel repair by a specialist
In difficult situations, in order to repair your favorite coil model, it is better to seek help from a specialist who already has dozens of repaired and correctly configured coils behind him. Masters who repair spinning reels have at their disposal a wide range of parts for products of any category, and therefore they will probably have something to replace the damaged element of your model. An experienced specialist can carry out not only the repair itself, but also lubricate the parts along the way and make precise adjustments of the main pair of gears.
Coil lubrication
Another reason for coil breakdowns is the lack of lubrication of the internal mechanisms. After each cleaning of sand and dirt, the parts must be lubricated. The oil used for this purpose should not be too thick, without various additives that can damage plastic parts. Naturally, it is better to buy special oil designed specifically for lubricating coils.
Careful operation and periodic maintenance will extend the life of the reel and protect it from damage. If the latter do arise, you need to promptly take care of repairs at an early stage, so that a minor problem does not turn into a large or even critical one.
Author of the article: Vitaly Leonidovich Ivanov, 2021.
The structure of inertia-free coils
Inertia-free devices have the following components: body, drive, brake clutch, rotor, reel seat leg, rear direction switch, spool fastening rod, line guide with shackle, roller, gear with shackle.
How to disassemble
Repairing a spinning reel at home is carried out in the following sequence:
- the nut of the brake system and spool is unscrewed;
- remove the gears and washers located under the spool;
- the reel handle is dismantled;
- the clamp nut in the mechanism device is unscrewed;
- the rotor is disassembled;
- the line-laying bow is dismantled;
- the line guide latch mechanism is dismantled;
- the line pulling roller is dismantled;
- the bolt of the reverse locking device is unscrewed;
- the switch is dismantled;
- the plug bolt is unscrewed;
- the plug is dismantled;
- the wall is dismantled.
The main mechanism, consisting of a pair of gears and a slider, remains undisassembled. Its disassembly is undesirable unless absolutely necessary.
To clean the parts of a spinning reel, damp cotton pads and swabs, fresh warm water, or preferably distillate are used. To eliminate contaminants in inaccessible areas, cotton swabs and tweezers are used.
When repairing fishing reels and cleaning them from dirt and sand, it is not advisable to use caustic household cleaning solutions. Replace them with gasoline or ethyl alcohol.
Regardless of the type of gear, when disassembling mechanisms, parts and pieces are placed on a clean surface in the dismantling sequence. This method will allow you to assemble the structure back several times faster.
Disassembling the multiplier inertial reel
Before starting restoration, the spinning reel is disassembled in the following order:
- The locknut securing the reel handle is unscrewed.
- To remove the spool, the multiplier casing is disassembled. For this purpose, the lock nut is unscrewed, the “cheek” of the multiplier is turned and removed.
- The spool is removed from the multiplier housing.
- To reach the main device of the multiplier, the assembly is removed from the axle and the gasket placed under it.
- Remove the cover on the axial brake.
- The bolted connections securing the main mechanism cover are unscrewed and the cover is removed.
- The main mechanism is disassembled. The largest gear in size is the main gear; it houses the friction discs of the spinning reel.
- The decorative overlay is removed and the slider guide is removed.
- The stopper of the worm assembly is dismantled, the cover is unscrewed and the “tooth” is removed, then the “worm” is removed.
After complete disassembly, the product is washed, the coil faults are diagnosed and repaired. To prevent malfunctions in the operation of the coil, certain procedures are carried out.
Periodically it is necessary to clean the device from dirt and dust, wipe the side of the spool to remove deposits. They lead to wear on the cord and deformation of the side when the reel handle is rotated. But the most important thing in self-prevention of part malfunctions is the timely repair of the line roller.
The reasons and frequency of roller prevention may vary. This depends on the individual design features. The sliding roller assembly must be serviced once every 10 to 20 hours of operation of the device, that is, every three to four fishing trips. The ball bearing-based roller is serviced at intervals of 40 to 50 hours. Such a high frequency is caused by the significant rotation speed and constant contact with the cord.
During operation, water, suspended sand, and algae constantly fall under the roller during operation, through a moving cord. Acting as an abrasive, these substances prematurely wear out the unit, leading to the “cut” of the roller, breakage of the cord and loss of trophies and baits.
Disassembling the line roller
Dismantling will require the following tools:
- tweezers;
- pencil;
- crosshead screwdriver;
- packaging of paper napkins;
- a set of cotton swabs;
- a bottle of liquid oil;
- jar of white spirit.
Do not use lubricants of dubious composition and origin. A popular option is hydraulic spindle oil.
Before disassembling the line roller, sketch or photograph its position in the assembly. During the entire disassembly process, step-by-step photographic recording should be carried out. The spinning reel is assembled in the opposite sequence. How to repair a spinning reel is determined after diagnosing the problem.