Secrets of making a bottle from a bottle
It’s not difficult to make a zherlitsa from a plastic bottle with your own hands. To make the design you will need:
- tape or tape;
- scissors or sharp knife;
- rubber;
- thin spring;
- nylon cord or fishing line 3-3.5 m long;
- plastic bottle with a lid with a volume of 1-1.5 l;
- hook;
- a piece of tarpaulin;
- sinker.
The process of making the girder:
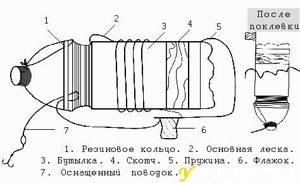
- Remove the bright label from the plastic bottle. Wind a fishing line or cord into the middle, tying it with a strong knot at the neck. Under the lid, attach a rubber ring, which additionally secures the fishing line.
- Attach a treble hook to the end of the cord. The sinker can be attached to the fishing line directly in front of the hook or 30-40 cm above.
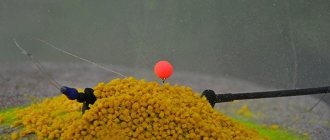
- Using tape or tape, attach the spring to the side of the bottle. Attach a bright tarpaulin flag to its end. Bend the spring to the bottle and secure the position by threading the fishing line under the elastic band.
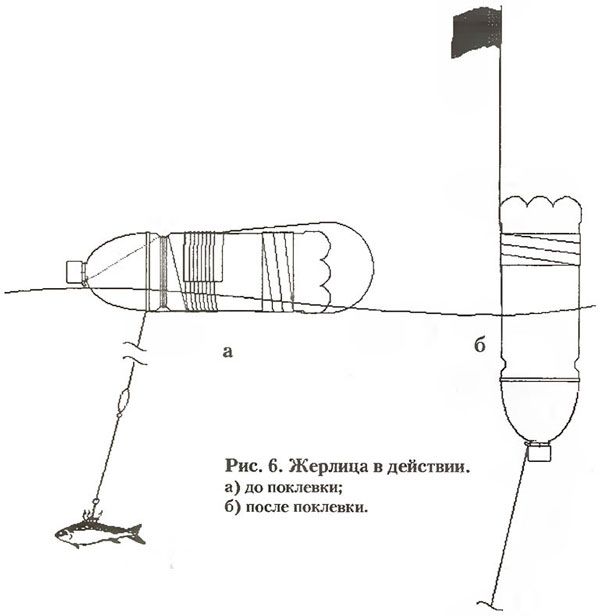
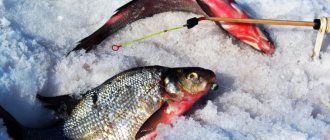
Place the live bait on the hook and lower the bait into the pond. When the fish swallows the bait, the line will unwind, releasing the spring with the flag. Take out your catch and attach a new baitfish.
Using a thread, the girder can be attached to a wooden or iron stick, polystyrene foam or board. This will make it easier to remove gear and catch from the water.
Water should not leak into the bottle. Fill the place where the lid is screwed with waterproof glue or screw a piece of bandage onto the thread. Check your equipment every 60-80 minutes; in case of even minimal leakage, the vent will completely go under water.
Tubular vents
Tubular vents have become popular with the advent of various materials on the construction market. Fishermen have come up with a new variety - tubular, consisting of a polymer pipe with a diameter of up to 35 mm and a length of up to 70 mm.
How to catch more fish?
I have been active fishing for quite some time and have found many ways to improve the bite. And here are the most effective:
- Bite activator. Attracts fish in cold and warm water with the help of pheromones included in the composition and stimulates its appetite. It’s a pity that Rosprirodnadzor wants to impose a ban on its sale.
- More sensitive gear. Reviews and instructions for other types of gear can be found on the pages of my website.
- Lures using pheromones.
You can get the rest of the secrets of successful fishing for free by reading my other materials on the site.
Design
The design of the vent is easy to manufacture:
- two holes are drilled at the top of the tube;
- a length of up to 20 meters and a thickness of no more than 0 5 mm is wound onto a tube;
- a sliding sinker weighing up to 15 g is suspended from the girder;
- is stopped by a rubber damper;
- a swivel with a clasp is tied to the end of the thread;
- a section from a bicycle tube up to 2 cm wide is pulled onto the tube in order to fix the girder in the working position.
Secrets of a good catch
Summer girders are used in reservoirs with different currents. If the river is stormy, then choose a large bottle; a small bottle will quickly be carried away by the current. Do not let the tackle out of sight; secure the pole with a cord on a long stick. Use a fishing line or cord that is brown in color. The white color can scare away predatory fish from the bait.
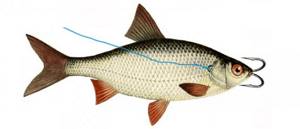
To ensure that the baitfish does not lose activity, place it on the hook correctly. Pass the line through the mouth and gills, and tie on the tee. You can place the bait under the dorsal fin, but this requires skill so as not to pierce or break the fish's spine. Catch live bait in the same reservoir in which pike fishing takes place.

Summer fishing with the help of a girder is used by all pike fishermen. You can make fishing tackle right on the shore of a reservoir. Manufacturing does not require much time and effort, and you will be able to go fishing where a spinning rod and fishing rod are useless.
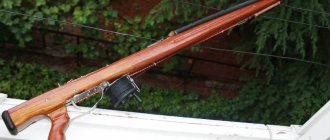
Zherlitsy with a flag
This is a common tackle among anglers used in winter. For fishing in the summer, it is enough to modify it a little.
The material you need to select is:
- stick up to 40-45cm long;
- checkbox;
- inertial coil;
- monofilament line up to 0.5 mm in diameter, length up to 20 m;
- carabiner;
- sinker;
- leash;
- hooks
Now only mine bites!
I caught this pike using a bite activator. No more fishing without a catch and no more looking for excuses for your bad luck! It's time to change everything. The best bite activator of 2021! Made in Italy.
Design
To assemble the structure you need:
- attach a flag and an inertial coil to the vent (reel);
- equip the reel with monofilament line up to 20 m in length;
- attach a sliding sinker when fishing for pike;
- equip the girder with a metal leash;
- attach the hooks and you can throw them into the pond.
To install the gear, you will need to drive a stake on the shore and tie the pole to the post with a rope. The leash allows you to make fish bites more pronounced, and the flag will tell you when the fish has swum to the bait. It will begin to rise above the water, signaling the start of a bite.
But you can’t rush into hooking. You need to wait a few minutes for the fish to properly swallow the bait. From the beginning of the rotation of the reel, you need to prepare to hook the fish.
The flag will be clearly visible even from a distance if you first paint it in brighter, more noticeable colors.
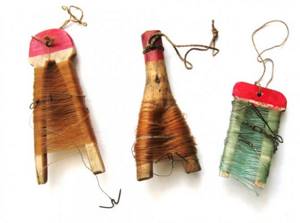
Homemade summer zherlitsa from a plastic bottle
Today in this article I just want to tell you about how you can speed up and increase the number of fish caught. I want to share with you the “recipe” for making a zherlitsa.
A zherlitsa is a fishing tackle adapted for catching predatory fish, such as, for example, pike, perch, catfish and others... As you know, predatory fish like to feed on their own kind, that is, fish, so you need to fish in this way with live bait. There is a variety of zherlitsa: both summer and winter zherlitsa.
In this article I will tell you about the summer zherlitsa.
I will begin my story about making this fishing tackle by explaining what things we will need.
So, for our craft we will need: - a small stick (it can be either wooden or made of any other dense material). I used a metal-plastic inch pipe; - scotch; – scissors or knife; – lace or small rope; - plastic bottle; - a piece of fabric.

So, let's start making...
To begin, take a plastic bottle (I took a 1 liter bottle) and cut off the neck of the bottle...
Now I’ll tell you how it all works... So, you come fishing, fix this shelf with one end into the bottom of the reservoir, and the other end sticks out, then the predator swallows your bait in the form of a live fish and pulls it along without feeling any resistance... Into this time the line unwinds and the plastic bag also unwinds (this is a signal to the fisherman that a predator has been caught), and the predator continues to pull the fish... As soon as the line finishes unwinding, it rests and thereby automatically hooks the predator, which has already completely swallowed your bait... Next, the fisherman pulls fishing line and pulls out the trophy! That's all!
Fishing for pike on girders in summer

Today, fishing has turned from a way of obtaining food into entertainment, so hunting for predatory fish is of particular interest. Avid fishermen use girders - gear for catching pike. These devices were used in ancient times, and today they have been modified and improved, which ensures a guaranteed catch.
The participation of the fisherman when using the girders is limited solely to the installation of gear and removal of the catch.
The advantage of girders is the ability to use gear in any place, even hard-to-reach places, where other devices cannot be used.
Tips and tricks
When creating equipment for a girder, you need to take into account the attack of the pike, which consists of two stages:
- First, the predator grabs the bait fish from across and drags it several meters forward.
- Then he stops, releases the fish and swallows it lengthwise.

Here it should be borne in mind that the bite can end at the first stage if:
- The pike will notice the resistance created by the fishing line wound around the tackle. To avoid this, you need to leave a sufficient supply of thread and select the right weight.
- The predator will prick itself with a hook that is embedded in the back of the bait.
It is important to select the correct weight of the lead olive and correctly position the stop pellet. You should not put the bait behind the back. First of all, the pike can prick itself, and the bait itself quickly dies and ceases to attract a predator.
It is recommended to carry out the installation as follows: push back the gills, pass the leash through the mouth and secure the hook. This way the tip will point towards the tail, which will not scare off the prey at an important moment.
Having figured out what the vent looks like and is made, you should take into account some additional nuances:
- If there are several types of bait, then it would be useful to use several leashes placed at different depths. This increases the chance of a bite, since several water horizons are fished at the same time.
- If the bite is bad, you should use the thinnest possible line and tackle that includes one hook.
- On bodies of water with strong currents, it is necessary to use a heavy weight.
- A perch installed at night in winter requires camouflage. It is enough to sprinkle the frozen hole with snow or simply cover it with something.
The information presented in the article allows you to understand the existing varieties of vents, used both in summer and winter. Most of them can be made independently at home without any problems. When fishing this way, you must adhere to certain recommendations so as not to scare away the prey.
Beacon design
Let us remind you that not only pike bite on girders, but also burbot, pike perch, perch, and rotan. Nevertheless, pike is the most popular fishing object. Finally, we will give 8 important recommendations.
- If fishing allows you to use several leashes, you can attach different live baits.
- The bite will depend on the gear. If it is thin, then the bite will be bad.
- If there is a strong current, then it is better to take a heavier sinker.
- Mask the items at night. The hole can be filled with snow.
- Do not stand over the tackle or run from one to the other. Choose a place to wait and watch the warning lights carefully.
- Observe the correct installation of the girder.
- The bite will depend on the fishing location.
- It would be useful to prepare for knowledge in the field of fish behavior in the dead of winter.

Any design of a girder must contain the basic elements on which the catchability and ease of use depend. What to pay attention to:
- To ensure that bites are noticeable at a considerable distance, the signal flag is used only in bright colors.
- The basis of the reel design should be plastic. The rotation of the reel should not be light, otherwise the line will definitely get tangled when biting.
- A sufficient amount of fishing line is wound onto the spool so that you can fish at different depths.
- The bite signaling element must have sufficient flexibility.
The main difficulty in manufacturing this gear lies in the design of the trigger mechanism, which consists of a guard, a fishing line and two staples.
And here’s what you need to know: Fishing for pike in winter - how to do it right
The brackets are installed into the base. They, in fact, are the fastening elements of the gatehouse.
They are located at the very edge of the frame. At the end of the gate, a light bulb is installed, to which 2 wires are connected, connected to terminals, through a copper plate and the gate.
The battery is connected to the terminals. As a result of the bite, the mechanism is triggered, the guard is installed in a vertical position, closing the contacts.
As a result, the light bulb located at the top of the gatehouse lights up.
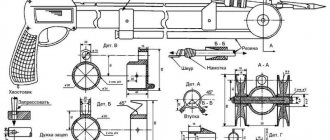
1 – reel ring; 2 – flag thread; 3 – reel; 4 – clamp; 5 – fishing line; 6 – olive-shaped sinker; 7 – rubber stopper; 8 – nut; 9 – flag; 10 – hook; 11 – pin; 12 – stand; 13 – stand ring.
A wire with a diameter of 3 mm and a length of 70 cm is used as a stand. The role of a reel is played by a tube with a diameter of 3.5 cm and a length of 12 cm.
A fishing line with a diameter of 0.8 mm and a length of about 20 m is wound on a tube (reel).
The stand ring and tube ring are held together with a pin. A ring is attached to the reel (tube) to secure the fishing line. The olive-shaped weight and its limiter are on the fishing line. The nut is placed on the tube, and a flag is installed on the nut.
Before installing the tackle, the flag is pressed against the reel, after which it is fixed with a fishing line. In case of a bite, the fishing line unwinds from the flag, freeing it. As a result, the checkbox takes a vertical position.
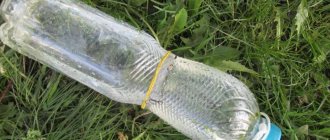
How to catch pike with a bottle
A pike fishing bottle works the same way as a circle. The advantage of this device is that it is easier to manufacture and can be used even by novice fishermen.
The best time to fish with a bottle is during Indian summer. At this time, for successful fishing in this way, you need to choose a large body of water in which large animals live. If you plan to use live bait, you need to choose a river or lake that contains a lot of pike, perch, and pike perch. It is not recommended to choose small bodies of water, because... It will be more difficult to choose a bait that will definitely bite.
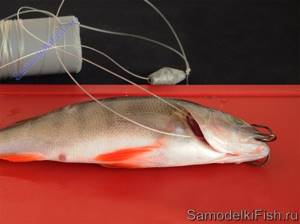
Having chosen a suitable place for fishing, take care of the reliability of attaching the live bait. Place it on the hook using one of the following methods:
- Behind the back: the hook is inserted under the dorsal fin so as to securely fix the bait without damaging the spine. The latter can lead to the fish stopping moving and the pike not seeing it in the water.
- By the lip: the hook is fixed on the upper lip of the bait so that it cannot come off during movement.
- By the gills: the end of the hook for attaching to the fishing line is inserted into the mouth cavity of the bait, brought out through the gills, then secured. With this method, the baitfish is not injured, so it can attract predators longer.
- By the tail: to secure the live bait in this way, you must first wrap its tail with thread, then thread the hook under it.
Equipment for pike rig
All important elements:
- Fishing line. Because it is less exploited, the company should not worry. Its diameter will depend on the size of the fish. Usually take up to 0.6 mm.
- Coil. 20 meters of fishing line are wound on it - maybe a little more.
- Leash. Metal so that predatory fish cannot bite it.
- Sinker. Its weight should have a ratio to fish of 1:2. On the river, the load is chosen depending on the speed of the current (it is important that the live bait is kept in one place).
- Signaling device.
- Bright flag.
Tackle design
For fishing from a boat
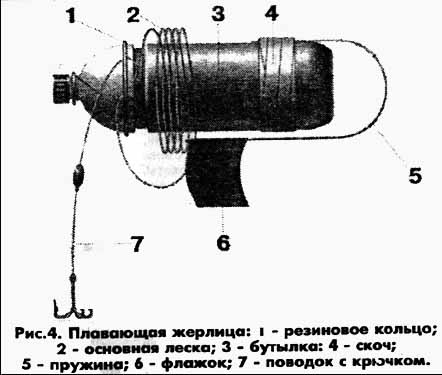
To make fishing tackle from a plastic bottle, you will need a vessel of suitable volume and a fishing line or nylon cord 8-16 m long. They are attached to the future tackle in the neck area. For greater reliability of fastening, you can make holes in the cork or neck through which the cord will be threaded: this way you will be sure that the bottle will not come undone after prolonged use.
A sinker is attached near the end of the fishing line or cord. A sinker tied to the end of the fishing line can have a mass of up to 100 g and must be sliding. In some cases, you can use more massive objects that will help hold the tackle in the installation location.
The attached cord or fishing line is folded into a knotted loop to which a metal leash is attached. It will carry a hook, the size of which can also vary depending on the size of the expected catch.
The technique of fishing with a bottle from a watercraft is simple. In order not to miss the moment of a bite, you can apply stripes of paint or other marks on the bottle, which will show its change in position. The level of the marks must be chosen taking into account the fact that when fishing, the bottle needs to be filled 2/3 with liquid so that it remains on the surface of the water with the neck down.
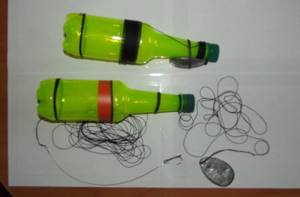
For shore fishing
The device for catching pike from the shore differs from the version for fishing from a boat in that the cord is attached to the bottle not only in the neck area: you need to wind another 5-8 m at the narrowing point of the container for a more reliable fixation. Using a cord, the tackle will be connected to the shore.
A sinker is attached to the end of the cord, which can be made motionless. A steel leash is attached 0.5 m above it.
The moment of the bite is determined by the movement of the bottle on the surface of the reservoir. It is not necessary to monitor the bottle; it can be attached to the nearest strong branch at night. The gear is checked in the morning for the presence of a catch.

For successful fishing from the shore, you need to choose the correct casting distance and evaluate how well the bottle is secured.
The process of making summer vents
There are the following types of homemade girders:
- Changeling. Consists of a plastic tube, thick wire and electrical tape. A hook with bait is attached to the wire and placed above the hole. The end of the tube with bright electrical tape shows whether there is a bite or not.
- On a leg. To use such a girder, you will need more materials. Here you need to have:
- plastic tube;
- bright flag;
- fishing line reel;
- nuts and washers;
- base;
- hose bushing.
It works this way: the leg is placed on the snow and frozen. A fishing line with a hook and bait passed through a reel will signal a bite.
- On the platform. The design is considered the most complex, as it requires drawing and fitting of all elements. They are mounted on one platform, which is often cut out of wood or plastic. To prepare it take:
- coil;
- checkbox;
- plywood;
- staples;
- fishing line;
- hook.
When there is a bite, the line comes out from under the clamp brackets, the flag rises up and signals the appearance of fish.
- From a bottle. The easiest way to make winter lanterns, as a regular plastic bottle will do. For large fish, you should take not a half-liter bottle, but at least a three-liter one. The only thing that will depend on the fisherman is whether the fish will fall on this girder. The main thing is to be careful.
- Under the ice. They leave the fisherman more free time. It is better to leave such supplies overnight. If you place the structure on ice, you need to place a signaling device there. This option does not contribute to freezing of the hole.
There is a great deal of information about various girders in the specialized literature, but they have one thing in common - you can actually catch fish on them.
The ice fishing rig consists of the following components:
- signaling device;
- bracket together with the coil;
- rack;
- equipment
And here's what you need to know: Casting telescopic rod
The stand is made of a plastic tube, and the bracket is made of a metal knitting needle, and their corners should remain even. The coil is made of polystyrene foam, and the alarm is made of steel wire.
When assembling the winter girder, you need to perform the following steps:
- Fix the wire on the stand at one end and attach the other with a flag.
- attach the equipment to the reel.
Recommendations for improving the girder
- Using the example of an American jig with a rubber shock absorber, we recommend that you also use this feature so that the pike does not break the tackle and when fishing, the rubber smoothes out sharp jerks of the fish.
- A great way to mount racks is to use a tripod. Unlike the platform version, this one will be securely fixed in the ice and dusted with snow, which guarantees its immobility.
- Closer to the bait, use fluorocarbon up to 0.4 mm so that the pike does not notice the fishing line. However, you will still have to use a metal leash.
- The wooden structure of the vent can be replaced with propylene (PVC) tubes.
- A flagless vent is another option for improving your design. Use an electronic bite alarm, or even better, a pager to transmit a bite signal at a distance.
Classic version
This design consists of several elements:
- signaling device;
- bracket with coil;
- rack;
- equipment
It's not difficult to make.
- Take a metal tube that will serve as a stand.
- The bracket can be made of metal knitting needles.
- The coil is made of polystyrene foam.
- The signaling device is made from a piece of wire.
- Attach equipment to the reel.
- At the moment when the fish swallows the bait, a bright flag rises up.
Modernized classic version
This design includes the following components:
- base;
- signaling device;
- bracket with coil;
- equipment
Cooking process:
- The base is prepared from hard foam or plywood with such a diameter that it matches the hole;
- The coil is made of polystyrene foam and is mounted on a bracket;
- The alarm is screwed to the base;
- A fishing line is threaded into the base and secured to the reel;
- During fishing, the signaling device goes behind the reel, and at the moment of a bite, it begins to rotate, causing the flag to rise up.
Reel "Spatel"
Comprises:
- polystyrene;
- racks;
- hinge;
- signaling device.
Since the alarm is similar to a spatula, it is equipped with a wooden handle and then secured with an elastic band. The handle itself should be painted or covered with electrical tape so that it remains bright and noticeable. When a pike bites, the alarm stands straight and the line begins to unwind.
Wood frame construction
The simplest model:
- Find a wooden flyer from a branched knot (preferably an elastic one).
- Cut a fork with a handle 15 centimeters long and 10 millimeters thick.
- At the end of the flyer, make a rim to secure the loop.
- It is better to have a fishing line with a reserve of up to 7 meters and a diameter of 0.6 mm.
- Attach a metal leash to the free end of the fishing line.
- Attach a treble hook size No. 4-5 through the ring from the leash.
- Place a sinker on the fishing line (several of them can be installed).
- Secure the sinker at the bottom with a swivel.
Subglacial vent
Such girders are simple to manufacture and are suitable for various objects that will correspond to the hole made. To prepare an ice trap you will need:
- object corresponding to the hole;
- a plastic tube approximately 40-50 cm, which is attached to any selected item;
- the fishing line is inserted into the sawn hole of the plastic tube.
Another way to make a structure for fishing from under the ice can be made from a duralumin strip using metal wire. The method of self-cooking consists of the following points:
- A strip of duralumin 1x50x200 millimeters or more with curved ends in one direction (this is also the base);
- Drill a small hole in the center of the plate where the coil will be placed;
- Make another hole near the reel for the fishing line.
- Attach a signaling device wrapped or painted with bright colors to the spring;
- Attach the spring to the end of the base and secure with a pin.
Another option for fishing from under the ice. To make it you will need:
- a couple of pieces of hose about 10 centimeters;
- make a hole on one piece of hose to attach a loop;
- on another section, cut a hole where the rope will be attached;
- instead of a reel, they use a plastic tube into which 10 meters of cord are wound;
- secure the first end of the cord with a loop, and insert the second into the slot at the end of the hose;
- Attach a sinker and a leash made of fishing line about 40 cm to the free end of the rope;
- connect the leash with another metal leash and hook.
For catching pike, perch, pike perch and other predatory fish in the summer, a girder that will float on the surface of the water is perfect. This type of tackle is called a circle.
To make a summer girder (mug) you will need:
- slingshot;
- fishing line;
- sinker;
- triple hook (single hook is also possible);
- wooden stake to secure it to the shore.
Instructions:
- tie the fishing line to the slingshot and wrap it around;
- the sinker, leash and float are assembled;
- put live bait on the hook;
- Attach the tackle on the shore to the branches of bushes that are located next to the reservoir.
With the onset of the summer season, many reservoirs are overgrown with vegetation, and in order to build a good trap for pike, you need to take into account the hard-to-reach places where this fish lives. For example, someone who is used to catching pike in winter can easily convert a winter fishing rod into a summer one.
The main thing is to find the necessary elements to make a fishing line on which you can wind the fishing line. Mainly used:
- plastic circle;
- plastic bottle;
- piece of wood
Fig.1. Base of the vent
The standard equipment includes: the base of the vent (Fig. 1), a spring signaling device, a box at the base, a coil on a stand and its fastening unit.
As a base, you can use materials such as plastic, plywood or aluminum. It is advisable to use aluminum 10 mm thick. At the base there is a coil attachment point (Fig. 2).
And here's what you need to know: Spoons for pike in spring, summer and autumn. The most catchy lures for pike
Fig.2. Methods for attaching the reel to the base
- A-block with a groove for the foot and a locking screw: 1 – locking screw; 2 – rivets; 3 – stand; 4 – base; 5 – foot; 6 – block with a groove for the foot.
- B-screw screwed into the base block: 1 – pin; 2 – screw; 3 – rivets; 4 – base; 5 – platform for the foot; 6 – foot; 7 – hole for the pin.
- B-nut - wing on a screw: 1 - screw, screwed motionless; 2 – wing nut; 3 – base; 4 – rivets.
Figure 3 shows a diagram of fastening the parts of the vent
1 – base; 2 – box; 3 – coil; 4 – stand; 5 – rack mounting unit; 6 – fixing elements; 7 – hole for fishing line.
Figure 3 shows that it is located at a distance of 12 mm from the edge of the frame and lies parallel to the center of the fastening element. This distance depends on the amount of rotation of the coil, so it is found experimentally after installing the coil. The center of the reel should be aligned with the center of the hole intended for the passage of fishing line.
Fig. 4 – blank for the stand with cutting lines.
Fig.5 – bracket for fastening.
Fig. 6 – box for nozzle.
Fig. 7 - indicates two options for mounting the alarm:
- using a plate;
- using a corner:
- Rack.
- Nest.
- Plate.
- Rivets.
- Corner.
Fig. 8 – shows the assembled rack.
Girdles made of galvanized and stainless wire
To bend a reliable frame for the girder, you need to take a wire with a diameter of at least 3 mm and a length of 550 to 700 mm. The wire is bent to create a short and a long end. The short end does not reach the long end by approximately 100 mm. After this, the long end is bent so that it forms a spool holder.
A bite alarm made of flexible steel wire is attached to the short end. A bright flag is attached to the end of the alarm.
From a plastic tube
To do this, you need to take a plastic tube and cut off a part of the tube from it, from 10 to 16 cm long, depending on the fishing conditions. The thickness of the tube does not play a special role. For fishing from the shore, this can be a piece of tube from 13 to 16 cm long, and for fishing from ice, its length can be no more than 10 cm.
To begin with, a through hole with a diameter of about 6 mm is drilled at one end of the tube, and a hole with a diameter of 8-10 mm is drilled at the other end. A thin but strong rope with loops will pass through these 2 holes. A fishing line with a hook should be attached to one loop using a latch.
To keep the live bait in the water column (fishing from the shore), a piece of foam should be attached to the fishing line.
As a rule, pine or aspen are used, which are more resistant to moisture.
- A reel is formed for the base of the structure. To do this, recesses are made on the end sides. To ensure that the line is pressed against the body of the reel, a wire retainer is screwed to it.
- On the front side there are 2 wire clips with bent ends.
- The thickness of the springs can be about 5 mm. One end of the spring is straightened by 9-10 cm.
- The spring is attached to a wooden base. One end must be securely fixed.
- A bright flag is attached to the straightened end. All that remains is to secure the fishing line with the hook and sinker, as well as bend the spring and secure it between the fixing parts. The zherlitsa is ready for use.
Subglacial vents
Such holes are easy to manufacture, since any unnecessary object that is longer than the diameter of the hole is suitable for this purpose. A plastic tube about 50 cm long should be attached to this object.
A cut is made at the end of the tube so that the line cannot fly off before the bite occurs. In case of a bite, the line jumps out of the cut, which allows the rest of the line to unwind freely from the tube.
Since the tube is always in the water, such girders, left, for example, overnight, freeze by morning. To check it, you have to punch a hole nearby.
Usually, with this method of fishing, the hole is covered at night, if, of course, there is something.
Made from duralumin strip and steel wire
The base of such gear is a duralumin strip (1x60x300 mm) with ends bent to one side. This will make it easier to install it on the ice. A hole is drilled in the center of the plate for attaching the coil, like an “ice block” or “hole”. A hole is drilled next to the reel for a fishing line with a hook.
The spring plays the role of a bite alarm, and an alarm made of bright material is attached to its end. The spring is attached to the end of the base and secured with a regular pin.
In working condition, the spring is pressed with a pin to the base. If there is a bite, the spring is released from the pin and ends up in a vertical position.
How to make tackle with your own hands
Accessories
The main part of the gear is a plastic bottle. Since pike are caught using live bait in this way, the size of the bottle is selected accordingly. The volume can be from 0.5 to 5 liters.
To make the device, in addition to the bottle, you will need a fishing line (or cord) and a sinker. Instead of fishing line, it is better to use a nylon cord. The weight of the sinker is selected individually and depends on the size of the live bait, the depth of the reservoir and the presence of a strong current in it.
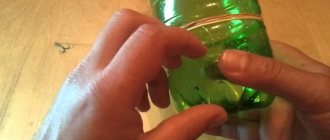
Manufacturing process
The algorithm for making gear for fishing with a bottle consists of the following steps:
- Selecting a bottle that is suitable in shape and size. Its preparation includes washing to rid the tackle of excess odor, which can scare away fish. If you use a vessel that previously contained vegetable oil, you don’t have to wash it: the smell of the oil can, on the contrary, increase the catch by luring predators.
- Attaching a nylon thread to the tackle in the neck area or in the middle (option for fishing from the shore). For greater reliability of fixation, it is recommended to additionally use an elastic band.
- Use one of the methods described above to secure the sinker and hook.
- The equipment is ready for use, all that remains is to put live bait on the hook and choose a suitable place to cast it.
What does the tackle look like?
In the classic version, the toothed circle is made in the form of a disk with a thickness of 25-30 mm and a diameter of 130-150 mm. It can be made of polystyrene foam or any type of wood.
There is a small groove running along the entire circumference of the rig (meaning the mug), designed to keep the monofilament in it. At the top of the disk plane there is a pair of slots. They are the ones who will hold the line after loading the tackle. In the center of the circle there is a special hole for a stick.
Even the color of the disc is unique. A layer of red or bright orange paint is placed on top, and white or black underneath. Of course, you can choose the colors yourself. But the main thing is to stick to contrast.
The circle mast or, in other words, the antenna is always created with a ball-shaped head and a thin end. Moreover, it is worth noting that it is recommended to make the mast and the disk the same in length. The thickness of the mast varies around 14 mm.
It is important to note that it is necessary to cut through the antenna in its thin part.
The thinner edge of the antenna is painted white, and the thicker edge is painted red. White and black stripes on the head of the pin, made vertically, will always allow you to observe the rotation of the equipment. Therefore, knowing this information, you will never miss a bite.
Disadvantages of store mugs:
- such mugs are excessively fragile and light;
- they are difficult to adjust;
- in store-bought mugs for pike, the hydrodynamics are not fully thought out , which is felt during the fishing process;
- they are not always convenient to use;
- It is the store equipment that requires improvement from its creators . Moreover, this concerns the essential points, not aesthetics.
Peculiarities of catching pike with summer girders and their types
Depending on the season, girders are divided into winter and summer. In other words, gear for closed or open water, which determines their design. According to the installation method, there are floating ones (circles), on a stationary pole (postavukhs), and slingshots for fishing from the shore.
Summer to winter zherlitsa
Winter gear for catching predators can be easily converted into a summer version using sheet insulation and thick rope. In open waters, with the help of an installed signal flag, the bite is quickly detected. The effectiveness of winter girders, which are competently converted, subject to the calculations of the technical characteristics of the gear, is not inferior to their summer counterparts.

The depth of the bait should not be less than 1 meter and no more than 2 meters, since it is in these layers of the reservoir that the temperature is optimal for live bait.
Mugs (floating mugs)
The essence of this fishing method is the natural movements of the bait, which should interest and provoke the predator to attack. Correct calculation of the technical characteristics of the fishing rod will ensure a guaranteed catch, and the slightest errors and errors in the manufacture of gear will reduce efforts to zero.

Slingshot from the shore
The most ancient way of catching pike is using a slingshot. This type of summer girder is used in reservoirs with a large amount of algae, snags and other obstructions that make it impossible to use a spinning rod. The tackle is a spear with a line wound around the branches of a fork in the form of a figure of eight. Even material found on the shore - dry branches, etc. - is suitable for a slingshot.